-
Cisco Unified Communications Manager Express System Administrator Guide
-
Feature Map
-
Feature History
-
Cisco Unified CME Overview
-
Before You Begin
-
Installing and Upgrading Cisco Unified CME Software
- Setting Up Basic Configuration
-
Configuring Dialing Plans
-
Configuring Localization Support
-
Configuring Transcoding Resources
-
Configuring Video Transcoding
-
Configuring Toll Fraud Prevention
-
Enabling the GUI
-
Integrating Voice Mail
-
Configuring Security
-
Adding Features
-
Configuring Automatic Line Selection
-
Configuring Barge and Privacy
-
Configuring Call Blocking
-
Configuring Call Park
-
Call Restriction Regulations
-
Configuring Call Transfer and Forwarding
-
Configuring Call-Coverage Features
-
Configuring Caller ID Blocking
-
Configuring Conferencing
-
Configuring Video Conferences
-
Configuring Voice and Video Hardware Conferencing
-
Configuring Directory Services
-
Configuring Do Not Disturb
-
Configuring Enhanced 911 Services
-
Configuring Extension Mobility
-
Configuring Fax Relay
-
Configuring Feature Access Codes
-
Configuring Forced Authorization
-
Configuring Headset Auto-Answer
-
Configuring Intercom Lines
-
Configuring Loopback Call Routing
-
Configuring MLPP
-
Configuring Music on Hold
-
Configuring Paging
-
Configuring Presence Service
-
Configuring Ring Tones
-
Configuring Single Number Reach
-
Customizing Soft Keys
-
Configuring Speed Dial
-
Configuring Video Support
-
Configuring SSL VPN Client for SCCP IP Phones
-
-
Creating Templates
-
Modifying Cisco Unified IP Phone Options
-
Configuring Interoperability with Cisco Unified CCX
-
Configuring the CTI CSTA Protocol Suite
-
Configuring SRST Fallback Mode
-
Configuring VRF Support on Cisco Unified CME
-
Configuring the XML API
-
Index
-
 Feedback
Table Of Contents
Configuring SSL VPN Client for SCCP IP Phones
Information About SSL VPN Client
SSL VPN Support on Cisco Unified CME with DTLS
Phone or Client Authentication
SSL VPN Client Support on SCCP IP Phones
How to Configure SSL VPN Client
How to Configure SSL VPN Client on SCCP IP Phones
Basic Configuration on Cisco Unified CME
Configuring Cisco Unified CME as CA Server
Verifying Phone Registration and Phone Load
Configuring ASA (Gateway) for SSL VPN
Configuring VPN Group and Profile on Cisco Unified CME
Associating VPN Group and Profile to SCCP IP Phone
Configuring Alternate TFTP Address on Phone
Registering Phone from a Remote Location
Configuring SSL VPN Client with DTLS on Cisco Unified CME
Setting Up the Clock, Hostname, and Domain Name
Configuring Trustpoint and Enrolling with the Certificates
Configuring Trustpoint (not the default) on VPN Gateway
Verifying the IOS SSL VPN Connection
Configuring Cisco Unified SCCP IP Phones for SSL VPN
Configuration on Cisco Unified SCCP IP Phone
Configuring SSL VPN on Cisco Unified CME
VPN Phone Redundancy Support for Cisco Unified CME with DTLS
Configuration Examples for SSL VPN Client
VPN-Group and VPN-Profile Configuration on Cisco Unified CME: Example
Associating VPN-Group and VPN-Profile to SCCP IP Phones: Example
Feature Information for SSL VPN Client
Configuring SSL VPN Client for SCCP IP Phones
Last Updated: August 11, 2011This chapter describes SSL VPN client support for SCCP IP phones on Cisco Unified CME. For a list of the versions in which each feature is supported, see the "Feature Information for SSL VPN Client" section.
Finding Feature Information in This Module
Your Cisco Unified CME version may not support all of the features documented in this module.
Contents
•
Information About SSL VPN Client
•
•
•
Information About SSL VPN Client
•
•
SSL VPN Support on Cisco Unified CME with DTLS
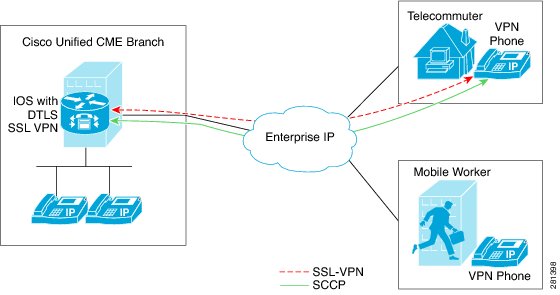
In Communications Manager Express 8.6 and later versions, Cisco Unified SCCP IP phones such as 7945, 7965, and 7975 located outside of the corporate network are able to register to Cisco Unified CME through an SSL VPN connection. The SSL VPN connection is set up between a phone and a VPN headend. The VPN headend can either be an Adaptive Secure Appliance (ASA 5500) or the Datagram Transport Layer Security (DTLS) enabled IOS SSL VPN router, see Figure 50. Support for VPN feature on ASA headend was added in Cisco Unified CME 8.5. For more information, see the "SSL VPN Client Support on SCCP IP Phones" section.
Figure 50 VPN connection between Cisco Unified IP Phone and VPN head ends (ASA and DTLS).
Cisco Unified CME 8.6 uses IOS SSL DTLS as a headend or gateway. To establish a VPN connection between a phone and a VPN head end, the phone must be configured with VPN configuration parameters. The VPN configuration parameters include VPN head end addresses, VPN head end credentials, user or phone ID, and credential policy. These parameters are considered as sensitive information and must be delivered in a secure environment using a signed configuration file or a signed and encrypted configuration file. The phone is required to be provisioned within the corporate network before the phone can be placed outside the corporate network.
After the phone is "staged" in a trusted environment, the phone can be deployed to a location where a VPN head end can be connected. The VPN configuration parameters for the phone dictates the user interface and behavior of the phone.
Phone or Client Authentication
Phone authentication is required to verify that the remote phone trying to register with Cisco Unified CME via, VPN DTLS is a legitimate phone. Phone or client authentication can be done with the following types of authentication:
h.
i.
–
–
Note
You can set up Cisco Unified CME with an encrypted mode, but encrypted SCCP phone has limited media call-flow support. Using a phone with authenticated mode does not have any media-related call-flow limitations.
SSL VPN Client Support on SCCP IP Phones
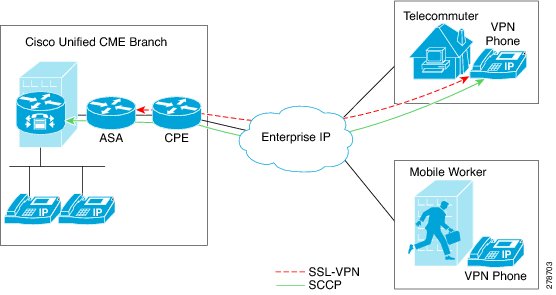
Cisco Unified CME 8.5 and later versions support Secure Sockets Layer (SSL) Virtual Private Network (VPN) on SCCP IP phones such as 7945, 7965, and 7975.
In Cisco Unified CME 8.5, SCCP IP phones outside of the corporate network can register with the Cisco Unified CME 8.5 through a VPN connection as shown in Figure 51.
Figure 51 Connection between a phone and a VPN head end.
An SSL VPN provides secure communication mechanism for data and other information transmitted between two endpoints. The VPN connection is set up between a SCCP IP phone and a VPN head end or VPN gateway. Cisco Unified CME 8.5 uses an Adaptive Security Appliances (ASA model 55x0) as a VPN head end or gateway.
To establish a VPN connection between a phone and a VPN gateway, the phone is required to be configured with VPN configuration parameters such as VPN gateway addresses, VPN head end credentials, user or phone ID, and credential policy. These parameters contain sensitive information and should be delivered in a secure environment using a signed configuration file or a signed and encrypted configuration file. The phone is required to be provisioned within the corporate network before the phone is placed outside the corporate network.
After the phone is provisioned in a trusted secure environment, the phone can be connected to Cisco Unified CME from any location, from where VPN head end can be reached. The VPN configuration parameters for the phone controls the user interface and behavior of the phone. For more information on configuring the SSL VPN feature on SCCP IP phones, see the "How to Configure SSL VPN Client on SCCP IP Phones" section.
You need to generate a trustpoint with exportable keys and use that as sast1.
How to Configure SSL VPN Client
This section contains the following tasks:
•
•
How to Configure SSL VPN Client on SCCP IP Phones
To configure the SSL VPN feature on SCCP IP phones, follow these steps in the order in which they are presented here:
1.
2.
3.
4.
5.
6.
7.
8.
Prerequisites
•
•
•
•
•
Note
Basic Configuration on Cisco Unified CME
The following steps are basic Cisco Unified configuration allowing the SSL VPN feature to be built on:
SUMMARY STEPS
1.
2.
3.
4.
5.
6.
7.
8.
9.
10.
11.
12.
13.
14.
15.
16.
17.
18.
19.
20.
21.
22.
23.
24.
25.
26.
27.
DETAILED STEPS
Configuring Cisco Unified CME as CA Server
The basic configuration on the CA server ensures IP connectivity, Network Time Protocol (NTP), time synchronization which are necessary for enabling the SSL VPN feature. To configure the CA server, follow these steps:
Step 1
Router(config)#Interface GigabitEthernet0/0
Router(config-if)#no ip address
Router(config-if)#interface GigabitEthernet0/0.10
Router(config-subif)#description DATA VLAN
Router(config-subif)#encapsulation dot1Q 10 native
Router(config-subif)#ip address 192.168.10.1 255.255.255.0
Router(config)#interface GigabitEthernet0/0.11
Router(config-subif)#description VOICE VLAN
Router(config-subif)#encapsulation dot1Q 11
Router(config-subif)#ip address 192.168.11.1 255.255.255.0
Router(config)#interface GigabitEthernet0/1
Router(config-if)#description INTERFACE CONNECTED TO ASA
Router(config-if)#ip address 192.168.20.1 255.255.255.0
Router(config)#! Default router is ASA Inside Interface
Router(config)#ip route 0.0.0.0 0.0.0.0 192.168.20.254
Router(config)#clock timezone PST -8
Router(config)#clock summer-time PST recurring
Router#! Set clock to current time
Router#clock set 10:10:00 15 oct 2010
Router(config)#ntp source GigabitEthernet0/1
Router(config)#ntp master 2
Router(config)#ip http server
Router(config)#ip domain-name cisco.com
Note
Step 2
Example:
Router(config)#crypto pki server cme_root
Router(config)#database level complete
Router(cs-server)#database url nvram:
Router(cs-server)#grant auto
Router(cs-server)#lifetime certificate 7305
Router(cs-server)#lifetime ca-certificate 7305
Router(cs-server)#exit
Router(config)#crypto pki trustpoint cme_root
Router(ca-trustpoint)# enrollment url http://192.168.20.1:80
Router(ca-trustpoint)# revocation-check none
Router(ca-trustpoint)# rsakeypair cme_root
Router(cs-server)#exit
Router(config)# crypto pki server cme_root
Router(cs-server)#no shutdown
%Some server settings cannot be changed after CA certificate generation.
% Please enter a passphrase to protect the private key
% or type Return to exit
Password: *****
Re-enter password: ****
% Generating 1024 bit RSA keys, keys will be non-exportable...
[OK] (elapsed time was 1 seconds)
Mar 10 16:44:00.576: %SSH-5-ENABLED: SSH 1.99 has been enabled% Exporting Certificate Server signing certificate and keys...
% Certificate Server enabled.
Router(cs-server)#
Mar 10 16:44:41.812: %PKI-6-CS_ENABLED: Certificate server now enabled.
Step 3
Example:
Router(config)#crypto pki trustpoint cme_cert
Router(ca-trustpoint)# enrollment url http://192.168.20.1:80
Router(ca-trustpoint)# revocation-check none
Router(ca-trustpoint)# exit
Router(config)# crypto pki authenticate cme_cert
Certificate has the following attributes:
Fingerprint MD5: 995C157D AABB8EE2 494E7B35 00A75A88
Fingerprint SHA1: F934871E 7E2934B1 1C0B4C9A A32B7316 18A5858F
% Do you accept this certificate? [yes/no]: yes
Trustpoint CA certificate accepted.
Router(config)# crypto pki enroll cme_cert
%
% Start certificate enrollment ..
% Create a challenge password.
You will need to verbally provide this password to the CA Administrator in order to revoke your certificate. For security reasons your password will not be saved in the configuration. Please make a note of it.
Password:
Jan 20 16:03:24.833: %CRYPTO-6-AUTOGEN: Generated new 512 bit key pair
Re-enter password:
% The subject name in the certificate will include: CME1.cisco.com
% Include the router serial number in the subject name? [yes/no]: no
% Include an IP address in the subject name? [no]: no
Request certificate from CA? [yes/no]: yes
% Certificate request sent to Certificate Authority
% The 'show crypto pki certificate verbose cme_cert' command will show the fingerprint.
! Verify Certificates
Verify Certificates (Optional)
Use the show crypto pki certificates command on your Cisco Unified CME router to verify the certificates.
Example:
Router#sh crypto pki certificates
Certificate
Status: Available
Certificate Serial Number (hex): 07
Certificate Usage: General Purpose
Issuer:
cn=cme_root
Subject:
Name: CME1.cisco.com
hostname=CME1.cisco.com
Validity Date:
start date: 15:32:23 PST Apr 1 2010
end date: 09:44:00 PST Mar 10 2030
Associated Trustpoints: cisco2
Storage: nvram:cme_root#7.cer
Certificate
Status: Available
Certificate Serial Number (hex): 06
Certificate Usage: General Purpose
Issuer:
cn=cme_root
Subject:
Name: CME1.cisco.com
hostname=CME1.cisco.com
Validity Date:
start date: 15:30:11 PST Apr 1 2010
end date: 09:44:00 PST Mar 10 2030
Associated Trustpoints: cisco1
Storage: nvram:cme_root#6.cer
Certificate
Status: Available
Certificate Serial Number (hex): 02
Certificate Usage: General Purpose
Issuer:
cn=cme_root
Subject:
Name: CME1.cisco.com
hostname=CME1.cisco.com
Validity Date:
start date: 08:47:42 PST Mar 10 2010
end date: 09:44:00 PST Mar 10 2030
Associated Trustpoints: cme_cert
Storage: nvram:cme_root#2.cer
CA Certificate
Status: Available
Certificate Serial Number (hex): 01
Certificate Usage: Signature
Issuer:
cn=cme_root
Subject:
cn=cme_root
Validity Date:
start date: 08:44:00 PST Mar 10 2010
end date: 09:44:00 PST Mar 10 2030
Associated Trustpoints: cisco2 cisco1 cme_cert cme_root
Storage: nvram:cme_root#1CA.cer
Verifying Phone Registration and Phone Load
Step 1
Example:
Router# Show ephone
ephone-1[0] Mac:0022.555E.00F1 TCP socket:[2] activeLine:0 whisperLine:0 REGISTERED in SCCP ver 19/17 max_streams=5 mediaActive:0 whisper_mediaActive:0 startMedia:0 offhook:0 ringing:0 reset:0 reset_sent:0 paging 0 debug:0 caps:9
IP:192.168.11.4 * 49269 7965 keepalive 0 max_line 6 available_line 6
button 1: cw:1 ccw:(0 0) dn 1 number 1001 CH1 IDLE CH2 IDLE
Preferred Codec: g711ulaw
Lpcor Type: none
Note
Step 2
Example:
Show ephone phoneload
DeviceName CurrentPhoneload PreviousPhoneload LastReset
SEP0016C7EF9B13 9.0(1TD1.36S) 9.0(1TD1.36S) UCM-closed-TCP
Configuring ASA (Gateway) for SSL VPN
Step 1
ciscoasa(config)# Interface Ethernet0/1
ciscoasa(config-if)# nameif Inside
ciscoasa(config-if)# description INTERFACE CONNECTED TO CUCME
ciscoasa(config-if)# security-level 100
ciscoasa(config-if)# ip address 192.168.20.254 255.255.255.0
ciscoasa(config)# interface Ethernet 0/0
ciscoasa(config-if)# description INTERFACE CONNECTED TO WAN
ciscoasa(config-if)# nameif Outside
ciscoasa(config-if)# security-level 0
ciscoasa(config-if)# ip address 9.10.60.254 255.255.255.0
ciscoasa(config)# router ospf 100
ciscoasa(config-router)network 9.10.60.0 255.255.255.0 area 1
ciscoasa(config-if)# ntp server 192.168.20.1
Step 2
ciscoasa(config)#crypto key generate rsa label cmeasa
ciscoasa(config)#crypto ca trustpoint asatrust
ciscoasa(config)#! Enrollment URL = CA Server = CUCME
ciscoasa(config-ca-trustpoint)#enrollment url http://192.168.20.1:80
ciscoasa(config-ca-trustpoint)#subject-name cn=cmeasa.cisco.com
ciscoasa(config-ca-trustpoint)#crl nocheck
ciscoasa(config-ca-trustpoint)#keypair cmeasa
ciscoasa (config)# crypto ca authenticate asatrust
INFO: Certificate has the following attributes:
Fingerprint: 27d00cdf 1144c8b9 90621472 786da0cf
Do you accept this certificate? [yes/no]: yes
! Enroll the Trustpoint
ciscoasa(config)# crypto ca enroll asatrust
% Start certificate enrollment ..
% Create a challenge password. You will need to verbally provide this
password to the CA Administrator in order to revoke your certificate.
For security reasons your password will not be saved in the configuration.
Please make a note of it.
Password: ********
Re-enter password: ********
% The subject name in the certificate will be: cn=cmeasa.cisco.com
% The fully-qualified domain name in the certificate will be: ciscoasa.cisco.com
% Include the device serial number in the subject name? [yes/no]: no
Request certificate from CA? [yes/no]: yes
% Certificate request sent to Certificate Authority
ciscoasa(config)# The certificate has been granted by CA!
ciscoasa# show crypto ca certificates
Step 3
Use the show crypto ca certificate command on your ASA router to verify the certificates.
Example:
ciscoasa# show crypto ca certificate
Certificate
Status: Available
Certificate Serial Number: 03
Certificate Usage: General Purpose
Public Key Type: RSA (1024 bits)
Issuer Name:
cn=cme_root
Subject Name:
hostname=ciscoasa.cisco.com
cn=cmeasa.cisco.com
Validity Date:
start date: 09:04:40 PST Mar 10 2010
end date: 08:44:00 PST Mar 10 2030
Associated Trustpoints: asatrust
CA Certificate
Status: Available
Certificate Serial Number: 01
Certificate Usage: Signature
Public Key Type: RSA (1024 bits)
Issuer Name:
cn=cme_root
Subject Name:
cn=cme_root
Validity Date:
start date: 08:44:00 PST Mar 10 2010
end date: 08:44:00 PST Mar 10 2030
Associated Trustpoints: asatrust
Step 4
ciscoasa(config)# ssl encryption 3des-sha1 aes128-sha1 aes256-sha1 des-sha1 null-sha1
ciscoasa(config)#
ciscoasa(config)# ssl trust-point asatrust
ciscoasa(config)# ssl trust-point asatrust inside
ciscoasa(config)# ssl trust-point asatrust outside
ciscoasa(config)# no ssl certificate-authentication interface outside port 443
ciscoasa(config)# ssl certificate-authentication interface inside port 443
Step 5
ciscoasa(config)#ip local pool SSLVPNphone_pool 192.168.20.50-192.168.20.70 mask 255.255.255.0
Step 6
ciscoasa(config)# access-list no_nat_to_vpn extended permit ip any 9.10.60.0 2$
ciscoasa(config)# nat (inside) 0 access-list no_nat_to_vpn
Step 7
ciscoasa(config-webvpn)# enable inside
INFO: WebVPN and DTLS are enabled on 'Inside'.
ciscoasa(config-webvpn)# enable outside
INFO: WebVPN and DTLS are enabled on 'Outside'.
ciscoasa(config-webvpn)# svc image disk0:/anyconnect-win-2.4.1012-k9.pkg 1
ciscoasa(config-webvpn)# svc enable
ciscoasa(config-webvpn)# group-policy SSLVPNphone internal
ciscoasa(config)# group-policy SSLVPNphone attribute
ciscoasa(config-group-policy)# banner none
ciscoasa(config-group-policy)# vpn-simultaneous-logins 10
ciscoasa(config-group-policy)# vpn-idle-timeout none
ciscoasa(config-group-policy)# vpn-session-timeout none
ciscoasa(config-group-policy)# vpn-tunnel-protocol svc webvpn
ciscoasa(config-group-policy)# address-pools value SSLVPNphone_pool
ciscoasa(config-group-policy)# webvpn
ciscoasa(config-group-webvpn)# svc dtls enable
ciscoasa(config-group-webvpn)# svc keepalive 120
ciscoasa(config-group-webvpn)# svc ask none
ciscoasa(config-group-webvpn)#
Step 8
ciscoasa(config)# tunnel-group SSLVPN_tunnel type remote-access
ciscoasa(config)# tunnel-group SSLVPN_tunnel general-attributes
ciscoasa(config-tunnel-general)#
ciscoasa(config-tunnel-general)#
ciscoasa(config-tunnel-general)# address-pool SSLVPNphone_pool
ciscoasa(config-tunnel-general)# default-group-policy SSLVPNphone
ciscoasa(config-tunnel-general)# tunnel-group SSLVPN_tunnel webvpn-attributes
ciscoasa(config-tunnel-webvpn)# group-url https://9.10.60.254/SSLVPNphone enable
Step 9
ciscoasa(config)# route Inside 192.168.11.0 255.255.255.0 192.168.20.254 1
Step 10
http://www.cisco.com/en/US/docs/security/asa/asa82/configuration/guide/access_aaa.html#wpmkr1083932.
ciscoasa(config)# username anyone password cisco
ciscoasa(config)# username anyone attributes
ciscoasa(config-username)# vpn-group-policy SSLVPNphone
ciscoasa(config-username)# vpn-tunnel-protocol IPSec l2tp-ipsec svc webvpn
ciscoasa(config-username)# webvpn
ciscoasa(config-username-webvpn)# svc dtls enable
ciscoasa(config-username-webvpn)# svc ask none
Step 11
ciscoasa(config)# same-security-traffic permit inter-interface
ciscoasa(config)# same-security-traffic permit intra-interface
Configuring VPN Group and Profile on Cisco Unified CME
To configure VPN group and profile on Cisco Unified CME, follow these steps:
Summary Steps
1.
2.
3.
4.
5.
6.
7.
8.
9.
10.
11.
Detailed Steps
Associating VPN Group and Profile to SCCP IP Phone
To associate VPN group and profile to SCCP IP phones, follow these steps:
Summary Steps
1.
2.
3.
4.
5.
6.
7.
8.
9.
10.
11.
12.
13.
14.
15.
16.
17.
18.
Configuring Alternate TFTP Address on Phone
Step 1
Settings->Network Configuration->IPv4 Configuration->Alternate TFTP
Press **# to unlock
Select YES
If the phone is already registered, "TFTP Server 1" will already be populated. Otherwise, enter the CUCME address as the alternate TFTP Server 1.
Step 2
Step 3
Press Settings -> Security Configuration -> VPN
When you press "Enable" from this menu, it should prompt for username and password.
Step 4
Settings->Network Configuration->IPv4 Configuration->Alternate TFTP.
Press **# to unlock and select YES.
If the phone is already registered, "TFTP Server 1" will already be populated. Otherwise, enter the CUCME address as the alternate TFTP Server 1.
Step 5
Step 6
Select Settings ->Security Settings ->VPN Configurations?
Enable VPN
Enter Username and Password. Phone will register with CUCME
Registering Phone from a Remote Location
To register a Cisco Unified IP phone from a remote location, follow these steps:
Step 1
Step 2
Step 3
Step 4
Configuring SSL VPN Client with DTLS on Cisco Unified CME
Before you begin, make sure you have configured the basic SSL VPN configuration on Cisco Unified CME (see the "Basic Configuration on Cisco Unified CME" section.)
To configure the SSL VPN client with DTLS on SCCP IP phones, follow these steps in the order in which they are presented here:
1.
2.
3.
5.
6.
8.
9.
10.
11.
Note
Setting Up the Clock, Hostname, and Domain Name
The clock, hostname, and domain name must be set up.
Step 1
hostname Router2811
ip domain name cisco.com
Interfaces on the Router_2811:
interface FastEthernet0/0
ip address 1.5.37.13 255.255.0.0
duplex auto
speed auto
interface FastEthernet0/1
ip address 30.0.0.1 255.255.255.0
duplex auto
speed auto
Step 2
Router#show clock
*10:07:57.109 pacific Thu Oct 7 2010
a.
Router#clock set 9:53:0 Oct 7 2010
Set time zone (Pacific Standard Time)
Router#configure terminal
Router(config)#clock timezone pst -8
(optional)
Set summer-time
Router#configure terminal
Router(config)#clock summer-time pst recurring
Or
Router(config)#
clock summer-time pst date apr 11 2010 12:00 nov 11 2010 12:00
b.
Router(config)#ntp server 192.18.2.1
Router(config)#ntp master 2
Configuring Trustpoint and Enrolling with the Certificates
To configure a trustpoint and enroll with the certificate server, see the "Configuring Cisco Unified CME as CA Server" section. You can also use the default self-signed certificate generated by the webvpn. This default trustpoint is generated when the webvpn gateway gateway name command is entered for the first time.
Note
Configuring Trustpoint (not the default) on VPN Gateway
The WebVPN gateway uses a default trustpoint name of SSL VPN. To tell the Web VPN gateway to use a trustpoint with another name, use the following configuration:
Router(config)#webvpn gateway GW1
Router(config-webvpn-gateway)#ssl trustpoint <trustpoint-name>
Note
Configuring User Database
1.
Router(config)#aaa new-model
username anyone password 0 cisco
aaa authentication login default local
2.
Router(config)#aaa new-model
aaa authentication login default group radius
radius-server host 172.19.159.150 auth-port 1923 acct-port 1924
radius-server key cisco
For more information, see
http://www.cisco.com/en/US/docs/security/asa/asa71/configuration/guide/aaa.html#wp1062044
Configuring Virtual Gateway
When entering "webvpn gateway <name>", a self-signed certificate is generated. The IP address must be a public IP address configured on an interface or loopback interface on the WebVPN gateway. The following example shows a public IP address configured on the WebVPN gateway:
Router(config)#webvpn gateway sslvpn_gw
Router(config-webvpn)# ip address 1.5.37.13 port 443
ssl encryption 3des-sha1 aes-sha1
ssl trustpoint R2811_cert
inservice
Configuring Virtual Context
Users can get access to the virtual context by specifying the "domain name" in the URL when accessing the WebVPN gateway such as, https://1.5.37.13/SSLVPNphone. The following example shows a virtual VPN context configured:
Router(config)# webvpn context sslvpn_context
ssl encryption 3des-sha1 aes-sha1
ssl authenticate verify all
gateway sslvpn_gw domain SSLVPNphone
inservice
When inservice was entered, the system prompted: 000304: Jan 7 00:30:01.206: %LINEPROTO-5-UPDOWN: Line protocol on Interface Virtual-Access1, changed state to up
Configuring Group Policy
Because the SSL VPN client on phone operates in full-tunnel mode, WebVPN gateway supplies an IP address to each of the clients logged in to the gateway. Configure the following:
ip local pool SSLVPNphone_pool 30.0.0.50 30.0.0.70
webvpn context sslvpn_context
ssl encryption 3des-sha1 aes-sha1
ssl authenticate verify all
!
!
policy group SSLVPNphone
functions svc-enabled
hide-url-bar
svc address-pool "SSLVPNphone_pool"
svc default-domain "cisco.com"
default-group-policy SSLVPNphone
no aaa authentication domain local
gateway sslvpn_gw domain SSLVPNphone
authentication certificate
ca trustpoint <trust point name>
inservice
Verifying the IOS SSL VPN Connection
Step 1
Step 2
From PC browser, connect to IOS (on the 1.5.37.x network) through https://1.5.37.13/SSLVPNphone. The default banner pops up. Enter username and password.
debug ssl openssl errors
debug ssl openssl msg
debug ssl openssl states
debug webvpn sdps
debug webvpn aaa (login authentication)
debug webvpn http verbose (for authentication)
debug webvpn webservice verbose
debug webvpn tunnel
debug crypto pki transactions
debug crypto pki validations
debug crypto pki messages
Step 3
Router (c3745): ip route 30.0.0.0 255.255.255.0 FastEthernet0/0
Router (c3745): ip route 10.0.0.0 255.255.255.0 1.5.37.11
(Must force this limited route or else it will fail)
Configuring Cisco Unified SCCP IP Phones for SSL VPN
Step 1
Step 2
Step 3
A generic software download is also available at Product/Technology Support.
Choose Voice and Unified Communications > IP Telephony > IP Phones.
Note
Step 4
Configuration on Cisco Unified SCCP IP Phone
Step 1
Step 2
Step 3
Step 4
Step 5
Note
Configuring SSL VPN on Cisco Unified CME
To configure SSL VPN on Cisco Unified CME, see the "Configuring VPN Group and Profile on Cisco Unified CME" section.
Example:
voice service voip
vpn-group 1
vpn-gateway 1 https://1.5.37.13/SSLVPNphone
vpn-trustpoint 1 trustpoint R2811_cert leaf
vpn-profile 1
host-id-check disable
crypto pki server R2811_root
database level complete
grant auto
lifetime certificate 7305
lifetime ca-certificate 7305
crypto pki token default removal timeout 0
!
crypto pki trustpoint R2811_root
enrollment url http://30.0.0.1:80
revocation-check none
rsakeypair R2811_root
!
crypto pki trustpoint R2811_cert
enrollment url http://30.0.0.1:80
serial-number
revocation-check none
telephony-service
cnf-file perphone
ephone 2
device-security-mode none
mac-address 001E.7AC4.DD25
type 7965
vpn-group 1
vpn-profile 1
button 1:5
telephony-service
create cnf-files
ephone 2
reset
VPN Phone Redundancy Support for Cisco Unified CME with DTLS
VPN phone supports redundancy with IOS and Cisco Unified CME in two ways:
a.
b.
Cisco Unified CME redundancy works when you import a trustpoint from primary CME to secondary CME. See the http://www.cisco.com/en/US/docs/ios/security/command/reference/sec_c5.html#wp1044112. For more information on reduntant Cisco Unified CME, see Redundant Cisco Unified CME Router.
You need to generate a trustpoint with exportable keys and use that as sast1.
Configuration Examples for SSL VPN Client
This section contains the following example:
•
•
VPN-Group and VPN-Profile Configuration on Cisco Unified CME: Example
The following example shows vpn-group 1 and vpn-profile1 configured on Cisco Unified CME:
Router# show running config
!
no ip domain lookup
no ipv6 cef
!
multilink bundle-name authenticated
!
!
voice-card 0
dsp services dspfarm
!
voice-card 3
dspfarm
dsp services dspfarm
!
!
voice service voip
ip address trusted list
ipv4 20.20.20.1
vpn-group 1
vpn-gateway 1 https://9.10.60.254/SSLVPNphone
vpn-trustpoint 1 trustpoint cme_cert root
vpn-hash-algorithm sha-1
vpn-profile 1
host-id-check disable
sip
!
Associating VPN-Group and VPN-Profile to SCCP IP Phones: Example
ip dhcp pool CME1
network 192.168.11.0 255.255.255.0
default-router 192.168.11.1
option 150 ip 192.168.11.1
telephony-service
max-ephones 24
max-dn 24
ip source-address 192.168.11.1 port 2000
! Each remote phone should have a separate cnf file.
cnf-file perphone
!Upgrade phone firmware to latest supported load
load 7965 SCCP45.9-0-1TD1-36S
no shutdown
ephone-dn 1 dual-line
number 1001
ephone 1
description SSL VPN REMOTE PHONE
device-security-mode none
mac-address 0022.555e.00f1
type 7965
button 1:1
vpn-group 1
vpn-profile 1
ephone 2
device-security-mode none
mac-address 001E.be91.37fb
type 7965
button 1:5
telephony-service
create cnf-files
!
The following example shows the vpn configuration:
Router #show voice vpn
The Voice Service VPN Group 1 setting:
VPN Gateway 1 URL https://9.10.60.254/SSLVPNphone
VPN Trustpoint hash in sha-1
VPN Trustpoint 1 trustpoint cme_cert root fbUqFIbtWtaYSGSlTP/Umshcgyk= The Voice Service VPN Profile 1 setting:
The host_id_check setting: 0
Additional References
The following sections provide references related to Cisco Unified CME features.
Related Documents
Cisco Unified CME Configuration
•
•
Cisco Unified CME Network Design
•
Cisco IOS Voice Configuration
•
Phone documentation for Cisco Unified CME
Cisco Unified IP Phone Firmware Release Notes
•
Technical Assistance
Feature Information for SSL VPN Client
Table 89 lists the features in this module and enhancements to the features by version.
To determine the correct Cisco IOS release to support a specific Cisco Unified CME version, see the Cisco Unified CME and Cisco IOS Software Version Compatibility Matrix at http://www.cisco.com/en/US/docs/voice_ip_comm/cucme/requirements/guide/33matrix.htm.
Use Cisco Feature Navigator to find information about platform support and software image support. Cisco Feature Navigator enables you to determine which Cisco IOS software images support a specific software release, feature set, or platform. To access Cisco Feature Navigator, go to http://www.cisco.com/go/cfn. An account on Cisco.com is not required.
Note