-
Cisco Unified Communications Manager Express System Administrator Guide
-
Feature Map
-
Feature History
-
Cisco Unified CME Overview
-
Before You Begin
-
Installing and Upgrading Cisco Unified CME Software
- Setting Up Basic Configuration
-
Configuring Dialing Plans
-
Configuring Localization Support
-
Configuring Transcoding Resources
-
Configuring Video Transcoding
-
Configuring Toll Fraud Prevention
-
Enabling the GUI
-
Integrating Voice Mail
-
Configuring Security
-
Adding Features
-
Configuring Automatic Line Selection
-
Configuring Barge and Privacy
-
Configuring Call Blocking
-
Configuring Call Park
-
Call Restriction Regulations
-
Configuring Call Transfer and Forwarding
-
Configuring Call-Coverage Features
-
Configuring Caller ID Blocking
-
Configuring Conferencing
-
Configuring Video Conferences
-
Configuring Voice and Video Hardware Conferencing
-
Configuring Directory Services
-
Configuring Do Not Disturb
-
Configuring Enhanced 911 Services
-
Configuring Extension Mobility
-
Configuring Fax Relay
-
Configuring Feature Access Codes
-
Configuring Forced Authorization
-
Configuring Headset Auto-Answer
-
Configuring Intercom Lines
-
Configuring Loopback Call Routing
-
Configuring MLPP
-
Configuring Music on Hold
-
Configuring Paging
-
Configuring Presence Service
-
Configuring Ring Tones
-
Configuring Single Number Reach
-
Customizing Soft Keys
-
Configuring Speed Dial
-
Configuring Video Support
-
Configuring SSL VPN Client for SCCP IP Phones
-
-
Creating Templates
-
Modifying Cisco Unified IP Phone Options
-
Configuring Interoperability with Cisco Unified CCX
-
Configuring the CTI CSTA Protocol Suite
-
Configuring SRST Fallback Mode
-
Configuring VRF Support on Cisco Unified CME
-
Configuring the XML API
-
Index
-
 Feedback
Table Of Contents
Modifying Cisco Unified IP Phone Options
Information About Cisco Unified IP Phone Options
Customized Background Images for Cisco Unified IP Phone 7970
Customized Phone User Interface Services
Fixed Line/Feature Buttons for Cisco Unified IP Phone 7931G
Programmable Vendor Parameters for Phones
URL Provisioning for Feature Buttons
My Phone Apps for Cisco Unified SIP IP Phones
How to Configure Cisco Unified IP Phone Options
Clearing Call-History Details from a SCCP Phone
Configuring Dial Rules for Cisco Softphone SIP Client
SCCP: Selecting Button Layout for a Cisco Unified IP Phone 7931G
Configuring Button Layout on SCCP Phones
Configuring Button Layout on SIP Phones
SIP: Configuring Service URL Button on a Line Key
SCCP: Configuring Service URL Button on a Line Key
SIP: Configuring Feature Button on a Line Key
SCCP: Configuring Feature Button on a Line Key
Blocking Local Services on Phone User Interface
SCCP: Modifying Header Bar Display
SIP: Modifying Header Bar Display
Troubleshooting Header Bar Display
SCCP: Creating Labels for Directory Numbers
SIP: Creating Labels for Directory Numbers
SCCP: Modifying System Message Display
Verifying System Message Display
Troubleshooting System Message Display
SCCP: Provisioning URLs for Feature Buttons
SIP: Provisioning URLs for Feature Buttons
Troubleshooting URL Provisioning for Feature Buttons
SCCP: Modifying Vendor Parameters for All Phones
SCCP: Modifying Vendor Parameters For a Specific Phone
Troubleshooting Vendor Parameter Configuration
SCCP: Configuring One-Way Push-to-Talk on Cisco Unified Wireless IP Phones
Configuration Examples for Cisco Unified IP Phone Options
Configuring Cisco Jabber: Example
Example: Configuring Cisco Jabber Windows Client
Configuring Dial Rules for Cisco Softphone SIP Client: Example
Exclusion of Local Services from Cisco Unified SIP IP Phones: Example
Text Labels for Ephone-dns: Example
Phone Header Bar Display: Example
System Text Message Display: Example
URL Provisioning for Directories, Services, and Messages Buttons: Example
Programmable VendorConfig Parameters: Example
Push-to-Talk (PTT) on Cisco Unified Wireless IP Phones in Cisco Unified CME: Example
Feature Information for Cisco Unified IP Phone Options
Modifying Cisco Unified IP Phone Options
Last Updated: July 25, 2013This chapter describes the screen and button features available for Cisco Unified IP phones connected to Cisco Unified Communications Manager Express (Cisco Unified CME).
Finding Feature Information in This Module
Your Cisco Unified CME version may not support all of the features documented in this module. For a list of the versions in which each feature is supported, see the "Feature Information for Cisco Unified IP Phone Options" section.
Contents
•
Information About Cisco Unified IP Phone Options
•
•
•
Information About Cisco Unified IP Phone Options
To enable IP phone options, you should understand the following concepts:
•
•
•
•
•
•
Clear Directory Entries
Cisco Unified CME 8.6 allows you to clear the display of call-history details such as missed, placed, and received call entries on your Cisco Unified SCCP IP phone's display screen. You can press the directory services button on most of the Cisco Unified IP phones or program a line button on 7931 phone to delete the display of phone number entries in the missed, placed, and received calls. The clear call directory feature is supported on Cisco Unified IP phones, 7960, 7961, 7970. 7971 and 8961.
To enable the clear directory entries feature, a call-history option is added to the exclude command. For more information on configuring phones to clear call-history details, see the "Clearing Call-History Details from a SCCP Phone" section.
Customized Background Images for Cisco Unified IP Phone 7970
The Cisco Unified IP Phone 7970 and 7971 support customized background images on the phone screen. To enable your Cisco Unified IP Phone 7970 or 7971 to display a customized background image, follow the procedure in the technical note at http://www.cisco.com/en/US/products/sw/voicesw/ps4625/products_tech_note09186a008062495a.shtml.
Sample background images are available in the 7970-backgrounds.tar file at http://www.cisco.com/pcgi-bin/tablebuild.pl/ip-iostsp.
Customized Button Layout
Cisco Unified CME 8.5 and later versions allow you to customize the display order of various button types on a phone using the button layout feature. The button layout feature allows you to customize the display of the following button types:
•
•
•
•
•
Cisco Unified CME 8.5 uses the button layout command is to populate buttons in any desired order. All buttons displayed on the phone follow the button-layout configuration. In the button layout command, the physical button number on the phone is specified under the button-string parameter of the button layout command. Buttons that are not defined under the button layout configuration are displayed as blank lines. Before configuring button layout on phones, line buttons, feature buttons (including privacy button), and url buttons must be configured through line button, feature button and url button commands, respectively.
Line Buttons
The button layout control feature allows you to populate buttons with corresponding physical line numbers or line number ranges. Line buttons that are not associated with a physical line are not displayed on the phone.You can customize any Cisco Unified SCCP IP phone button to function as a line button using the button command and specifying the position, button type, and directory number of the phone. For more information, see the "Configuring Button Layout on SCCP Phones" section.
For Cisco Unified SIP phones, the first physical button must be a line button with a valid directory number. You can customize the other buttons using the button command and specifying the relative position (position index), button type, and directory number of the button. For more information, see the "Configuring Button Layout on SIP Phones" section.
Speed Dial Buttons
You can customize the display of Speed Dial buttons to appear before, after, or between line buttons using the speed-dial command and specifying the position of the button. The button layout feature allows you to populate the buttons with corresponding physical line numbers or line number ranges. Buttons that do not have a physical line associated with them are not displayed on the phone.
BLF Speed Dial Buttons
The button layout feature allows you to display the BLF Speed-Dial buttons before, after or between the line buttons using the blf-speed-dial command with a specific position. Once the BLF speed-dial button is configured, the system populates the button with corresponding physical line number or range of line numbers. Buttons without a physical line association are not displayed on the phone.
Feature Buttons
Currently, privacy button is the only button available and is presented at the end of all the above mentioned buttons. With PLK feature you can enable most phone features on phone's physical buttons (line keys). This button layout feature requests all presented buttons to be configured via button, speed-dial, blf-speed-dial, feature-button, or url-button commands. The privacy-button is overridden by feature-button if there is one. For more information on configuring feature buttons on a line key, see the "SCCP: Configuring Feature Button on a Line Key" section and "SIP: Configuring Feature Button on a Line Key" section.
Note
Note
URL Buttons
The button layout feature allows you to display the url button before, after, or even between the line buttons, speed dial buttons, BLF speed dial buttons, or feature buttons. For more information on configuring the URL button on a line key, see the "SCCP: Configuring Service URL Button on a Line Key" section and "SIP: Configuring Service URL Button on a Line Key" section.
Customized Phone User Interface Services
In Cisco Unified CME 8.5 and later, you can customize the availability of individual service items such as Extension Mobility, My Phone Apps, and Single Number Reach (SNR) on a phone's user interface by assigning individual service item to a button using the Programmable Line Key (PLK) url-button configuration. For more information, see the "SCCP: Configuring Service URL Button on a Line Key" section.
You can limit the availability of an individual service item on a phone's user interface by disabling the configuration for services such as EM, My Phone Apps, and Local Directory and exclude the display of these services from the phone's user interface. You can use the exclude command under ephone-template mode to exclude the display of Extension Mobility (EM), My Phone Apps, and Local Directory. For more information, see the "Blocking Local Services on Phone User Interface" section.
If a directory service is enabled through PLK configuration, the PLK configuration takes precedence over the exclusion of directory services under ephone or ephone template configuration modes. The service is available through the button directly regardless of the exclusion of services configured under ephone and ephone-template modes.
In Cisco Unified CME 8.5 and later versions, you use the exclude command in ephone or ephone-template configuration mode to exclude the availability of local services such as EM, My Phone Apps, and Local Directory from a Cisco Unified SCCP IP phone's user interface.
In Cisco Unified CME 9.0 and later versions, you use the exclude command in voice register pool or voice register template configuration mode to exclude any of these local services from a Cisco Unified SIP IP phone's user interface.
Note
In Cisco Unified CME 9.0 and later versions, the internal URL address is the default when no external URL address is configured.
Fixed Line/Feature Buttons for Cisco Unified IP Phone 7931G
In Cisco Unified CME 4.0(2) and later versions, you can select from two fixed button-layout formats to assign functionality to certain line buttons on a Cisco Unified IP Phone 7931G to support key system phone behavior. If you do not select a button set, no fixed set of feature/line buttons are defined.
The line button layout for the Cisco Unified IP Phone 7931G is a bottom-up array. Button 1 is at the bottom right of the array and button 24 is at the top left of the array.
Button set 1 includes two predefined feature buttons: button 24 is Menu and button 23 is Headset.
Button set 2 includes four predefined feature buttons: button 24 is Menu; button 23 is Headset; button 22 is Directories; and button 21 is Messages.
For configuration, see the "SCCP: Selecting Button Layout for a Cisco Unified IP Phone 7931G" section.
Header Bar Display
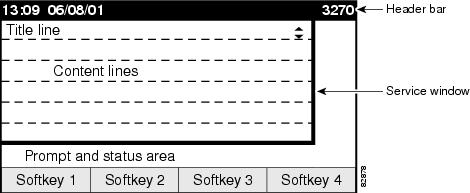
You can customize the content of an IP phone header bar, which is the top line of the IP phone display.
The IP phone header bar, or top line, of a Cisco Unified IP Phone normally replicates the text that appears next to the first line button. The header bar is shown in Figure 52. The header bar can, however, contain a user-definable message instead of the extension number. For example, the header bar can be used to display a name or the full E.164 number of the phone. If no description is specified, the header bar replicates the extension number that appears next to the first button on the phone.
Figure 52 Cisco Unified IP Phone Display
Phone Labels
Phone labels are configurable text strings that can be displayed instead of extension numbers next to line buttons on a Cisco Unified IP phone. By default, the number that is associated to a directory number, and assigned to a phone, is displayed next to the applicable button. The label feature allows you to enter a meaningful text string for each directory number so that a phone user with multiple lines can select a line by label instead of by phone number, thus eliminating the need to consult in-house phone directories. For configuration information, see the "SCCP: Creating Labels for Directory Numbers" section or the "SIP: Creating Labels for Directory Numbers" section.
Programmable Vendor Parameters for Phones
The vendorConfig section of the configuration file contains phone and display parameters that are read and implemented by a phone's firmware when that phone is booted. Only the parameters supported by the currently loaded firmware are available. The number and type of parameters may vary from one firmware version to the next.
The IP phone that downloads the configuration file will implement only those parameters that it can support and ignore configured parameters that it cannot implement. For example, a Cisco Unified IP Phone 7970G does not have a backlit display and cannot implement Backlight parameters regardless of whether they are configured. The following text shows the format of an entry in the configuration file:
<vendorConfig><parameter-name>parameter-value</parameter-name></vendorConfig>For configuration information at the system level, see the "SCCP: Modifying Vendor Parameters for All Phones" section.
For configuration information for individual phones, see the "SCCP: Modifying Vendor Parameters For a Specific Phone" section.
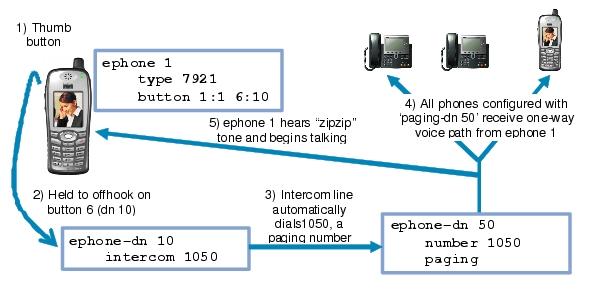
Push-to-Talk
This feature allows one-way Push-to-Talk (PTT) in Cisco Unified CME 7.0 and later versions without requiring an external server to support the functionality. PTT is supported in firmware version 1.0.4 and later versions on Cisco Unified Wireless IP Phone 7921 and 7925 with a thumb button.
In the following figure, button1/DN 1 is configured as the primary line for this phone. Button 6/ DN 10 is configured for PTT and is the line that is triggered by pushing the thumb button on this phone.
•
•
•
•
•
•
Figure 53
PTT Call Flow
For configuration information, see the "SCCP: Configuring One-Way Push-to-Talk on Cisco Unified Wireless IP Phones" section.
Support for Cisco Jabber
Cisco Unified CME 8.6 and later versions support Cisco Jabber. The softphone SIP client is an iPhone application and works as a SIP softphone. The SIP softphone client is capable of supporting VoIP over WLAN. Cisco Unified CME 8.6 supports supplementary services such as Hold, Resume, Transfer, Call Park, and Call Pickup for the softphone SIP client.
To configure visual voicemail settings on Cisco Jabber, the ability to edit user settings should be enabled, see the "Enabling Edit User Settings" section.
You can configure the softphone SIP client using the phone type CiscoJabber-iOS option. For more information on configuring Cisco Jabber, see the "Configuring Cisco Jabber" section.
Note
Note
Note
Call Park and Pickup
In Cisco SIP client, when you press the Home action button, the call continues and the application runs in the background.
When a call is parked and the Cisco iPhone SIP client unregisters because of a power outage, out of range access point, or simply because you pressed the Home action button, the SIP client displays a pop-up with an option to pickup the call (the parked call). This only happens when the client re-registers (before the configured park timer expires or call gets dropped).
Dial Rules
Cisco softphone SIP client uses the dial rules to integrate with the Lightweight Directory Access Protocol (LDAP) directory server. The Cisco softphone SIP client also uses dial rules such as application dial rule and directory lookup rule to translate the outgoing phone numbers and display the incoming phone numbers with a rich caller ID. A rich caller ID displays a caller's name, caller's picture, or caller's phone number, or the information saved in the phone's directory.
You can create the application dial rule or directory lookup rule xml files and add these files to a tftp server. The Cisco softphone SIP client can download the dial rules using the url [ldapserver string], url[AppDialRule string] url [DirLookupRule string] command under voice register template configuration mode. You must apply the voice registration configuration to the voice register pool configuration mode. For more information, see the "Configuring Dial Rules for Cisco Softphone SIP Client" section.
Cisco Jabber for Windows
Cisco Jabber for Windows client is supported from Cisco Unified CME Release 10 onwards. Cisco Jabber for Windows supports the visual voice mail functionality integrated with the Cisco Unity connection. Cisco Jabber for Windows is a SIP-based soft client with integrated Instant Messaging and presence functionality, and uses the new Client Services Framework 2nd Generation (CSF2G) architecture.
CSF is a unified communications engine that is reused by multiple Cisco PC-based clients. The client is identified by a device ID name that can be configured under the voice register pool in Cisco Unified CME. You should configure the username and password under voice register pool to identify the user logging into Cisco Unified CME through Cisco Jabber for Windows client. The device discovery process uses HTTPS connection. Therefore, you should configure the secure HTTP on Cisco Unified CME. A new phone type, Jabber-Win has been added to configure the voice register pool for Cisco Jabber for Windows client.
Restrictions
•
•
•
•
•
For configuration information, see the "Cisco Jabber for Windows" section.
For configuration examples, see the "Example: Configuring Cisco Jabber Windows Client" section.
System Message Display
The System Message Display feature allows you to specify a custom text or display message to appear in the lower part of the display window on display-capable IP phones. If you do not set a custom text or display message, the default message "Cisco Unified CME" is displayed.
When you specify a text message, the number of characters that can be displayed is not fixed because IP phones typically use a proportional (as opposed to fixed-width) font. There is room for approximately 30 alphanumeric characters.
The display message is refreshed with a new message after one of the following events occurs:
•
•
•
The file-display feature allows you to specify a file to display on display-capable IP phones when they are not in use. You can use this feature to provide the phone display with a system message that is refreshed at configurable intervals, similar to the way that the text message feature provides a message. The difference between the two is that the system text message feature displays a single line of text at the bottom of the phone display, whereas the system display message feature can use the entire display area and contain graphic images.
URL Provisioning for Feature Buttons
URL provisioning for programmable feature buttons allows you to specify alternative XML files to access using the feature buttons on IP phones.
Certain phones, such as the Cisco Unified IP Phone 7940, 7940G, 7960, and 7960G, have programmable feature buttons that invoke noncall-related services. The four buttons—Services, Directories, Messages, and Information (the i button)—are linked to appropriate feature operations through URLs. The fifth button—Settings—is managed entirely by the phone.
The feature buttons are provisioned with specific URLs. The URLs link to XML web pages formatted with XML tags that the Cisco Unified IP phone understands and uses. When you press a feature button, the Cisco Unified IP phone uses the configured URL to access the appropriate XML web page for instructions. The web page sends instructions to the Cisco Unified IP phone to display information on the screen for users to navigate. Phone users can select options and enter information by using soft keys and the scroll button.
Operation of these feature buttons is determined by the capabilities of the Cisco Unified IP phone and the content of the specified URL.
In Cisco Unified CME 4.2 and later versions, up to eight URLs can be configured for the Services feature button by using an ephone template to apply the configuration to one or more supported SCCP phones. If you use an ephone template to configure services URLs for one or SCCP phones and you also configure a system-level services URL in telephony-service configuration mode, the value set in telephony-service configuration mode appears first in the list of services displayed when the phone user presses the Services feature button. Cisco Unified CME self-hosted services, such as Extension Mobility, always appears last in the list of options displayed for the Services feature button.
For configuration information, see the "URLs for Feature Buttons" section.
My Phone Apps for Cisco Unified SIP IP Phones
Before Cisco Unified CME 9.0, the My Phone Apps features were only supported on Cisco Unified SCCP IP phones.
In Cisco Unified CME 9.0 and later versions, support is added for My Phone Apps feature on Cisco Unified SIP IP phones.
My Phone Apps is a user application that enables the following settings to be configured using the menu available with the phone's Services feature buttons:
•
•
•
•
•
•
The My Phone Apps features are available on both Extension Mobility (EM) and non-EM phones. For EM phones, the user login service allows the user to temporarily access a physical phone other than their own and utilize their personal settings as if the phone is their own desk phone. Any change in settings follows the user to the next phone they access. For non-EM phones, any change in settings remains with the physical phone.
How to Configure Cisco Unified IP Phone Options
This section contains the following tasks:
•
Button Layout for Cisco Unified IP Phone 7931G
•
Clear Directory Entries
•
Customized Button Layout
•
•
•
•
•
•
Customized Phone User Interface Services
•
Header Bar Display
•
•
•
•
Labels for Directory Numbers
•
•
•
System Message Display
•
•
•
URLs for Feature Buttons
•
•
•
Programmable VendorConfig Parameters
•
•
•
Push-To-Talk
•
Cisco Jabber for Microsoft Windows
Enabling Edit User Settings
To enable the edit user setting, perform the following steps.
Prerequisites
Cisco Unified CME 8.6 or a later version.
SUMMARY STEPS
1.
2.
3.
4.
5.
6.
7.
DETAILED STEPS
Configuring Cisco Jabber
To configure Cisco Jabber for Cisco Unified CME 8.6, follow these steps:
Prerequisites
Cisco Unified CME 8.6 or a later version.
Restrictions
•
•
•
SUMMARY STEPS
1.
2.
3.
4.
5.
6.
7.
8.
DETAILED STEPS
Clearing Call-History Details from a SCCP Phone
To clear the display of Call History details such as Missed Calls, Placed Calls, and Received Calls, from a SCCP IP phone user interface, follow these steps:
Prerequisites
To enable phones to send an HTTP GET request, url directories must be the default (not configured) or configured as http://<CME's ip address>/localdirectory.
SUMMARY STEPS
1.
2.
3.
4.
5.
DETAILED STEPS
Example
The following example shows call-history as excluded from ephone 10 and ephone-template 5:
!telephony-servicemax-ephones 40max-dn 100max-conferences 8 gain -6transfer-system full-consult!!ephone-template 5exclude call-history!!ephone 10exclude call-historydevice-security-mode none!Troubleshooting Tips
The following is a list of troubleshooting tips for successful implementation of this feature:
–
–
–
–
–
–
Configuring Dial Rules for Cisco Softphone SIP Client
To configure the dial rules for Cisco softphone SIP client, follow these steps:
Prerequisites
Cisco Unified CME 8.6 or a later version.
SUMMARY STEPS
1.
2.
3.
4.
5.
6.
DETAILED STEPS
Example
The following example shows dial rules configured under voice register template 2:
!
voice register template 2
url ldapServer ldap.abcd.com
url AppDialRule tftp://10.1.1.1/AppDialRules.xml
url DirLookupRule tftp://10.1.1.1/DirLookupRules.xml
!
The following is a sample of Application Dial Rule content:
Router#more flash:AppDialRules.xml
<?xml version="1.0" encoding="UTF-8"?><DialRules>
<DialRule BeginsWith="+1" NumDigits="12" DigitsToRemove="1" PrefixWith="9"/>
<DialRule BeginsWith="+1" NumDigits="12" DigitsToRemove="1" PrefixWith="9"/>
<DialRule BeginsWith="919" NumDigits="10" DigitsToRemove="3" PrefixWith="9"/>
<DialRule BeginsWith="1" NumDigits="11" DigitsToRemove="0" PrefixWith="9"/>
<DialRule BeginsWith="" NumDigits="10" DigitsToRemove="0" PrefixWith="91"/>
<DialRule BeginsWith="" NumDigits="7" DigitsToRemove="0" PrefixWith="9"/>
<DialRule BeginsWith="+" NumDigits="13" DigitsToRemove="1" PrefixWith="9011"/>
<DialRule BeginsWith="+" NumDigits="14" DigitsToRemove="1" PrefixWith="9011"/>
<DialRule BeginsWith="+" NumDigits="15" DigitsToRemove="1" PrefixWith="9011"/>
<DialRule BeginsWith="+" NumDigits="12" DigitsToRemove="1" PrefixWith="9011"/>
<DialRule BeginsWith="+" NumDigits="11" DigitsToRemove="1" PrefixWith="9011"/>
</DialRules>
SCCP: Selecting Button Layout for a Cisco Unified IP Phone 7931G
To select a fixed-button layout for a Cisco Unified IP Phone 7931G, perform the following steps.
Prerequisites
Cisco Unified CME 4.0(2) or a later version.
SUMMARY STEPS
1.
2.
3.
4.
5.
6.
7.
8.
DETAILED STEPS
What to Do Next
If you are done modifying parameters for phones in Cisco Unified CME, generate a new configuration file and restart the phones. See the "Generating Configuration Files for Phones" section.
Configuring Button Layout on SCCP Phones
To configure button layout on SCCP IP Phones, follows these steps:
Prerequisites
•
•
•
SUMMARY STEPS
1.
2.
3.
4.
5.
6.
7.
8.
DETAILED STEPS
What to Do Next
If you are done modifying parameters for SCCP phones in Cisco Unified CME, restart the phones.
Examples
Router# show telephony-service ephone-template
ephone-template 10
button-layout 1 line
button-layout 2,5 speed-dial
button-layout 3,6 blf-speed-dial
button-layout 4,7,9 feature
button-layout 8,11 url
Configuring Button Layout on SIP Phones
To configure button layout on SIP phones, follow these steps:
Prerequisites
•
•
Restrictions
You can not change the button number in the line button or index command through button layout configuration because the button number specifies the relative display order of the button within the button type (line button, speed-dial, blf-speed-dial, feature button, or url button).
SUMMARY STEPS
1.
2.
3.
4.
5.
6.
7.
8.
DETAILED STEPS
Step 1
enable
Example:Router> enable
Enables privileged EXEC mode.
•
Step 2
configure terminal
Example:Router# configure terminal
Enters global configuration mode.
Step 3
voice register template template-tag
Example:Router(config)# voice register template 5
Enters voice register template configuration mode to create a SIP phone template.
•
Step 4
button-layout [button-string] [button-type]
Example:Router(config-register-template)#button-layout 1 line
Router(config-register-template)#button-layout 2, 5 speed-dial
Router(config-register-template)#button-layout 3, 6 blfspeed-dial
Router(config-register-template)#button-layout 4,7,9 feature-button
Router(config-register-template)# button-layout 8,11 url-button
Assigns physical button numbers or ranges of numbers with button types.
•
•
Note
Note
Step 5
exit
Example:Router(config-register-template)# exit
Exits voice register template configuration mode.
Step 6
voice register pool pool-tag
Example:Router(config)# voice register pool 10
Enters voice register pool configuration mode to set phone-specific parameters for a SIP phone.
Step 7
template template-tag
Example:Router(config-register-pool)# template 5
Applies a SIP phone template to the phone you are configuring.
•
Step 8
end
Example:Router(config-register-pool)# end
Exits to privileged EXEC mode.
What to Do Next
If you are done modifying parameters for phones in Cisco Unified CME, generate a new configuration file and restart the phones. See the "SIP: Generating Configuration Profiles for SIP Phones" section.
Examples
Router# show voice register template all
!
voice register dn 65
number 3065
name SIP-7965
label SIP3065
!
voice register template 5
button-layout 1 line
button-layout 2,5 speed-dial
button-layout 3,6 blf-speed-dial
button-layout 4,7,9 feature-button
button-layout 8,11 url-button
!
voice register template 2
button-layout 1,5 line
button-layout 4 speed-dial
button-layout 3,6 blf-speed-dial
button-layout 7,9 feature-button
button-layout 8,10-11 url-button
!
SIP: Configuring Service URL Button on a Line Key
To implement service URL feature line key buttons on Cisco Unified IP Phones, perform the following steps.
SUMMARY STEPS
1.
2.
3.
4.
5.
6.
7.
8.
DETAILED STEPS
Examples
The following example shows url buttons configured in voice register template 1:
Router# show run!voice register template 1url-button 1 http://9.10.10.254:80/localdirectory/query My_Dir
url-button 5 http://www.yahoo.com Yahoo
!voice register pool 50!
What to Do Next
If you are done configuring the url buttons for phones in Cisco Unified CME, generate a new configuration file and restart the phones. See the "SIP: Generating Configuration Profiles for SIP Phones" section.
SCCP: Configuring Service URL Button on a Line Key
To implement service URL feature line key buttons on Cisco Unified SCCP Phones, perform the following steps.
SUMMARY STEPS
1.
2.
3.
4.
5.
6.
7.
8.
DETAILED STEPS
Examples
The following example shows three url buttons configured for line keys:
!
!
!
ephone-template 5
url-button 1 em
url-button 2 mphoneapp mphoneapp
url-button 3 snr
!
ephone 36
ephone-template 5
What to Do Next
If you are done configuring the url buttons for phones in Cisco Unified CME, restart the phones.
SIP: Configuring Feature Button on a Line Key
To configure a feature button on a Cisco Unified SIP Phone's line key, perform the following steps.
SUMMARY STEPS
1.
2.
3.
4.
5.
6.
7.
8.
DETAILED STEPS
Examples
The following example shows three feature buttons configured for line keys:
voice register template 5
feature-button 1 DnD
feature-button 2 EndCall
feature-button 3 Cfwdall
!!voice register pool 12
template 5
What to Do Next
If you are done configuring the url buttons for phones in Cisco Unified CME, generate a new configuration file and restart the phones. See the "SIP: Generating Configuration Profiles for SIP Phones" section.
SCCP: Configuring Feature Button on a Line Key
To configure a feature button on a Cisco Unified SCCP Phone's line key, perform the following steps.
Restrictions
•
•
•
•
•
•
•
•
SUMMARY STEPS
1.
2.
3.
4.
5.
6.
7.
8.
DETAILED STEPS
Examples
The following example shows feature buttons configured for line keys:
!
!
!
ephone-template 10
feature-button 1 Park
feature-button 2 MeetMe
feature-button 3 CallBack
!
!
ephone-template 10
What to Do Next
If you are done configuring the feature buttons for phones in Cisco Unified CME, restart the phones.
Blocking Local Services on Phone User Interface
To block the display and availability of local services such as Local Directory, Extension Mobility (EM), and My Phone Apps on a SCCP IP phone's user interface, perform the following steps.
Prerequisites
Cisco Unified CME 8.5 or later versions.
SUMMARY STEPS
1.
2.
3.
4.
5.
DETAILED STEPS
Examples
The following example shows the Local Directory and Extension Mobility services excluded from the phone user interface:
ephone 10
exclude directory em
device-security-mode none
description sccp7961
mac-address 0007.0E57.7561
SCCP: Modifying Header Bar Display
To modify the phone header bar display, perform the following steps.
Prerequisites
Directory number to be modified is already configured. For configuration information, see the "SCCP: Creating Directory Numbers" section.
SUMMARY STEPS
1.
2.
3.
4.
5.
DETAILED STEPS
What to Do Next
If you are done modifying parameters for phones in Cisco Unified CME, generate a new configuration file and restart the phones. See the "Generating Configuration Files for Phones" section.
SIP: Modifying Header Bar Display
To modify the phone header bar display on supported SIP phones, perform the following steps.
Prerequisites
Cisco CME 3.4 or a a later version.
Restrictions
This feature is supported only on Cisco Unified IP Phone 7940, 7940G, 7960, and 7960G.
SUMMARY STEPS
1.
2.
3.
4.
5.
DETAILED STEPS
What to Do Next
If you are done modifying parameters for phones in Cisco Unified CME, generate a new configuration file and restart the phones. See the "SIP: Generating Configuration Profiles for SIP Phones" section.
Verifying Header Bar Display
Step 1
Router# show running-config
ephone-dn 1 dual-line
number 150 secondary 151
description 555-0150
call-forward busy 160
call-forward noan 160 timeout 10
huntstop channel
no huntstop
!
!
!
voice-register dn 1
number 1101
description 555-0101
Troubleshooting Header Bar Display
Step 1
Use this command to ensure that the ephone-dn to which you applied the description appears on the first button on the ephone. In the example below, ephone-dn 22 has the description in the phone display header bar.
Router# show telephony-service ephone
ephone-dn 22
number 2149
description 408-555-0149
ephone 34
mac-address 0030.94C3.F96A
button 1:22 2:23 3:24
speed-dial 1 5004
speed-dial 2 5001
SCCP: Creating Labels for Directory Numbers
To create a label to display in place of the number next to a line button, perform the following steps.
Prerequisites
Directory number for which the label is to be created is already configured. For configuration information, see the "SCCP: Creating Directory Numbers" section.
SUMMARY STEPS
1.
2.
3.
4.
5.
DETAILED STEPS
What to Do Next
If you are done modifying parameters for phones in Cisco Unified CME, generate a new configuration file and restart the phones. See the "Generating Configuration Files for Phones" section.
SIP: Creating Labels for Directory Numbers
To create label to be displayed in place of a directory number for a SIP phone, intercom line, voice port, or a message-waiting indicator (MWI), perform the following steps for each label to be created.
Prerequisites
•
•
Restrictions
Only one label is permitted per directory number.
SUMMARY STEPS
1.
2.
3.
4.
5.
6.
DETAILED STEPS
What to Do Next
If you are done modifying parameters for phones in Cisco Unified CME, generate a new configuration file and restart the phones. See the "SIP: Generating Configuration Profiles for SIP Phones" section.
Verifying Labels
Step 1
Router# show running-config
ephone-dn 1 dual-line
number 150 secondary 151
label MyLine
call-forward busy 160
call-forward noan 160 timeout 10
huntstop channel
no huntstop
!
!
!
voice-register dn 1
number 1101
label MyLine
SCCP: Modifying System Message Display
To modify the system message display on phone screen, perform the following steps.
SUMMARY STEPS
1.
2.
3.
4.
5.
6.
DETAILED STEPS
What to Do Next
After configuring the url idle command, you must reset phones. See the "SCCP: Using the reset Command".
Verifying System Message Display
Step 1
Router# show running-config
telephony-service
fxo hook-flash
load 7960-7940 P00307020300
load 7914 S00104000100
max-ephones 100
max-dn 500
ip source-address 10.153.13.121 port 2000
max-redirect 20
timeouts ringing 100
system message XYZ Company
voicemail 7189
max-conferences 8 gain -6
call-forward pattern .T
moh flash:music-on-hold.au
multicast moh 239.10.10.1 port 2000
web admin system name server1 password server1
dn-webedit
time-webedit
transfer-system full-consult
transfer-pattern 92......
transfer-pattern 91..........
transfer-pattern 93......
transfer-pattern 94......
transfer-pattern 95......
transfer-pattern 96......
transfer-pattern 97......
transfer-pattern 98......
transfer-pattern 99......
transfer-pattern .T
secondary-dialtone 9
create cnf-files version-stamp Jan 01 2002 00:00:00
Troubleshooting System Message Display
Step 1
SCCP: Provisioning URLs for Feature Buttons
To customize URLs for feature buttons in the Sep*.conf.xml configuration file for SCCP IP phones, perform the following steps.
Restrictions
•
•
•
SUMMARY STEPS
1.
2.
3.
4.
5.
DETAILED STEPS
What to Do Next
If you want to create an ephone template to provision multiple URLs for the Services feature button on supported individual SCCP phones, see the "Creating Templates".
If you are done modifying parameters for phones in Cisco Unified CME, generate a new configuration file and restart the phones. See the "Generating Configuration Files for Phones" section.
SIP: Provisioning URLs for Feature Buttons
To customize URLs for feature buttons in the SEPDEFAULT.cnf configuration profile for SIP IP phones, perform the following steps.
Prerequisites
Cisco CME 3.4 or a later version.
Restrictions
•
•
•
•
SUMMARY STEPS
1.
2.
3.
4.
5.
DETAILED STEPS
What to Do Next
If you are done modifying parameters for phones in Cisco Unified CME, generate a new configuration file and restart the phones. See the "SIP: Generating Configuration Profiles for SIP Phones" section.
Troubleshooting URL Provisioning for Feature Buttons
Step 1
SCCP: Modifying Vendor Parameters for All Phones
To configure programmable phone and display parameters in the vendorConfig section of the SepDefault.conf.xml configuration file for all phones, perform the following steps.
Restrictions
•
•
•
SUMMARY STEPS
1.
2.
3.
4.
5.
DETAILED STEPS
Step 1
enable
Example:Router> enable
Enables privileged EXEC mode.
•
Step 2
configure terminal
Example:Router# configure terminal
Enters global configuration mode.
Step 3
telephony-service
Example:Router(config)# telephony-service
Enters telephony-service configuration mode.
Step 4
service phone parameter-name parameter-value
Example:Router(config-telephony)# service phone daysDisplayNotActive 1,2,3,4,5,6,7
Router(config-telephony)# service phone displayOnTime 07:30
Router(config-telephony)# service phone displayOnDuration 10:00
Router(config-telephony)# service phone displayIdleTimeout 00.01
Sets display and phone functionality for all IP phones that support the configured parameters and to which this template is applied.
•
•
Step 5
end
Example:Router(config-telephony)# end
Returns to privileged EXEC mode.
What to Do Next
If you are done modifying parameters for phones in Cisco Unified CME, generate a new configuration file and restart the phones. See the "Generating Configuration Files for Phones" section.
SCCP: Modifying Vendor Parameters For a Specific Phone
To configure parameters in the vendorConfig section of the Sep*.conf.xml configuration file for an individual SCCP phone, perform the following steps.
Restrictions
•
•
•
•
•
SUMMARY STEPS
1.
2.
3.
4.
5.
6.
7.
8.
DETAILED STEPS
Step 1
enable
Example:Router> enable
Enables privileged EXEC mode.
•
Step 2
configure terminal
Example:Router# configure terminal
Enters global configuration mode.
Step 3
ephone-template template-tag
Example:Router (config)# ephone-template 15
Enters ephone-template configuration mode to create an ephone template.
Step 4
service phone parameter-name parameter-value
Example:Router(config-telephony)# service phone daysDisplayNotActive 1,2,3,4,5,6,7
Router(config-telephony)# service phone displayOnTime 07:30
Router(config-telephony)# service phone displayOnDuration 10:00
Router(config-telephony)# service phone displayIdleTimeout 00.01
Sets parameters for all IP phones that support the configured functionality and to which this template is applied.
•
•
Step 5
exit
Example:Router(config-ephone-template)# exit
Exits from this command mode to the next highest mode in the configuration mode hierarchy.
Step 6
ephone phone-tag
Example:Router(config)#
ephone 1Enters ephone configuration mode.
Step 7
ephone-template template-tag
Example:Router(config-ephone)# ephone-template 15
Applies an ephone template to the ephone that is being configured.
Step 8
end
Example:Router(config-ephone)# end
Exits configuration mode and enters privileged EXEC mode.
What to Do Next
If you are done modifying parameters for phones in Cisco Unified CME, generate a new configuration file and restart the phones. See the "Generating Configuration Files for Phones" section.
Troubleshooting Vendor Parameter Configuration
Step 1
Step 2
Step 3
Router# show telephony-service tftp-binding
tftp-server system:/its/SEPDEFAULT.cnf
tftp-server system:/its/SEPDEFAULT.cnf alias SEPDefault.cnf
tftp-server system:/its/XMLDefault.cnf.xml alias XMLDefault.cnf.xml
tftp-server system:/its/ATADefault.cnf.xml
tftp-server system:/its/XMLDefault7960.cnf.xml alias SEP00036B54BB15.cnf.xml
tftp-server system:/its/germany/7960-font.xml alias German_Germany/7960-font.xml
tftp-server system:/its/germany/7960-dictionary.xml alias German_Germany/7960-dictionary.xml
tftp-server system:/its/germany/7960-kate.xml alias German_Germany/7960-kate.xml
tftp-server system:/its/germany/SCCP-dictionary.xml alias German_Germany/SCCP-dictionary.xml
tftp-server system:/its/germany/7960-tones.xml alias Germany/7960-tones.xml
Step 4
SCCP: Configuring One-Way Push-to-Talk on Cisco Unified Wireless IP Phones
To associate a phone button with the thumb button on a wireless phone for one-way Push-to-Talk (PTT) functionality in Cisco Unified CME, perform the following steps.
Prerequisites
•
•
•
•
•
Restrictions
Supported on Cisco Unified Wireless IP Phone 7921 and 7925 only.
SUMMARY STEPS
1.
2.
3.
4.
5.
6.
7.
8.
DETAILED STEPS
Cisco Jabber for Windows
To configure Cisco Jabber for Windows in Cisco Unified CME, perform the steps.
Prerequisites
You require Cisco Unified CME Release 10 or a later release.
Restrictions
The Cisco Jabber for Windows client does not support software-based conferencing on phones.
SUMMARY STEPS
1.
2.
3.
4.
5.
6.
7.
8.
9.
10.
11.
12.
13.
14.
DETAILED STEPS
Step 1
enable
Example:Router> enable
Enables the privileged EXEC mode. Enter your password if prompted.
Step 2
configure terminal
Example:Router# configure terminal
Enters the global configuration mode.
Step 3
ip http secure-server
Example:Router(config)# ip http secure-server
Enables a secure HTTP (HTTPS) server. The HTTPS server uses the Secure Sockets Layer (SSL) Version 3 protocol.
Step 4
ip http secure-port port number
Example:Router(config)# ip http secure-port 8443
Sets the HTTPS server port number for listening.
Step 5
voice register dn dn-tag
Example:Router(config)# voice register dn 1
Creates directory numbers for the SIP IP phones that are directly connected to Cisco Unified CME
Step 6
number number
Example:Router(config-register-dn)# number 991001
Defines the numbers for the SIP IP phones.
Step 7
voice register pool phone-tag
Example:Router# voice register pool 1
Sets the phone type for the SIP IP phones on a Cisco Unified CME system.
Step 8
id device-id-name
Example:Router(config-register-pool)# id device-id-name JabberWIN
Specifies the device ID of a phone type.
For a list of supported device IDs, see Cisco Unified Communications Manager Express Command Reference.
Assigns a name to a phone type.
•
Step 9
type type
Example:Router(config-register-pool)# type Jabber-Win
Defines the phone type.
Step 10
number number
Example:Router(config-register-pool)# number 1
Defines the numbers for the SIP IP phones.
Step 11
username username password password
Example:Router(config-register-pool))# username jabber1 password jabber1
Sets the username and password.
•
•
Step 12
description string
Example:Router(config-register-pool)# description Jabber WIN
Associates a description with the Cisco Jabber client. Enter a string of up to 64 characters. A maximum of 128 characters, including spaces.
Step 13
exit
Example:Router(config-register-pool)# exit
Exits the voice register-pool configuration mode.
Step 14
end
Example:Router(config)# end
Exits the privileged EXEC configuration mode.
What to Do Next
If you are done modifying parameters for phones in Cisco Unified CME, generate a new configuration file and restart the phones. See the "Generating Configuration Files for Phones" section.
Configuration Examples for Cisco Unified IP Phone Options
This section contains the following examples:
•
•
•
•
•
•
•
•
•
Configuring Cisco Jabber: Example
The following example shows phone type Cisco Jabber configured under voice register pool 10:
!
voice register dn 10
number 1089
call-forward b2bua busy 1500
call-forward b2bua mailbox 1500
call-forward b2bua noan 1500 timeout 20
pickup-call any-group
pickup-group 1
name CME SIP iPhone
label CME SIP iPhone
!
!
voice register pool 8
registration-timer max 720 min 660
park reservation-group 1
session-transport tcp
type CiscoMobile-iOS
number 1 dn 10
dtmf-relay rtp-nte
!
ephone-dn 61
number 1061
park-slot reservation-group 1 timeout 10 limit 2 recall retry 2 limit 2
!
Example: Configuring Cisco Jabber Windows Client
The following example shows how to configure the Cisco Jabber Windows client .
ip http secure-serverip http secure-port 8443!voice register dn 1number 991001!voice register pool 1id device-id-name JabberWIN1type Jabber-Win ? New Phone Type added in CMEnumber 1 dn 1username jabber1 password jabber1description Jabber WIN
Configuring Dial Rules for Cisco Softphone SIP Client: Example
The following example shows dial rules configured under voice register template 2:
!
voice register template 2
url ldapServer ldap.abcd.com
url AppDialRule tftp://10.1.1.1/AppDialRules.xml
url DirLookupRule tftp://10.1.1.1/DirLookupRules.xml
!
The following is a sample of Application Dial Rule content:
Router#more flash:AppDialRules.xml
<?xml version="1.0" encoding="UTF-8"?><DialRules>
<DialRule BeginsWith="+1" NumDigits="12" DigitsToRemove="1" PrefixWith="9"/>
<DialRule BeginsWith="+1" NumDigits="12" DigitsToRemove="1" PrefixWith="9"/>
<DialRule BeginsWith="919" NumDigits="10" DigitsToRemove="3" PrefixWith="9"/>
<DialRule BeginsWith="1" NumDigits="11" DigitsToRemove="0" PrefixWith="9"/>
<DialRule BeginsWith="" NumDigits="10" DigitsToRemove="0" PrefixWith="91"/>
<DialRule BeginsWith="" NumDigits="7" DigitsToRemove="0" PrefixWith="9"/>
<DialRule BeginsWith="+" NumDigits="13" DigitsToRemove="1" PrefixWith="9011"/>
<DialRule BeginsWith="+" NumDigits="14" DigitsToRemove="1" PrefixWith="9011"/>
<DialRule BeginsWith="+" NumDigits="15" DigitsToRemove="1" PrefixWith="9011"/>
<DialRule BeginsWith="+" NumDigits="12" DigitsToRemove="1" PrefixWith="9011"/>
<DialRule BeginsWith="+" NumDigits="11" DigitsToRemove="1" PrefixWith="9011"/>
</DialRules>
Exclusion of Local Services from Cisco Unified SIP IP Phones: Example
The following example shows how the exclude command is used to exclude from the Cisco Unified SIP IP phone's user interface the availability of two local services. These services are Local Directory and My Phone Apps.
Router(config)# voice register pool 80Router(config-register-pool)# exclude directoryRouter(config-register-pool)# exclude myphoneappsText Labels for Ephone-dns: Example
The following example creates text labels for two ephone-dns:
ephone-dn 1
number 2001
label Sales
ephone-dn 2
number 2002
label Engineering
Phone Header Bar Display: Example
The following example provides the full E.164 number for a phone line in the phone header bar:
ephone-dn 55
number 2149
description 408-555-0149
ephone-dn 56
number 2150
ephone 12
button 1:55 2:56
System Text Message Display: Example
The following example specifies text that should display on IP phones when they are not in use:
telephony-service
system message ABC Company
System File Display: Example
The following example specifies that a file called logo.htm should be displayed on IP phones when they are not in use:
telephony-service
url idle http://www.abcwrecking.com/public/logo.htm idle-timeout 35
URL Provisioning for Directories, Services, and Messages Buttons: Example
The following example provisions the Directories, Services, and Messages buttons:
telephony-service
url directories http://10.4.212.4/localdirectory
url services http://10.4.212.4/CCMUser/123456/urltest.html
url messages http://10.4.212.4/Voicemail/MessageSummary.asp
Programmable VendorConfig Parameters: Example
The following partial output shows a template in which programmable parameters for phone and display functionality have been configured by using the service phone command:
ephone-template 1
button-layout 7931 1
service phone daysDisplayNotActive 1,2,3,4,5,6,7
service phone backlightOnTime 07:30
service phone backlightOnDuration 10:00
service phone backlightIdleTimeout 00.01
In the following example, the PC port is disabled on phones 26 and 27. All other phones have the PC port enabled.
ephone-template 8
service phone pcPort 1
!
!
ephone 26
mac-address 1111.1111.1001
ephone-template 8
type 7960
button 1:26
!
!
ephone 27
mac-address 1111.2222.2002
ephone-template 8
type 7960
button 1:27
Push-to-Talk (PTT) on Cisco Unified Wireless IP Phones in Cisco Unified CME: Example
The following partial output shows a template in which one-way PTT is configured by using the service phone thumbButton1 command:
ephone-template 12
service phone thumbButton1 PTTH6
!!ephone-dn 10intercom 1050ephone-dn 50number 1050paging!!ephone 1
type 7921
button 1:1 6:10
!
!
ephone 2button 1:2paging-dn 50ephone 3button 1:3paging-dn 50ephone 4button 1:1paging-dn 50Additional References
The following sections provide references related to Cisco Unified CME features.
Related Documents
Cisco Unified CME configuration
•
Cisco IOS commands
•
Cisco IOS configuration
•
Phone documentation for Cisco Unified CME
Technical Assistance
Feature Information for Cisco Unified IP Phone Options
Table 90 lists the features in this module and enhancements to the features by version.
To determine the correct Cisco IOS release to support a specific Cisco Unified CME version, see the Cisco Unified CME and Cisco IOS Software Version Compatibility Matrix at http://www.cisco.com/en/US/docs/voice_ip_comm/cucme/requirements/guide/33matrix.htm.
Use Cisco Feature Navigator to find information about platform support and software image support. Cisco Feature Navigator enables you to determine which Cisco IOS software images support a specific software release, feature set, or platform. To access Cisco Feature Navigator, go to http://www.cisco.com/go/cfn. An account on Cisco.com is not required.
Note