-
Cisco Prime Network Administration Guide, 3.10
-
Preface
-
Set Up Prime Network and Its Components
-
Manage the Prime Network Software Image and Backups
-
Manage the Prime Network Components: Gateway, Units, AVMs, and VNEs
-
Manage Network Elements (VNEs)
-
Manage Redundancy for Units and Processes
-
Control Device Access Using Device Scopes
-
Manage User Accounts
-
Manage the Database and System Data
-
Control Event Monitoring
-
Manage Workflows and Activations
-
System Security
-
Perform Advanced VNE Configurations
-
Device Configuration Tasks for Proper Modeling
-
Prime Network Log Files
-
Manage the Prime Network Registry
-
VNE Properties Reference
-
Index
-
 Feedback
Table Of Contents
User Authentication and Authorization Overview
Configure Global User Settings
User Permissions: Lockouts, Commands and Activations, and Job Scheduling
Change GUI Client User Passwords
Create a New User Account and View User Properties
Change User Accounts and Device Scope Access
Change the User Access Role for the Events GUI Client
Configure External User Authentication (LDAP)
Use an External LDAP Server for Password Authentication
Configure Prime Network to Communicate with the External LDAP Server
Import Users from the LDAP Server to Prime Network
Change from External to Local Authentication
Unlock and Re-enable User Accounts
Delete a Prime Network User Account
Manage User Accounts
Note
User authentication and authorization by Prime Network is disabled if Prime Network is installed with Cisco Prime Central.
User account settings determine the actions users can perform in Prime Network. Each user has an access role that determines the GUI-based tasks they can perform. Device-based tasks are determined by the device scopes that are applied to a user's account, and the privileges they have for that scope. You can also control which maps users can access.
These topics explain how to create and manage user accounts. These topics also explain how to change global password rules and how to change the default access role required to log into the Events GUI client.
•
•
•
•
•
•
•
•
User Authentication and Authorization Overview
Note
In Prime Network, user authentication and authorization is controlled by a combination of device scopes, user roles, and other settings in a user's account. While device scopes determine which devices a user can access and what they can do to those devices, user roles and account settings determine the GUI tasks a user can perform.
User Authentication
User authentication is managed either locally by Prime Network, or externally by an LDAP application. Either method can be used to validate user accounts and passwords, thus controlling who can log in to Prime Network. If you use Prime Network for authentication, user information and passwords are stored in the Prime Network database. If you use an external LDAP application for authentication, passwords are stored on the external LDAP server. (User authorization information—that is, roles and scopes—is always stored in the Prime Network database. The external LDAP server, if used, only stores passwords.) The external authentication method has a special user called the emergency user. In Prime Network, root is designated as the external authentication emergency user. This means if Prime Network loses communication with the LDAP server, Prime Network will allow root (and only root) to log in. The root user can then change the authentication method to local, and edit user accounts so that those users can subsequently log in. Prime Network uses LDAP version 3.
Other User Account Settings that Affect Authentication
When you create a user's account, you can also specify the intervals at which users must change their passwords. Prime Network also has authentication settings that are controlled at the global level, such as how many login attempts are permitted before the user is locked out, and when to lock the account due to user inactivity. If a user account is locked, you can easily reenable it from their user account dialog box.
Change the Authentication Method
If you want to change to external authentication, you must do the following:
•
•
If you want to change from external authentication to Prime Network authentication, you can import the user information from the LDAP server into Prime Network. That procedure is described in the Change from External to Local Authentication.
User Authorization
User authorization is controlled by a combination of user roles, device scopes, and other user account settings.
User Roles
Prime Network provides five predefined security access roles that you can assign to a user when you create their account: Viewer, Operator, OperatorPlus, Configurator, and Administrator. These roles determine which actions a user is permitted to perform in the Prime Network GUI clients. Table 7-1 describes the five user roles.
Note
When you create a user account, you assign one user access role to the account. This role determines the user's default permissions, which in turn determine the GUI-based functions the user can perform (those that do not affect devices).
When a new user is defined as an Administrator, this user can perform all administrative actions, including opening all maps, working with all scopes, and managing the system using Prime Network Administration. These activities are performed with the highest privileges. Prime Network Administration supports multiple administrators.
Device Scopes
Device scopes control which devices a user can access, and the actions they can perform on those devices. When you create the user account, you assign one or more device scopes to the user's account, along with a security level for that scope. Detailed information about device scopes and security levels is provided in Control Device Access Using Device Scopes. You can add device scopes to a user account Change User Accounts and Device Scope Access.
Other User Account Settings that Affect Authorization
When you create a user's account, you can also specify whether the user is permitted to create public (shared) reports and manage jobs. These settings only apply if these features are enabled at the global level. In addition, you can specify that whenever any user runs a Command Builder script, Prime Network will request their credentials. These global settings are described in Configure Global User Settings.
Check Existing User Accounts
Note
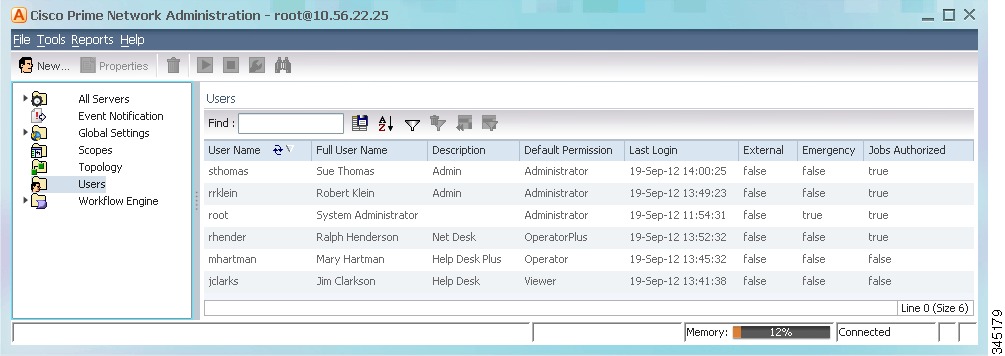
To check existing user accounts, click Users in the navigation area. Figure 7-1 shows an example of the Prime Network Administration window with Users selected.
Note
Figure 7-1 Users Window
The following describes the columns that are displayed in the Users table.
User Name
The unique username defined for the current client station.
Full User Name
(Optional) Full username.
Description
A description of the user.
Default Permission
The default permission of the user, such as Viewer or Administrator. For example, a user with the default permission Viewer can view maps and the Device List.
Note
Last Login
The date and time that the user last logged in.
External
Indicates whether an external authentication server is used for account and password verification.
Emergency
Indicates that a user is designated as an emergency user for the external authentication server, in case the external server goes down.
Jobs Authorized
Indicates whether the user can schedule jobs when the per-user authorization for scheduling jobs is enabled. (See User Permissions: Lockouts, Commands and Activations, and Job Scheduling.
Configure Global User Settings
Note
Each user has an account which controls the actions they are authorized to perform and the devices they can access. The following tables list the global user account settings, their defaults, and how these global settings may interact with individual user account settings. All of these settings can be adjusted from the Administration GUI client.
The topics covered in this section are:
•
User Password Settings
Note
To change the global user password settings listed in Table 7-2, choose Global Settings > Security Settings > Password Settings. Changes are applied after you click Apply.
Table 7-2 Global Password Settings
Password Validity Period
Number of days after which users must reset their password.
30
Number of Attempts Before Lockout
Number of attempts before a user's account is disabled. (Administrators can reenable accounts as described in Change User Accounts and Device Scope Access.)
5
Password Strength
The last ___ passwords cannot be repeated (1 to 15)
5
Password must contain four different character types
Enabled
No character can be repeated more than twice consecutively
Enabled
Password cannot contain more than ___ consecutive characters from the previous passwords
4
Cannot contains replication or reversal of user name
Enabled
Cannot contain the following words (comma-separated list)
Cisco
Days to alert before password expires
Number of days before the password expires. User will receive a warning during the login that his password is about to expire in x days.
7
.
User Permissions: Lockouts, Commands and Activations, and Job Scheduling
Note
To change the global user account settings listed in Table 7-3, choose Global Settings > Security Settings > User Account Settings. Changes are applied to new users; for existing users in active sessions, the changes are applied the next time they log in.
Table 7-3 Global User Account Settings
Account Inactivity
Changes the threshold for when Prime Network should disable a user account due to inactivity. To disable the feature (so that accounts are never disabled), enter 0.
30 days
Execution of Commands and Activations
By default, a VNE's Telnet credentials are used for device access when a user executes a command or activation. But if you enable this feature, users are required to enter their credentials for device access when they execute an activation or command script. Once the credentials are entered, they are used throughout the current GUI client session for all subsequent command or activation executions. The user can change the credentials using the Edit Credentials button, if necessary. Provisioning and Audit events will display an additional column that lists the device user name. If the original VNE credentials are used, they are not exposed; the device user name will display From VNE login.
For activations, users must have the same credentials for all devices involved in the activation because Prime Network propagates the credentials to all command scripts in the activation. (Scheduled commands will continue to use the VNE's credentials.)
This feature is not available for scheduled commands or activations or for SNMP commands (the user will not be prompted for credentials and the Edit Credentials button will be disabled). The VNE credentials will be used for device access.
Note
Disabled
Job Scheduling
Enables a per-user authorization mode for scheduling jobs.
When the mode is enabled, job scheduling privileges are controlled by the settings in individual user accounts (as described in Create a New User Account and View User Properties).
•
•
Disabled (all users can schedule jobs)
Report Settings
Note
To change the global report setting listed in Table 7-4, choose Global Settings > Report Settings.
Table 7-4 Global Report Settings
Security Settings
Allows all users to create shared (public) reports. When a report is public, all users can view the contents; reports are not filtered according to scopes or security privileges.
Disabled (no users can create public reports)
Purge reports after ___ days
Specifies how long to save a report. (For information on Prime Network data purging, see Reports.)
90 days
Store reports up to ___ MB
Specifies the maximum disk size, in MB, at which reports should be purged. (For information on Prime Network data purging, see Reports.)
Disabled
.
Change GUI Client User Passwords
Note
When you change a user's password using this procedure, the user must enter the new password when they log into any of the Prime Network GUI clients: Vision, Events, Administration, Workflow, and Activation Wizard Builder; and the BQL client. You can change the password for any user, including root, using the procedure in this topic.
Users must change their passwords according to the settings in their user account. At any time, users can change their password by choosing Tools > Change User Password from the any of the GUI clients.
The following procedures apply only if you are using Prime Network to validate users. If you are using an external LDAP application to manage passwords, you must change the passwords in the LDAP server.
Step 1
Step 2
Step 3
Step 4
Step 5
Create a New User Account and View User Properties
Note
The following procedure describes how to define a user account.
Before You Begin
Check the global security settings to see the current system defaults. You might also want to check the device scopes that are currently available.
Step 1
Step 2
User Name
Enter the new user's name to be used for logging in.
Full Name
(Optional) Enter the full name of the user.
Description
(Optional) Enter a free text description of the user.
External user only
If checked, Prime Network will only let the user log in if the user's password can be validated by an external LDAP server. The password fields are disabled. (If external authentication is being used, the box is checked by default. See Use an External LDAP Server for Password Authentication.)
Click Test Connection to confirm the connection between the gateway and the LDAP server.
Password
Enter the new Prime Network password, which is then stored in the Prime Network database. Passwords must adhere to the global password rules set by the administrator (see User Password Settings).
This field is disabled if you are using LDAP (external user) for authentication.
Confirm Password
Reenter the new Prime Network password.
User is authorized to schedule jobs
Gives the user authority to schedule jobs across the product if per-user job scheduling authorization mode is enabled. If the global authorization mode is disabled, this setting is ignored.
If the per-user authorization mode is enabled and:
•
•
By default, the global per-user authorization mode is disabled (all users can schedule jobs), and this setting is ignored. The per-user job scheduling authorization mode is controlled from Global Settings > Security Settings > User Account Settings.
Step 3
User Role
Select the role that will control the actions the user can perform in the Prime Network, such as which functions they can use in the GUI clients. Click Read More for a description of the roles; you can also get more information from User Authentication. For information on the special All Managed Elements scope, see What Are Device Scopes?.
Device Security
Select scopes and apply the security levels to them that will control the actions the user can perform on devices. You can apply different security levels for different scopes. If you do not apply a security level to a scope, it defaults to the Viewer level.
Note
Use the following buttons to manage scopes. Note that the edit and remove buttons only affect the scopes assigned to this user.
•
•
•
•
Step 4
Enable Account
Enables and disabled the user account. You can manually lock or unlock a user's account at any time. A user whose account is locked cannot log into the system until you reenable their account.
The user account is automatically locked if:
•
•
Enabled.
Force Password Change at Next Login
Check this check box to force the user to change their user password when they next log in. This field is disabled if the gateway server is using external LDAP authentication.
Enabled.
Limit Connections:
Maximum number of Prime Network client sessions that a user can be running at any one time (to protect performance). This BQL sessions and workflow invocations. Leaving this field blank means the user can have unlimited connections.
Note
10 connections
Force Password Change After ___ Days
Forces the user to change their password after a specific number of days. Uncheck this check box to allow the user to retain their current password indefinitely.
This field is disabled if the gateway server is using external LDAP authentication.
Controlled by Global Settings; see User Password Settings.
Step 5
Change User Accounts and Device Scope Access
Note
Administrators can view, edit, or disable an individual user's account settings. To change global settings such as password rules and inactivity periods, see System Security.
Step 1
Step 2
Step 3
User Name
User ID of the user logged in to the system.
Full Name
(Optional) Full name of the user.
Description
(Optional) Free text description of the user.
External User only
Select this option if the user is an external user.
User is authorized to schedule jobs
Select this option if the user can schedule jobs.
User Role
The role that will control the actions the user can perform in the Prime Network, such as which functions they can use in the GUI clients. For information on how to make changes, see Configure Global User Settings.
Device Security
Scopes and apply the security levels to them that will control the actions the user can perform on devices. For information on how to make changes, see Configure Global User Settings.
Enable Account
Enables and disabled the user account.
Force Password Change at Next Login
Force the user to change their user password when they next log in. This field is disabled if the gateway server is using external LDAP authentication.
Limit Connections:
The maximum number of Prime Network client sessions that the user can be running at any one time. This includes all client types.
Force Password Change After ___ Days
Forces the user to change their password after a specific number of days. Uncheck this check box to allow the user to retain their current password indefinitely.
This field is disabled if the gateway server is using external LDAP authentication.
User Last Login
Displays date and time of the last login.
Step 4
Change the User Access Role for the Events GUI Client
Note
By default, only the Administrator user access role can launch the Events GUI client. If users with other roles try to log into the Events GUI client, they receive an error that tells them they have insufficient permissions. You can adjust Prime Network roles so that other roles in addition to Administrator can log in and use the Events GUI client.
When you change the required role to a lower role, the higher roles also inherit the access. For example, changing the required access role to OperatorPlus means that users with Configurator privileges will also inherit the access. The supported roles are:
Note
Step 1
# cd $ANAHOME/MainStep 2
# ./runRegTool.sh -gs 127.0.0.1 set 0.0.0.0 "site/plugin/ClientPlugin/eventVisionRole"
role
role can be any of the user access roles: configurator, operatorplus, operator, viewer, or (if reverting back to the original setting) administrator.
Step 3
Configure External User Authentication (LDAP)
•
•
Note
User authentication is managed either locally by Prime Network, or externally by an LDAP application. Either method can be used to validate user accounts and passwords, thus controlling who can log in to Prime Network. If you use Prime Network, user information and passwords are stored in the Prime Network database. If you use an external LDAP application, passwords are stored on the external LDAP server. (User authorization information (roles and scopes) is always stored in the Prime Network database. The external LDAP server, if used, only stores passwords.) The external authentication method has a special user called the emergency user. In Prime Network, root is designated as the external authentication emergency user. This means if Prime Network loses communication with the LDAP server, Prime Network will allow root (and only root) to log in. The root user can then change the authentication method to local, and edit user accounts so that those users can subsequently log in. Prime Network uses LDAP version 3.
User authorization is managed through a combination of user access roles and scopes. For detailed information on these topics, see User Authentication, and What Are Device Scopes?.
Use an External LDAP Server for Password Authentication
Note
The following topics describe how you can use an external LDAP server to perform user authentication. By default, Prime Network users internal authentication, which means passwords are stored in and verified against the data that is stored in the Prime Network database. If you want to use external authentication, these topics will guide you through the process.
•
•
•
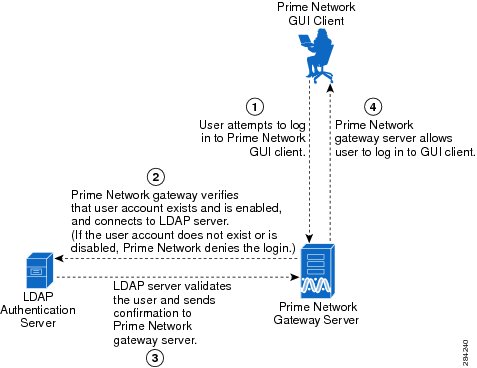
How Does External Authentication Work?
Note
User authentication can be managed locally by Prime Network or externally by a Lightweight Directory Access Protocol (LDAP) application. If you use an external authentication, user information is checked against what is stored in the external LDAP server (instead of the Prime Network database). The external authentication server only stores login and password information; information pertaining to user roles and scopes is stored in the Prime Network database.
As illustrated in Figure 7-2, when a user logs in to the GUI client, the gateway server contacts the LDAP server to authenticate the user. If the user is successfully authenticated, the LDAP server sends a confirmation to the gateway server, and the gateway server allows the user to log in to Prime Network. From that point on, the user can perform functions and access network elements as specified by their roles and scopes (see Change a User's Device Scope Security Level).
Figure 7-2 User Authentication Process with External LDAP Server
The root user is the emergency user. The LDAP emergency user is validated only by Prime Network. Consequently, if the LDAP server goes down, root can log back into Prime Network.
Note
Prerequisites for Using LDAP
Note
You must meet the following prerequisites before you can configure Prime Network to use LDAP:
•
•
•
•
Configure a Secure Connection with the Windows Server 2003 Active Directory
To manage users in the Active Directory from Java, the connection to the server must be secure. Follow these procedures to make the server connection secure.
If you are using Secure Socket Layer (SSL) for encryption between the Prime Network server and the LDAP server, the Windows server must be a domain controller installed with an Enterprise Certificate Authority. To guarantee a secure connection, you must request and install the appropriate certificate.
Note
To obtain the certificate from the LDAP server and place it on the gateway:
Step 1
Step 2
Step 3
Step 4
Step 5
Step 6
Step 7
Step 8
Step 9
# netstat -naThe SSL port 636 should be active; for example:
TCP 0.0.0.0:636 0.0.0.0:0 LISTENING
Install the LDAP Certificate on the Prime Network Gateway Server
Prime Network requires a certificate to open a context with the LDAP server. To import the certificate into the system .truststore file, complete the following steps:
Step 1
a.
b.
c.
d.
e.
f.
Step 2
Step 3
Step 4
# keytool -import -alias LDAPID -file CA.LDAP-IP-address.cer -keystore .truststore
Note
Step 5
# keytool -list -keystore .truststore
Configure Prime Network to Communicate with the External LDAP Server
Note
Use this procedure to configure the Prime Network gateway server to communicate with the LDAP server, and to test the connection after it is configured. You can configure a primary and secondary LDAP server. This procedure uses LDAP terminology, such as distinguished name (DN), common name (CN), and domain component (DC). An LDAP distinguished name uniquely identifies a user in the LDAP database, similar to a full filename but in reverse order. CNs and DCs are attributes of the domain name.
Before You Begin
Make sure you have performed the required prerequisites that are described in the Cisco Prime Network 3.10 Installation Guide:
•
•
•
You must have Administrator privileges (user access role) to use this and all other functions in Prime Network Administration.
Note
To configure the Prime Network gateway server to communicate with the LDAP server:
Step 1
Figure 7-3 Authentication Method Window
Step 2
Step 3
Table 7-5 LDAP Authentication Method Settings
LDAP URL
LDAP server name and port number, in the following format:
ldap://host.company.com:port
where:
•
•
To specify a primary and secondary LDAP server, use the following format:
ldap://host1.company.com:port1 ldap://host2.company.com:port2
For example:
ldap://ldapsj.acme.com:636 ldap://ldapsfo.acme.com:636
Distinguished Name Prefix
First part of the LDAP DN, which is used to uniquely identify users. Enter the information exactly as shown:
CN
(The actual format is CN=Value, which specifies the common name for specific users. =Value will be automatically populated with Prime Network usernames.)
Distinguished Name Suffix
Second part of the LDAP distinguished name, which specifies the location in the directory:
,CN=Users,DC=LDAP_server,DC=company,DC=com
where:
•
,DC=Users
•
,DC=ldapsj
•
,DC=acme
•
,DC=com
The form should:
•
•
For example:
,CN=Users,DC=ldapsj,DC=cisco,DC=com
Application-LDAP Protocol
Encryption protocol used for communication between the Prime Network gateway server and the LDAP server.
Note
The supported protocols are:
•
•
Step 4
Step 5
Step 6
You can now manage user passwords using the external LDAP server.
Import Users from the LDAP Server to Prime Network
Note
To import users from an LDAP server into Prime Network, you must first create and LDAP Data Interchange Format (LDIF) file using the ldifde command, and then import the file into Prime Network using the import_users_from_LDIF_file.pl command.
This command produces an LDIF file for a Windows LDAP server:
# ldifde -l description,displayName,userPrincipalName -f desired-filename -r
objectClass=user
The following shows sample contents of an LDIF file named users.LDF:
dn: CN=xxx,CN=Users,DC=ldapsj,DC=comchangetype: adddisplayName: xxxuserPrincipalName: xxx@acme.comdn: CN=yyyy,CN=Users,DC=ldapsj,DC=comchangetype: adddisplayName: yyyyuserPrincipalName: yyy@acme.comdn: CN=zzz,CN=Users,DC=ldapsj,DC=comchangetype: adddescription: descriptiondisplayName: zzzuserPrincipalName: zzz@acme.comThe import_users_from_LDIF_file.pl command has the following syntax:
import_users_from_LDIF_file.pl ldif-filename [roleName] username-attribute-name [user-desc-attribute-name] [full-name-attribute-name]
Where:
The following command imports the LDAP users listed in the users.LDF file into Prime Network. It creates three users with a Viewer role.
# cd $ANAHOME/Main/scripts# import_users_from_LDIF_file.pl users.LDF userPrincipalName description displayName
Note
Change from External to Local Authentication
Note
If Prime Network is using external authentication and cannot communicate with the LDAP server, the only user permitted to log back into Prime Network is root. This is because root is the emergency user, and is validated only by Prime Network. The root user can then log into Prime Network, change the authentication method to local, and edit user accounts so that those users can subsequently log in. For information on editing user accounts, see Change User Accounts and Device Scope Access.
You must have Administrator privileges (user access role) to use this and all other functions in Prime Network Administration.
Note
To change from external to local authentication, follow this procedure:
Step 1
Step 2
Step 3
Step 4
Step 5
Control User Access to Maps
Note
You can use the Maps tab to control user access to existing maps. This feature is disabled by default. You must first enable it and then you can control map access.
When logging into Prime Network Vision, new users do not have permission to view any existing maps; they can only access maps they create going forward. However, administrators can assign existing maps to new users by enabling this feature and manually assigning the maps.
You must have Administrator privileges (user access role) to use this and all other functions in Prime Network Administration.
Note
To enable this feature:
Step 1
# cd $ANAHOME/MainStep 2
# ./runRegTool.sh -gs 127.0.0.1 set 0.0.0.0
"site/mmvm/services/securitymanager/map-security-enabled" true
Step 3
To assign maps to a user (after enabling the feature):
Step 1
Step 2
Step 3
•
•
Step 4
Step 5
Step 6
Unlock and Re-enable User Accounts
Note
User accounts can become locked or disabled for two reasons:
•
•
The settings that control these actions are specified in the Global Settings; see User Permissions: Lockouts, Commands and Activations, and Job Scheduling.
To reenable a locked account:
Step 1
Step 2
Step 3
Step 4
Delete a Prime Network User Account
Note
If you want to disable a user account but not delete it, see Change User Accounts and Device Scope Access.
To delete a user account:
Step 1
Step 2
The account is deleted and is removed from the content area.
Track User-Related Events
The following table provides ways you can get historical information on user-related events. You can tailor your search or reports by specifying keywords (such as user)
.