-
Cisco Prime Network Administration Guide, 3.10
-
Preface
-
Set Up Prime Network and Its Components
-
Manage the Prime Network Software Image and Backups
-
Manage the Prime Network Components: Gateway, Units, AVMs, and VNEs
-
Manage Network Elements (VNEs)
-
Manage Redundancy for Units and Processes
-
Control Device Access Using Device Scopes
-
Manage User Accounts
-
Manage the Database and System Data
-
Control Event Monitoring
-
Manage Workflows and Activations
-
System Security
-
Perform Advanced VNE Configurations
-
Device Configuration Tasks for Proper Modeling
-
Prime Network Log Files
-
Manage the Prime Network Registry
-
VNE Properties Reference
-
Index
-
 Feedback
Table Of Contents
Communication Security Between Prime Network Components
Communication Security with Devices: SSH and SNMPv3
System Passwords (Database, Graphs Tool, root, bos* Users)
Change Password for bosenable, bosconfig, and bosusermanager, and root
Change Password for Database Schemas
Change Password for Diagnostics (Graphs) Tool
Create a GUI Client Banner Message
System Security
These topics provide an overview of the communication and data security mechanism used by Prime Network:
•
Communication Security Between Prime Network Components
•
•
•
Communication Security Between Prime Network Components
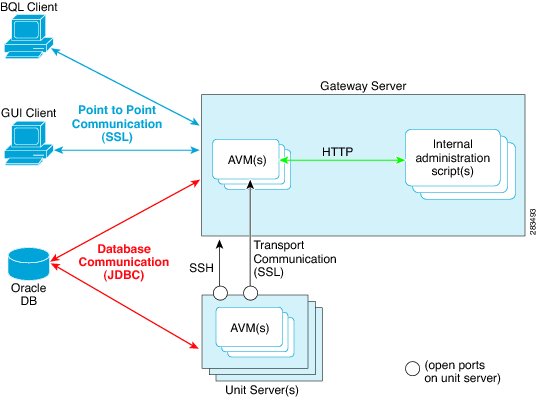
Figure 11-1 illustrates the different forms of secure communication that are implemented between the Prime Network gateway server, units, clients, and database.
Figure 11-1 Communication Security in Prime Network
A socket factory service that runs on the gateway server implements SSL sockets between:
•
•
With SSL version 3.0, keys are created when you install Prime Network on the gateway server. All secured connections use the same private key and certificate for SSL authentication. After installation, these keys are distributed by the gateway to the clients and other units. SSL keys can be recreated (as described in the Cisco Prime Network Integration Developer Guide).
Whenever a socket cannot be opened, a System event is generated and is displayed in Prime Network Events.
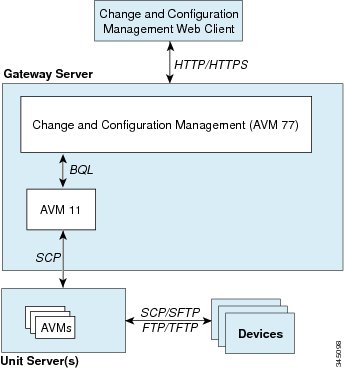
Figure 11-2 provides a simplified illustration of the methods and protocols that Change and Configuration Management, and devices use to communicate with each other.
Caution
Figure 11-2 Communication Security in Change and Configuration Management
Gateway Server and Unit Communication Security
Communication between the gateway server and units is called transport communication. Transport connections are encrypted when the unit and gateway are on different machines, but are not encrypted when both are local to the same machine. Similarly, AVMs use transport communication, and communication between AVMs is encrypted when the AVMs are on different machines. There is no option to change this behavior in the GUI clients.
Prime Network uses the SSH protocol for administrative messages (such as scp) between the gateway and units. A random certificate (that is privately signed) is generated on the gateway at installation time. When Prime Network is installed on any unit (or the unit is restarted), the keys are copied from the gateway to the unit.
Gateway Server and Client (Including BQL) Communication Security
For gateway and client communication, Prime Network uses a proprietary protocol called PTP (Point to Point communication). This is encrypted using SSL. The SSL keys are downloaded to Prime Network clients using the JNLP (Webstart) protocol.
For BQL clients, the gateway server allows secured and unsecured connections from local clients (on port 9002), but only secured connections from clients on other machines. By default, port 9002 only allows unsecured connections. Information on how to change this behavior is described in the BQL documentation in the Cisco Prime Network Integration Developer Guide.
For a client to communicate with the Prime Network gateway using Perl, a certificate in .pem format is required. This can be generated from the .cer format using the two-stage process described in the Cisco Prime Network Integration Developer Guide.
If a client trusts all servers, the public key is automatically imported as part of the SSL handshake. However, for a client to validate a server's public key, the .truststore file must be manually copied from the server.
For more information on SSL sockets and BQL, such as the architecture and negotiation process, see the Cisco Prime Network Integration Developer Guide.
Database Connections
Prime Network is connected to the database using an Oracle encryption feature. All client-to-database connections are encrypted. Server-to-database connections are encrypted if are using an embedded database; otherwise, they are not.
If you have an external database and want to enable encryption on server-to-database connections, follow this procedure. You must run it for each database schema. The schemas are listed below.
Before You Begin
Make sure the values you set comply with the values set on the server side (the database server).
Step 1
# cd $ANAHOME/MainStep 2
runRegTool.sh -gs localhost set 0.0.0.0 site/persistency/nodes/db_schema/EncryptionClient value
The Encryption Client value can be one of the following settings:
Step 3
runRegTool.sh -gs localhost set 0.0.0.0 site/persistency/nodes/db_schema/EncryptionTypesClient value
The EncryptionTypesClient value can be one or more of the following algorithms (comma-separated):
RC4_128,RC4_40,RC4_56,RC4_256
Arcfour
AES256,AES192,AES128
Advanced Encryption Standard (AES)
3DES168,3DES112
Data Encryption Standard (DES)
Step 4
For more information on the database schemas, see Overview of the Prime Network Database and Schemas.
Gateway and Unit Servers Behind Firewalls or NAT Devices
If any unit servers are located behind firewalls or NAT devices:
•
•
•
If a gateway server is behind a firewall, you must open ports on the firewall. The gateway will to need publicly addressable IP address.
Managed Devices Behind Firewalls or NAT Devices
If there is a firewall between a GUI client and a managed device, all attempted Telnet connections to the device will fail. The Prime Network Administration GUI client provides a device proxy feature that, when enabled, routes connections from the client through the gateway server and units, as required, to reach the device. Supported connections are Telnet, Ping, and SSH. When it is enabled, dedicated SSH connections are used between the gateway and the unit. For information on how to configure this feature, see Manage Configurations with Firewalls (Device Proxy).
Communication Security with Devices: SSH and SNMPv3
In Prime Network, protocol collectors are the components responsible for actively polling devices and transporting information between devices and the Prime Network gateway. Protocols collectors are part of the instrumentation layer of Prime Network VNEs. A device has a collector for each protocol it supports, such as one collector for SSH and another collector for SNMP. Each collector contains the necessary logic for its specific protocol.
The security of device communication is maintained by specifying SSH and SNMPv3 authentication and encryption methods when you create the VNE. Table 11-2 summarizes the security methods that are supported by each protocol.
The settings in Table 11-2 can be controlled from Prime Network Administration, as described in VNE Properties: Telnet/SSH. The exceptions are the SSHv2 key exchange algorithm, MAC algorithms, ciphers, and host key algorithms, which you can only change by editing the registry. By default, all of the SSHv2 algorithm settings in Table 11-2 are supported.
Note
The following procedure shows how to check and change your current settings.
Step 1
# cd $ANAHOME/MainStep 2
# ./runRegTool.sh -gs 127.0.0.1 get 127.0.0.1
"agentdefaults/da/ip_default/protocols/telnet/connection/algorithms"
<key name="algorithms"><entry name="mac-alg">sha1,md5,sha1-96,md5-96,</entry><entry name="keys-exchange-alg">diffie-hellman-group1-sha1,diffie-hellman-group1-exchange-sha1,</ entry><entry name="host-key-alg">dsa,rsa,</entry><entry name="encryption-alg">3des,aes-128,aes-192,aes-256,</entry></key>For example, the following command overwrites the encryption (ciphers) algorithms so that 3DES is no longer allowed for any newly-created VNEs:
Note
# ./runRegTool.sh -gs 127.0.0.1 set 0.0.0.0
"site/agentdefaults/da/ip_default/protocols/telnet/connection/algorithms/encryption-alg"
"aes-128,aes-192,aes-256,"
Step 3
Registry Security
The Golden Source registry is the master registry responsible for maintaining, distributing, and updating registry configuration files to all Prime Network units and the Prime Network gateway. The master copy of the Golden Source files is centrally located on the gateway server at:
NETWORKHOME/Main/registry/ConfigurationFiles
Credentials data is encrypted. This includes the SNMP, Telnet, and SSH credentials for VNEs, and the database password. Sections that are encrypted are marked with an ENCRYPTED_ENTRY_AES prefix.
System Passwords (Database, Graphs Tool, root, bos* Users)
These topics explain how to change system-level passwords:
•
•
•
For information on managing individual user passwords, see Manage User Accounts.
Change Password for bosenable, bosconfig, and bosusermanager, and root
The passwords for bosenable, bosconfig, bosusermanager, and root are established during the Prime Network installation. Use the following to change the bos passwords.
To change the root password, you can use Change GUI Client User Passwords. If you have lost the root password, you can use this procedure to reset it.
Step 1
# cd $ANAHOME/MainStep 2
java -classpath ./jars/classes.jar com.sheer.metromission.authentication2.PasswordEncrypt
password
The encrypted password is listed in the command output (after the comma). You will need this information in Step 3.
For example, the following command creates a new password for test.
# java -classpath ./jars/classes.jar
com.sheer.metromission.authentication2.PasswordEncrypt test
The command returns the following output. The portion of the output that is in bold is what you will need in the subsequent step.
'test' -> 'PEv1:DC57A2A7', '7E84D3A8F60F30B7B62946D532E24608'Step 3
a.
sqplplus pn310/adminb.
update bosuser set ENCRYPTEDPASSWORD='xxx' where username='bosenable';
For example:
SQL> update bosuser set ENCRYPTEDPASSWORD='7E84D3A8F60F30B7B62946D532E24608' where
username='bosenable';
1 row updated.
To update the root user password, you would use the following command:
update bosuser set ENCRYPTEDPASSWORD='xxx' where username='root';
c.
SQL> commit;
Commit complete.
d.
Change Password for Database Schemas
By default, an operating system account for the Prime Network application is created when Prime Network is installed. When the database is created, it uses this operating system account name as the basis for naming the schemas. The following are the database schemas that are created by Prime Network. As an example, in the following table the Prime Network operating system account (pnuser) is named pn310. (For more details about these schemas, see Overview of the Prime Network Database and Schemas.)
At installation time, the network-conf script assigns the same password to all of the schemas. After installation, you can assign different passwords to each schema. The following procedure describes how to change any or all of the passwords. Note that you have to change the password in two places: in the Oracle software and in the Prime Network software.
In the following procedure, pnuser-DB, pnuser-EP-DB, pnuser-DWE-DB, pnuser-admin-DB, and pnuser-XMP-DB are the user accounts for the four database schemas.
Step 1
Step 2
a.
# sqlplus /nolog \@$ANAHOME/Main/unix/setPassword.sql DBA-username DBA-password
pnuser-DB pnuser-DB-new-password DB-IP DB-port SID
For example:
# sqlplus /nolog \@$ANAHOME/Main/unix/setPassword.sql system systempassword pn310
pn310newDBpassword 127.0.0.1 1521 MCDB
b.
# cd $ANAHOME/Main
# ./runRegTool.sh -gs 127.0.0.1 setEncrypted 0.0.0.0
"site/persistency/nodes/main/PASS" pnuser-DB-new-password
Step 3
a.
# sqlplus /nolog \@$ANAHOME/Main/unix/setPassword.sql DBA-username DBA-password
pnuser-EP-DB pnuser-EP-DB-new-password DB-IP DB-port SID
For example:
# sqlplus /nolog \@$ANAHOME/Main/unix/setPassword.sql system systempassword pn310_ep
EPnewDBpassword 127.0.0.1 1521 MCDB
b.
# cd $ANAHOME/Main
# ./runRegTool.sh -gs 127.0.0.1 setEncrypted 0.0.0.0 "site/persistency/nodes/ep/PASS"
pnuser-EP-DB-new-password
Step 4
a.
# sqlplus /nolog \@$ANAHOME/Main/unix/setPassword.sql DBA-username DBA-password
pnuser-DWE-DB pnuser-DWE-DB-new-password DB-IP DB-port SID
For example:
# sqlplus /nolog \@$ANAHOME/Main/unix/setPassword.sql system systempassword pn310_dwe
DWEnewDBpassword 127.0.0.1 1521 MCDB
b.
# cd $ANAHOME/Main
# ./runRegTool.sh -gs 127.0.0.1 setEncrypted 127.0.0.1
avm66/services/workflow/engine/databasePassword pnuser-DWE-DB-new-password
Step 5
a.
# sqlplus /nolog \@$ANAHOME/Main/unix/setPassword.sql DBA-username DBA-password
pnuser-admin-DB pnuser-admin-DB-new-password DB-IP DB-port SID
For example:
# sqlplus /nolog \@$ANAHOME/Main/unix/setPassword.sql system systempassword
pn310_admin adminnewDBpassword 127.0.0.1 1521 MCDB
b.
# cd $ANAHOME/Main
# ./runRegTool.sh -gs 127.0.0.1 setEncrypted 0.0.0.0
"site/persistency/nodes/admin/PASS" pnuser-admin-DB-new-password
Step 6
Note
a.
# sqlplus /nolog \@$ANAHOME/Main/unix/setPassword.sql DBA-username DBA-password
pnuser-XMP-DB pnuser-XMP-DB-new-password DB-IP DB-port SID
For example:
# sqlplus /nolog \@$ANAHOME/Main/unix/setPassword.sql system systempassword pn310_xmp
pn310XMPnewDBpassword 127.0.0.1 1521 MCDB
b.
# cd $XMP_HOME/bin
# xmpchangepw.ksh pnuser-XMP-DB-old-password pnuser-XMP-DB-new-password
Step 7
# cd $ANAHOME/Main
# networkctl stop
Step 8
a.
# sqlplus /nolog
SQL> connect /as sysdba
b.
SQL> alter user account-name account unlockStep 9
# cd $ANAHOME/Main
# networkctl start
Change Password for Diagnostics (Graphs) Tool
The username and password for the Diagnostics Tool (described in Prevent System Overloads (Advanced Overload Prevention/Safe Mode)) is established during the Prime Network installation.
To change the passwords:
Step 1
# cd $ANAHOMEStep 2
# utils/operating-system/apache/bin/htpasswd ./Main/webroot/.passwd new-usernameThe utility will prompt you for a new password for new-username.
Create a GUI Client Banner Message
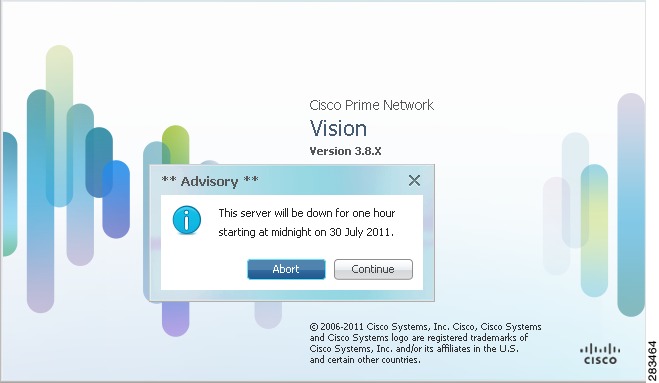
Prime Network Administration enables you to define a Message of the Day, or banner, that is displayed when a user logs into any client application. The user must accept the message before logging in. If the user does not accept the message, the user cannot log in. The message supports HTML format. Figure 11-3 provides an example.
Figure 11-3 Message of the Day Example
The message can be changed as required. However, only one message is applied at a time.
To create a message of the day:
Step 1
Step 2
Step 3
Note
Step 4
Step 5
To delete a message of the day, edit the message so that the Title and Message field is empty, and click Save.