-
Cisco Prime Network Administration Guide, 3.10
-
Preface
-
Set Up Prime Network and Its Components
-
Manage the Prime Network Software Image and Backups
-
Manage the Prime Network Components: Gateway, Units, AVMs, and VNEs
-
Manage Network Elements (VNEs)
-
Manage Redundancy for Units and Processes
-
Control Device Access Using Device Scopes
-
Manage User Accounts
-
Manage the Database and System Data
-
Control Event Monitoring
-
Manage Workflows and Activations
-
System Security
-
Perform Advanced VNE Configurations
-
Device Configuration Tasks for Proper Modeling
-
Prime Network Log Files
-
Manage the Prime Network Registry
-
VNE Properties Reference
-
Index
-
 Feedback
Table Of Contents
Control Device Access Using Device Scopes
View Links When Only One Endpoint is in Scope
Move Devices In and Out of a Scope
Change a User's Device Scope Security Level
Delete a Device Scope from Prime Network
Control Device Access Using Device Scopes
These topics describe how to create and manage device scopes. Device scopes determine the devices a user can access, and the actions the user can perform on the devices. The same device scope can be applied to multiple user accounts, but you can specify more or less strict privileges on a per-user basis.
Note
Device scopes are disabled if Prime Network is installed with Cisco Prime Central.
•
•
•
•
What Are Device Scopes?
Note
In Prime Network, user roles and device scopes determine which tasks a user can perform. A user role is specified when you create the user's account. The user role determines the GUI-based actions the user can perform.
The actions a user can perform on a device are controlled by device scopes. Device scopes are groups of devices that you assign to users. If a device is in a scope that is assigned to a user, then the user can access the device. Device scopes are listed in the Administration GUI client when you choose Scopes in the navigation tree.
This topic does not address authentication—that is, the process of verifying the identity of the user. For information on user authentication, see User Authentication.
When you create a new device scope, you specify a name for the scope and which devices to include in the scope (as many or as few as you want). This allows you to group devices in a way that fits your deployment—for example, by geography, by device type, by customer, and so forth. However, just because a user has access to a device does not mean they can perform all actions on the device. When you assign a device scope to a user, you also specify the security level for that scope. In this way, you control the devices a user can access, and what actions the user can perform on those devices.
Creating scopes and assigning them to users is controlled from the Administration GUI client. If you create an account for a user but do not assign any device scopes to the account, the user will be able to open Prime Network but will not see any devices.
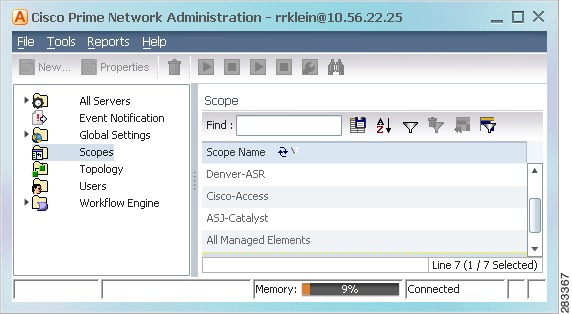
Figure 6-1 shows an example of the Prime Network Administration Scopes window.
Figure 6-1 Scopes Window
Severity levels for device scopes can override GUI user access roles. For example:
1.
2.
Prime Network will allow John to perform Configurator operations on any devices in the CE-SJ device scope.
The All Managed Elements Device Scope
The All Managed Elements device scope is a predefined scope that is automatically assigned to users with Administrator privileges. It contains all NEs that are managed by Prime Network and has a security level named Special. The Special security level only applies to this device scope, and only when the scope is assigned to Administrators.
New devices are automatically added to the All Managed Elements device scope when the VNEs are created.
Note
You are permitted to assign the All Managed Elements device scope to non-Administrators, but you can only apply a security level of Configurator or less.
Table 6-1 lists the device-based actions a user can perform, based on the device scope security level.
Note
Create New Device Scopes
Note
Before you create a scope, consider the following:
•
•
When you create a device scope, you must give it a name and choose the devices to include in the scope. When you assign a scope to a user, you adjust the security level to be more or less strict.
Note
To create a scope:
Step 1
Step 2
Step 3
Step 4
View Links When Only One Endpoint is in Scope
Note
By default, a user can view a link in Prime Network Vision only if both link endpoints are in the user's device scope. If you want to make links viewable if only one endpoint is in a user's scope, you must edit the registry as follows. Changes are applied to all device scopes in the system.
Note
Step 1
# cd $ANAHOME/MainStep 2
# ./runRegTool.sh -gs 127.0.0.1 get 0.0.0.0
"site/mmvm/services/securitymanager/linkoid-by-any-side"
A return of false means it is set to the default; that is, both links must be in a user's scope to be viewable.
Step 3
# ./runRegTool.sh -gs 127.0.0.1 set 0.0.0.0
"site/mmvm/services/securitymanager/linkoid-by-any-side" true
Step 4
Move Devices In and Out of a Scope
Note
Change the device membership
Follow the procedure in this topic.
Change the name
Create a new scope. You cannot change an existing scope's name.
Change the security level
Edit the security level in the user's account. See Change a User's Device Scope Security Level
Caution
To add or remove devices from a scope:
Step 1
Step 2
Step 3
Note
Step 4
Change a User's Device Scope Security Level
Note
This procedure explains how to change the security level for a device scope. This is done from the user accounts dialog box. When you change the security level, it only affects this user. (Scopes do not have a default security level; the security level is set when the scope is added to a user account.)
Step 1
Step 2
Step 3
Step 4
Step 5
Step 6
Delete a Device Scope from Prime Network
Note
Caution
To delete a scope:
Step 1
Step 2
Note
The scope is deleted and is removed from the content area.
Track Device Scope Events
The following table provides ways you can get historical information on device scope-related events. You can tailor your search or reports by specifying keywords (such as scope)
.