-
Cisco Prime Network Administration Guide, 3.10
-
Preface
-
Set Up Prime Network and Its Components
-
Manage the Prime Network Software Image and Backups
-
Manage the Prime Network Components: Gateway, Units, AVMs, and VNEs
-
Manage Network Elements (VNEs)
-
Manage Redundancy for Units and Processes
-
Control Device Access Using Device Scopes
-
Manage User Accounts
-
Manage the Database and System Data
-
Control Event Monitoring
-
Manage Workflows and Activations
-
System Security
-
Perform Advanced VNE Configurations
-
Device Configuration Tasks for Proper Modeling
-
Prime Network Log Files
-
Manage the Prime Network Registry
-
VNE Properties Reference
-
Index
-
 Feedback
Table Of Contents
Set Up Prime Network and Its Components
Launch the Prime Network Administration GUI Client
Set Up Redundancy, Data Purging, and Other Stability Settings
Set Up the Regular Backup Schedule
Set Default Credentials for VNEs
Set Up External Authentication
Configure Global Rules for User Accounts
Create User Accounts and Device Scopes
Use Prime Network with Cisco Prime Central
Set Up Prime Network and Its Components
These topics introduce you to the Prime Network Administration GUI client and describe the setup tasks you should perform after installing Prime Network. These tasks configure Prime Network so that other users can log into the GUI clients and use Prime Network to manage the NEs and network.
•
Launch the Prime Network Administration GUI Client
•
•
Launch the Prime Network Administration GUI Client
Note
Prime Network Administration is password-protected to ensure security and is available only to users with Administrator privileges. You can use the Prime Network Administration GUI client to configure a variety of global GUI client properties, such as requiring that passwords be changed on a regular basis, disabling accounts after long periods of inactivity, and locking accounts after repeated unsuccessful login retries. These properties are applied to all of the Prime Network GUI clients, such as Prime Network Vision and Prime Network Events.
Note
When you log out of the Administration GUI client, any changes you made are automatically saved, including changes to VNEs. Some changes may require a restart of the AVMs or VNEs, or event the Prime Network gateway. These requirements are noted with the relevant procedures.
Instructions for downloading and installing GUI clients are provided in the Cisco Prime Network 3.10 Installation Guide. To launch the Administration GUI client, use one of the following:
•
•
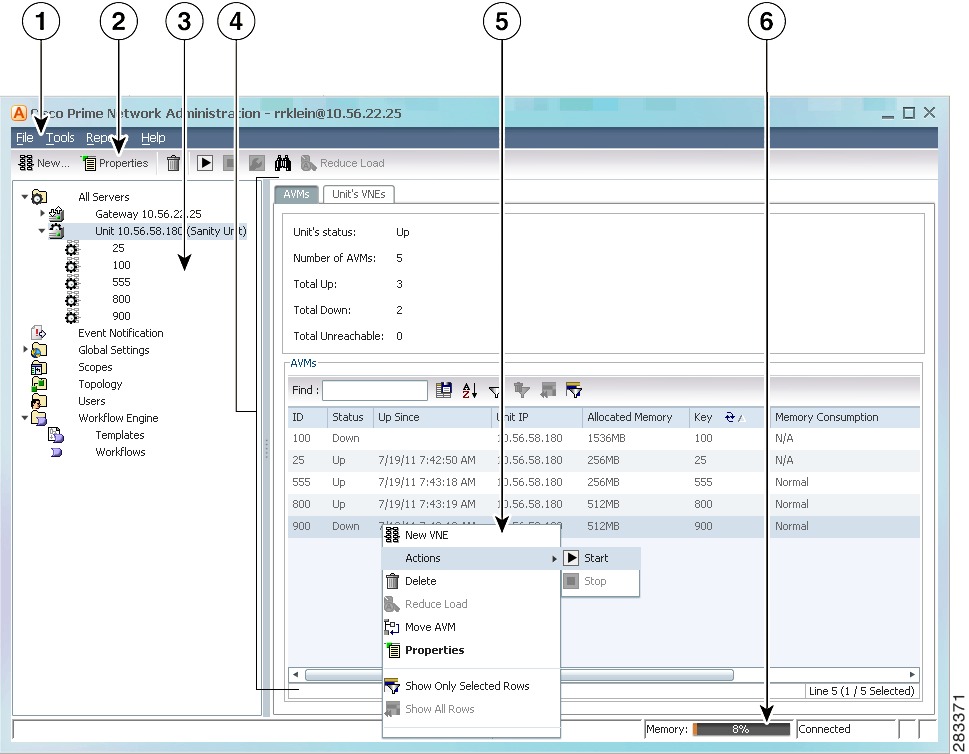
Figure 1-1 identifies the basic parts of the Prime Network Administration window.
Figure 1-1 Prime Network Administration Window
Setup Tasks for Prime Network
Note
Table 1-1 Setup Tasks for Prime Network
Licenses
Verify that your license is registered
System stability
Check standby units, control when data is purged, adjust the warning thresholds for AVM memory usage, and control how many clients can connect to a gateway
Set Up Redundancy, Data Purging, and Other Stability Settings
Backups
Control where data is saved, and how often backups occur, to protect your data
Event Management
Configure the Event Collector (which listens for incoming events), e-mail notifications for critical events, and a service to forward trap notifications to other OSSs
Default AVM size for new AVMs
For VNE and AVM auto-add mechanism, adjust the settings for the size of AVMs and how much of a unit's memory must remain free
VNE default credentials for SNMP, Telnet, SSH
Set defaults for Telnet/SSH and SNMP credentials (so you do not have to specify them for new VNEs)
External user authentication
Control user authentication using an external LDAP server (optional)
Global rules for users
Configure rules for user passwords, a timeout for when inactive accounts should be disabled, whether credentials are required for running Command Builder commands, whether Prime Network should display a warning message when users run command scripts or activations, whether users can create public reports, and who can schedule jobs
Banners
Have Prime Network display a banner whenever a user logs into a client
User accounts and device scopes
Control access to the GUI client and device tasks users can perform
Reports
Monitor network and non-network events
Devices
Create VNEs to model devices so Prime Network can manage them
Register Licenses
When you install Prime Network, it automatically activates a 120-day Evaluation license. This allows you to being using the product immediately while you obtain a permanent license. If you do not apply a permanent license by the end of the evaluation period, your connection attempts will be rejected. To apply a new license, see Install and Apply Licenses. For information on licensing and gateway high availability configurations, see Cisco Prime Network 3.10 Gateway High Availability Guide.
Set Up Redundancy, Data Purging, and Other Stability Settings
Create Unit Protection Groups and Designate Standby Units
When you install Prime Network on a unit, the installation procedure queries whether the unit will be a standby unit. A standby unit comes online when a unit in its protection group fails. By default, all units are added to a protection group called default-pg. You can get information on unit and process protection from Overview of Unit and Process Protection.
Note
Adjust Data Purging
To protect system stability and performance, Prime Network purges data from the system regular intervals, depending on the data type. While the default settings are normally sufficient, you can adjust them if necessary as described in Control How Data is Saved, Archived, and Purged. The following table lists the default settings for data purging.
Caution
Adjust the AVM Memory Warning Thresholds
If a user-created AVM exceeds 80% of its total memory, Prime Network displays warning indicators to signal a possible load balancing problem. You can quickly respond to these indicators using the Reduce Load option which will adjust VNE allocation (move VNEs to other units). If you want to adjust this threshold, see Manage AVM Memory and Thresholds (Load Balancing).
Control the Maximum Number of Client Sessions for a Gateway
By default, a maximum of 150 clients can be connected to the gateway at one time. This is a system-wide setting. You can adjust this setting, but you should not make it higher than 150 (otherwise system performance may be negatively impacted).
Note
User accounts also have a connection limit. This is a per-user setting. A user will not be able to login if the system-level setting has been reached, or their per-user limitation has been reached.
To adjust the system-wide setting, see Manage Client and User Sessions. To control the per-user setting, see Create a New User Account and View User Properties.
Specify When Events Are Removed from a Vision GUI Client Inventory Window
When an inventory window is opened from the Vision GUI client, it displays an Inventory Event Viewer (normally at the bottom of the window) that lists the recent events for that device. By default, only events that occurred in the last 6 hours are listed. To change this setting, see Change Fault Settings: Clear, Archive, and Purge Fault Data.
Set Up the Regular Backup Schedule
The timing of your backup schedule depends on whether you have an embedded or external database, and if you have an embedded database, the schedule further depends on the database profile.
If you have an embedded database and you want Prime Network to perform regular backups, you must enable the backup mechanism. This is normally done during installation but you can do it manually by following the procedure in Enable Embedded Database Backups.
Note
The following table shows the default backup settings.
Embedded Database
Data is backed up according to the profile entered at installation:
•
•
If you did not enable backups during installation, follow the procedure in Enable Embedded Database Backups.
External Database
Gateway data is backed up every 12 hours at 4:00 a.m. and 4:00 p.m, as defined in the crontab file.
Note
For information on the backup and restore mechanism, see Back Up and Restore Process.
Set Up Fault Management
Set Up Prime Network to Receive Events from Devices and Process Them
Make sure that Prime Network is properly configured to receive and save events. You may want to refer to How Prime Network Handles Incoming Events, which provides an illustration of how events are handled by Prime Network.
Check the configuration of the Event Collector, AVM 100. During installation, Prime Network creates Event Collectors on the gateway and all units, but only the gateway Event Collector is started. As VNEs are added, they will automatically register with that Event Collector. Check Setting Up the Event Collector: Supported Scenarios, to make sure you are using the configuration appropriate to your deployment.
By default, when the Event Collector receives raw events, it saves them in the Event Archive in the database. As a result, the server with the running Event Collector must have database connectivity. If you want to disable saving raw events to the Event Archive, see Disable Saving Raw Events to the Event Archive.
Check the configuration of the Fault Agent, AVM 25. The Fault Agent runs on all units and creates tickets based on correlation and event type information, and sends information to the Fault Database so it can be saved and viewed in the GUI clients. AVM 25 always requires database connectivity. If a connection is not available, you can configure AVM 25 to use a proxy AVM 25. (See Configuring Proxy AVM 25 for Units Not Connected to Database.)
Configure Devices to Forward Events to Prime Network
All devices you want Prime Network to manage must configure devices to forward events to Prime Network (where the Event Collector, AVM 100, is running). If you want Prime Network to forward generic events from unmanaged devices, you must enable notification from unmanaged devices using the procedure in the Cisco Prime Network Integration Developer Guide.
Before you add devices to Prime Network (by creating VNEs), be sure to provide all necessary device configuration tasks so that when the VNE is created, Prime Network can properly connect to the device, discover it, and monitor it. Prime Network will automatically choose the best VNE scheme according to device type. A VNE's scheme determines what data will be retrieved for each device, and which commands and protocols Prime Network should use to collect that data. You can also configure a new scheme that will model and monitor the specific information you want.
For information on schemes and device configuration tasks, see Device Configuration Tasks for Modeling.
Create E-mail Notifications for Important Events and Tickets
You can configure Prime Network to generate e-mail notifications when an event or ticket occurs. You can base it on severity, type, and other criteria. For information on how to create an Event Notification Service, see Configure Trap and E-Mail Notifications (Event Notification Service).
Forward Event and Ticket Information to Other Applications
You can also use the Event Notification Service to forward specific events and event information to other NMSs or as an e-mail notification. This is described in Configure Trap and E-Mail Notifications (Event Notification Service).
Set Default Size for AVMs
When you use the AVM auto-add feature (which is recommended), Prime Network will create new AVMs using global properties (memory size and threshold) that you can adjust. Prime Network will also choose the most appropriate unit for you, or you can specify the one you want to use.
This tables describes these settings and their system defaults.
To avoid load balancing problems, Prime Network will warn you when a user-created AVM exceeds 80% of its total memory. You can quickly respond to these indicators by triggering the Reduce Load option which will adjust VNE allocation. If you want to adjust this or any other AVM default settings, see Manage AVM Memory and Thresholds (Load Balancing).
Set Default Credentials for VNEs
When you create default settings for the SNMP and Telnet/SSH protocols, the settings are automatically applied to all new VNEs
To configure default VNE settings, choose Global Settings > Default VNE Settings.
•
•
To find out what version of SNMP or SSH a VNE is using, right-click the VNE and choose Inventory. This opens the In the device inventory window, click VNE Status. See Figure 4-12 for an example.
Set Up External Authentication
If you want to use external authentication, you must configure Prime Network to communicate with the LDAP server. See Configure Prime Network to Communicate with the External LDAP Server. If you are switching from external authentication to Prime Network authentication, you can import the user information from the LDAP server into Prime Network. That procedure is described in the Import Users from the LDAP Server to Prime Network.
Configure Global Rules for User Accounts
This topic describes the default settings that are applied to user accounts. If you want to change any of these settings, see User Password Settings.
Adjust Rules for User Passwords
By default, Prime Network uses the following password rules
Adjust the Timer for Disabling Accounts Due to User Inactivity
By default, if a user does not log into their account for 30 days, their account is disabled. A disabled account must be re-enabled by a user with Administrator privileges. You can adjust this period if necessary.
Request User Credentials Before Running Scripts and Activations
You can configure Prime Network to require users to enter their device credentials when they execute an activation or command script. When this mode is enabled, the following occurs:
•
•
This mode is disabled by default.
Control Who Can Schedule Jobs
Prime Network provides a per-user authorization mode for scheduling jobs. Enabling and disabling this mode is controlled from global security settings. If the mode is enabled, job scheduling privileges are controlled by the settings in the individual user accounts.
•
•
If the global per-user authorization mode is disabled, all users can schedule jobs; the setting in the users's account is ignored.
By default, this mode is disabled which means all users can schedule jobs.
Allow Shared (Public) Reports
Prime Network also provides a global authorization mode for creating shared or public reports.When a report is public, all users can view the contents; reports are not filtered according to scopes or security privileges. Enabling and disabling this mode is controlled from global security settings. If the mode is enabled, all users can create shared reports.
This mode is disabled by default, which means no users can create public reports.
Create a Login Banner
You can create a message of the day or banner, which is displayed whenever a user logs into a GUI client or the gateway server. See Create a GUI Client Banner Message.
Create User Accounts and Device Scopes
Only a root user account created when you install Prime Network. The root user can then create accounts for other users. The settings in individual user accounts specify the GUI tasks the user can perform.
In addition, the devices a user can see and manage is determined by the device scopes that are assigned to their user account. Device scopes are groups of devices that can be configured and named according to your deployment needs. When you assign a device scope to a user's account, you also choose a security level for that scope. As the user role determines the GUI tasks a user can perform, the security level determines the tasks a user can perform on devices in the scope. Only one device scope is created by default, the All Managed Elements device scope.
For information on creating user accounts and device scopes, see User Authentication and Authorization Overview.
Set Up Regular Reports
Prime Network provides a robust report framework for generating common reports. You can also create new report templates that will provide the information you need for your deployment. You can schedule any of these reports to run at regular intervals. These are some examples of reports you can generate:
•
•
•
•
•
You can see all available reports from the Administration GUI client by choosing Reports > Run Report from the main menu. For more information, see the Cisco Prime Network 3.10 User Guide.
Use Prime Network with Cisco Prime Central
Prime Network can be installed as a standalone product or with Cisco Prime Central. When installed with Cisco Prime Central, you can launch Prime Network GUI clients from the Cisco Prime Portal. Cross-launch to and from other suite applications is also supported. The applications share a common inventory.
The Cisco Prime Portal uses a single sign-on (SSO) mechanism so that users need not re-authenticate with each GUI client. All session management features are controlled by the portal (such as client timeouts). If a user tries to log into a standalone GUI client, the user will be redirected to the portal login. The only exception is the emergency user, who will still be allowed to log into a standalone GUI client.
These Prime Network features are disabled in suite mode because they are controlled at the suite level:
•
•
•
Prime Network sends the suite regular information about Prime Network server health (ping, CPU usage, and memory usage). At hourly intervals, Prime Network checks the suite for any changes that should be reflected in Prime Network.
Keep these operational items in mind when using Prime Network with Cisco Prime Central:
•
•
Prime Network users will only be allowed to view reports if an additional session is configured in their Prime Central user management settings. This is because Prime Central gives Prime Network users one session by default, but the reports function requires an additional session.
•
–
–
No special configuration is required.
Prime Network also receives EPM-MIB traps from the network. By default Prime Network receives EPM-MIB traps from any source in the network. If desired, you can configure Prime Network to only process EPM-MIB traps arriving from a specific Prime Performance Manager server. The instructions for doing this are provided on the Cisco Developer Network at http://developer.cisco.com/web/prime-network/home.