
-
Cisco Active Network Abstraction User Guide, 3.7.1
-
Preface
-
Cisco ANA Client Overview
-
Working with the Cisco ANA NetworkVision Client
-
Viewing Network Element Properties
-
Working with Cisco ANA NetworkVision Maps
-
Working with Links
-
Working with Business Tags and Business Elements
-
Working with the Cisco ANA EventVision Client
-
Tracking Faults Using Cisco ANA EventVision
-
Working with Tickets in Cisco ANA NetworkVision
-
Working with Reports
-
Using Cisco ANA PathTracer to Diagnose Problems
-
Monitoring Carrier Ethernet Services
-
Monitoring Carrier-Grade NAT Properties
-
Monitoring DWDM Properties
-
Viewing Ethernet Operations, Administration, and Maintenance Tool Properties
-
IPv6 and IPv6 VPN over MPLS
-
Monitoring MPLS Services
-
Monitoring MToP Services
-
Viewing SBC Properties
-
Icon Reference
-
Index
-
Table Of Contents
Working with Cisco ANA NetworkVision Maps
User Roles Required for Working with Cisco ANA NetworkVision Maps
Opening a New Map from the Open Map Dialog Box
Deleting a Map from the Cisco ANA Database
Finding Elements Affected by a Ticket
Finding and Selecting Links in Maps
Finding a Network Device or Service
Grouping Network Elements into Aggregations
Filtering Links According to Type
Communicating with Devices Using Ping and Telnet
Working with Cisco ANA NetworkVision Maps
The topological map is the main tool used by Cisco ANA NetworkVision to display the links and relationships between the network elements and aggregated nodes. The following topics describe how to work with the topological maps displayed in the content pane of the Cisco ANA NetworkVision window:
•
User Roles Required for Working with Cisco ANA NetworkVision Maps
•
Deleting a Map from the Cisco ANA Database
•
Finding Elements Affected by a Ticket
•
Finding and Selecting Links in Maps
•
Finding a Network Device or Service
•
Filtering Links According to Type
•
Communicating with Devices Using Ping and Telnet
•
Previewing and Printing a Map
You can also perform the following functions from the map and list views if they are configured for your client. These are described in the Cisco Active Network Abstraction 3.7.1 Customization User Guide.
•
Launch external applications or tools, such as an SSH client.
•
Launch available activation and configuration scripts, including those you create using Command Builder. These scripts can be launched against multiple NEs at the same time.
User Roles Required for Working with Cisco ANA NetworkVision Maps
Table 4-1 identifies the roles that are required to work with Cisco ANA NetworkVision maps. Cisco ANA determines whether you are authorized to perform a task as follows:
•
For GUI-based tasks (tasks that do not affect devices), authorization is based on the default permission that is assigned to your user account.
•
For device-based tasks (tasks that do affect devices), authorization is based on the default permission that is assigned to your account. That is, whether the device is in one of your assigned scopes and whether you meet the minimum security level for that scope.
For more information on user authorization, see the Cisco Active Network Abstraction 3.7.1 Administrator Guide.
Table 4-1 Default Permission/Security Level Required for Working with Cisco ANA NetworkVision Maps
Add elements to a map
—
—
X
X
X
Create maps
—
—
X
X
X
Define a map layout
X
X
X
X
X
Delete maps
—
—
X
X
X
Group and ungroup aggregations
—
X
X
X
X
Preview and print maps
X
X
X
X
X
Remove elements from a map
—
—
X
X
X
Rename maps
—
—
X
X
X
Resize elements in a map
X
X
X
X
X
View maps1
X
X
X
X
X
Filter links
—
—
X
X
X
Find and select a link in a map
—
—
X
X
X
Open the CPU Usage Graph
—
—
—
—
X
Use Ping and Telnet to communicate with devices
—
—
—
—
X
1 A user with Viewer, Operator, OperatorPlus, or Configurator access can view objects in a map, but the objects are generic in their representation and are displayed with a locked icon on them.
Opening Maps
Cisco ANA provides two methods for opening maps:
•
You can open commonly used maps (if you left the maps open when you last exited Cisco ANA NetworkVision). See Opening Commonly Used Maps.
•
You can view all existing maps and choose the ones you want to open. See Opening a New Map from the Open Map Dialog Box.
For information on how to close a map, see Closing a Map.
When you open a map, the network information is automatically refreshed. For example, if a device was up the last time that the map was saved and closed, and then the device is moved to maintenance, the next time you open the map the management status of the device is updated accordingly and the device displays a maintenance status.
Opening Commonly Used Maps
When you launch Cisco ANA NetworkVision, it lists the maps you recently viewed but did not close when you exited the client session. This list of maps that you recently viewed prevents you from having to view the complete list of available maps, which can be quite lengthy.
Note
This list is not available to first-time users or users who closed their maps before closing the application.
To open a commonly used map that you did not close previously:
Step 1
Launch Cisco ANA NetworkVision as described in Starting Cisco ANA NetworkVision, page 2-2. The Cisco ANA NetworkVision window opens, and the Last Open Maps dialog box is displayed.
Step 2
Check the check boxes for the maps you want to open, and uncheck the check boxes for the maps you do not want to open.
Step 3
Click OK.
Opening a New Map from the Open Map Dialog Box
You can open any maps that are in the Open Map dialog box, even if you have never accessed them before.
To open a new map:
Step 1
Display the Open Map dialog box by doing one of the following:
•
Click Open Map in the main toolbar.
•
Choose File > Open.
The Open Map dialog box lists the existing maps.
The Find field enables you to search for a map containing the string that you enter. For more information, see Finding Text in a Table, page 2-41.
You can use the tools described in Table 4-2 to manage maps in the Open Map dialog box.
Table 4-2 Open Map Dialog Box Options
Export to CSV—Exports the information displayed in the table. For more information, see Exporting Tables to a File, page 2-45.
Delete Map—Deletes the selected map from the Open Map dialog box, the Cisco ANA NetworkVision window and the database. If a map that is opened is deleted, the map closes. For more information, see Deleting a Map from the Cisco ANA Database.
Rename Map—Renames the selected map in the Open Map dialog box and Cisco ANA NetworkVision window. For more information, see Renaming a Map.
Sort Table Values—Sorts the information displayed in the table.
Filter—Defines a filter for the information displayed in the table. For more information, see Filtering Table Contents, page 2-43.
Note
When a filter is applied, the Clear Filter button is activated.
Clear Filter—Clears the existing filter.
Show All Rows—Displays all table rows that meet the current filtering criteria.
Show Only Selected Rows—Displays only the rows that you select.
For more information, see Viewing Selected Rows, page 2-45.
Step 2
Select the maps you want to open using one of the following methods. You can select multiple maps by pressing Ctrl while you select individual maps.
•
Select the maps in which you are interested, and then click Open.
•
Right-click the required maps and choose Open.
•
Double-click the required maps.
Use the Window menu in the Cisco ANA NetworkVision window to move between the open maps. For more information on the Cisco ANA NetworkVision window, see Cisco ANA NetworkVision Window, page 2-4.
Note
By default you can view and work on a maximum of five maps at any given time in the Cisco ANA NetworkVision window. To change this default setting, contact your Cisco account representative. To create a new map or select a new map, close the required number of maps.
Closing a Map
When you close a map, Cisco ANA saves basic map information whether or not you manually save the map. This default information includes device and link additions, device and link removals, aggregations, and disaggregations. However, you must use the Save Map option if you want to retain the following information in the database:
•
The location of the devices on the map
•
The layout
•
Thumbnails
•
The size of the devices
To close a map:
Step 1
(Optional) To save more than the default map information, use one of the following methods:
•
Click Save Map Appearance in the main toolbar.
•
Choose File > Save Map from the main menu.
Step 2
Do one of the following:
•
Choose File > Close.
•
Click
in the upper right corner of the content pane.
If changes have been made to the map, an information message is displayed.
Step 3
Click Yes. The map is saved and closed. An empty Cisco ANA NetworkVision window is displayed, or the map that was last opened is displayed.
Creating a New Map
Cisco ANA NetworkVision enables you to create multiple network maps to represent specific network views. Views can cover specific network segments, customer networks, or any other mix of network elements desired. When you create a map, it is available to other users if they have sufficient access and security privileges.
The network maps provide a graphic display of active faults and alarms, and serve as an easy access point for activating services.
Keep the following in mind when creating a new map:
•
You cannot specify the same name for two or more maps.
•
If you use non-US characters for a map name, they are not displayed correctly in the navigation pane. However, the names are displayed correctly in the Window menu.
To create a new map:
Step 1
Do one of the following:
•
Click New Map in the main toolbar.
•
Choose File > New Map in the main menu.
The Create Map dialog box is displayed.
The Advanced button enables you to filter the links displayed in the map pane. For more information, see Filtering Links According to Type.
Step 2
Enter a name for the new map and click OK.
An empty new map is displayed in the navigation pane and map pane.
Step 3
Add elements to your new map as described in Adding Elements to a Map.
See the following topics for information on adding elements to and removing elements from a map:
Adding Elements to a Map
When you add a network element to a map, the map is automatically saved in the Cisco ANA database.
Note
Based on the security level and access permissions assigned, this option might not be available to all users.
To add a network element:
Step 1
Do one of the following:
•
Click Add to Map in the main toolbar, and then choose the required element.
•
Choose File > Add to Map > element.
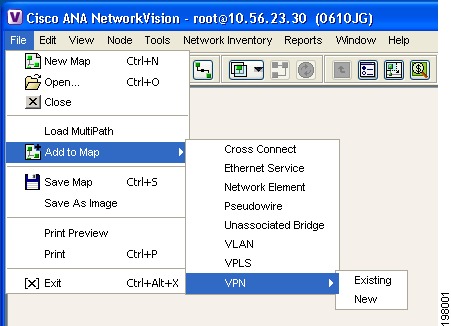
Figure 4-1 shows the elements available for adding to maps.
Figure 4-1 Available Elements to Add to Maps
Table 4-3 describes the types of elements that you can add to a map and the available search criteria for each type.
Table 4-3 Network Elements to Add to Maps
Cross-Connect
EFP cross-connects that can be added to the map.
The Search field allows you to search for an EFP cross-connect by name.
Ethernet Service
Ethernet services that can be added to the map.
The Search field allows you to search for an Ethernet Service by any of the following categories:
•
EVC-terminating EFPs
•
Name
•
System name
Network Element
Devices that can be added to the map.
The Search field allows you to search for a device by any of the following categories:
•
Element Category
•
Element Type
•
IP Address
•
Name
•
System Name
•
Vendor
Pseudowire
Pseudowires that can be added to the map.
The Search field allows you to search for a pseudowire by any of the following categories:
•
Description
•
Is Multisegment Pseudowire
•
Name
•
Pseudowire Type
•
System Name
Unassociated Bridge
Unassociated bridges that can be added to the map.
The Search field allows you to search for unassociated bridges by name.
VLAN
VLANs that can be added to the map.
The Search field allows you to search for a VLAN by any of the following categories:
•
Ethernet Flow Domain
•
ID
•
Name
VPLS
VPLS instances that can be added to the map.
The Search field allows you to search for a VPLS instance by name.
VPN > Existing
Existing VPNs that can be added to the map.
The Search field allows you to search for a VPN by either of the following categories:
•
Description
•
Name
VPN > New
Opens the Create VPN dialog box so that you can create a new VPN to add to the map.
For information on creating a VPN, see Creating a VPN, page 17-6.
After you select the required type of element, the Add element to map dialog box is displayed. For example, if you are adding a pseudowire to a map named CompanyEast, the dialog box is named Add Pseudowire to CompanyEast.
Step 2
In the Add element dialog box, do either of the following:
•
To search for specific elements:
a. In the Search field, choose a search category.
b. Enter a search string to narrow the display to a range of elements or to a specific element. Table 4-3 identifies the search categories available for each type of element.
c. Click Go.
For example, if you choose IP Address and enter 254, the network elements that have IP addresses beginning with 254 are displayed. If you choose Vendor and enter Cisco, only Cisco network elements are displayed.
•
To view all available elements, choose Show All and click Go.
Note
If you choose Show All and the number of elements for that type is large, it might take a while for all elements to be displayed.
The available elements that meet the specified search criteria are displayed in the Add element dialog box in table format. The dialog box also displays the date and time at which the list was generated. To update the list, click Refresh.
Note
If a network element is not included in your scope, it is displayed with the locked device icon.
For information about sorting and filtering the table contents, see Working with Cisco ANA Tables, page 2-40.
Step 3
In the Add element dialog box, select the elements that you want to add. You can select and add multiple elements by pressing Ctrl while selecting individual network elements or by pressing Ctrl +Shift to select a group of elements.
Step 4
Click OK.
If you selected more than 25 business elements (such as VLANs or VPLS instances) to add, a message is displayed, stating that the action can take a while to complete and asking if you want to continue. Click OK to continue or Cancel to change your selection.
The elements are displayed in the navigation pane and content area. In addition, any associated tickets are displayed in the ticket pane.
The network element information is saved with the map in the Cisco ANA database.
Removing Elements from a Map
When you delete an element or aggregated node from a map, it is removed from the map in the database, but the elements are still managed by Cisco ANA.
Note
Based on the security level and access permissions assigned, this option might not be available to all users.
To remove a network element or aggregated node from a map:
Step 1
In the navigation pane or map, select the network element or aggregated node that you want to delete.
Step 2
Right-click to display the shortcut menu and choose Remove from Map. The selected network element or aggregated node is removed from the map.
The network element is removed from the map in the database, but is still managed by Cisco ANA and can be added again.
Defining a Map Layout
Cisco ANA NetworkVision enables you to select the way in which the network object topology is displayed. The map view displays the objects in the selected layout: circular, symmetric, tree, or hierarchical.
You can select the map layout by using either of the following methods:
•
In the toolbar, click the drop-down list next to the Layout Map button, and choose one of the options.
•
Choose View > Layout from the main menu and select one of the layout options.
By default, Cisco ANA uses the circular layout for maps. If you click Layout Map in the main toolbar, Cisco ANA displays the map according to the option last selected.
Saving Maps
Cisco ANA provides three options for saving maps:
•
To save more map information than Cisco ANA saves by default, see Saving a Map with Information.
•
To save a copy of a map so you can use it as a template for another map, see Saving a Map as a New Map.
•
To save a map as an image, see Saving a Map as an Image.
Saving a Map with Information
By default, Cisco ANA saves basic map information whether or not you manually save the map. This default information includes device and link additions, device and link removals, aggregations, and disaggregations. However, you must use the Save Map option if you want to retain the following information in the database:
•
The location of the devices on the map
•
The layout
•
Thumbnails
•
The size of the devices
To save these changes, do one of the following:
•
Click Save Map Appearance in the main toolbar.
•
Choose File > Save Map.
Saving a Map as a New Map
You can save a copy of an entire map or parts of a map (such as specific devices and aggregations) while leaving the original map intact.
To save a map as a new map:
Step 1
Make sure that the map that you want to save is displayed in the Cisco ANA NetworkVision content pane.
Step 2
Select the required map, elements, or aggregated nodes in the navigation tree or the map.
Step 3
Right-click in the navigation pane or one of the selected items in the map pane, and choose Save as New Map.
Step 4
In the Create Map dialog box, enter a new name for the map.
Step 5
Click OK. The new map is created.
Note
For information about opening the new map, see Opening a New Map from the Open Map Dialog Box.
Saving a Map as an Image
To save a map as an image:
Step 1
Display the required map in Cisco ANA NetworkVision.
Step 2
Choose File > Save As Image from the main menu.
Step 3
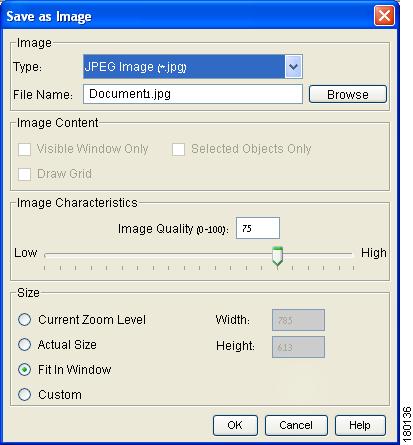
In the Save as Image dialog box, define the image characteristics as described in Table 4-4.
Figure 4-2 Save as Image Dialog Box
Step 4
Click OK. The map is saved as an image in the directory you specified.
Deleting a Map from the Cisco ANA Database
Cisco ANA NetworkVision enables you to delete a map from all the views in the Cisco ANA NetworkVision window.
If another client is using a map that you are deleting, Cisco ANA displays a message to those clients advising them that the map is being closed and deleted from the database.
To delete a map from Cisco ANA NetworkVision and the Cisco ANA database:
Step 1
Open the Open Map dialog box in one of the following ways:
•
Click Open Map in the main toolbar.
•
Choose File > Open from the File menu.
Step 2
In the Open Map dialog box, complete the following steps:
a.
In the Open Map dialog box, select the map that you want to delete.
b.
In the toolbar, click Delete Map. A confirmation message is displayed.
c.
Click Yes. The selected map is deleted from the Open Map dialog box, the Cisco ANA NetworkVision window, and the database.
d.
Click Cancel to close the Open Map dialog box.
Renaming a Map
Cisco ANA NetworkVision enables you to rename a map that is displayed in the Cisco ANA NetworkVision window. The name change affects all users of the map and the new name is displayed in the Cisco ANA NetworkVision window of all users.
To rename a map:
Step 1
Do one of the following:
•
Click Open Map in the main toolbar.
•
Choose File > Open from the main menu.
Step 2
In the Open Map dialog box, select the map that you want to rename.
Step 3
Click Rename Map in the toolbar.
Step 4
Enter the new map name.
Step 5
Click OK. The selected map is renamed in the Open Map dialog box, in the Cisco ANA NetworkVision window, and in the database.
Step 6
Click Cancel to close the Open Map dialog box.
Resizing a Map Element
Cisco ANA NetworkVision enables you to define the size of selected devices or aggregated nodes in the map view, according to predefined sizes or according to a percentage of the current size.
Note
You can manually resize a node by selecting it and dragging the corner (handle).
To resize a device or aggregated node:
Step 1
In the map, select the devices or aggregated node that you want to resize.
Note
The Resize option is enabled only when devices or aggregated nodes are selected. Links cannot be resized.
Step 2
Do one of the following:
•
Choose Edit > Resize from the main menu.
•
Right-click the selected devices or aggregated node in the map, and choose Resize.
Step 3
In the Resize Nodes Controller dialog box, set the size of the devices or nodes:
•
In the Resize Node field, select a resizing percentage from the drop-down list.
•
In the Set Nodes Sizes field, select a fixed size from the drop-down list.
Step 4
Click OK. The selected devices or aggregated node are resized.
Viewing the Network Map
Cisco ANA NetworkVision enables you to display the entire network map or any part of the map in the Cisco ANA NetworkVision map view.
Use the Zoom tools or the Overview window to display the part of the map that you require. Viewing the Overview window enables you to see all the changes and alarms taking place in the network. In addition, you can display an aggregated node in a thumbnail.
Viewing a Network Overview
To open an overview of the network:
Step 1
Do one of the following:
•
Click Overview in the main toolbar.
•
Choose View > Overview from the main menu.
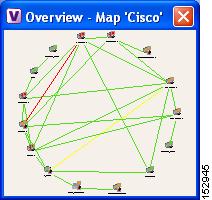
Figure 4-3 Overview Window
Step 2
In the Overview window, select the required area by clicking and dragging the mouse, thereby enlarging it in the map pane. A blue rectangle is displayed around the selected area. You can move the selected area by placing the mouse within the rectangle. The mouse icon changes to a hand, and you can then click and drag the mouse to move the rectangle over the required area.
Step 3
Click and drag the rectangle again to select or resize a different network area.
Step 4
Click the upper right corner to close the Overview window.
Viewing an Aggregated Node Thumbnail
In addition, you can display a thumbnail of the selected aggregated node in the map pane, including all aggregated devices. Thumbnails can also be nested.
To display a thumbnail of the node:
Step 1
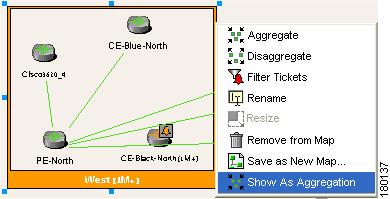
Right-click an aggregated node, and choose Show Thumbnail. The thumbnail is displayed in the map pane.
Figure 4-4 Thumbnail
Step 2
From here you can do the following:
•
To redisplay the aggregated node in the map, right-click the thumbnail frame and choose Show As Aggregation.
•
To resize the thumbnail, select the thumbnail frame and then click and drag any of the thumbnail handles.
Viewing a Network Device
To view a network device, select the device in the navigation tree or in the map. You can:
•
Use the Zoom tools when viewing the network (see Cisco ANA NetworkVision Toolbar, page 2-22).
•
Click Overview in the main toolbar to display the network in the Overview window.
For more information, see:
•
Finding a Network Device or Service
•
Chapter 3, "Viewing Network Element Properties"
Selecting Map Views
Cisco ANA NetworkVision provides you with various selection and display tools that can be used to view and analyze maps in the content area.
You can view graphical representations of NEs and various links that appear in the map view in the Cisco ANA NetworkVision content area by using the toolbar buttons.
The Show List View and Show Links View icons open dynamic tables that present network element information, device information, and respective map context links.
Table 4-5 identifies and describes the tools that you can use to view and manipulate maps in the Cisco ANA NetworkVision content area.
To select a tool, do one of the following:
•
From the View menu, choose the required selection tool.
•
In the toolbar, click the required tool icon.
Finding Elements Affected by a Ticket
Cisco ANA NetworkVision enables you to find the elements that might be affected by a ticket displayed in the ticket pane.
To find elements affected by a ticket:
Step 1
In the ticket pane, right-click the required ticket and choose Find Affected Elements. Depending on the number of affected elements, the information is displayed in one of the following ways:
•
If only one element is affected, the affected element is selected in the navigation pane and the content area.
•
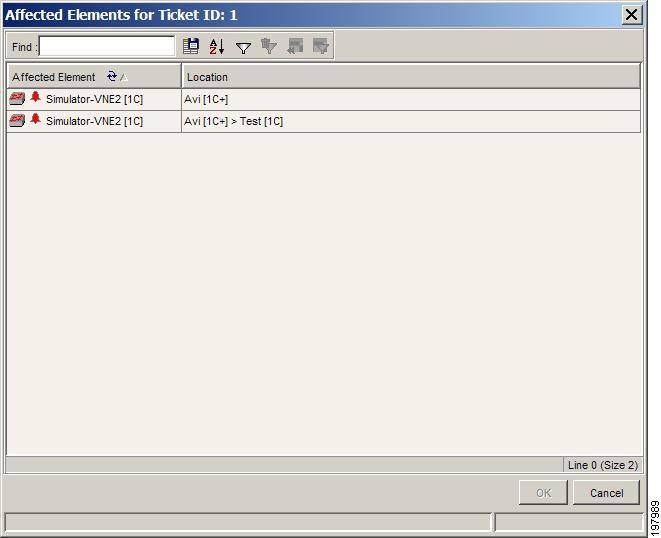
If two or more elements are affected, the affected elements are displayed in the Affected Elements window as shown in Figure 4-5.
Figure 4-5 Affected Elements Window
Step 2
Do one of the following, as appropriate:
•
Click in the navigation pane or the map pane to remove the highlight from the selected device or link.
•
Close the Affected Elements table.
Finding and Selecting Links in Maps
Cisco ANA NetworkVision enables you to find a specific link and select it in the map pane.
To find and select a link:
Step 1
In the Links view, right-click the required link and choose Select Link in Map.
The link is highlighted in the map pane.
Step 2
If two or more lines represent the same link (such as a VRF link), the Select Link Context dialog box is displayed. Select the required link context from the drop-down list and click OK. The link is highlighted in the map pane.
Step 3
Click in the content area to remove the highlight from the selected link.
For more information about links in Cisco ANA NetworkVision, see Chapter 5, "Working with Links."
Finding a Network Device or Service
Cisco ANA NetworkVision enables you to find a device or service (such as a VPN or VLAN) in the map by entering the device or service name, the device IP address, or any part of the name or IP address.
To find a device or service in a map:
Step 1
Do one of the following:
•
Click Find in the main toolbar.
•
Choose Edit > Find in Map from the main menu.
Step 2
In the Find in Map dialog box, enter the device name or the IP address.
Note
You can enter a partial name (case sensitive) or IP address. For example, entering XY finds devices or services with names containing the letters XY.
The Search all map levels check box enables you to search for a device, name, or IP address at all levels of the map. When disabled, this option searches for the device or service, but excludes aggregations from the search. This option is disabled by default.
Step 3
Check or uncheck the Search all map levels check box, as required.
Step 4
Click OK. A device or service matching the search criteria is displayed on the map.
Step 5
Continue searching using the following methods:
•
To view the next device or service that matches the search criteria, click Find Next in the toolbar or press F3.
•
To view the previous device or service that matches the search criteria, click Find Previous in the toolbar or press Shift + F3.
Working with Overlays
Cisco ANA NetworkVision enables you to apply overlays to a map and thus isolate the parts of a network that are being used by a specific service.
The following topics discuss the overlay options in more detail:
Applying an Overlay
To apply an overlay:
Step 1
In Cisco ANA NetworkVision, choose the map in which you want to apply an overlay.
Step 2
From the toolbar, choose Choose Overlay Type > overlay-type where overlay-type is one of the following options:
With the exception of the None option, a dialog box is displayed that allows you to select the specific overlay to apply.
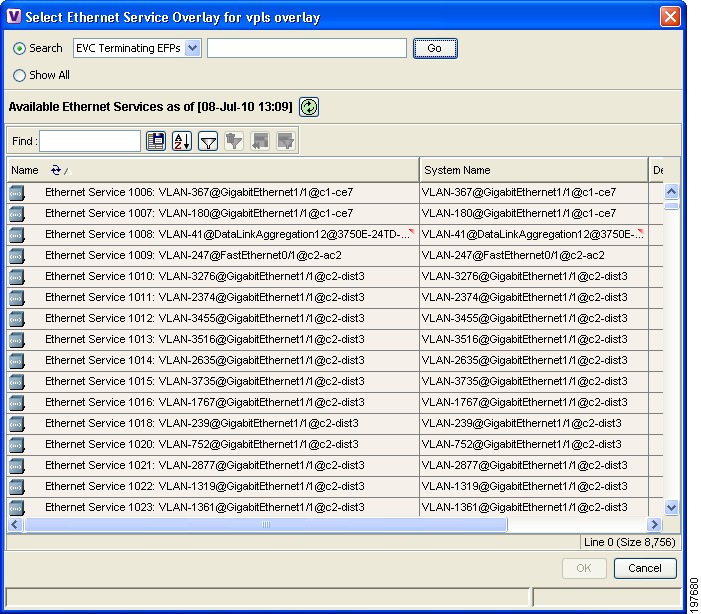
Figure 4-6 shows an example of the Select Ethernet Service Overlay dialog box.
Figure 4-6 Select Overlay Dialog Box
Each overlay type allows you to search for specific overlays. Table 4-6 identifies the fields you can search for each overlay type.
Step 3
In the Select Overlay dialog box, do either of the following:
•
To search for specific overlays:
a. In the Search field, choose a search category.
b. Enter a search string to narrow the display to a range of overlays or to a specific overlay. Table 4-6 identifies the search categories available for each type of overlay.
c. Click Go.
Search strings are case-insensitive. If you choose Name and enter NET, the overlays that contain "net" in their names are displayed. If you choose System Name and enter System123, only the overlay with the system named System123 is displayed.
•
To view all available overlays, choose Show All and click Go.
The available overlays that meet the specified search criteria are displayed in the Select Overlay dialog box in table format. The dialog box also displays the date and time at which the list was generated. To update the list, click Refresh.
Step 4
Select the overlay that you want to apply to the map.
The elements and links that are used by the overlay are displayed in the map, and the overlay name and date are displayed in the toolbar.
Note
The overlay is a snapshot taken at a specific point in time and does not reflect changes that occur in the service. As a result, the information in an overlay can become stale. To update the overlay, click Refresh Overlay in the toolbar.
Hiding or Viewing an Overlay
When an overlay is applied to a map, the Show Overlay/Hide Overlay button becomes active in the toolbar.
To hide and view the overlay, click Hide Overlay/Show Overlay in the toolbar. The button toggles depending on whether the overlay is currently displayed or hidden.
Removing an Overlay
To remove an overlay, choose Choose Overlay Type > None. The overlays are removed from the map.
Working with Aggregations
Cisco ANA NetworkVision enables you to group network elements and display them as an aggregated node. Aggregations can contain devices, VPNs, other aggregated nodes, and so forth.
For more information, see the following topics:
•
Grouping Network Elements into Aggregations
Grouping Network Elements into Aggregations
To aggregate network elements:
Step 1
Select the network elements using one of the following methods:
•
Select a single item in the map pane or navigation tree.
•
Select multiple items in the map pane or navigation tree while pressing Ctrl.
Step 2
Aggregate the network elements using one of the following methods:
•
Choose Node > Aggregate from the main menu.
•
Right-click in the navigation pane or map pane and choose Aggregate.
Step 3
In the Aggregation dialog box, enter a unique name for the aggregated node and click OK. The aggregated node is displayed in the navigation pane and the map pane. Aggregated nodes are displayed as a single entity with the Aggregation icon.
The aggregated node icon changes color according to the alarm severity. For more information about device colors, see Network Element Status Indicators, page 2-17.
Ungrouping Aggregated Nodes
All aggregated nodes can be ungrouped. If the node you disaggregate contains any child aggregations, the child aggregations move up one level, and the original aggregated node is removed.
If an element in the aggregation that you ungroup also exists at the parent level, the element is represented only once after the aggregated node is ungrouped. As a result, no elements are represented twice at the same level.
To disaggregate a node:
Step 1
Select the required aggregation in Cisco ANA NetworkVision.
Step 2
Disaggregate the node using one of the following methods:
•
Choose Node > Disaggregate from the main menu.
•
Right-click the aggregated node in the navigation tree or map pane and choose Disaggregate.
If the aggregation contains elements that already exist at the parent level, a confirmation message is displayed, stating that any duplicate elements will be removed.
Step 3
Confirm the disaggregation.
The node is disaggregated. Any aggregations in the selected node move up one level, and the original aggregated node is removed.
For more information about resizing an aggregated node, see Resizing a Map Element.
Renaming Aggregated Nodes
You can rename aggregated nodes that are displayed in Cisco ANA NetworkVision. The name change affects all users of the map, and the new name is displayed in the Cisco ANA NetworkVision window of all users.
To rename an aggregated node:
Step 1
Select the aggregated node that you want to rename in the navigation tree or the map.
Step 2
Right-click the aggregated node and choose Rename.
Step 3
In the Rename Node dialog box, enter a new name for the aggregated node and click OK. The selected aggregated node is renamed in the navigation tree, map pane, and database.
Filtering Links According to Type
The links filter enables you to filter the links displayed in the map view and the links view.
You can quickly select the types of links to be filtered by selecting from a predefined set of link types in the list, or by manually configuring a customized set of link types. You can do either of the following:
•
(Method 1) Create a new map, select a filter and then add the devices to the map. This filter is applied to the new map and only the required link types are visible in the map view and the links view.
•
(Method 2) Create a map and add the devices with all links enabled and visible in the map view and links view. You can then filter (display or hide) the different types of links as required.
The links filter applies to all aspects of Cisco ANA NetworkVision: the map view, links view, ticket pane, severity calculation, and other items, such as memory consumption and thresholds. Cisco ANA NetworkVision holds only the links that are relevant to the filter and synchronizes the links with the gateway according to that filter.
For more information about links in Cisco ANA NetworkVision, see Chapter 5, "Working with Links."
Method 1
To filter links according to type (method 1):
Step 1
Open the Create Map dialog box using one of the following methods:
•
Click New Map in the main toolbar.
•
Choose File > New Map from the main menu.
The Create Map dialog box is displayed. For more information, see Creating a New Map.
Step 2
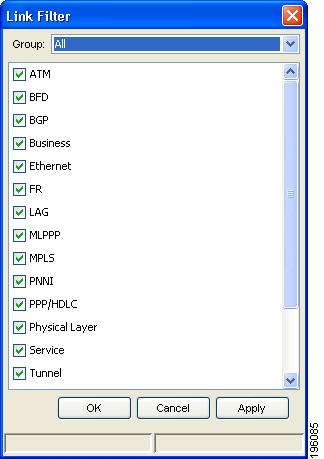
Click Advanced. The Link Filter dialog box is displayed.
Figure 4-7 Link Filter Dialog Box
The Link Filter dialog box displays a list of all the types of links that you can filter in the map view and links view.
Note
By default all link types are selected in the Link Filter dialog box. That is, all links are displayed in the map view and links view.
Step 3
Select the required option from the Group drop-down list:
•
All—All the links are displayed in the map view and links view.
•
Custom—Only the links defined for the customized filter are displayed in the map view and links view.
•
Data Link—The data link layer class of links (ATM and Frame Relay) is displayed in the map view and links view.
•
None—None of the links are displayed in the map view and links view.
•
Physical—Only the physical links are displayed in the map view and links view.
•
VPN—Only the VPN links are displayed in the map view and links view.
Note
You can customize the Group drop-down list options by selecting an option and adding or removing the required link types. The next time the Link Filter dialog box is opened, the Custom option is displayed with the specified link types.
Step 4
Check the check boxes for the links that you want to display in the map view and links view. Uncheck the check boxes for the links you do not want to display in the map view and links view.
Step 5
Click Apply to apply the defined link filter settings and continue with more selections.
Step 6
Click OK when you have completed your selections.
Step 7
In the Create Map dialog box, enter a name for the new map and click OK. An empty new map is displayed in the navigation pane and content area.
Step 8
Add the required devices to the map. For more information, see Creating a New Map.
The links are displayed in the map view and links view according to your selections.
Method 2
You can also create a map and add the devices with all the links enabled and visible in the map view and links view. You can then filter (display or hide) the different types of links as required.
To filter links according to type (method 2):
Step 1
Click Link Filter in the main toolbar.
Step 2
In the Link Filter dialog box, uncheck the check boxes for the links that you do not want to display in the map view and links view.
Step 3
Click Apply to apply the defined link filter settings and continue with more selections.
Step 4
Click OK when you have completed your selections.
The links are displayed in the map view and links view according to the defined filter.
Opening the CPU Usage Graph
Cisco ANA NetworkVision enables you to display memory and CPU usage information for a device or network element, including its history.
To open the CPU usage graph:
Step 1
Right-click a network element in the navigation tree and choose Tools > CPU Usage.
The CPU Usage dialog box displays the following information:
•
CPU Usage—The CPU usage rate as a percentage.
•
CPU Usage History—The CPU usage rate history is graphically displayed.
•
Memory Usage—The memory usage rate as a percentage.
•
Memory Usage History—The memory usage rate history is graphically displayed.
Step 2
If desired, click Save to CSV File to export the displayed data. For more information, see Exporting Tables to a File, page 2-45.
Step 3
Click the upper right corner to close the CPU Usage dialog box.
Communicating with Devices Using Ping and Telnet
Cisco ANA NetworkVision enables you to communicate with devices in the following ways:
Pinging a Device
Cisco ANA NetworkVision enables you to ping a device to verify that the device is responding.
Note
The ping is performed from the client to the device, and not from the Cisco ANA unit hosting the VNE to the device.
To ping a device, right-click a device in the navigation tree or map, and choose Tools > Ping.
Telneting a Device
Cisco ANA NetworkVision enables you to communicate with a device using the Telnet window.
Note
The telnet is performed from the client to the device, and not from the Cisco ANA unit hosting the VNE to the device.
To telnet a device:
Step 1
Right-click a device in the navigation tree or map, and choose Tools > Telnet.
Step 2
Log in and use the Telnet window as needed.
Previewing and Printing a Map
To print a map, choose File > Print. If you would like to preview a map before printing it, or define the print setup for a map, see the following topics:
•
Previewing a Map Before Printing It
•
Defining the Print Setup for a Map
Previewing a Map Before Printing It
Using Cisco ANA NetworkVision, you can preview a map before printing it.
To preview a map:
Step 1
In Cisco ANA NetworkVision, display the map that you want to print.
Step 2
From the main menu, choose File > Print Preview. The Print Preview dialog box is displayed with the active map.
The following buttons are displayed in the Print Preview dialog box:
Prints the displayed network or map to the selected printer.
Print Setup
Opens the Print Setup dialog box, enabling you to define how the network or map is printed. For more information, see Defining the Print Setup for a Map.
Zoom In
Zooms in on the network or map.
Zoom Out
Zooms out of the network or map.
Zoom %
Zooms in to get a close-up view of your network or map or zooms out to see more of the network or map at a reduced size. Use the drop-down list to choose the zoom setting that you want.
Fit In Window
Displays the entire network or map in the Print Preview dialog box.
Close
Closes the Print Preview dialog box.
Step 3
Click Print. The required map is printed to the selected printer.
Defining the Print Setup for a Map
Cisco ANA NetworkVision enables you to define the print setup of a map before it is printed.
To define the print setup:
Step 1
From the main menu, choose File > Print Preview to open the Print Preview dialog box.
Step 2
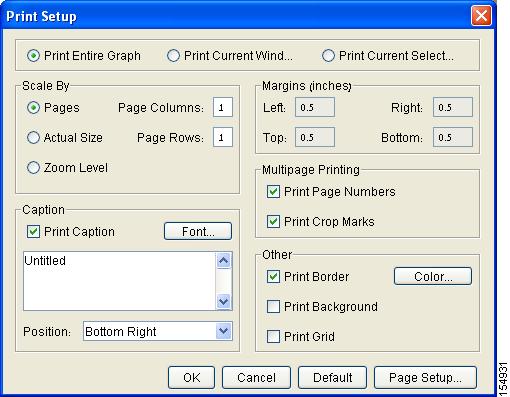
Click Print Setup. The Print Setup dialog box is displayed.
Figure 4-8 Print Setup Dialog Box
Step 3
Define the print setup, using the information in Table 4-7.
Step 4
Click OK to save your settings, or Default to restore the default settings.
The Print Preview dialog box is refreshed with the current settings.
Step 5
If you are satisfied with your settings, click Print. Otherwise, click Print Setup and revise your settings.

 Feedback


