-
Cisco Active Network Abstraction Administrator Guide, 3.6
-
Introducing Cisco ANA
-
Getting Started With Cisco ANA Manage
-
Deploying Cisco ANA
-
Using Cisco ANA Manage Tables
-
Managing Cisco ANA Units
-
Managing AVMs and VNEs
-
Managing Global Settings
-
Managing Links
-
Managing Workflows
-
Managing Security
-
Database Backup and Restore
-
Utility Scripts
-
Golden Source Registry
-
Ports Used By Cisco ANA
-
Drools Rules Engine
-
VNE Persistency Mechanism
-
Index
-
 Feedback
Table Of Contents
Getting Started With Cisco ANA Manage
Cisco ANA Manage Window Workspace
Cisco ANA Manage Window, Menus and Toolbars
ANA Server Entities Branch Menus
ANA Server Entities Branch Toolbar
Client Licenses Branch Menus and Toolbar
Polling Groups Branch Menus and Toolbar
Protection Groups Branch Menus and Toolbar
Getting Started With Cisco ANA Manage
This chapter describes the Cisco ANA Manage working environment and how to access Cisco ANA Manage tools and commands. It also provides instructions for launching, and overviews operating Cisco ANA Manage application-using menu and toolbar options.
The Cisco ANA Manage window provides access to all Cisco ANA Manage's functionality.
•
Starting Cisco ANA Manage—Describes how to open the Cisco ANA Manage window.
•
•
•
Starting Cisco ANA Manage
Cisco ANA Manage is password protected to ensure security, and is only available to users with administrator privileges. Before you start working with Cisco ANA Manage, make sure you know the username, password and the Cisco ANA gateway IP address or hostname that you require.
Note
To start Cisco ANA Manage:
Step 1
It is recommended that you change the login password after logging in for the first time.
The last four Cisco ANA gateways to which the user logged in successfully are displayed in the Host dropdown list. The list is displayed in chronological order with the most recent gateway displayed at the top of the list.
Step 2
or
Choose a Cisco ANA gateway from the Host dropdown list.
Note
Note
Step 3
Note
The Cisco ANA Manage Window
The Cisco ANA Manage window is displayed below.
Figure 2-1 Cisco ANA Manage Window
The Cisco ANA Manage window includes:
•
•
Dragging the borders in the window adjusts the size of each area.
Tree Pane
The tree pane displays a tree-and-branch representation of the Cisco ANA Manage folders. The branches can be expanded and collapsed in order to display and hide information as needed.
Cisco ANA Manage enables the user to manage and maintain information in Cisco ANA using the following branches in the Cisco ANA Manage window:
•
•
–
–
–
–
–
For more information, see Global Settings Branch.
•
•
•
•
Click on a branch in the tree pane to view information relating to the selected branch in the workspace. Right-click on a branch in the tree pane to open a shortcut menu to perform various functions.
The following icons are displayed in the Cisco ANA Manage window:
Note
Cisco ANA Manage Window Workspace
The workspace pane displays the Cisco ANA Manage information according to the branch selected in the tree pane. The workspace is divided into two parts. The upper pane displays the properties of the element that is selected in the tree pane; the table in the lower pane displays its nested children.
Note
The status bar displays the number of selected rows and the total number of rows in the table, for example, 6/6 Selected. It also displays the location of the selected rows in the table, for example, Line 2.
Table Toolbar
Whenever a table forms part of the workspace, the same toolbar is displayed, no matter which branch is selected in the tree pane.
Table 2-2 Table Toolbar Tools
Export to CSV—Save the current working environment as a file in Cisco ANA. See Exporting the Table To a File, page 4-5.
Sort Table Values—Sort the information displayed in the table, for example, according to status or IP address.
Filter—Define a filter on the information displayed in the table of the workspace using the Filter dialog box. See Filtering Information, page 4-2.
Note
Set Selection Filter—Apply filters to the selected line or lines.
Note
Previous Selection Filter—Undo the last applied filter selection.
Rewind All—Undo all previous applied filter selections, and return all the originally displayed data to the table displayed in the workspace.
Note
Opens the Cisco ANA Manage online help.
For details about choosing lines and applying filters, see Filtering Information, page 4-2 and Setting Selection Filters, page 4-3.
The Find field is used to search for information relating to the branch selected in the tree pane. See Finding Text In a Table, page 4-2.
Cisco ANA Manage Window, Menus and Toolbars
This section provides a detailed description of the information displayed in the Cisco ANA Manage window depending on the branch selected, the menus, and the toolbars.
For specific information about each branch, refer to:
•
ANA Servers Branch
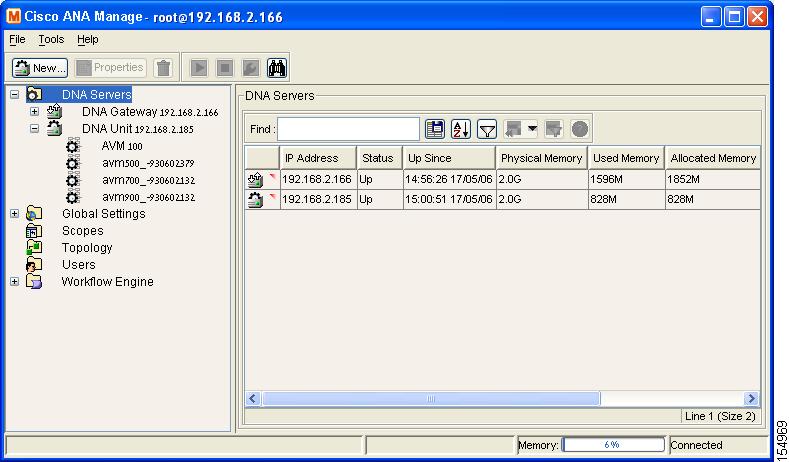
Cisco ANA Manage maintains a list of all the servers defined in the system. The ANA Servers branch is used to add and remove unit servers.
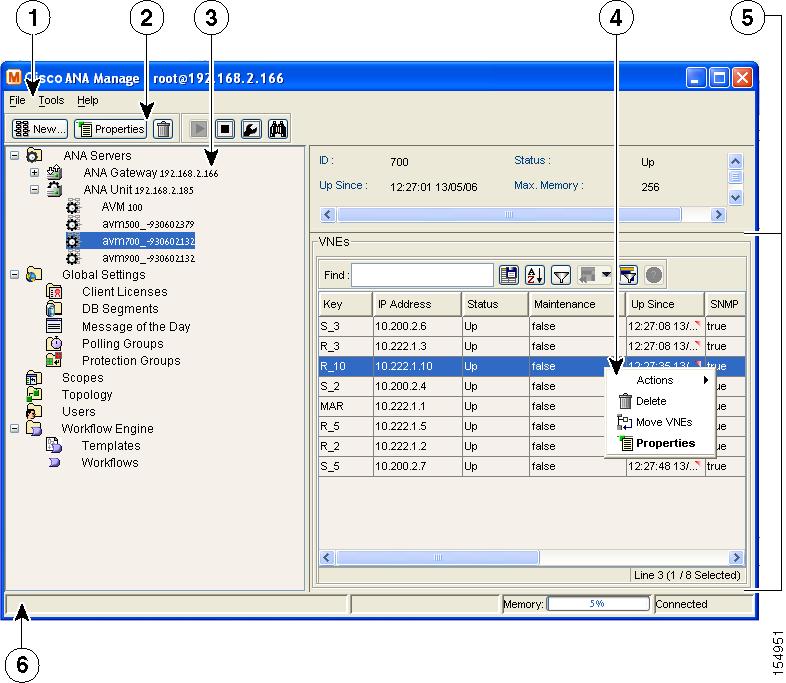
You can expand this branch to view a list of the units, gateway and AVMs. Each gateway, unit and AVM has its own sub-branch. The ANA Servers branch (and associated sub-branches) is used to manage information relating to the AVMs and VNEs contained in the units.
Note
The ANA Servers branch is displayed below.
Figure 2-2 ANA Servers Branch
The ANA Servers branch contains the following sub-branches:
For more information about the ANA Server menu and toolbar options:
The workspace area displays a list of all the gateway and units and their status. Clicking on a column heading in the table in the workspace sorts the units in ascending or descending order according to the selected column.
Note
The following columns are displayed in the table in the workspace:
•
•
–
–
–
•
•
•
•
•
•
For more information about the ANA Servers branch, see Chapter 5, "Managing Cisco ANA Units".
ANA Servers Branch Menus
This section provides a description of each option available in the menus when the ANA Servers branch is selected. The following menus are available:
File Menu
The File menu is displayed.
New ANA Unit
Creates a new unit.
Exit
Exits Cisco ANA Manage. See Logging Out.
Tools Menu
The Tools menu is displayed.
Change User Password
Enables the user to change the password used when logging into the client application suite. The change will take effect the next time the user logs into the application. The Tools menu option is the same throughout the application.
Help Menu
The Help menu is displayed.
The Help menu enables the user to access online help about the application and to also display application information, for example, the version number. The Help menu options are the same throughout the application.
Tree Pane Menu
When the user right-clicks on the ANA Servers branch the menu is displayed.
New ANA Unit
The user can add a new unit to the servers.
Workspace Shortcut Menu
When the user right-clicks on a selected unit the following shortcut menu (and sub-menu, when required) options are displayed.
New AVM
Adds an AVM to the selected unit. See Creating AVMs, page 6-1.
Properties
Displays the ANA Unit Properties dialog box. This dialog box lists the properties of the selected unit and indicates its status. See Editing Cisco ANA Unit Properties, page 5-4.
Delete
Deletes the selected unit.
Move VNEs
Move a VNE between AVMs. Actions can be performed on a single VNE or multiple VNEs.
ANA Servers Branch Toolbar
The ANA Servers branch contains the following toolbar options:
For more information about the ANA Servers branch, see Chapter 5, "Managing Cisco ANA Units".
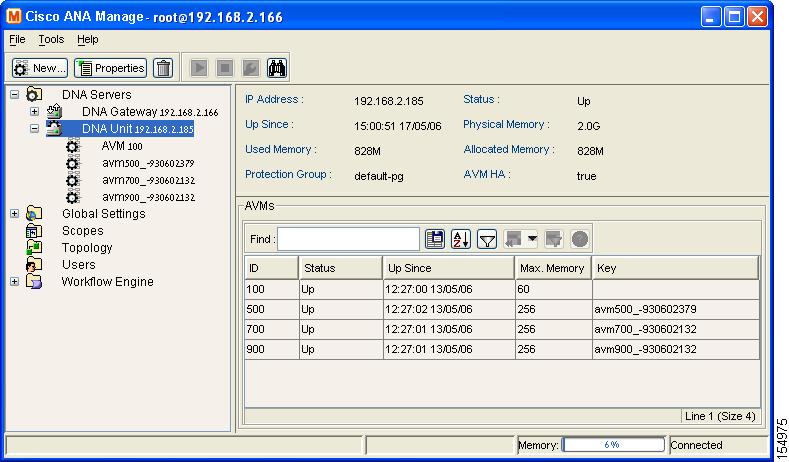
ANA Server Entities Branch
The ANA Server Entities sub-branch includes the ANA Gateway and ANA Unit sub-branches. All the options described here refer to both sub-branches.
The ANA Server Entities sub-branch enables the user to manage information relating to the AVMs and VNEs on a selected unit. These include:
•
•
•
•
•
•
An example of the Cisco ANA Manage window when a ANA Servers Entity sub-branch is selected is displayed below.
Figure 2-3 ANA Servers Entity Sub-Branch
Each row in the table in the workspace enables the user to view the status of an AVM. The AVMs can be sorted in ascending or descending order by clicking on the column heading in the table.
Note
The following columns are displayed in the workspace table for the AVMs that are listed or running under the server entity:
•
•
–
–
–
–
–
•
•
•
For more information about specific menu and toolbar options, see:
•
•
ANA Server Entities Branch Menus
This section provides a description of each option available in the menus when the ANA Server sub-branch is selected. The following menus are available:
File Menu
The File menu is displayed.
New AVM
Adds an AVM to the selected unit. See Creating AVMs, page 6-1.
Properties
Displays the ANA Unit Properties dialog box. This dialog box lists the properties of the selected unit and indicates its status. See Editing Cisco ANA Unit Properties, page 5-4.
Exit
Exits Cisco ANA Manage. See Logging Out.
Tree Pane Shortcut Menu
When the user right-clicks on the ANA Server Entities sub-branch in the tree pane the following shortcut menu is displayed.
New AVM
Adds an AVM to the selected unit.
Properties
Displays the properties of the selected unit.
Switch
This option is available when high availability is enabled and is only available for units. Manually switch to the standby unit. For more information, refer to the Cisco Active Network Abstraction High Availability User Guide.
Delete
Deletes the selected unit.
Workspace Shortcut Menu
New VNE
Creates a VNE for the selected AVM. See Creating AVMs, page 6-1.
Note
Actions
Starts or stops an AVM. See Starting and Stopping AVMs, page 6-5.
Delete
Deletes an AVM from the server.
Note
Move AVM
Move an entire AVM between units. See Moving AVMs, page 6-6.
Note
Properties
Displays the properties of the selected AVM.
ANA Server Entities Branch Toolbar
When the ANA Server Entities sub-branch is selected in the tree pane the following tools are displayed on the toolbar:
Table 2-4 ANA Server Entities Tools
Creates a new AVM in the selected unit or gateway.
Displays the server properties and status.
Deletes the selected unit.
Search for a AVM/VNE amongst the Cisco ANA servers.
Note
For more information on the ANA Servers Entity sub-branch, see Chapter 6, "Managing AVMs and VNEs".
AVM Branch
The AVM sub-branch enables the user to manage information relating to the VNEs in a selected AVM. This includes:
•
•
•
•
•
•
An example of the Cisco ANA Manage window when the AVM sub-branch is selected is displayed below.
Figure 2-4 AVM Sub-Branch
When the user chooses the AVM sub-branch the workspace displays the properties of the AVM and a table with the list of VNEs.
Note
The following columns are displayed in the workspace table:
•
•
•
–
–
–
–
–
•
•
•
•
•
•
•
For more information about VNEs, see Chapter 6, "Managing AVMs and VNEs".
For more information about AVM menu and toolbar options see:
AVM Branch Menus
This section provides a description of each option available in the menus when the AVM sub-branch is selected. The following menus are available:
File Menu
The File menu is displayed.
New VNE
Adds a VNE to the selected AVM.
Note
Properties
Displays the properties of the selected AVM and its status.
Exit
Exits Cisco ANA Manage. See Logging Out.
Tree Pane Shortcut Menu
When the user right-clicks on the AVM sub-branch in the tree pane the following menu is displayed.
New VNE
Creates a VNE for the selected AVM. See Creating AVMs, page 6-1.
Note
Actions
Starts or stops an AVM. See Starting and Stopping AVMs, page 6-5.
Delete
Deletes an AVM from the server.
Note
Move AVM
Move an entire AVM between units. See Moving AVMs, page 6-6.
Note
Properties
Displays the properties of the selected AVM.
Workspace Shortcut Menu
When the user right-clicks on a selected VNE in the table the following shortcut menu (and sub-menu, when required) options are displayed.
Actions
Enables the user to start and stop a VNE. In addition, the VNE can be moved to maintenance mode. Actions can be performed on multiple VNEs.
Delete
Deletes the selected VNE from an AVM.
Move VNEs
Move a VNE between AVMs. Actions can be performed on a single VNE or multiple VNEs.
Properties
Displays the properties of the selected VNE.
AVM Branch Toolbar
When the AVM sub-branch is selected in the tree pane the following tools are displayed on the toolbar:
Table 2-5 AVM Tools
Creates a new VNE in the selected AVM.
Displays the properties of the selected AVM.
Deletes the selected AVM.
Starts the selected AVM.
Stops the selected AVM.
Search for a Cisco ANA AVM/VNE amongst all the servers.
When a VNE is selected in the table in the workspace the following tools are displayed on the toolbar:
Table 2-6 VNE Tools
Creates a new VNE in the selected AVM.
Displays the properties of the selected VNE.
Deletes the selected VNE from an AVM.
Starts the selected VNE.
Moves the selected VNE to maintenance mode.
Stops the selected VNE.
Search for an AVM/VNE amongst all the servers.
For more information on the AVM sub-branch, see Chapter 6, "Managing AVMs and VNEs".
Global Settings Branch
The Global Settings branch maintains system-wide settings, for example, polling and protection groups. Any changes that are made to the settings affect the configuration throughout the entire system.
The Global Settings branch includes the following sub-branches:
•
•
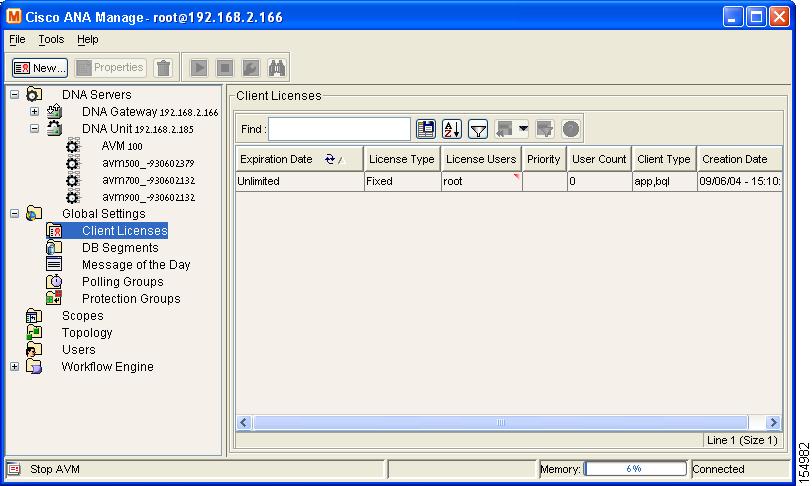
Client Licenses Branch
The Client Licenses sub-branch enables control and monitoring of the number of client connections over a limited or unlimited period of time as defined in terms of the client license. The Cisco ANA Manage window with the Client Licenses sub-branch selected is displayed below.
Figure 2-5 Client Licenses Sub-Branch
The following columns are displayed in the workspace table when the Client Licenses sub-branch is selected:
•
•
–
or
–
•
•
•
•
•
For more information about:
•
•
Client Licenses Branch Menus and Toolbar
This section provides a description of each option available in the menus when the Client Licenses sub-branch is selected. The following menus are available:
File Menu
The File menu is displayed.
New License
Install a new license.
Properties
Displays the properties of the selected license.
Exit
Exits Cisco ANA Manage. See Logging Out.
Tree Pane Shortcut Menu
Right-click the Client Licenses sub-branch to display the shortcut menu:
New License
Install a new license.
Workspace Shortcut Menu
Right-click in the table in the workspace to display the following shortcut menu:
Delete
Deletes the selected license.
Properties
Displays the properties of the selected license.
Client Licenses BranchToolbar
When the Client Licenses sub-branch is selected in the tree pane the toolbar contains the following tools:
Table 2-7 Client Licenses Tools
Install a new license.
Displays the properties of the selected license.
Deletes the selected license.
For more information about client licenses, see Managing Client Licenses, page 7-1.
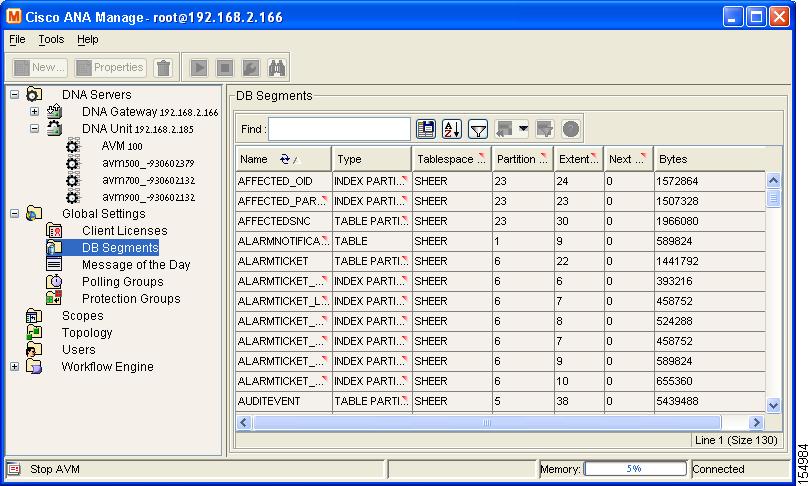
DB Segments Branch
The DB segments branch in Cisco ANA Manage displays a table describing the storage allocated for all database segments. An example of the Cisco ANA Manage window when the DB segments branch is selected is displayed below.
Figure 2-6 DB Segments Branch
The following columns are displayed in the workspace table when the DB segments branch is selected:
•
•
•
•
•
•
•
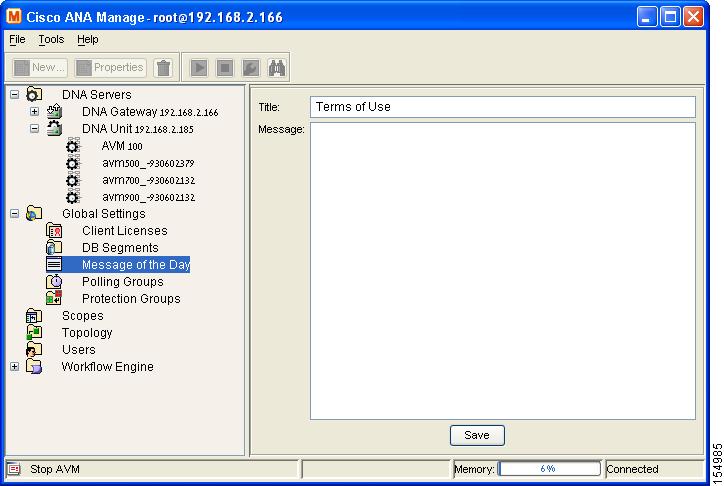
Message of the Day Branch
The Message of the Day sub-branch enables the user to define a message (service disclaimer) that will be displayed when a user logs into client applications. An example of the Cisco ANA Manage window when the Message of the Day sub-branch is selected is displayed below.
Figure 2-7 Message Of The Day Sub-Branch
The following areas are displayed in the workspace:
•
•
Note
The following button is displayed in the workspace:
•
For more information about the Message of the Day branch, see
Customizing a Message of the Day, page 7-4.Polling Groups Branch Menus and Toolbar
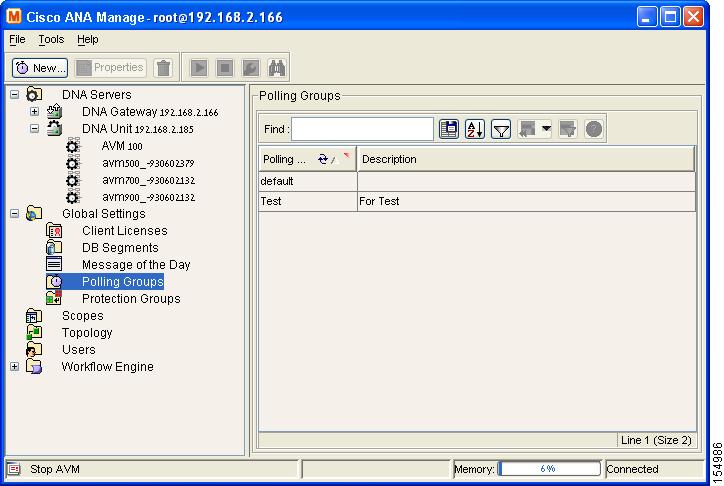
The Polling Groups sub-branch enables the user to manage polling groups, by categorizing a group of devices to be polled according to pre-set intervals. The Polling Groups sub-branch is displayed below.
Figure 2-8 Polling Groups Sub-Branch
The following columns are displayed in the workspace table when the Polling Groups sub-branch is selected:
•
•
Note
For more information about:
•
Polling Group Menus
This section provides a description of each option available in the menus when the Polling Groups sub-branch is selected. The following menus are available:
File Menu
The File menu is displayed.
New Polling Group
Creates a new polling group.
Properties
Displays the properties of the selected polling group.
Exit
Exits Cisco ANA Manage. See Logging Out.
Tree Pane Shortcut Menu
Right-clicking on the Polling Groups sub-branch displays the shortcut menu.
New Polling Group
Creates a new polling group.
Workspace Shortcut Menu
When the user right-clicks in the table in the workspace the following shortcut menu, is displayed.
Properties
Displays the properties of the selected polling group.
Delete
Deletes the selected polling group.
Note
Polling Groups Branch Toolbar
When the Polling Groups sub-branch is selected in the tree pane the toolbar contains the following tools:
Table 2-8 Polling Groups Tools
Creates a new polling group.
Displays the properties of the selected polling group.
Deletes the selected polling group.
Note
When a polling group is selected in the table in the workspace, clicking Properties on the toolbar displays the properties of the polling group in a Properties dialog box.
For more information about polling groups, see Managing Polling Groups, page 7-5.
Protection Groups Branch Menus and Toolbar
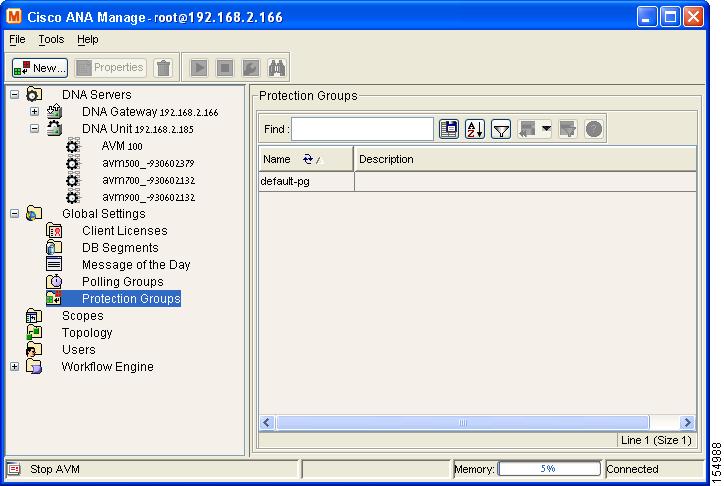
By default all the units in the Cisco ANA fabric belong to one big cluster. The Protection Groups sub-branch enables the administrator to change the default setup of the units by customizing protection groups (clusters) and then assigning units to these protection groups.
For more information, refer to the Cisco Active Network Abstraction High Availability User Guide.
The Cisco ANA Manage window with the Protection Groups sub-branch selected is displayed below.
Figure 2-9 Protection Groups Sub-Branch
The following columns are displayed in the workspace table when the Protection Groups sub-branch is selected:
•
•
For more information about:
•
Protection Group Menus
This section provides a description of each option available in the menus when the Protection Groups sub-branch is selected. The following menus are available:
File Menu
The File menu is displayed.
New Protection Group
Creates a new protection group.
Properties
Displays the properties of the selected protection group.
Exit
Exits Cisco ANA Manage. See Logging Out.
Tree Pane Shortcut Menu
Right clicking on the Protection Groups sub-branch displays the shortcut menu.
New Protection Group
Creates a new protection group.
Workspace Shortcut Menu
When the user right-clicks in the table in the workspace the following shortcut menu is displayed.
Delete
Deletes the selected protection group.
Note
Properties
Displays the properties of the selected protection group in a Properties dialog box.
Protection Groups Branch Toolbar
When the Protection Groups sub-branch is selected in the tree pane the toolbar contains the following tools:
Table 2-9 Protection Group Tools
Creates a new protection group.
Displays the properties of the selected protection group.
Deletes the selected protection group.
Note
For more information about protection groups, refer to the Cisco Active Network Abstraction High Availability User Guide.
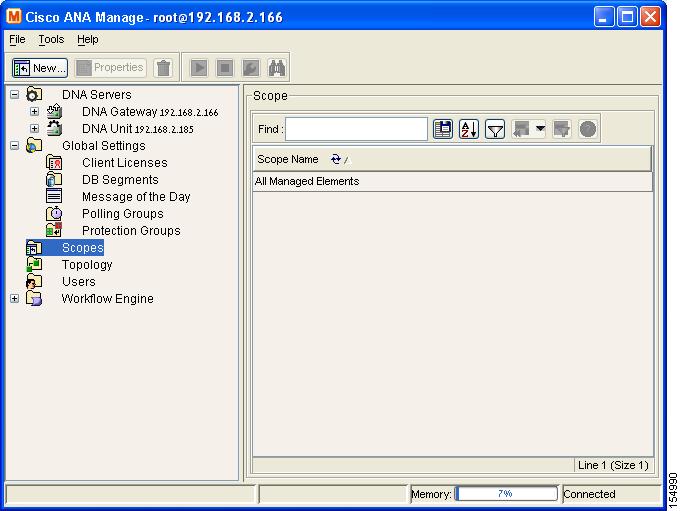
Scopes Branch
The Scopes branch enables the administrator to group a collection of managed network elements together in order to enable the user to view and manage the network elements based on the role granted to the user for the scope. For more information on the Scopes branch, see Chapter 10, "Managing Security".
The Scopes branch is displayed below.
Figure 2-10 Scopes Branch
Each row in the table in the workspace displays the name of a scope as defined in Cisco ANA Manage.
For more information about:
•
Note
Scopes Branch Menus
This section provides a description of each option available in the menus when the Scopes branch is selected. The following menus are available:
File Menu
The File menu for the Scopes branch is displayed.
New Scope
Creates a new scope.
Properties
Displays the properties of the selected scope.
Exit
Exits Cisco ANA Manage. See Logging Out.
Tree Pane Shortcut Menu
When the user right-clicks on the Scopes branch in the tree pane the shortcut menu is displayed.
New Scope
Creates a new scope.
Workspace Shortcut Menu
When the user right-clicks in the table in the workspace the following shortcut menu is displayed.
Delete
Deletes the selected scope.
Properties
Displays the properties of the selected scope.
Note
Scopes Branch Toolbar
When the Scopes branch is selected in the tree pane the toolbar contains the following tools:
Table 2-10 Scopes Branch Tools
Creates a new scope. See Creating Scopes, page 10-5.
Displays the properties of the selected scope.
Deletes the selected scope.
When a scope is selected in the table in the workspace, clicking Properties on the toolbar displays the properties of the selected scope in a Properties dialog box.
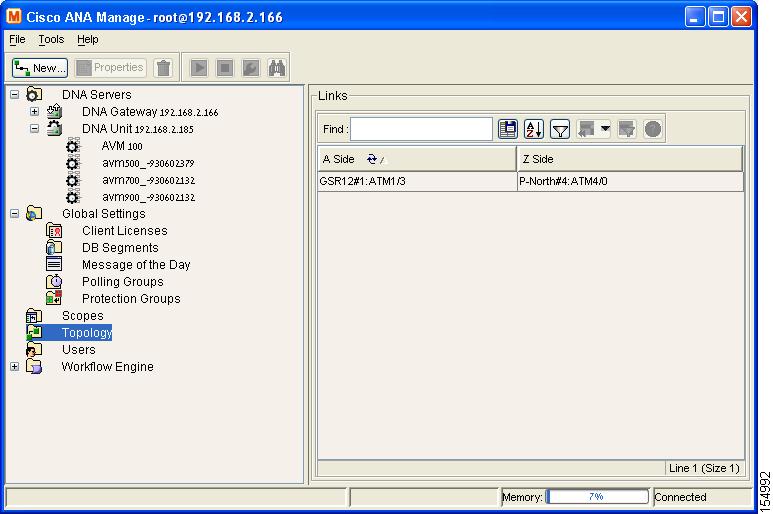
Topology Branch
The Topology branch enables the user to define static links between the network elements in order to supplement or override existing auto-discovered topology. The Cisco ANA Manage window with the Topology branch selected is displayed below.
Figure 2-11 Topology Branch
The Topology branch displays all the static links defined in the system including the A side and Z side of the link.
For more information about:
•
•
Topology Branch Menus
This section provides a description of each option available in the menus when the Topology branch is selected. The following menus are available:
File Menu
The File menu is displayed.
New Static Link
Creates a new static link.
Properties
This option is unavailable.
Exit
Exits Cisco ANA Manage. See Logging Out.
Tree Pane Shortcut Menu
When the user right-clicks on the Topology branch in the tree pane the shortcut menu is displayed.
New Static Link
Creates a new static link.
Workspace Shortcut Menu
When the user right-clicks in the table in the workspace the shortcut menu is displayed.
Delete
Deletes the selected static link.
Topology Branch Toolbar
The Topology branch contains the following tools:
Table 2-11 Topology branch Tools
Opens the New Link dialog box enabling the user to create a link between two devices. See Creating a Static Link, page 8-1.
Deletes the selected static link.
For more information about the Topology branch, see Chapter 8, "Managing Links".
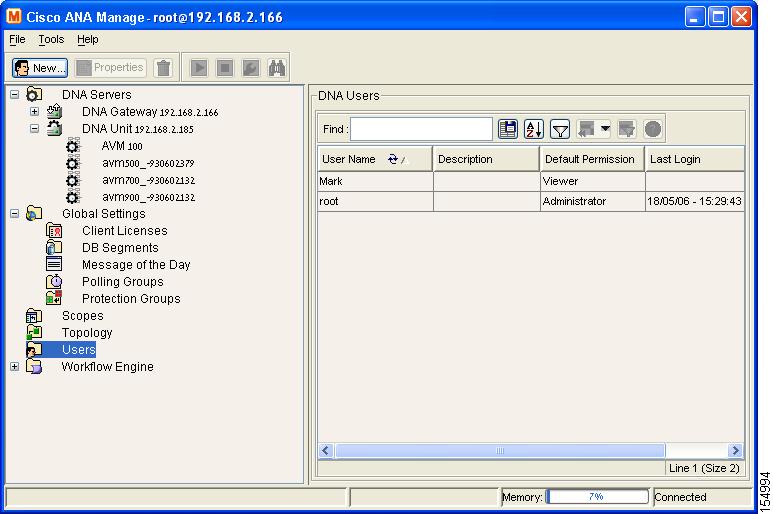
Users Branch
The Users branch enables the administrator to define and manage user accounts. For more information about the Users branch, see Chapter 10, "Managing Security".
The Cisco ANA Manage window with the Users branch selected is displayed below.
Figure 2-12 Users Branch
Each row in the table in the workspace displays the username and a description of the user.
The following columns are displayed in the workspace table:
•
•
•
Note
•
For more information about:
Note
Users Branch Menus
This section provides a description of each option available in the menus when the Users branch is selected. The following menus are available:
File Menu
The File menu is displayed.
New User
Creates a new user for the current client station.
Properties
Displays the properties of the selected user.
Exit
Exits Cisco ANA Manage. See Logging Out.
Tree Pane Menu
When the user right-clicks on the Users branch in the tree pane the shortcut menu is displayed.
New User
Creates a new user for the current client station.
Workspace Shortcut Menu
When the user right-clicks in the table in the workspace the shortcut menu is displayed.
Change Password
Displays the Set Password dialog box that enables the administrator to edit a user's password.
Delete
Deletes the selected username from the system.
Note
Properties
Displays the properties of the selected user.
Users Branch Toolbar
The Users branch contains the following tools:
Table 2-12 Users branch Tools
Opens the New User dialog box enabling the user to define a new user for the current client station.
Displays the properties of the selected user.
Deletes the selected username from the system.
Workflow Engine Branch
Note
The Workflow Engine branch enables the user to manage workflow templates and running workflows in runtime. The Workflow Engine branch includes the following sub-branches:
•
•
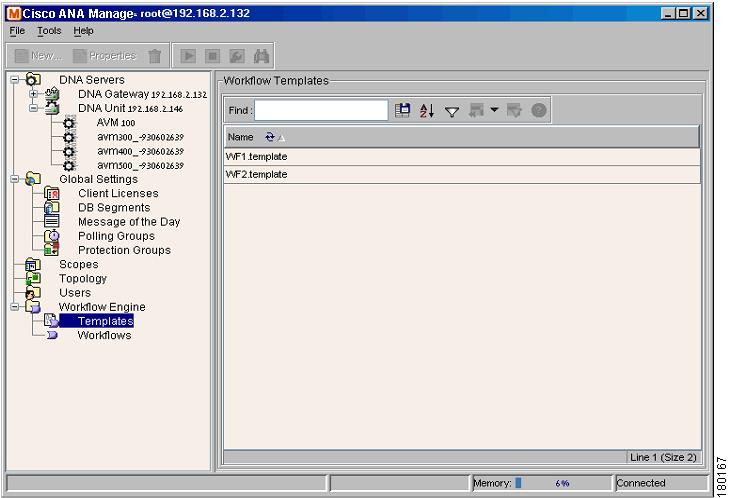
Templates
The Templates sub-branch enables the user to:
•
•
•
The Cisco ANA Manage window with the Templates sub-branch selected is displayed below.
Figure 2-13 Templates Sub-Branch
The table displays the names of the workflow templates (in the workspace), as defined using the Cisco Workflow Editor.
For more information about:
•
Templates Branch Menus
This section provides a description of each option available in the menus when the Templates sub-branch is selected. The following menus are available:
Tree Pane Shortcut Menu
Right clicking on the Templates sub-branch displays the shortcut menu.
Properties
Displays a list of the workflow templates available on the gateway.
Workspace Shortcut Menu
When the user right-clicks in the table in the workspace the shortcut menu is displayed.
Properties
Displays the properties (attributes) of the selected workflow template.
Delete
Deletes the selected workflow template.
Templates Branch Toolbar
When the Templates sub-branch is selected in the tree pane and a template is selected in the workspace, the toolbar contains the following tool:
For more information about workflows, refer to the Cisco Active Network Abstraction Workflow User Guide.
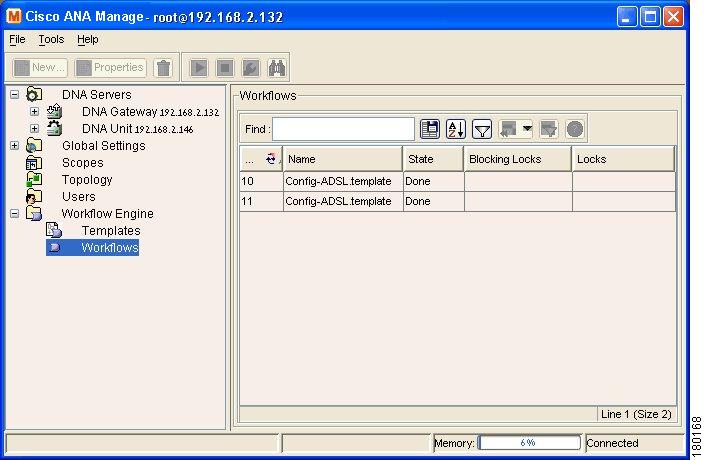
Workflows
The Workflows sub-branch enables the user to:
•
•
•
•
•
The Cisco ANA Manage window with the Workflows sub-branch selected is displayed.
Figure 2-14 Workflows Sub-Branch
The following columns are displayed in the workspace table when the Workflows sub-branch is selected:
•
•
•
•
•
For more information about:
•
Workflows Menus
This section provides a description of each option available in the menus when the Workflows sub-branch is selected. The following menus are available:
Tree Pane Menu
Right clicking on the Workflows sub-branch displays the shortcut menu.
Properties
Displays a list of the scripts and their current status.
Workspace Shortcut Menu
When the user right-clicks in the table in the workspace the shortcut menu is displayed.
Show Output
View the output of the workflow.
Abort/Rollback
Aborts the workflow and performs rollback if the workflow is running, or if the workflow has already been completed it performs rollback.
Delete
Deletes the workflow from the database.
Note
Properties
Displays the properties (attributes) of the selected workflow, including its status.
Workflows Branch Toolbar
When the Workflows sub-branch is selected in the tree pane and a workflow is selected in the workspace, the toolbar contains the following tool:
For more information about workflows, refer to the Cisco Active Network Abstraction Workflow User Guide.
Logging Out
When the user has finished working with Cisco ANA Manage the user can log out of the application. Any changes that were made are automatically saved when logging out.
To log out of Cisco ANA Manage:
Step 1
or
Click in the top right-hand corner to close the Cisco ANA Manage window.
A confirmation message is displayed.
Step 2