-
Cisco Active Network Abstraction Administrator Guide, 3.6
-
Introducing Cisco ANA
-
Getting Started With Cisco ANA Manage
-
Deploying Cisco ANA
-
Using Cisco ANA Manage Tables
-
Managing Cisco ANA Units
-
Managing AVMs and VNEs
-
Managing Global Settings
-
Managing Links
-
Managing Workflows
-
Managing Security
-
Database Backup and Restore
-
Utility Scripts
-
Golden Source Registry
-
Ports Used By Cisco ANA
-
Drools Rules Engine
-
VNE Persistency Mechanism
-
Index
-
 Feedback
Table Of Contents
Editing a Scope and Viewing a Scope Properties
Creating New Cisco ANA User Accounts
Granting or Editing a User's Rights
Deleting a Cisco ANA User Account
Managing Security
This chapter describes how Cisco ANA implements a two-dimensional security engine combining a role-based security mechanism with scopes (groups of NEs) that are granted to users. In addition, it describes managing users in the Cisco ANA platform, including defining users and passwords.
•
Security Overview—Describes the security-related concepts and terms used in Cisco ANA Manage and throughout this guide.
•
•
•
•
•
•
Security Overview
This section describes the security related concepts and terms used in Cisco ANA Manage.
Scopes
Cisco ANA Manage enables the administrator to group a collection of managed NEs together in order to enable the user to view and manage the NEs based on the user's role or permission.
After the user is allocated a scope (list of NEs) and a role, they can perform various activities on the NEs included in the scope, as follows:
•
•
•
•
•
•
•
By default, Cisco ANA includes a pre-configured scope, All Managed Elements, for the administrator's use, which cannot be edited or deleted. This default scope includes all the managed NEs. A user granted the All Managed Elements scope can view and manage all the NEs all the time according to the user's role assigned to the scope.
Default Permissions
The role or default permission only applies to the activities that are related to GUI functionality, not the activities related to NEs, including:
•
•
•
•
•
Security Access Roles
Cisco ANA provides five pre-defined security access roles that can be granted to a user in order to enable system functions:
•
•
•
•
•
Note
The table below describes role functions according to the default permission and scope-based functionality:
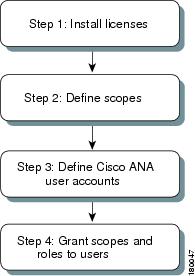
Customizing Security Flow
The flow below describes the steps required to customize security using Cisco ANA Manage, and the order in which the steps must be performed.
Figure 10-1 Customizing Security Flow
Step 1
Step 2
Step 3
Step 4
Creating Scopes
Cisco ANA Manage enables the administrator to group a collection of managed NEs together in order to enable the user to view and manage the NEs based on the user's role or permission.
Once a scope is created it can be assigned to a user. Multiple scopes can be assigned to a single user and a single scope can be assigned to multiple users. When the scope is assigned to a user, the administrator is required to provide the user with security access roles as well, namely, to define the user's role within the assigned scope. See Granting or Editing a User's Rights.
To create a scope:
Step 1
Step 2
The following fields are displayed in the New Scope dialog box:
•
•
•
The following buttons are displayed in the New Scope dialog box:
Add All—Adds all available devices to the Active Devices list.
Add Selected—Adds the active device to the Active Devices list.
Remove Selected—Removes an active device from the scope.
Remove All—Removes all active devices from the scope.
Step 3
Step 4
Note
Step 5
Editing a Scope and Viewing a Scope Properties
Cisco ANA Manage enables the administrator to edit the details of a scope and to view the scope's properties.
To edit a scope or view scope properties:
Step 1
Step 2
Step 3
For more information about the Properties dialog box, see Creating Scopes.
Step 4
Step 5
Deleting Scopes
A device scope (lists of devices or NE groups) can also be deleted.
Note
To delete a scope:
Step 1
Step 2
Note
Step 3
Creating New Cisco ANA User Accounts
The Users branch enables the administrator to define and manage user accounts. This includes managing general user information as well as security access rights and forced login changes, as required. The administrator can also monitor the user's last login time.
Note
The new user is created with a set of pre-defined system defaults, as follows:
•
•
•
Note
The maximum length of the username and full name is 20 characters.
The minimum length of the user password is 8 characters.
The maximum length of the password is 20 characters.
The minimum number of digits that must be included in the user password is 1.
The username cannot contain any special characters like * # ? and so on.
The password cannot contain the username or vice versa.To define a user account:
Step 1
Step 2
Note
The following fields are displayed in the New User dialog box:
•
Note
•
Note
•
•
Note
•
The Role dropdown list enables the administrator to define the security access role (permission) for the new user.
Note
When a new user is defined as an Administrator this user can perform all administrative actions, including opening all maps, working with all scopes and managing the system using Cisco ANA Manage. All this is performed with the highest privileges. Cisco ANA Manage supports multiple administrators. Access rights do not need to be defined for an administrative user. For more information, see the Security Access Roles section.
The Force Password Change at Next Login checkbox is selected by default and forces the user to change the user password at next login.
The following button is displayed in the New User dialog box:
•
Step 3
Step 4
Step 5
Step 6
Step 7
Step 8
Granting or Editing a User's Rights
Once the administrator has defined the scopes and the new user accounts, Cisco ANA Manage enables the administrator to manage or edit general user account information and the list of scopes assigned to the user, the security access roles per scope, and assign maps to a user.
Note
In addition, the administrator can view the properties of a user.
User's Rights
Cisco ANA Manage enables the administrator to manage or edit general user account information. In addition, the administrator can view the properties of a user.
To grant or edit a user's rights:
Step 1
Step 2
Step 3
The General tab contains general user account information, and the following fields are displayed:
•
•
•
•
The following checkboxes are displayed in the General tab of the Properties dialog box:
•
•
•
•
Step 4
User Security Rights
To define a user's default security rights, you use the Security tab in the User Properties dialog box.
To edit a user's default security rights:
Step 1
Step 2
Step 3
The Security tab controls the user's capability to view and manage the application and NEs by granting the user scopes and security access roles. By default, a new user is assigned a viewer security access role. The following columns are displayed in the table in the Security tab of the Properties dialog box—
•
•
The following buttons are displayed in the Properties dialog box when the Security tab is selected:
•
•
•
Step 4
The following area is displayed in the Security Level dialog box:
•
The following list is displayed in the Security Level dialog box:
•
Step 5
Step 6
Step 7
Step 8
Map User Permissions
Cisco ANA Manage enables the administrator to assign a maps to the user. When the user logs into NetworkVision, the user can only open and manage the maps assigned to the user by the administrator.
To assign maps to a user:
Step 1
Step 2
Step 3
The Maps tab is divided into two parts:
•
•
The following buttons are displayed between the available maps and assigned maps lists in the Maps tab:
Moves the selected map to the Assigned Maps list.
Move the entire available map list to the Assigned Maps list.
Removes a selected map from the assigned map list to the Available Map list.
Removes the entire assigned map list to the Available Map list.
Step 4
Note
Step 5
Step 6
Deleting a Cisco ANA User Account
An administrator can also delete a Cisco ANA user account.
To delete a user account:
Step 1
Step 2
Note
Step 3
Changing a User Password
The administrator can use Cisco ANA Manage to change the user's password at any time. When this happens the user is usually forced to change the password at the next login.
In addition, the current user can also initiate a change of password, where they will be required to enter the old password in order to validate the new password.
To change a user's password as an administrator:
Step 1
Step 2
Step 3
Note
Step 4
Step 5
Step 6
Cisco ANA Manage enables the current user to also initiate a change of password.
To change the user's own password:
Step 1
Note
Step 2
Step 3
Step 4
Step 5