-
Cisco Active Network Abstraction Administrator Guide, 3.6
-
Introducing Cisco ANA
-
Getting Started With Cisco ANA Manage
-
Deploying Cisco ANA
-
Using Cisco ANA Manage Tables
-
Managing Cisco ANA Units
-
Managing AVMs and VNEs
-
Managing Global Settings
-
Managing Links
-
Managing Workflows
-
Managing Security
-
Database Backup and Restore
-
Utility Scripts
-
Golden Source Registry
-
Ports Used By Cisco ANA
-
Drools Rules Engine
-
VNE Persistency Mechanism
-
Index
-
 Feedback
Table Of Contents
Working With Cisco ANA Manage Tables
Using Cisco ANA Manage Tables
This chapter describes how to perform general Cisco ANA Manage functions when working with tables:
•
Working With Cisco ANA Manage Tables—Describes how to work with tables, including finding information, opening filters and exporting table information.
•
•
•
•
•
All these functions are performed using the Cisco ANA Manage table toolbar.
Working With Cisco ANA Manage Tables
Various tables are used throughout the application to display different types of information. Cisco ANA Manage enables the administrator to perform the following functions using the toolbar displayed above the table in the workspace:
•
•
•
•
•
•
•
•
•
You can also find specific Cisco ANA Manage information, such as Cisco ANA units, AVM/VNE details using Find and entering criteria into the Find dialog box. For more information, see Finding an AVM or VNE, page 6-6.
For more information about the table toolbar, see Table Toolbar, page 2-6.
Finding Text In a Table
Cisco ANA Manage enables you to search for information in the workspace by entering the search criteria, for example, by entering a partial username.
Note
To find text in a table:
Step 1
Step 2
Note
Filtering Information
Cisco ANA Manage enables you to define a filter for the data displayed in the workspace according to a selected column. For example, in the Users branch, information can be filtered according to username.
To define a filter:
Step 1
The following lists are displayed in the Filter dialog box:
•
•
The following checkbox is displayed in the Filter dialog box:
•
The following free text area is displayed in the Filter dialog box:
•
Step 2
Step 3
Step 4
Note
The filter can be cleared in order to display all the data in the table again.
To clear a filter:
Step 1
Step 2
Note
Setting Selection Filters.
Setting Selection Filters
You can choose a line or specific set of lines, and display them in the table (all un-selected lines are hidden). You may make continuous multiple line selections, setting the table content after each selection using Set Selection Filter.
You can undo the last line selections (one step back), one at a time, using Previous Selection Filter, or undo (rewind) all multiple line selections, using the Rewind All menu option.
This filtering mechanism enables you sort though several hundred lines and pinpoint the appropriate lines that contain the required information. For example, you could filter and display seven lines in a 129 line database segment table:
To choose multiple lines and apply the set selection filter:
Step 1
Step 2
To undo the previous filter selection:
Step 1
Step 2
To undo all previous selected filter out options:
Step 1
Step 2
Step 3
Tip
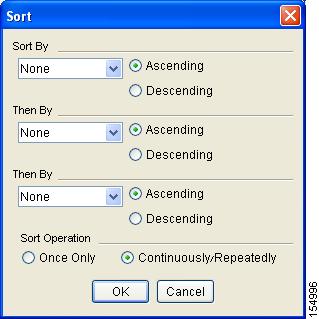
Sorting a Table
The tables displayed in Cisco ANA Manage can be sorted by defining specific criteria on a one-time only basis or continuously.
To sort a table:
Step 1
Figure 4-1 Sort Dialog Box
The following dropdown lists are displayed in the Sort By area:
•
•
The following buttons are displayed in the Sort Operation area:
•
•
icon is displayed next to the selected column heading.
Step 2
Step 3
Step 4
Step 5
Exporting the Table To a File
Cisco ANA Manage enables you to export all the currently displayed data from the workspace to a CSV (comma separated values) file. The selected rows are exported; when nothing is selected the entire table is exported. The data can then be imported and viewed at a later stage.
Note
To export the table to a file:
Step 1
Step 2
Step 3
Step 4