-
Cisco Active Network Abstraction Administrator Guide, 3.6
-
Introducing Cisco ANA
-
Getting Started With Cisco ANA Manage
-
Deploying Cisco ANA
-
Using Cisco ANA Manage Tables
-
Managing Cisco ANA Units
-
Managing AVMs and VNEs
-
Managing Global Settings
-
Managing Links
-
Managing Workflows
-
Managing Security
-
Database Backup and Restore
-
Utility Scripts
-
Golden Source Registry
-
Ports Used By Cisco ANA
-
Drools Rules Engine
-
VNE Persistency Mechanism
-
Index
-
 Feedback
Table Of Contents
Viewing Client License Properties
Customizing a Message of the Day
Checking Assignment of Protection Groups to Cisco ANA Units
Changing Protection Groups for Cisco ANA Units
Viewing and Editing Protection Group Properties
Managing Global Settings
This chapter describes how to define and manage the Cisco ANA Manage global settings, including client licenses, polling groups, protection groups, and customizing a message of the day.
•
Managing Client Licenses—Describes how to install and uninstall a client license. In addition, it describes viewing client license properties.
•
•
•
•
For more information about the Global Settings branch, see Global Settings Branch, page 2-18.
Note
Managing Client Licenses
Cisco ANA client applications and BQL connectivity is based on installed license files. Cisco ANA Manage enables the administrator to control and monitor the number of client and BQL connections over a limited or unlimited period of time based on the client licenses installed. Two types of licenses are supported:
•
•
For more information, see Client Licenses Branch, page 2-18.
The Cisco ANA license mechanism looks for a license file for a user who has logged in and successfully passed the user authentication. It goes through all the licenses one by one, in order of priority until it finds a license that fits the user. The user is associated to that license.
The priority is the order in which the Gateway checks the licenses. After the license is created, the priority can be set in the Registry or by using BQL.
This priority is important, for example with two licenses as follows:
•
•
If License 1 has priority over License 2:
1.
2.
3.
4.
To install a license:
Step 1
Step 2
Step 3
Step 4
Step 5
The administrator can uninstall the client license, for example, if it has expired.
Note
To uninstall a license:
Step 1
Step 2
Step 3
Viewing Client License Properties
Cisco ANA Manage enables the user to view the properties of a license, for example, the IP address and account name.
To view client license properties:
Step 1
Step 2
Step 3
The following fields are displayed at the top of the Client License Properties dialog box:
•
–
or
–
•
•
•
When the properties of the license are displayed in the workspace table then the properties of the allocated users are displayed as follows:
•
•
•
Step 4
Viewing Database Segments
Cisco ANA Manage enables the administrator to view and monitor the following:
•
•
•
The information is automatically checked by the system.
To view the database segments, select the DB Segments branch in the Cisco ANA Manage window's tree pane. The database segments are displayed in the Workspace.
For more information about the columns displayed in the DB Segments table, see DB Segments Branch, page 2-21.
Customizing a Message of the Day
Cisco ANA Manage enables the user to define a message (service disclaimer) that is displayed when the user logs in to any client application (optional). The user must accept the message before logging in. If the user does not accept the message, the user will be unable to login. The message supports HTML format.
The message can be changed as required. However, only one message is applied at any given point in time.
To customize a message of the day:
Step 1
Step 2
Step 3
Note
Step 4
Step 5
To remove a message of the day:
Step 1
Step 2
Step 3
Step 4
Managing Polling Groups
This section includes the following:
•
•
•
•
•
Polling Groups Overview
The unit servers poll the NEs to discover and display accurate and up-to-date information of the network. The system periodically triggers polling at set intervals. The polling rates can be customized or optimized by the administrator.
Cisco ANA provides the ability to fine-tune the frequency in which information is retrieved from the managed elements in order to enable a high degree of control and flexibility over the amount of network traffic used by the various VNEs. Different polling intervals can be set for gathering information for:
•
•
•
•
•
Note
In addition to the defined polling intervals, the VNEs implement adaptive polling ensuring that the element is not overloaded. Checking the device CPU may defer specific polls in order to avoid an additional load on the managed element. See Adaptive Polling.
The user can define polling profiles by setting customized polling intervals which can be applied to managed elements. The VNE then polls the network element according to the preset values. This ensures polling of devices for different information consistently and in accordance with technical and business requirements.
Core devices can be assigned to a polling group (all devices use the same polling profile) that specifies a higher frequency for status but a lower frequency for configuration-related information while edge or access devices can be polled more frequently for system and configuration-related information. Managed network service operators for example, can use polling groups to reflect their agreement with customers so that premium customer devices are polled more frequently than normal devices.
For the administrator's convenience, Cisco ANA includes the pre-configured polling group "default" which cannot be deleted. The default polling group includes the following settings:
•
•
•
•
•
Customizing a Polling Group
Cisco ANA Manage enables the user to create and customize new polling groups. The new polling groups that are created can then be used when defining a VNE. For more information, see the Defining VNEs section.
Note
To create and customize a polling group:
Step 1
Step 2
Step 3
Step 4
The New Polling Group dialog box is displayed.
The following fields are displayed at the top of the New Polling Group dialog box:
•
•
Step 5
The following fields are displayed in the Polling Intervals area:
•
•
•
The following fields are displayed in the Topology area:
•
•
Step 6
Step 7
The new polling group can be used when defining a new VNE. See Defining VNEs, page 6-9.
Modifying a Polling Group
Cisco ANA Manage enables the user to modify a polling group and view polling group properties.
To modify a polling group:
Step 1
Step 2
For more information on the fields displayed in the Update Polling Group dialog box, see Customizing a Polling Group.
Step 3
Note
Step 4
Step 5
Note
Deleting a Polling Group
Cisco ANA Manage enables the user to delete polling groups.
To delete a polling group:
Step 1
Step 2
Step 3
Step 4
Note
Adaptive Polling
VNEs implement adaptive polling ensuring that the element is not overloaded in addition to defined polling intervals. Checking the device CPU usage may defer specific polls in order to avoid an additional load on the managed element.
When a VNE exceeds the maximum CPU usage threshold value an alarm is sent, and the VNE is automatically transferred to a slow polling interval. For example, the VNE is polled less regularly and a delay is added between the commands.
When the CPU usage threshold values for the VNE fall below the clear threshold value an alarm is sent and the VNE returns to normal polling.
The values for any VNE can be customized through the system registry, for example, the minimum and maximum CPU usage threshold values. When the defined values are reached, an alarm is sent. A clear value can also be defined so that when the CPU usage threshold value drops below the maximum value or rises above the minimum value, a message is sent clearing the original alarm. These values are defined in the registry.
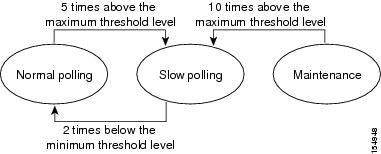
In addition, the maximum and minimum tolerance levels can be customized through the system registry. When a VNE is using normal polling and CPU usage is high, Cisco ANA waits for the maximum CPU usage threshold value (upper tolerance level) to be exceeded five times (default), and then the VNE moves to slow polling, as shown in the diagram below.
Figure 7-1 Polling Threshold Levels
If the VNE is using slow polling after it has been checked five times, then the VNE is checked a further 10 times (default) to see whether the CPU usage is still high. If this is the case, the VNE is moved to maintenance mode. Once the VNE is in maintenance mode, the user must manually set the VNE back to normal polling, (it does not automatically return to regular polling). Once the VNE is in maintenance mode the device is not polled.
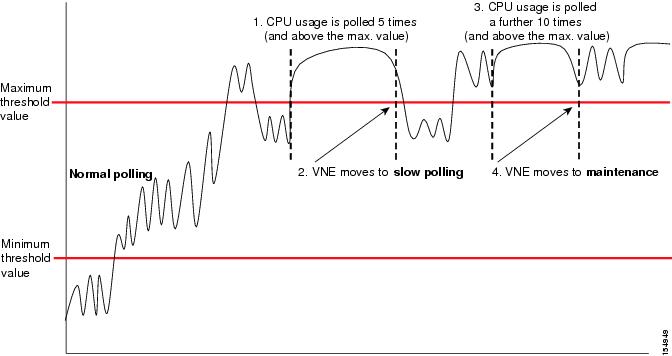
In the example below, CPU usage is polled five times. As the CPU usage is above the maximum value, the VNE moves to slow polling. The CPU usage is then polled a further 10 times. It is above the maximum value, so the VNE moves to maintenance mode.
Figure 7-2 CPU Usage—Example 1
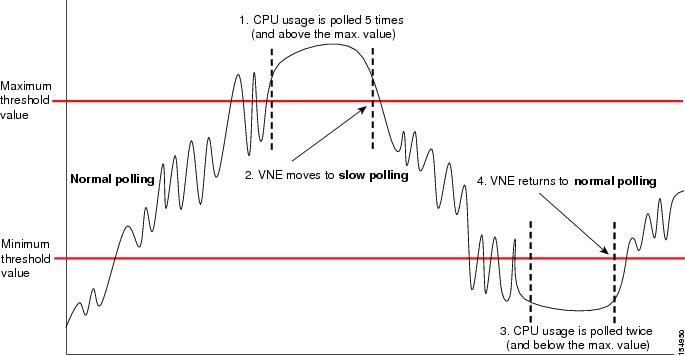
When the VNE is using slow polling and CPU usage drops to a regular level (or below the minimum value), Cisco ANA waits for the VNE to drop below the maximum CPU usage threshold value twice (default), it then returns the VNE to normal polling.
In the example below, CPU usage is polled five times, it is above the maximum value, so the VNE moves to slow polling. The CPU usage then drops to a regular level (or below the minimum value). The CPU usage is then polled again twice. It is below the maximum value, so the VNE returns to normal polling.
Figure 7-3 Example 2 CPU Usage
If CPU usage is high and a slow polling interval is used, and the AVM goes down and is then restarted, the AVM remembers its previous polling interval. When the AVM is restarted, the AVM makes use of the same polling interval that it was using before it went down.
Managing Protection Groups
By default all the units in the Cisco ANA fabric belong to one cluster, the default-pg protection group. The administrator can change the default setup of the units by customizing protection groups (clusters) and then assigning units to these groups.
For more information, refer to the Cisco Active Network Abstraction High Availability User Guide.
Cisco ANA Manage enables the user to create new protection groups. The new protection groups that are created can then be used when defining a unit. For more information, see the Adding New Cisco ANA Units section.
To create a protection group:
Step 1
Step 2
Step 3
Step 4
The New Protection Group dialog box is displayed.
The following fields are displayed in the New Protection Group dialog box:
•
•
Step 5
Note
Checking Assignment of Protection Groups to Cisco ANA Units
The administrator can view the protection groups to which the units are currently assigned to check that the configuration or assignment matches the initial deployment plan.
To check the units-protection groups assignments:
Step 1
Changing Protection Groups for Cisco ANA Units
The administrator can easily and quickly change the protection group to which a unit has been assigned.
To change the protection group setting of a unit:
Step 1
Step 2
Step 3
or
On the toolbar, click Properties,
or
From the File menu, choose Properties. The ANA Unit Properties dialog box is displayed.
The Protection Group list displays the currently customized protection groups. For more information about defining a new protection group, see Managing Protection Groups.
The Enable Unit Protection checkbox enables the administrator to define whether a unit is enabled (checkbox is selected) for high availability.
Note
Step 4
Step 5
Viewing and Editing Protection Group Properties
The administrator can view the properties of a protection group, for example, the description. In addition, the administrator can edit the description of the protection group.
To view and edit a protection group's properties:
Step 1
Step 2
Step 3
Step 4
or
On the toolbar, click Properties,
or
From the File menu, choose Properties.
The Properties dialog box is displayed.
Step 5
Step 6
Deleting a Protection Group
Cisco ANA Manage enables the user to delete protection groups.
Note
To delete a protection:
Step 1
Step 2
Step 3
Step 4
or
On the toolbar, click Delete.
The protection group is deleted.