-
Cisco IOS Software Configuration Guide for Cisco Aironet 1300 Series Outdoor Access Point/Bridge 12.3(7)JA
-
Preface
-
Overview
-
Configuring the Access Point/Bridge for the
-
Using the Web-Browser Interface
-
Using the Command-Line Interface
-
Administering the Access Point/Bridge
-
Configuring Radio Settings
-
Configuring Multiple SSIDs
-
Configuring Spanning Tree Protocol
-
Configuring Cipher Suites and WEP
-
Configuring Authentication Types
-
Configuring WDS, Fast Secure Roaming, Radio Management, and Wireless Intrusion Detection Services
-
Configuring RADIUS and TACACS+ Servers
-
Configuring VLANs
-
Configuring QoS
-
Configuring Filters
-
Configuring CDP
-
Configuring SNMP
-
Managing Firmware and Configurations
-
Configuring System Message Logging
-
Configuring Repeater and Standby Access Points and Workgroup Bridge Mode
-
Troubleshooting
-
Protocol Filters
-
Supported MIBs
-
Error and Event Messages
-
Glossary
-
 Feedback
Table Of Contents
Understanding QoS for Wireless LANs
QoS for Wireless LANs Versus QoS on Wired LANs
Impact of QoS on a Wireless LAN
Configuring QoS Using the Web-Browser Interface
Adjusting Radio Access Category Definitions
Disabling IGMP Snooping Helper
Disabling AVVID Priority Mapping
CW-min and CW-max Settings for Point-to-Point and Point-to-Multipoint Bridge Links
Giving Priority to Voice Traffic
Giving Priority to Video Traffic
Configuring QoS
This chapter describes how to configure quality of service (QoS) on your access point/bridge. With this feature, you can provide preferential treatment to certain traffic at the expense of others. Without QoS, the access point/bridge offers best-effort service to each packet, regardless of the packet contents or size. It sends the packets without any assurance of reliability, delay bounds, or throughput.
Note
For complete syntax and usage information for the commands used in this chapter, refer to the Cisco IOS Command Reference for Cisco Aironet Access Points and Bridges for this release.
This chapter consists of these sections:
•
Understanding QoS for Wireless LANs
Typically, networks operate on a best-effort delivery basis, which means that all traffic has equal priority and an equal chance of being delivered in a timely manner. When congestion occurs, all traffic has an equal chance of being dropped.
When you configure QoS on the access point/bridge, you can select specific network traffic, prioritize it, and use congestion-management and congestion-avoidance techniques to provide preferential treatment. Implementing QoS in your wireless LAN makes network performance more predictable and bandwidth utilization more effective.
When you configure QoS, you create QoS policies and apply the policies to the VLAN configured on your access point/bridge. If you do not use VLANs on your network, you can apply your QoS policies to the access point/bridge's Ethernet and radio ports.
Note
QoS for Wireless LANs Versus QoS on Wired LANs
The QoS implementation for wireless LANs differs from QoS implementations on other Cisco devices. With QoS enabled, access points perform the following:
•
•
•
•
•
•
•
•
To contrast the wireless LAN QoS implementation with the QoS implementation on other Cisco network devices, see the Cisco IOS Quality of Service Solutions Configuration Guide at this URL:
http://www.cisco.com/en/US/docs/ios/12_2/qos/configuration/guide/fqos_c.html
Impact of QoS on a Wireless LAN
Wireless LAN QoS features are a subset of the proposed 802.11e draft. QoS on wireless LANs provides prioritization of traffic from the access point/bridge over the WLAN based on traffic classification.
Just as in other media, you might not notice the effects of QoS on a lightly loaded wireless LAN. The benefits of QoS become more obvious as the load on the wireless LAN increases, keeping the latency, jitter, and loss for selected traffic types within an acceptable range.
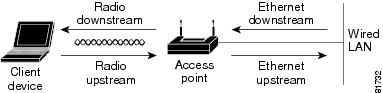
QoS on the wireless LAN focuses on downstream prioritization from the access point. Figure 14-1 shows the upstream and downstream traffic flow.
Figure 14-1 Upstream and Downstream Traffic Flow
QoS on the wireless LAN focuses on downstream prioritization from the access point/bridge. These are the effects of QoS on access point/bridge traffic:
•
•
•
•
Precedence of QoS Settings
When you enable QoS, the access point/bridge queues packets based on the Layer 2 class of service value for each packet. The access point/bridge applies QoS policies in this order:
1.
Note
2.
You can use the Cisco IOS command dot11 phone dot11e command to enable the future upgrade of the 7920 Wireless Phone firmware to support the standard QBSS Load IE. The new 7920 Wireless Phone firmware will be announced at a later date.
Note
This example shows how to enable IEEE 802.11 phone support with the legacy QBSS Load element:
AP(config)# dot11 phoneThis example shows how to enable IEEE 802.11 phone support with the standard (IEEE 802.11e draft 13) QBSS Load element:
AP(config)# no dot11 phone dot11eThis example shows how to stop or disable the IEEE 802.11 phone support:
AP(config)# no dot11 phone3.
4.
Using Wi-Fi Multimedia Mode
When you enable QoS, the access point uses Wi-Fi Multimedia (WMM) mode by default. WMM provides these enhancements over basic QoS mode:
•
•
•
•
The access point uses WMM enhancements in packets sent to client devices that support WMM. The access point applies basic QoS policies to packets sent to clients that do not support WMM.
Use the no dot11 qos mode wmm configuration interface command to disable WMM using the CLI. To disable WMM using the web-browser interface, unselect the check boxes for the radio interfaces on the QoS Advanced page. Figure 14-4 shows the QoS Advanced page.
Configuring QoS
QoS is disabled by default (however, the radio interface always honors tagged 802.1P packets even when you have not configured a QoS policy). This section describes how to configure QoS on your access point. It contains this configuration information:
•
•
•
•
Configuration Guidelines
Before configuring QoS on your access point/bridge, you should be aware of this information:
•
•
Configuring QoS Using the Web-Browser Interface
This section describes configuring QoS using the web-browser interface.
For a list of IOS commands for configuring QoS using the CLI, consult the Cisco IOS Command Reference for Cisco Aironet Access Points and Bridges. Follow these steps to browse to the command reference:
1.
http://www.cisco.com/cisco/web/support/index.html
2.
Products & Solutions > Wireless > All Wireless Products > Cisco Aironet 1300 Series > Technical Documentation > Command References > Cisco IOS Command Reference for Cisco Aironet Access Points and Bridges, 12.x(xx)JAFollow these steps to configure QoS:
This section describes configuring QoS using the web-browser interface.
For a list of Cisco IOS commands for configuring QoS using the CLI, consult the Cisco IOS Command Reference for Cisco Aironet Access Points and Bridges.
Follow these steps to configure QoS:
Step 1
Step 1
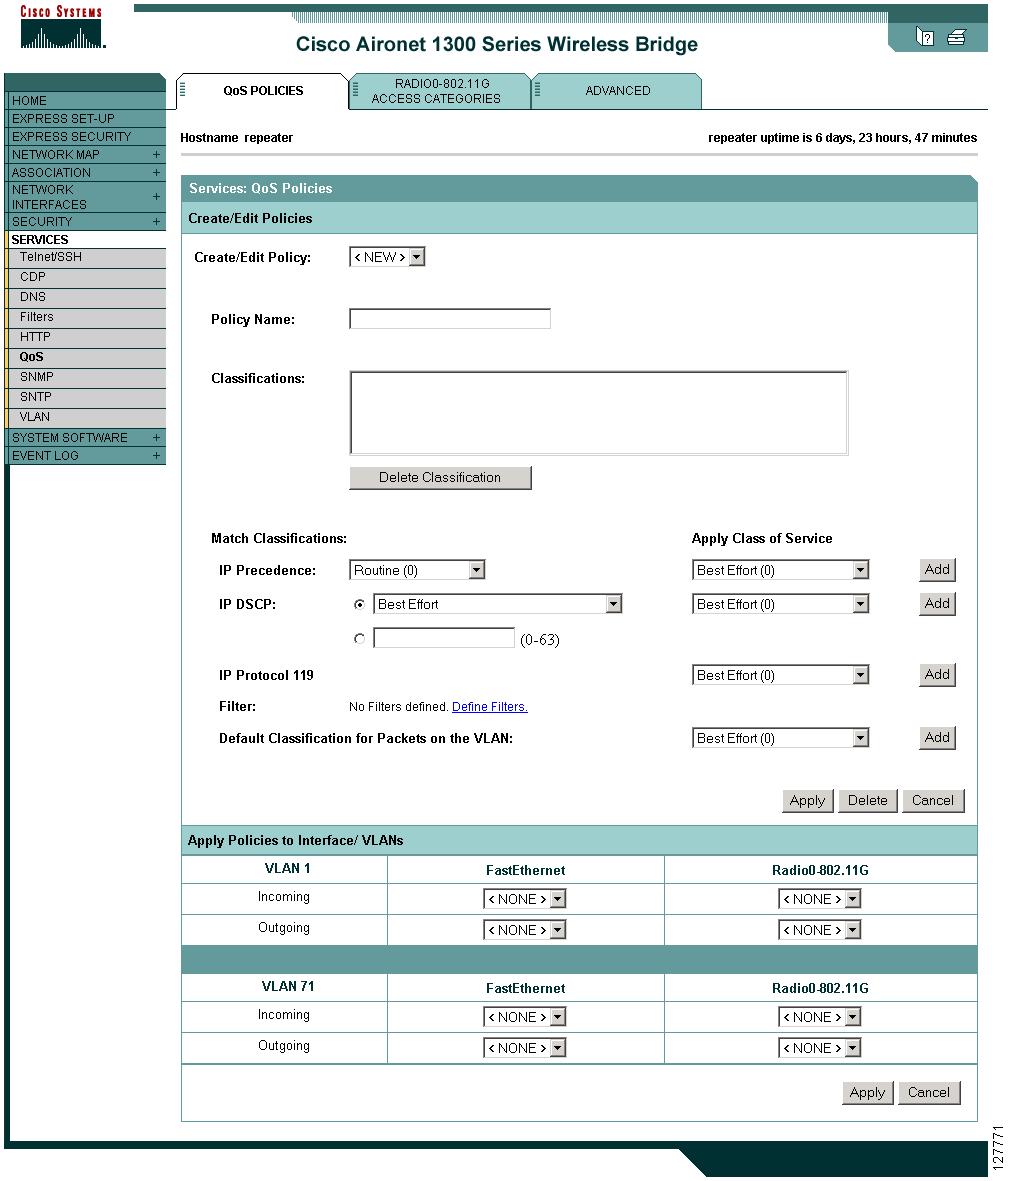
Figure 14-2 QoS Policies Page
Step 2
Step 3
•
•
•
•
•
•
•
•
Step 4
•
•
•
•
•
•
•
•
Step 5
Step 6
•
•
•
•
•
•
•
•
•
•
•
•
•
•
•
•
•
•
•
•
•
Step 7
Step 8
Step 9
Step 10
Step 11
Note
Step 12
Step 13
Step 14
Step 15
Step 16
Step 17
Step 18
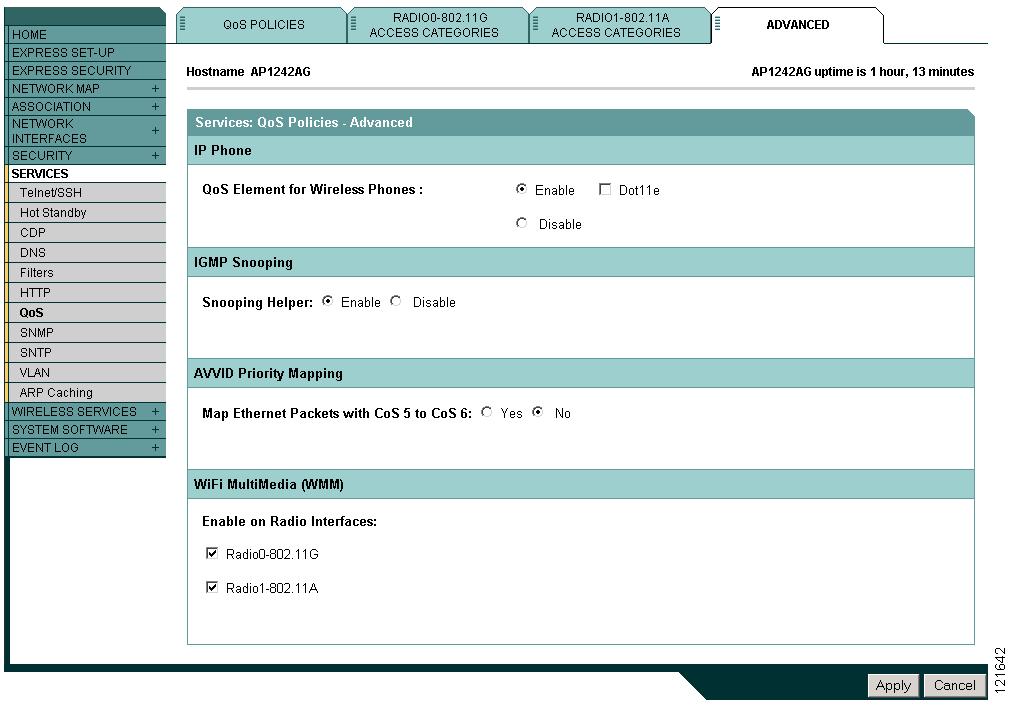
If you want the access point to give priority to all voice packets regardless of VLAN, click the Advanced tab. Figure 14-3 shows the QoS Policies - Advanced page.
Figure 14-3 QoS Policies - Advanced Page
Select Enable and click Apply to give top priority to all voice packets.
Note
Note
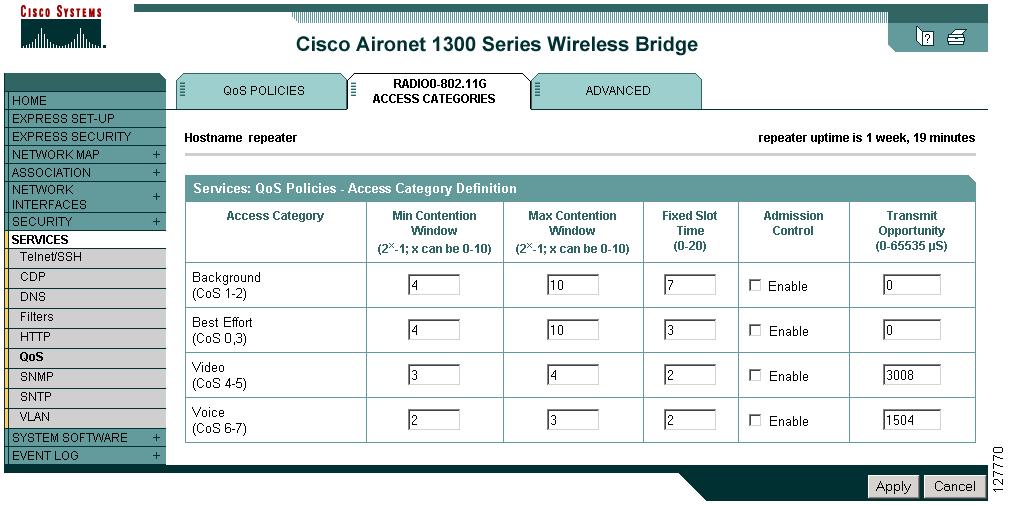
Adjusting Radio Access Category Definitions
The access point uses the radio access categories to calculate backoff times for each packet. As a rule, high-priority packets have short backoff times.
The default values in the Min and Max Contention Window fields and in the Slot Time fields are based on settings recommended in IEEE Draft Standard 802.11e. For detailed information on these values, consult that standard.
Cisco strongly recommends that you use the default settings on the Radio Access Categories page. Changing these values can lead to unexpected blockages of traffic on your wireless LAN, and the blockages might be difficult to diagnose. If you change these values and find that you need to reset them to defaults, use the default settings listed in Table 14-1.
The values listed in Table 14-1 are to the power of 2. The access point computes Contention Window values with this equation:
CW = 2 ** X minus 1
where X is the value from Table 14-1.
Figure 14-4 shows the Radio 802.11G Access Categories page.
Figure 14-4 Radio 802.11G Access Categories Page
Note
Using the Admission Control check boxes, you can control client use of the access categories. When you enable admission control for an access category, clients associated to the access point must complete the WMM admission control procedure before they can use that access category. However, access points do not support the admission control procedure in this release, so clients cannot use the access category when you enable Admission Control.
Disabling IGMP Snooping Helper
When Internet Group Membership Protocol (IGMP) snooping is enabled on a switch and a client roams from one access point to another, the clients' multicast session is dropped. When the access points' IGMP snooping helper is enabled, the access point sends a general IGMP query to the network infrastructure on behalf of the client every time the client associates or reassociates to the access point. By doing so, the multicast stream is maintained for the client as it roams.
The IGMP snooping helper is enabled by default. To disable it, browse to the QoS Policies - Advanced page, select Disable, and click Apply. Figure 14-3 shows the QoS Policies - Advanced page.
Disabling AVVID Priority Mapping
AVVID priority mapping maps Ethernet packets tagged as class of service 5 to class of service 6. This feature enables the access point to apply the correct priority to voice packets for compatibility with Cisco AVVID networks.
AVVID priority mapping is enabled by default. To disable it, browse to the QoS Policies - Advanced page, select No for Map Ethernet Packets with CoS 5 to CoS 6, and click Apply. Figure 14-3 shows the QoS Policies - Advanced page.
CW-min and CW-max Settings for Point-to-Point and Point-to-Multipoint Bridge Links
For best performance on your bridge links, adjust the CW-min and CW-max contention window settings according to the values listed in Table 14-2. The default settings, CW-min 3 and CW-max 10, are best for point-to-point links. However, for point-to-multipoint links, you should adjust the settings depending on the number of non-root bridges that associate to the root bridge.
Note
Beginning in privileged EXEC mode, follow these steps to adjust the CW-min and CW-max settings:
Step 1
configure terminal
Enter global configuration mode.
Step 2
interface dot11radio 0
Enter interface configuration mode for the radio interface.
Step 3
traffic class { cw-min number }
{ cw-max number }
{ fixed-slot number }Assign CW-min, CW-max, and fixed-slot settings to a traffic class. Use the values in Table 14-2 to enter settings that provide the best performance for your network configuration.
Note
Step 4
end
Return to privileged EXEC mode.
Step 5
copy running-config startup-config
(Optional) Save your entries in the configuration file.
Use the no form of the command to reset the setting to defaults.
QoS Configuration Examples
These sections describe two common uses for QoS:
•
•
Giving Priority to Voice Traffic
This section demonstrates how you can apply a QoS policy to your wireless network's voice VLAN to give priority to wireless phone traffic.
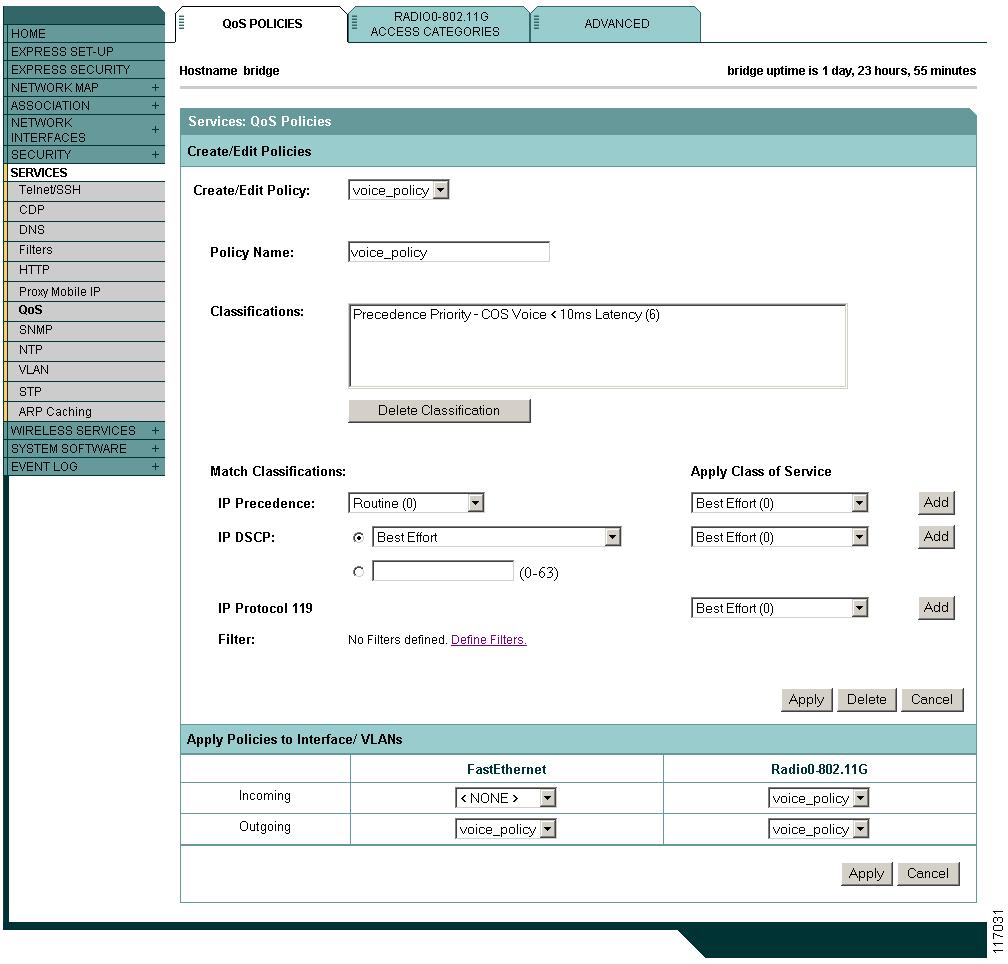
In this example, the network administrator creates a policy named voice_policy that applies voice class of service to traffic from Spectralink phones (protocol 119 packets). The user applies the voice_policy to the incoming and outgoing radio ports and to the outgoing Ethernet port for VLAN 77. Figure 14-5 shows the administrator's QoS Policies page.
Figure 14-5 QoS Policies Page for Voice Example
The network administrator also enables the QoS element for wireless phones setting on the QoS Policies - Advanced page. This setting gives priority to all voice traffic regardless of VLAN.
Giving Priority to Video Traffic
This section demonstrates how you could apply a QoS policy to a VLAN on your network dedicated to video traffic.
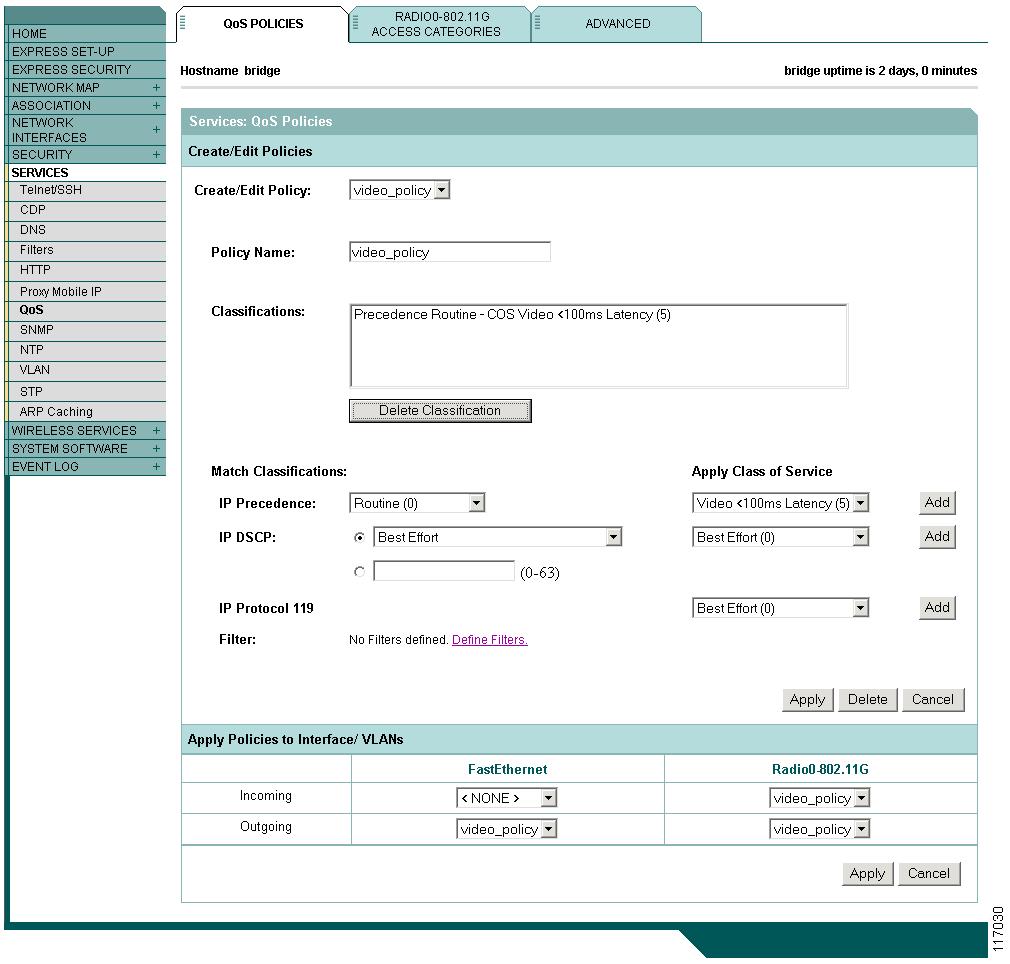
In this example, the network administrator creates a policy named video_policy that applies video class of service to video traffic. The user applies the video_policy to the incoming and outgoing radio ports and to the outgoing Ethernet port for VLAN 87. Figure 14-6 shows the administrator's QoS Policies page.
Figure 14-6 QoS Policies Page for Video Example