-
Cisco IOS Software Configuration Guide for Cisco Aironet 1300 Series Outdoor Access Point/Bridge 12.3(7)JA
-
Preface
-
Overview
-
Configuring the Access Point/Bridge for the
-
Using the Web-Browser Interface
-
Using the Command-Line Interface
-
Administering the Access Point/Bridge
-
Configuring Radio Settings
-
Configuring Multiple SSIDs
-
Configuring Spanning Tree Protocol
-
Configuring Cipher Suites and WEP
-
Configuring Authentication Types
-
Configuring WDS, Fast Secure Roaming, Radio Management, and Wireless Intrusion Detection Services
-
Configuring RADIUS and TACACS+ Servers
-
Configuring VLANs
-
Configuring QoS
-
Configuring Filters
-
Configuring CDP
-
Configuring SNMP
-
Managing Firmware and Configurations
-
Configuring System Message Logging
-
Configuring Repeater and Standby Access Points and Workgroup Bridge Mode
-
Troubleshooting
-
Protocol Filters
-
Supported MIBs
-
Error and Event Messages
-
Glossary
-
 Feedback
Table Of Contents
Configuring Authentication Types
Understanding Authentication Types
Open Authentication to the Access Point/Bridge
Shared Key Authentication to the Access Point/Bridge
EAP Authentication to the Network
MAC Address Authentication to the Network
Combining MAC-Based, EAP, and Open Authentication
Using CCKM for Authenticated Clients
Software and Firmware Requirements for WPA and WPA-TKIP
Configuring Authentication Types
Assigning Authentication Types to an SSID
Configuring WPA Migration Mode
Configuring the Root Access Point/Bridge to Interact with the WDS Device
Configuring Additional WPA Settings
Configuring Authentication Holdoffs, Timeouts, and Intervals
Matching Authentication Types on Root and Non-Root Access Point/Bridges
Configuring Authentication Types
This chapter describes how to configure authentication types on the access point/bridge. This chapter contains these sections:
•
Understanding Authentication Types
•
•
Understanding Authentication Types
This section describes the authentication types that you can configure on the access point/bridge. The authentication types are tied to the SSIDs that you configure for the access point. If you want to serve different types of client devices with the same access point, you can configure multiple SSIDs. See Chapter 7 "Configuring Multiple SSIDs," for complete instructions on configuring multiple SSIDs.
Before a wireless client device can communicate on your network through the access point/bridge, it must authenticate to the access point using open or shared-key authentication. For maximum security, client devices should also authenticate to your network using MAC-address or EAP authentication, authentication types that rely on an authentication server on your network.
Note
The access point/bridge uses several authentication mechanisms or types and can use more than one at the same time. These sections explain each authentication type:
•
•
•
•
•
•
•
•
•
•
Open Authentication to the Access Point/Bridge
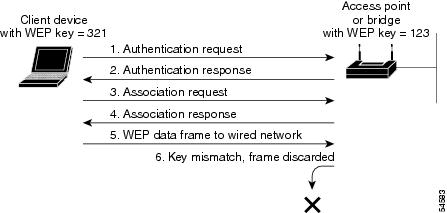
Open authentication allows any 1300 series access point/bridge to authenticate and then attempt to communicate with another 1300 series access point/bridge. Using open authentication, a non-root access point/bridge can authenticate to a root access point/bridge, but the non-root access point/bridge can communicate only if its WEP keys match the root access point/bridge's. An access point/bridge that is not using WEP does not attempt to authenticate with an access point/bridge that is using WEP. Open authentication does not rely on a RADIUS server on your network.
Figure 10-1 shows the authentication sequence between a non-root access point/bridge trying to authenticate and a root access point/bridge using open authentication. In this example, the device's WEP key does not match the access point/bridge's key, so it can authenticate but not pass data. The same scenario occurs when a client attempts to associate to the access point/bridge configured as an a root access point or repeater access points with clients.
Figure 10-1 Sequence for Open Authentication
Shared Key Authentication to the Access Point/Bridge
Cisco provides shared key authentication to comply with the IEEE 802.11b standard. However, because of shared key's security flaws, we recommend that you avoid using it.
During shared key authentication, the root access point/bridge sends an unencrypted challenge text string to other access point/bridges attempting to communicate with the root access point/bridge. The access point/bridge requesting authentication encrypts the challenge text and sends it back to the root access point/bridge. If the challenge text is encrypted correctly, the root access point/bridge allows the requesting device to authenticate. Both the unencrypted challenge and the encrypted challenge can be monitored, however, which leaves the root access point/bridge open to attack from an intruder who calculates the WEP key by comparing the unencrypted and encrypted text strings. Because of this weakness, shared key authentication can be less secure than open authentication. Like open authentication, shared key authentication does not rely on a RADIUS server on your network.
Figure 10-2 shows the authentication sequence between a device trying to authenticate and an access point/bridge using shared key authentication. In this example the device's WEP key matches the access point/bridge's key, so it can authenticate and communicate. The same sequence occurs when the bridge is configured as a root access point or repeater access point with clients.
Figure 10-2 Sequence for Shared Key Authentication
EAP Authentication to the Network
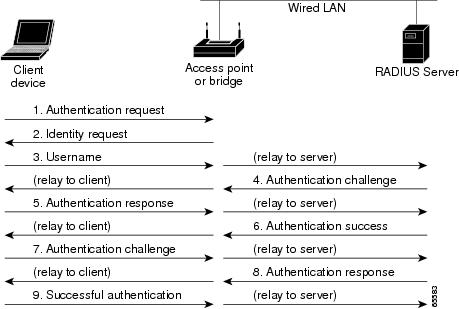
This authentication type provides the highest level of security for your wireless network. By using the Extensible Authentication Protocol (EAP) to interact with an EAP-compatible RADIUS server, the root access point/bridge helps another access point/bridge and the RADIUS server to perform mutual authentication and derive a dynamic unicast WEP key. The RADIUS server sends the WEP key to the root access point/bridge, which uses it for all unicast data signals that it sends to or receives from the non-root access point/bridge. The root access point/bridge also encrypts its broadcast WEP key (entered in the access point/bridge's WEP key slot 1) with the non-root access point/bridge's unicast key and sends it to the non-root access point/bridge.
When you enable EAP on your access point/bridges, authentication to the network occurs in the sequence shown in Figure 10-3:
Figure 10-3 Bridge Sequence for EAP Authentication
In Steps 1 through 9 in Figure 10-3, a non-root access point/bridge or wireless client device and a RADIUS server on the wired LAN use 802.1x and EAP to perform a mutual authentication through the root access point/bridge. The RADIUS server sends an authentication challenge to the non-root access point/bridge or client. The non-root access point/bridge uses a one-way encryption of the user-supplied password to generate a response to the challenge and sends that response to the RADIUS server. Using information from its user database, the RADIUS server creates its own response and compares that to the response from the non-root access point/bridge or client. When the RADIUS server authenticates the non-root access point/bridge, the process repeats in reverse, and the non-root access point/bridge or client authenticates the RADIUS server.
When mutual authentication is complete, the RADIUS server and the non-root access point/bridge determine a WEP key that is unique to the non-root access point/bridge and provides the non-root access point/bridge with the appropriate level of network access, thereby approximating the level of security in a wired switched segment to an individual desktop. The non-root access point/bridge loads this key and prepares to use it for the logon session.
During the logon session, the RADIUS server encrypts and sends the WEP key, called a session key, over the wired LAN to the root access point/bridge. The root access point/bridge encrypts its broadcast key with the session key and sends the encrypted broadcast key to the non-root access point/bridge, which uses the session key to decrypt it. The non-root access point/bridge and the root access point/bridge activate WEP and use the session and broadcast WEP keys for all communications during the remainder of the session.
There is more than one type of EAP authentication, but the access point/bridge behaves the same way for each type: it relays authentication messages from the wireless client device to the RADIUS server and from the RADIUS server to the wireless client device. See the "Assigning Authentication Types to an SSID" section for instructions on setting up EAP on the access point/bridge.
Note
MAC Address Authentication to the Network
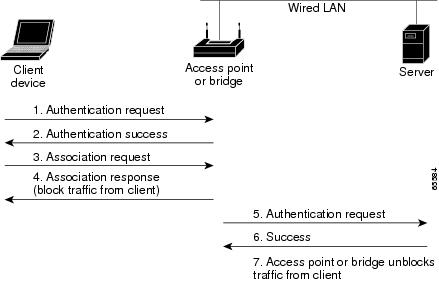
The access point/bridge relays the wireless client device's MAC address to a RADIUS server on your network, and the server checks the address against a list of allowed MAC addresses. Intruders can create counterfeit MAC addresses, so MAC-based authentication is less secure than EAP authentication. However, MAC-based authentication provides an alternate authentication method for client devices that do not have EAP capability. See the "Assigning Authentication Types to an SSID" section for instructions on enabling MAC-based authentication.
Tip
Figure 10-4 shows the authentication sequence for MAC-based authentication.
Figure 10-4 Sequence for MAC-Based Authentication
Combining MAC-Based, EAP, and Open Authentication
You can set up the access point to authenticate client devices using a combination of MAC-based and EAP authentication. When you enable this feature, client devices that associate to the access point using 802.11 open authentication first attempt MAC authentication; if MAC authentication succeeds, the client device joins the network. If MAC authentication fails, the access point waits for the client device to attempt EAP authentication. See the "Assigning Authentication Types to an SSID" section for instructions on setting up this combination of authentications.
Using CCKM for Authenticated Clients
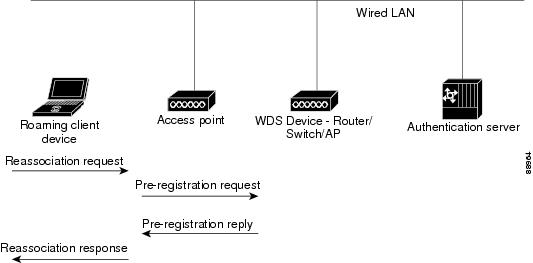
Using Cisco Centralized Key Management (CCKM), authenticated client devices can roam from one access point to another without any perceptible delay during reassociation. An access point on your network provides Wireless Domain Services (WDS) and creates a cache of security credentials for CCKM-enabled client devices on the subnet. The WDS access point's cache of credentials dramatically reduces the time required for reassociation when a CCKM-enabled client device roams to a new access point. When a client device roams, the WDS access point forwards the client's security credentials to the new access point, and the reassociation process is reduced to a two-packet exchange between the roaming client and the new access point. Roaming clients reassociate so quickly that there is no perceptible delay in voice or other time-sensitive applications. See the "Assigning Authentication Types to an SSID" section for instructions on enabling CCKM on your access point. See the "Configuring Access Point/Bridges as Potential WDS Devices" section for detailed instructions on setting up a WDS access point on your wireless LAN.
Note
Figure 10-5 shows the reassociation process using CCKM.
Figure 10-5 Client Reassociation Using CCKM
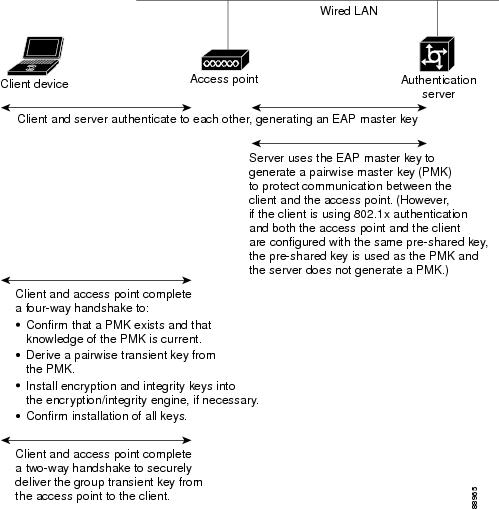
Using WPA Key Management
Wi-Fi Protected Access (WPA) is a standards-based, interoperable security enhancement that strongly increases the level of data protection and access control for existing and future wireless LAN systems. It is derived from and will be forward-compatible with the upcoming IEEE 802.11i standard. WPA leverages TKIP (Temporal Key Integrity Protocol) for data protection and 802.1X for authenticated key management.
WPA key management supports two mutually exclusive management types: WPA and WPA-Pre-shared key (WPA-PSK). Using WPA key management, non-root access point/bridges and the authentication server authenticate to each other using an EAP authentication method, and the non-root access point/bridge and server generate a pairwise master key (PMK). Using WPA, the server generates the PMK dynamically and passes it to the root access point/bridge. Using WPA-PSK, however, you configure a pre-shared key on both the non-root access point/bridge and the root access point/bridge, and that pre-shared key is used as the PMK.
Note
See the "Assigning Authentication Types to an SSID" section for instructions on configuring WPA key management on your access point/bridge.
Figure 10-6 shows the WPA key management process.
Figure 10-6 WPA Key Management Process
Software and Firmware Requirements for WPA and WPA-TKIP
Table 10-1 lists the firmware and software requirements required on access points and Cisco Aironet client devices to support WPA key management and WPA-TKIP encryption protocols.
To support the security combinations in Table 10-1, your Cisco Aironet access points and Cisco Aironet client devices must run the following software and firmware versions:
•
•
–
–
–
–
Table 10-1 Software and Firmware Requirements for WPA, CCKM, CKIP, and WPA-TKIP
LEAP with WPA-TKIP
No
Windows XP and 2000
LEAP with WPA
No
Windows XP and 2000
Host-based EAP (such as PEAP and EAP-TLS) with WPA
No2
Windows XP
Host-based EAP (such as PEAP and EAP-TLS) with WPA
Yes
Windows 2000
WPA-PSK Mode
No3
Windows XP
WPA-PSK Mode
Yes
Windows 2000
1 Such as Funk Odyssey Client supplicant version 2.2 or Meetinghouse Data Communications Aegis Client version 2.1.
2 Windows XP does not require a third-party supplicant, but you must install Windows XP Service Pack 1 and Microsoft support patch 815485.
3 Windows XP does not require a third-party supplicant, but you must install Windows XP Service Pack 1 and Microsoft support patch 815485.
Note
Configuring Authentication Types
This section describes how to configure authentication types. You attach configuration types to the access point/bridge's SSID. See Chapter 7 "Configuring Multiple SSIDs," for details on setting up the access point/bridge SSID. This section contains these topics:
•
•
Assigning Authentication Types to an SSID
Beginning in privileged EXEC mode, follow these steps to configure authentication types for SSIDs:
Step 1
configure terminal
Enter global configuration mode.
Step 2
interface dot11radio 0
Enter interface configuration mode for the radio interface.
Step 3
ssid ssid-string
Create an SSID and enter SSID configuration mode for the new SSID. The SSID can consist of up to 32 alphanumeric characters. SSIDs are case sensitive.
Note
Step 4
authentication open
[mac-address list-name [alternate]]
[eap list-name](Optional) Set the authentication type to open for this SSID. Open authentication allows any device to authenticate and then attempt to communicate with the access point/bridge.
•
Use the alternate keyword to allow client devices to join the network using either MAC or EAP authentication; clients that successfully complete either authentication are allowed to join the network.
•
Note
Step 5
authentication shared
[mac-address list name]
[eap list-name](Optional) Set the authentication type for the SSID to shared key.
Note
Note
•
Step 6
authentication network-eap list-name
[mac-address list name](Optional) Set the authentication type for the SSID to Network-EAP. Using the Extensible Authentication Protocol (EAP) to interact with an EAP-compatible RADIUS server, the access point helps a wireless client device and the RADIUS server to perform mutual authentication and derive a dynamic unicast WEP key. However, the access point does not force all client devices to perform EAP authentication.
(Optional) Set the SSID's authentication type to Network-EAP with MAC address authentication. All client devices that associate to the access point are required to perform MAC-address authentication. For list-name, specify the authentication method list.
Step 7
authentication key-management { [wpa] } [ optional ]
(Optional) Set the authentication type for the SSID to WPA. If you use the optional keyword, client devices other than WPA clients can use this SSID. If you do not use the optional keyword, only WPA client devices are allowed to use the SSID.
To enable WPA for an SSID, you must also enable Open authentication or Network-EAP or both.
Note
Note
Step 8
end
Return to privileged EXEC mode.
Step 9
copy running-config startup-config
(Optional) Save your entries in the configuration file.
Use the no form of the SSID commands to disable the SSID or to disable SSID features.
This example sets the authentication type for the SSID access point/bridgeman to open with EAP authentication. Access points and bridges using the access point/bridge an SSID attempt EAP authentication using a server named adam.
ap# configure terminalap(config)# configure interface dot11radio 0ap(config-if)# ssid bridgemanap(config-ssid)# authentication open eap adamap(config-ssid)# endThe configuration on non-root access point/bridges associated to this access point/bridge would also contain these commands:
ap(config)# configure interface dot11radio 0ap(config-if)# ssid bridgemanap(config-ssid)# authentication client username bridge7 password catch22ap(config-ssid)# authentication open eap adamThis example sets the authentication type for the SSID access point/bridget to network-EAP with a static WEP key. EAP-enabled access point/bridges using the access point/bridget SSID attempt EAP authentication using a server named eve, and access point/bridges using static WEP rely on the static WEP key.ap# configure terminalap(config)# configure interface dot11radio 0ap(config-if)# encryption key 2 size 128 12345678901234567890123456ap(config-if)# ssid bridgetap(config-ssid)# authentication network-eap eveap(config-ssid)# endThe configuration on non-root access point/bridges associated to this access point/bridge would also contain these commands:
ap(config)# configure interface dot11radio 0ap(config-if)# ssid bridgetap(config-ssid)# authentication client username bridge11 password 99bottlesConfiguring WPA Migration Mode
WPA migration mode allows these client device types to associate to the access point/bridge using the same SSID:
•
•
•
If all three client types associate using the same SSID, the multicast cipher suite for the SSID must be WEP. If only the first two types of clients use the same SSID the multicast key can be dynamic, but if the static-WEP clients use the SSID, the key must be static. The access point/bridge can switch automatically between a static and a dynamic group key to accommodate associated client devices. To support all three types of clients on the same SSID, you must configure the static key in key slots 2 or 3.
To set up an SSID for WPA migration mode, configure these settings:
•
•
•
This example sets the SSID migrate for WPA migration mode:
ap# configure terminalap(config)# interface dot11radio 0ap(config-if)# encryption mode cipher tkip wep128ap(config-if)# encryption key 3 size 128 12345678901234567890123456 transmit-keyap(config-if)# ssid migrateap(config-ssid)# authentication openap(config-ssid)# authentication network-eap adamap(config-ssid)# authentication key-management wpa optionalap(config-ssid)# wpa-psk ascii batmobile65ap(config-ssid)# exitConfiguring the Root Access Point/Bridge to Interact with the WDS Device
To support non-root access point/bridges using CCKM, your root access point/bridge must interact with the WDS device on your network, and your authentication server must be configured with a username and password for the root access point/bridge. For detailed instructions on configuring WDS and CCKM on your wireless LAN, see Chapter 11 in the Cisco IOS Software Configuration Guide for Cisco Aironet Access Points.
On your root access point/bridge, enter this command in global configuration mode:
ap(config)# wlccp ap username username password passwordYou must configure the same username and password pair when you set up the root access point/bridge as a client on your authentication server.
Configuring Additional WPA Settings
Use two optional settings to configure a pre-shared key on the access point/bridge and adjust the frequency of group key updates.
Setting a Pre-Shared Key
To support WPA on a wireless LAN where 802.1x-based authentication is not available, you must configure a pre-shared key on the access point/bridge. You can enter the pre-shared key as ASCII or hexadecimal characters. If you enter the key as ASCII characters, you enter between 8 and 63 characters, and the access point/bridge expands the key using the process described in the Password-based Cryptography Standard (RFC2898). If you enter the key as hexadecimal characters, you must enter 64 hexadecimal characters.
Configuring Group Key Updates
In the last step in the WPA process, the access point/bridge distributes a group key to the authenticated client device. You can use these optional settings to configure the access point to change and distribute the group key based on client association and disassociation:
•
•
Beginning in privileged EXEC mode, follow these steps to configure a WPA pre-shared key and group key update options:
This example shows how to configure a pre-shared key for non-root access point/bridges using WPA and static WEP, with group key update options:
ap# configure terminalap(config)# configure interface dot11radio 0ap(config-if)# ssid batmanap(config-ssid)# wpa-psk ascii batmobile65ap(config-ssid)# end
Configuring Authentication Holdoffs, Timeouts, and Intervals
Beginning in privileged EXEC mode, follow these steps to configure holdoff times, reauthentication periods, and authentication timeouts for non-root access point/bridges and client devices authenticating through your root access point/bridge:
Use the no form of these commands to reset the values to default settings.
Matching Authentication Types on Root and Non-Root Access Point/Bridges
To use the authentication types described in this section, the access point/bridge authentication settings must match the authentication settings on the client adapters that associate to the access point. Refer to the Cisco Aironet Wireless LAN Client Adapters Installation and Configuration Guide for Windows for instructions on setting authentication types on wireless client adapters. Refer to Chapter 9 "Configuring Cipher Suites and WEP," for instructions on configuring cipher suites and WEP on the access point.
Table 10-2 lists the client and access point settings required for each authentication type.
Note
Table 10-2 Client and Access Point Security Settings
Static WEP with open authentication
Create a WEP key and enable Use Static WEP Keys and Open Authentication
Set up and enable WEP and enable Open Authentication for the SSID
Static WEP with shared key authentication
Create a WEP key and enable Use Static WEP Keys and Shared Key Authentication
Set up and enable WEP and enable Shared Key Authentication for the SSID
LEAP authentication
Enable LEAP
Set up and enable WEP and enable Network-EAP for the SSID1
802.1x authentication
Enable LEAP
Select a cipher suite and enable Network-EAP for the SSID
802.1x authentication and WPA
Enable any 802.1x authentication method
Select a cipher suite and enable Open authentication and WPA for the SSID (you can also enable Network-EAP authentication in addition to or instead of Open authentication)
Note
802.1x authentication and WPA-PSK
Enable any 802.1x authentication method
Select a cipher suite and enable Open authentication and WPA for the SSID (you can also enable Network-EAP authentication in addition to or instead of Open authentication). Enter a WPA pre-shared key.
Note
EAP-TLS authentication
If using ACU to configure card
Enable Host Based EAP and Use Dynamic WEP Keys in ACU and select Enable network access control using IEEE 802.1X and Smart Card or Other Certificate as the EAP Type in Windows 2000 (with Service Pack 3) or Windows XP
Set up and enable WEP and enable EAP and Open authentication for the SSID
If using Windows XP to configure card
Select Enable network access control using IEEE 802.1X and Smart Card or other Certificate as the EAP Type
Set up and enable WEP and enable EAP and Open Authentication for the SSID
PEAP authentication
If using ACU to configure card
Enable Host Based EAP and Use Dynamic WEP Keys in ACU and select Enable network access control using IEEE 802.1X and PEAP as the EAP Type in Windows 2000 (with Service Pack 3) or Windows XP
Set up and enable WEP and enable EAP and Open authentication for the SSID
If using Windows XP to configure card
Select Enable network access control using IEEE 802.1X and PEAP as the EAP Type
Set up and enable WEP and enable Require EAP and Open Authentication for the SSID
1 Some non-Cisco Aironet client adapters do not perform 802.1x authentication to the access point unless you configure
Open authentication with EAP. To allow both Cisco Aironet clients using LEAP and non-Cisco Aironet clients using LEAP to associate using the same SSID, you might need to configure the SSID for both Network EAP authentication and
Open authentication with EAP.