-
Cisco IOS Software Configuration Guide for Cisco Aironet 1300 Series Outdoor Access Point/Bridge 12.3(7)JA
-
Preface
-
Overview
-
Configuring the Access Point/Bridge for the
-
Using the Web-Browser Interface
-
Using the Command-Line Interface
-
Administering the Access Point/Bridge
-
Configuring Radio Settings
-
Configuring Multiple SSIDs
-
Configuring Spanning Tree Protocol
-
Configuring Cipher Suites and WEP
-
Configuring Authentication Types
-
Configuring WDS, Fast Secure Roaming, Radio Management, and Wireless Intrusion Detection Services
-
Configuring RADIUS and TACACS+ Servers
-
Configuring VLANs
-
Configuring QoS
-
Configuring Filters
-
Configuring CDP
-
Configuring SNMP
-
Managing Firmware and Configurations
-
Configuring System Message Logging
-
Configuring Repeater and Standby Access Points and Workgroup Bridge Mode
-
Troubleshooting
-
Protocol Filters
-
Supported MIBs
-
Error and Event Messages
-
Glossary
-
 Feedback
Table Of Contents
Configuring Filters Using the CLI
Configuring Filters Using the Web-Browser Interface
Configuring and Enabling MAC Address Filters
Using MAC Address ACLs to Block or Allow Client Association to the Access Point
Configuring and Enabling IP Filters
Configuring and Enabling Ethertype Filters
Configuring Filters
This chapter describes how to configure and manage MAC address, IP, and Ethertype filters on the access point/bridge using the web-browser interface. This chapter contains these sections:
•
Configuring Filters Using the CLI
•
Understanding Filters
Protocol filters (IP protocol, IP port, and Ethertype) prevent or allow the use of specific protocols through the access point/bridge's Ethernet and radio ports. You can set up individual protocol filters or sets of filters. You can filter protocols for wireless client devices, users on the wired LAN, or both. For example, an SNMP filter on the access point/bridge's radio port prevents wireless clients from using SNMP with the access point/bridge but does not block SNMP access from the wired LAN.
IP address and MAC address filters allow or disallow the forwarding of unicast and multicast packets either sent from or addressed to specific IP or MAC addresses. You can create a filter that passes traffic to all addresses except those you specify, or you can create a filter that blocks traffic to all addresses except those you specify.
You can configure filters using the web-browser interface or by entering commands in the CLI.
Tip
Configuring Filters Using the CLI
To configure filters using IOS commands, you use access control lists (ACLs) and access point/bridge groups. You can find explanations of these concepts and instructions for implementing them in these documents:
•
•
Configuring Filters Using the Web-Browser Interface
This section describes how to configure and enable filters using the web-browser interface. You complete two steps to configure and enable a filter:
1.
2.
These sections describe setting up and enabling three filter types:
•
•
•
Configuring and Enabling MAC Address Filters
MAC address filters allow or disallow the forwarding of unicast and multicast packets either sent from or addressed to specific MAC addresses. You can create a filter that passes traffic to all MAC addresses except those you specify, or you can create a filter that blocks traffic to all MAC addresses except those you specify. You can apply the filters you create to either or both the Ethernet and radio ports and to either or both incoming and outgoing packets.
Note
Note
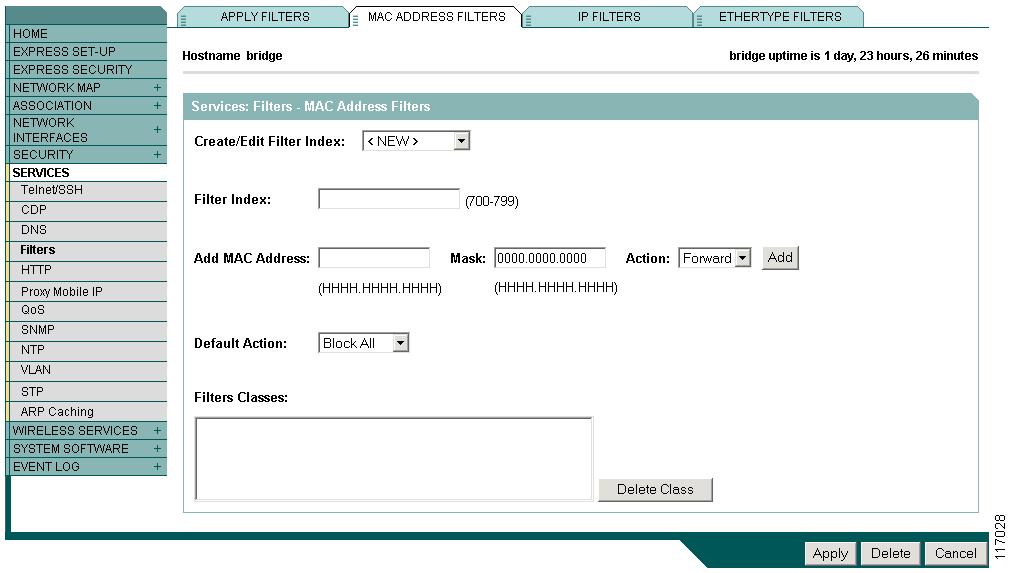
Use the MAC Address Filters page to create MAC address filters for the access point/bridge. Figure 15-1 shows the MAC Address Filters page.
Figure 15-1 MAC Address Filters Page
Follow this link path to reach the Address Filters page:
1.
2.
3.
Creating a MAC Address Filter
Follow these steps to create a MAC address filter:
Step 1
Step 2
Step 3
Step 4
Note
Step 5
Step 6
Step 7
Step 8
Step 9
Tip
Step 10
Step 11
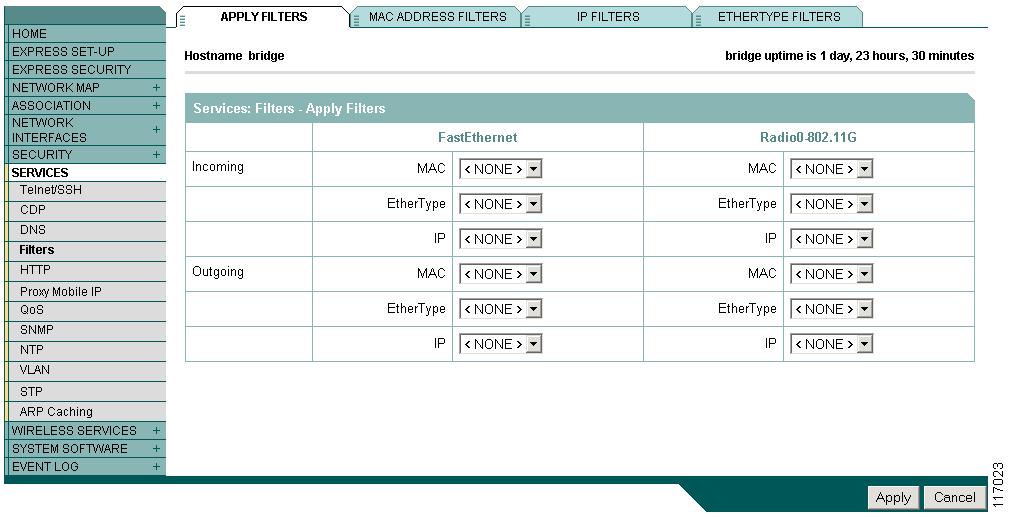
Figure 15-2 Apply Filters Page
Step 12
Step 13
If clients are not filtered immediately, click Reload on the System Configuration page to restart the access point/bridge. To reach the System Configuration page, click System Software on the task menu and then click System Configuration.
Using MAC Address ACLs to Block or Allow Client Association to the Access Point
You can use MAC address ACLs to block or allow association to the access point. Instead of filtering traffic across an interface, you use the ACL to filter associations to the access point radio.
Follow these steps to use an ACL to filter associations to the access point radio:
Step 1
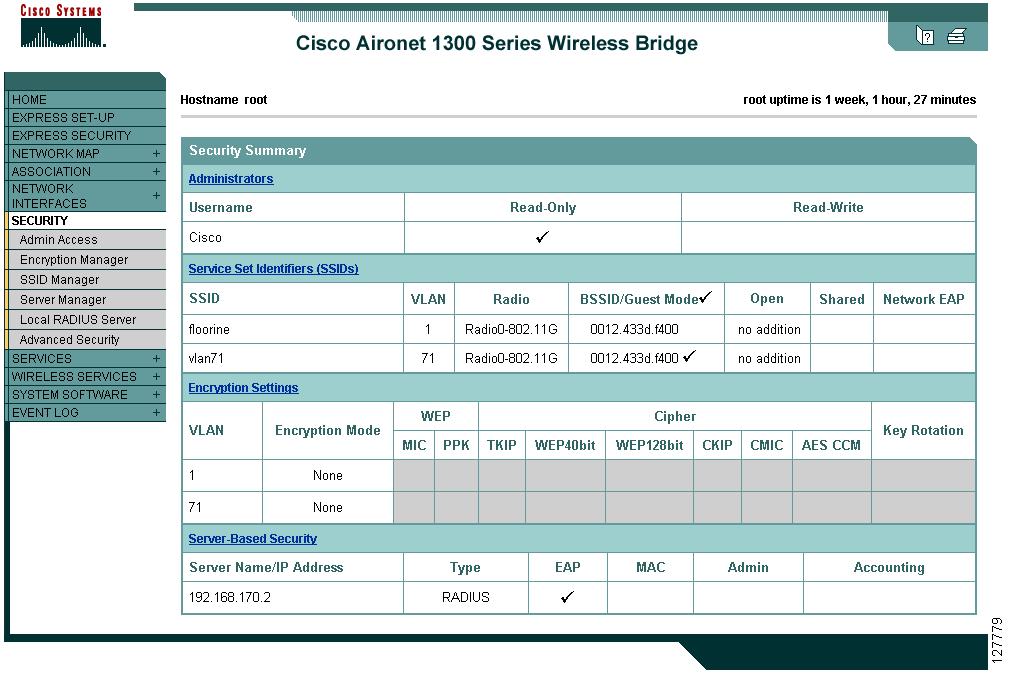
Step 2
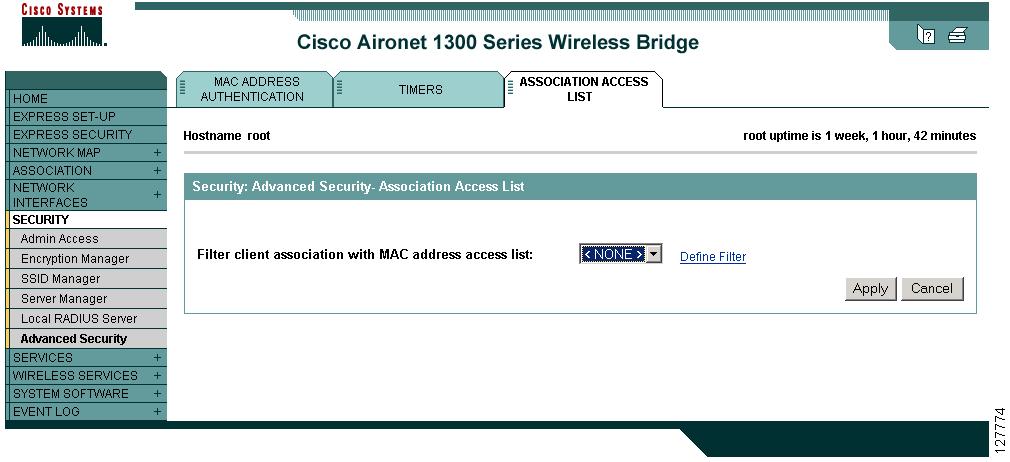
Figure 15-3 Security Summary Page
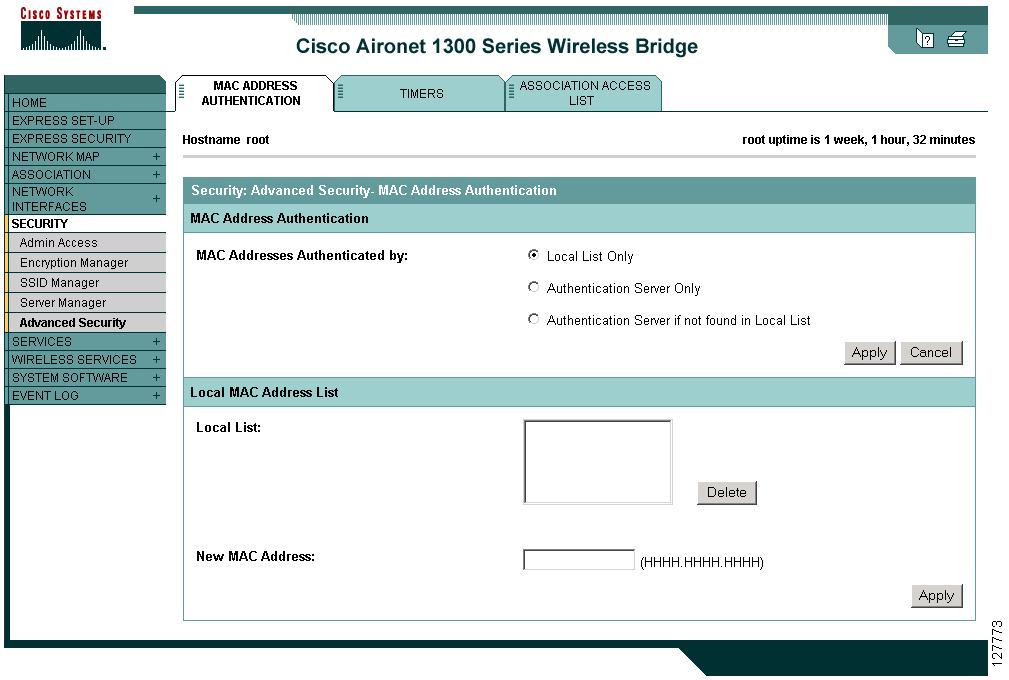
Step 3
Figure 15-4 Advanced Security: MAC Address Authentication Page
Step 4
Figure 15-5 Association List Page
Step 5
Step 6
This example shows the CLI commands that are equivalent to the steps listed in the "Using MAC Address ACLs to Block or Allow Client Association to the Access Point" section:
ap# configure terminalap(config)# dot11 association access-list 777ap(config)# endIn this example, only client devices with MAC addresses listed in access list 777 are allowed to associate to the access point. The access point blocks associations from all other MAC addresses.
For complete descriptions of the commands used in this example, consult the Cisco IOS Command Reference for Cisco Aironet Access Points and Bridges.
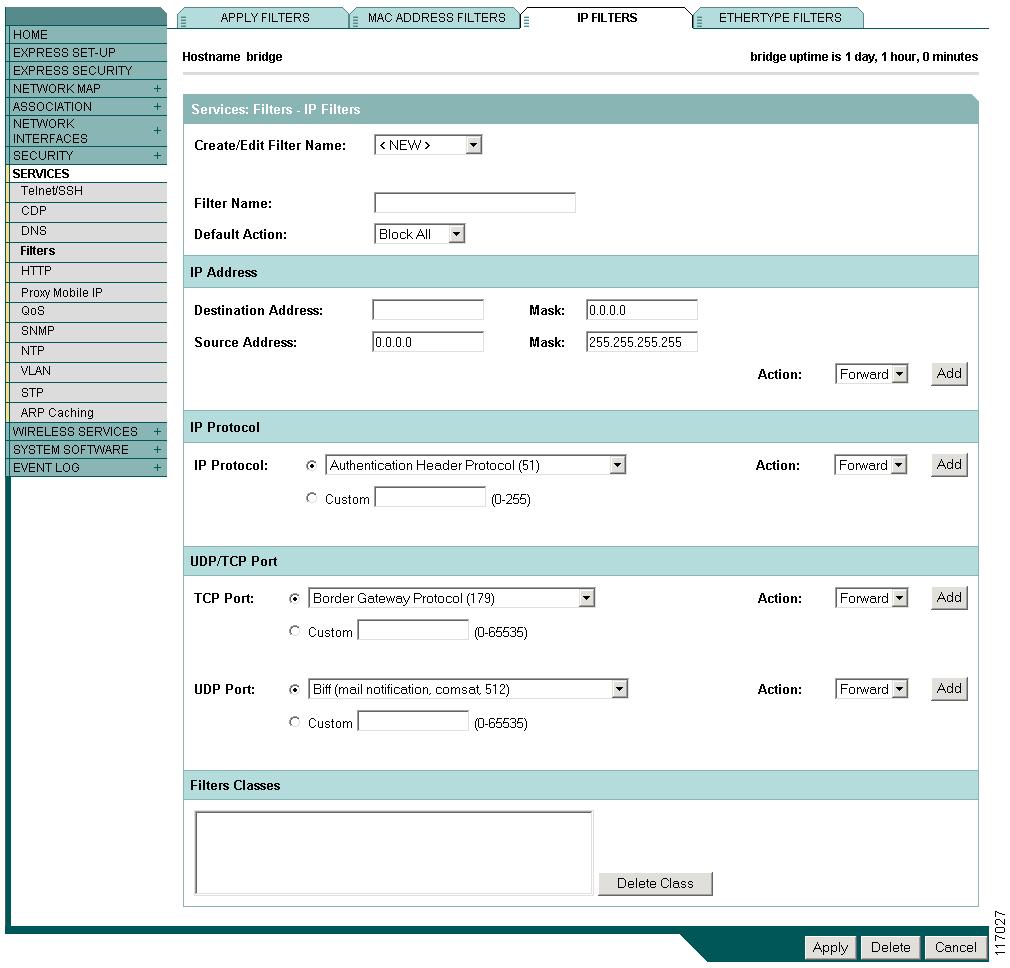
Configuring and Enabling IP Filters
IP filters (IP address, IP protocol, and IP port) prevent or allow the use of specific protocols through the access point/bridge's Ethernet and radio ports, and IP address filters allow or prevent the forwarding of unicast and multicast packets either sent from or addressed to specific IP addresses. You can create a filter that passes traffic to all addresses except those you specify, or you can create a filter that blocks traffic to all addresses except those you specify. You can create filters that contain elements of one, two, or all three IP filtering methods. You can apply the filters you create to either or both the Ethernet and radio ports and to either or both incoming and outgoing packets.
Use the IP Filters page to create IP filters for the access point/bridge. Figure 15-6 shows the IP Filters page.
Figure 15-6 IP Filters Page
Follow this link path to reach the IP Filters page:
1.
2.
3.
Creating an IP Filter
Follow these steps to create an IP filter:
Step 1
Step 2
Step 3
Step 4
Step 5
Note
Step 6
Step 7
Step 8
If you do not need to add IP protocol or IP port elements to the filter, skip to Step 15 to save the filter on the access point/bridge.
Step 9
Step 10
Step 11
If you do not need to add IP port elements to the filter, skip to Step 15 to save the filter on the access point/bridge.
Step 12
Step 13
Step 14
Step 15
Step 16
Figure 15-7 Apply Filters Page
Step 17
Step 18
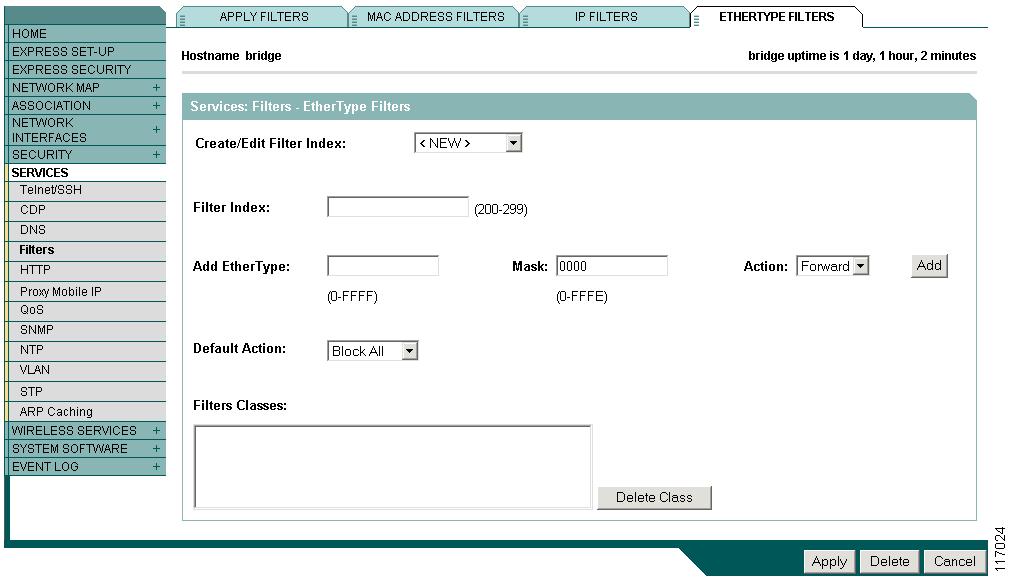
Configuring and Enabling Ethertype Filters
Ethertype filters prevent or allow the use of specific protocols through the access point/bridge's Ethernet and radio ports. You can apply the filters you create to either or both the Ethernet and radio ports and to either or both incoming and outgoing packets.
Use the Ethertype Filters page to create Ethertype filters for the access point/bridge. Figure 15-8 shows the Ethertype Filters page.
Figure 15-8 Ethertype Filters Page
Follow this link path to reach the Ethertype Filters page:
1.
2.
3.
Creating an Ethertype Filter
Follow these steps to create an Ethertype filter:
Step 1
Step 2
Step 3
Step 4
Step 5
Step 6
Step 7
Step 8
Step 9
Step 10
Figure 15-9 Apply Filters Page
Step 11
Step 12