-
Administration Guide for Cisco Virtualization Experience Client Manager 4.9
-
Preface
-
Getting Started
-
Device Manager
-
Package Manager
-
Cisco VXC Firmware and Configuration Upgrade Procedures
-
Update Manager
-
Report Manager
-
Configuration Manager
-
Appendix A: Working with Groups and Views
-
Appendix B: About Cisco VXC Manager Security
-
Appendix C: Upgrading Cisco VXC Manager Agents
-
Appendix D: Device Discovery, Device Imaging, and Mass Imaging Tool
-
Appendix E: Troubleshooting
-
Appendix F: Licensing and Sales Keys
-
Appendix G: Additional Package Manager Procedures
-
Appendix H: Cisco VXC Manager ScriptBuilder Tool and Scripting Language
-
Appendix I: Autogenic Imaging
-
 Feedback
Table Of Contents
Managing the Schedules for Device Updates
Scheduling Device Updates Using the Package Distribution Wizard
Scheduling Device Updates Using the Drag-and-Drop Method
Scheduling Device Updates Using the Default Device Configuration
Changing a Scheduled Device Update for a Cisco VXC Manager Package
Scheduling a Remote Repository Synchronization
Configuring an Automatic Synchronization
Manually Scheduling a Synchronization (Using the Remote Software Repository Synchronization Wizard)
Changing a Remote Software Repository Synchronization
Update Manager
This chapter describes how to perform routine device update management tasks using the Administrator Console. It provides information on managing the device updates in your Cisco VXC Manager system and the schedules for synchronizations between Remote Repositories and the Master Repository.
Managing the Schedules for Device Updates
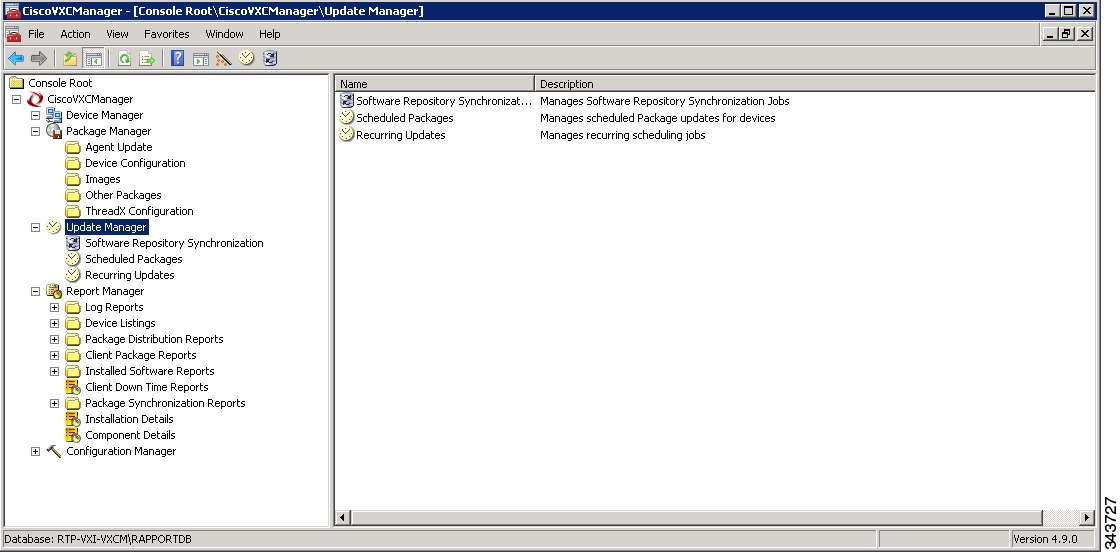
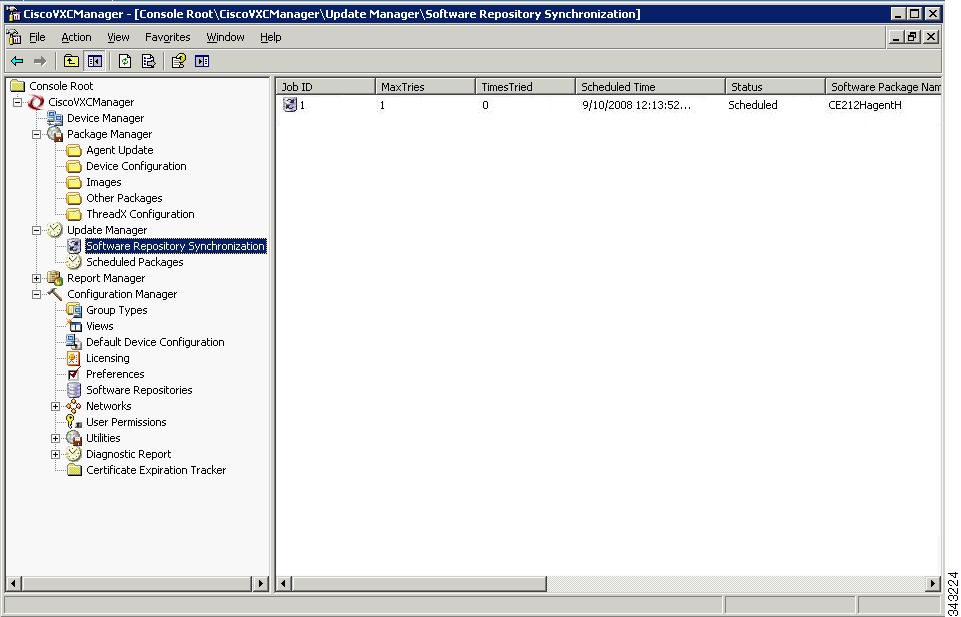
Click Update Manager in the tree pane of the Cisco VXC Manager Administrator Console to open the Update Manager. The Update Manager allows you to quickly view and manage the device updates (schedules of the Cisco VXC Manager packages registered in the Cisco VXC Manager database that are ready to be distributed to devices) within your Cisco VXC Manager environment (see Table 5-1). It also allows you to view and manage the schedules for synchronizations between Remote Repositories and the Master Repository.
Figure 5-1 Update Manager
Before using the Update Wizard to schedule device updates, you should understand the update distribution process and the contents of the registered Cisco VXC Manager packages, know the identity of the Cisco VXC Manager packages that you want to distribute, and ensure that the devices to which you will be pushing images or configurations are recognized by the Cisco VXC Manager system (for example, they have been discovered by Cisco VXC Manager). After the Cisco VXC Manager packages in the Cisco VXC Manager database are scheduled for distribution, they will be distributed as updates to the devices within your Cisco VXC Manager network according to your schedules and preferences.
Tip
If you intend to perform Cisco VXC Manager package registration and scheduling for all of the devices in your Cisco VXC Manager system at the same time, the Cisco VXC Manager Mass Imaging Tool can be a convenient way for you to easily perform these tasks (see Using the Cisco VXC Manager Mass Imaging Tool).
Table 5-1 provides a quick overview of what you can do using the Update Manager.
Table 5-1 Routine Update Manager Tasks
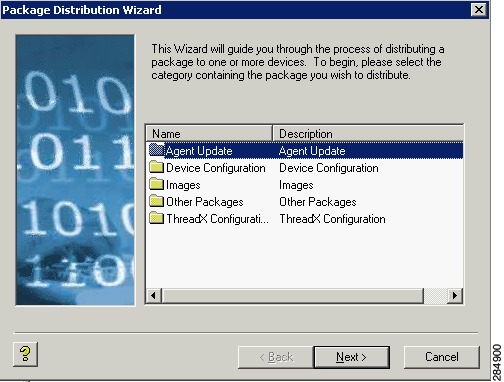
Use the Package Distribution Wizard to schedule a registered Cisco VXC Manager package so that it will be distributed as an update.
In the tree pane of the Administrator Console, expand Update Manager, right-click Scheduled Packages, and then choose New > Update to open and use the Package Distribution Wizard.
Scheduling Device Updates Using the Package Distribution Wizard
Use the Drag-and-Drop method to schedule a registered Cisco VXC Manager package so that it will be distributed as an update (useful for environments with a large number of devices and Views).
Complete the instructions in Scheduling Device Updates Using the Drag-and-Drop Method.
Use the Default Device Configuration method to schedule a registered Cisco VXC Manager package so that it will be distributed as an update (useful if you have a group of devices that have the same OS and media size on which you want to enforce your specified configurations automatically).
Complete the instructions in Scheduling Device Updates Using the Default Device Configuration.
Scheduling Device Updates Using the Default Device Configuration
View the schedules of Cisco VXC Manager packages that will be distributed as updates.
In the tree pane of the Administrator Console, expand Update Manager and click Scheduled Packages (the details pane displays any scheduled and in-progress device updates).
Change a previously scheduled update or recurring update (the schedule of a Cisco VXC Manager package that will be distributed as an update).
In the tree pane of the Administrator Console, expand Update Manager and click Scheduled Packages. In the details pane, right-click the previously scheduled or recurring update and choose Properties to open and use the Edit Updatesor Recurring Scheduler dialog box.
Changing a Scheduled Device Update for a Cisco VXC Manager Package
Delete a previously scheduled update (the schedule of a Cisco VXC Manager package that will be distributed as an update).
In the tree pane of the Administrator Console, expand Update Manager and choose Scheduled Packages. In the details pane, right-click the previously scheduled update, choose Delete, and then confirm the deletion.
TipYou cannot delete in-progress device updates for a Cisco VXC Manager package.
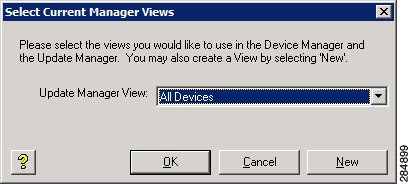
TipChoose an Update Manager View (a default or one that you created) to use with Scheduled Packages so you can quickly find the devices you want.
In the tree pane of the Administrator Console, expand Update Manager, right-click Scheduled Packages, and then choose Switch View to open and use the Select Current Manager View dialog box.
After creating Views according to your device Group Types, Networks, and so on, selecting a Current Manager View makes it easy to view the devices you want (see Managing Views).
Use the Remote Software Repository Synchronization Wizard to manually schedule a synchronization.
In the tree pane of the Administrator Console, expand Update Manager, right-click Software Repository Synchronization, and then choose New > Remote SW Repository Synch to open the Remote Software Repository Synchronization Wizard.
Manually Scheduling a Synchronization (Using the Remote Software Repository Synchronization Wizard)
Set up or change an automatic synchronization.
Complete the instructions in Configuring an Automatic Synchronization.
Configuring an Automatic Synchronization
Note
View the schedules of remote repository synchronizations.
In the tree pane of the Administrator Console, expand Update Manager and click Software Repository (the details pane displays any scheduled, error-state, or in-progress remote repository synchronizations).
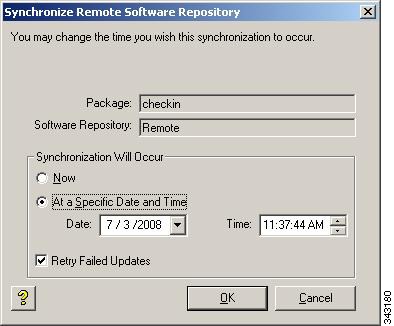
Change the schedule of a remote repository synchronization.
In the tree pane of the Administrator Console, expand Update Manager and click Software Repository Synchronization. In the details pane, right-click the scheduled synchronization and choose Properties to open and use the Synchronize Remote Software Repository dialog box.
Delete a previously scheduled remote repository synchronization.
In the tree pane of the Administrator Console, expand Update Manager and click Software Repository Synchronization. In the details pane, right-click the previously scheduled synchronization, choose Delete, and then confirm the deletion.
You cannot delete in-progress remote repository synchronizations.
Scheduling Device Updates Using the Package Distribution Wizard
Use the following procedure to schedule updates using the Package Distribution Wizard.
Procedure
Step 1
Figure 5-2 Choose View
Step 2
Figure 5-3 Package Distribution Wizard
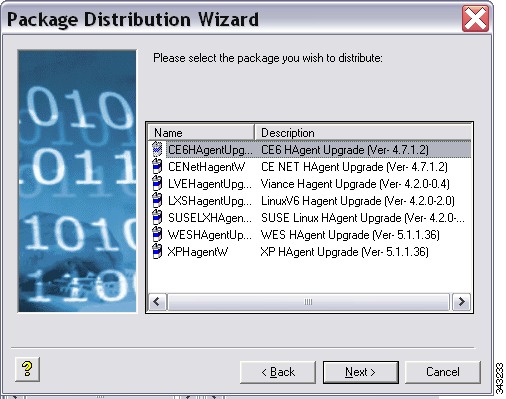
Step 3
Note
Figure 5-4 Choose the Cisco VXC Manager Package
Step 4
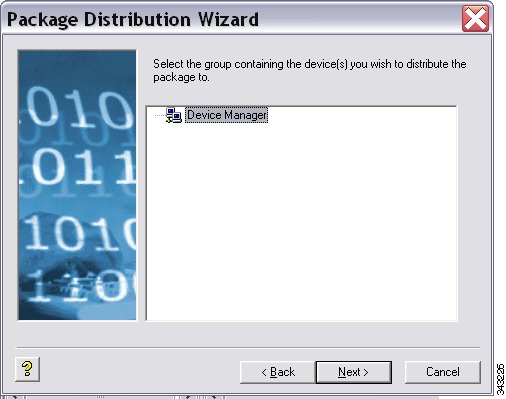
Figure 5-5 Choose Client Groups
Step 5
Tip
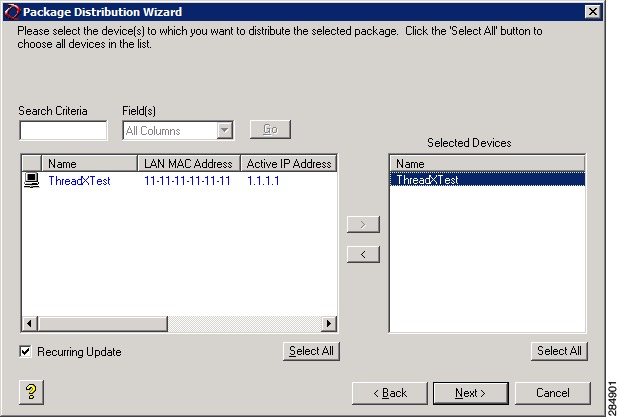
Figure 5-6 Choose Clients
Step 6
Step 7
•
•
Step 8
Step 9
Scheduling Device Updates Using the Drag-and-Drop Method
Caution
You can use the drag-and-drop method to schedule a registered Cisco VXC Manager package so that it will be distributed as an update (useful for environments with a large number of devices and Views). Drag-and-drop can push only one package at a time to your devices. To push multiple packages to your devices at the same time, you must use DDC.
Tip
Procedure
Step 1
Step 2
Step 3
Figure 5-7 Choose Devices
Step 4
Step 5
•
•
Step 6
Step 7
After you configure a DDC for Cisco VXC clients, the clients are updated to the selected OS version automatically: either at their regularly scheduled check-in time or according to the update time set in the Device Manager DDC preferences in Configuration Manager. You can also right-click the Cisco VXC client you want to upgrade, and choose Reboot to perform a manual upgrade.
Scheduling Device Updates Using the Default Device Configuration
If you have a group of devices that have the same OS and media size, you can assign a Default Device Configuration (DDC) to update the devices automatically. A DDC allows you to set default configurations for a group of devices and ensures that the devices conform to your configurations. That is, if there is any deviation from your default configurations, Cisco VXC Manager reverts the devices back to your specified configurations automatically (Cisco VXC Manager automatically sends the Cisco VXC Manager packages in the DDC to the devices according to your schedule and without your intervention).
Procedure
Step 1
Tip
Step 2
Tip
Step 3
Changing a Scheduled Device Update for a Cisco VXC Manager Package
Use the following procedure to change a scheduled device update for a Cisco VXC Manager Package.
Caution
Procedure
Step 1
Step 2
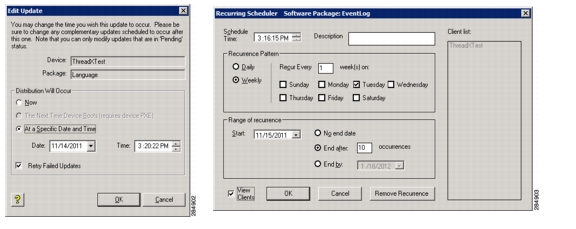
Figure 5-8 Edit Updates/Recurring Scheduler
Step 3
Tip
Step 4
Scheduling a Remote Repository Synchronization
Cisco VXC Manager packages in Remote Repositories can be synchronized using either of the following methods:
•
Note
Automatic Synchronization only occurs when a client requires a package that does not already exist on the Remote Repository for that client. If you configure a package on the Master Repository that is not applicable to clients on a particular subnet, the Remote Repository for that subnet does not perform a synchronization to obtain this package. As such, the contents of a Remote Repository do not always match the Master Repository.
To fully synchronize the Remote Repository to the Master Repository, you can perform a manual synchronization prior to deploying the package.
•
Configuring an Automatic Synchronization
By default, Cisco VXC Manager uses automatic synchronization of the Remote Repository with the Master Repository. If you ever need to change a manual synchronization schedule back to an automatic schedule, or simply need to change the time settings on your current automatic schedule, use the following guidelines:
Procedure
Step 1
Step 2
Step 3
Step 4
Step 5
Step 6
Step 7
Manually Scheduling a Synchronization (Using the Remote Software Repository Synchronization Wizard)
Use the following procedure to manually schedule a synchronization.
Procedure
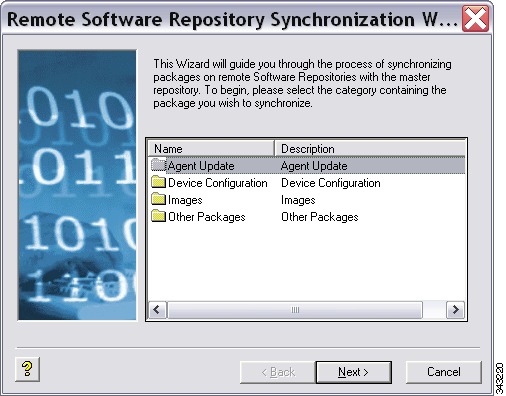
Step 1
Figure 5-9 Remote Software Repository Synchronization Wizard
Step 2
Figure 5-10 Choose the Cisco VXC Manager Package
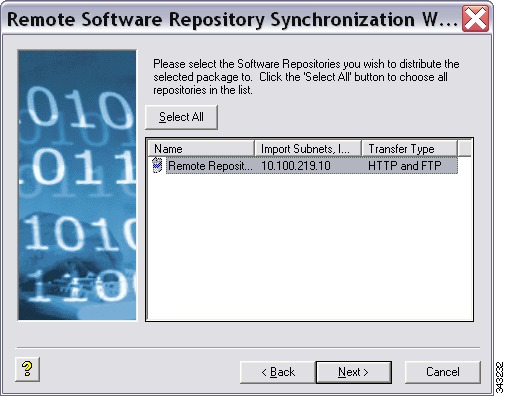
Step 3
Figure 5-11 Choose the Software Repository
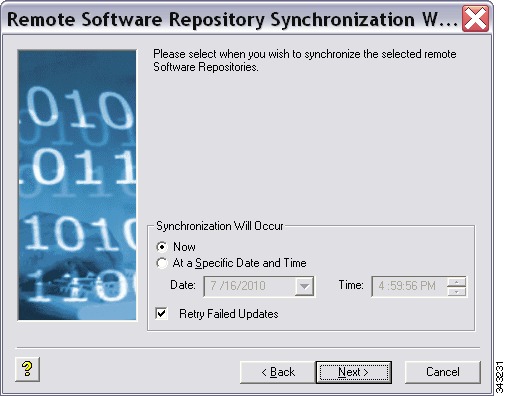
Step 4
Figure 5-12 Choose the Scheduling Options
Step 5
Step 6
Step 7
Step 8
Figure 5-13 Repository Synchronization
Changing a Remote Software Repository Synchronization
Use the following procedure to change a remote software repository synchronization.
Procedure
Step 1
Step 2
Figure 5-14 Software Repository Synchronization
Step 3
Figure 5-15 Edit Synchronize Remote Software Repository
Step 4
Step 5