-
Administration Guide for Cisco Virtualization Experience Client Manager 4.9
-
Preface
-
Getting Started
-
Device Manager
-
Package Manager
-
Cisco VXC Firmware and Configuration Upgrade Procedures
-
Update Manager
-
Report Manager
-
Configuration Manager
-
Appendix A: Working with Groups and Views
-
Appendix B: About Cisco VXC Manager Security
-
Appendix C: Upgrading Cisco VXC Manager Agents
-
Appendix D: Device Discovery, Device Imaging, and Mass Imaging Tool
-
Appendix E: Troubleshooting
-
Appendix F: Licensing and Sales Keys
-
Appendix G: Additional Package Manager Procedures
-
Appendix H: Cisco VXC Manager ScriptBuilder Tool and Scripting Language
-
Appendix I: Autogenic Imaging
-
 Feedback
Table Of Contents
Step 1: Prepare an Image to be Autogenic Capable
Step 2: Register the Prepared Image in Cisco VXC Manager
Step 3: Convert the Registered Image to an Autogenic Capable Image
Step 4: Convert a Device to an Autogenic Capable Device
Step 5: Schedule an Autogenic Capable Image to an Autogenic Capable Device
Autogenic Imaging Technical Details
Update Manager (Autogenic Imaging Technical Details)
Cisco VXC Manager (Autogenic Imaging Technical Details)
Autogenic Imaging
Note
This appendix is not applicable to Cisco VXC devices. It is applicable only for the management of third-party clients.
This appendix contains advanced information about Autogenic Imaging.
Overview
The purpose of Autogenic Imaging (image backup mechanism scheme) is to image a device with the image residing on the flash or hard drive of the device. This document describes the following steps you must complete prior to the actual imaging process/scheme:
Procedure
Step 1
Step 2
Step 3
Step 4
Step 5
Caution
Autogenic Imaging means to image a device with the image residing on the backup partition of the device flash/hard drive. The backup OS partition is a FAT32 partition where the backup image resides. The disk layout of the device is as follows.
For XPe:
WFS | Active OS partition (NTFS) | Non-PXE boot agent (Fat32) | Back up OS partition (Fat32)
For WES 2009:
WFS | Non-PXE boot agent (Fat32) | Active OS partition (NTFS) | Back up OS partition (Fat32)
For WES 7:
Non-PXE boot agent (Fat32) | Active OS partition (NTFS) | Back up OS partition (Fat32)
The Autogenic Image contains the standard image files with one extra script file named image.rsp inside the package. In the package script you can verify the Autogenic Image by looking for the <BackupImage> tag. If this tag is present in the registered image package script, then the image is autogenic. Upon scheduling the image, the image script (RSP file) will have instructions for the agent to download the image from the Master (or remote) repository to the back-up partition.
Procedures
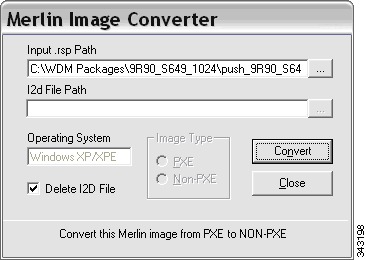
Step 1: Prepare an Image to be Autogenic Capable
Convert a normal WISard Image or Merlin Image to a non-PXE Merlin Image by using a converter utility.
Note
Caution
Figure I-1 Merlin Image Converter
Step 2: Register the Prepared Image in Cisco VXC Manager
Note
To register the prepared image in Cisco VXC Manager, perform the same steps as you would to register a normal package in Cisco VXC Manager (see Cisco VXC Manager documentation). After registering the image in Cisco VXC Manager, be sure that image type appears as Merlin in the Package Manager View.
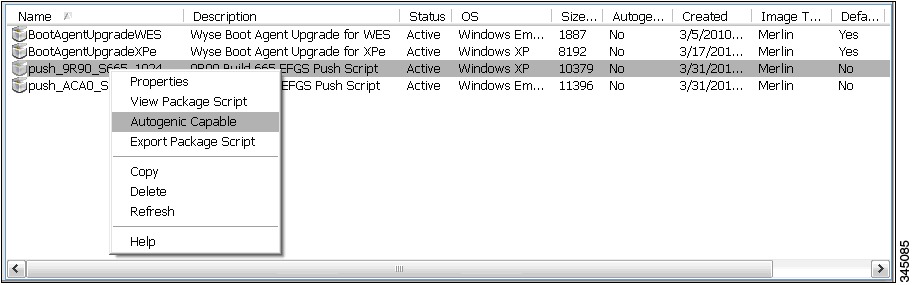
Step 3: Convert the Registered Image to an Autogenic Capable Image
After registering the image in Cisco VXC Manager, right-click on the registered image and choose the Autogenic Capable option from the available options. The image will be converted to an Autogenic Capable Image.
After converting the image to an Autogenic Capable Image in Cisco VXC Manager, be sure that Yes appears in the Autogenic column for the image in the Package Manager View.
Figure I-2 Package Manager View
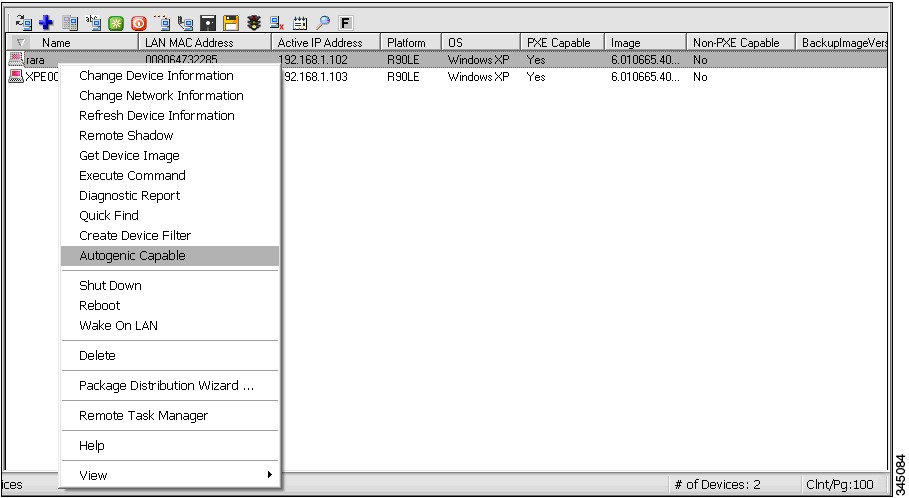
Step 4: Convert a Device to an Autogenic Capable Device
If there is no registered Autogenic Capable Image in the Cisco VXC Manager Package Manager, the device cannot be converted to an Autogenic Capable Device. Thus, before attempting to convert a device to an Autogenic Capable Device, be sure that an Autogenic Capable Image exists in the Cisco VXC Manager Package Manager.
Procedure
Step 1
Step 2
Figure I-3 Device Manager
Step 3
Note
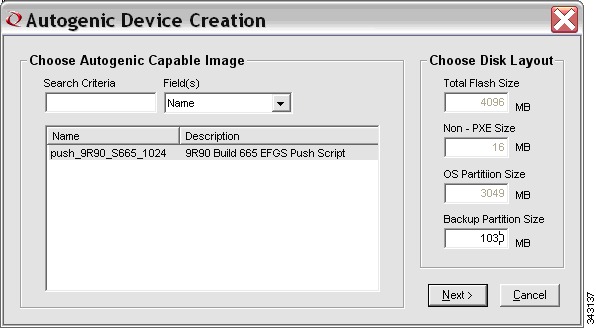
Figure I-4 Autogenic Device Creation
Step 4
Note
Step 5
•
•
•
•
Step 6
Step 7
Step 8
Step 9
Step 5: Schedule an Autogenic Capable Image to an Autogenic Capable Device
Procedure
Step 1
Step 2
Step 3
•
•
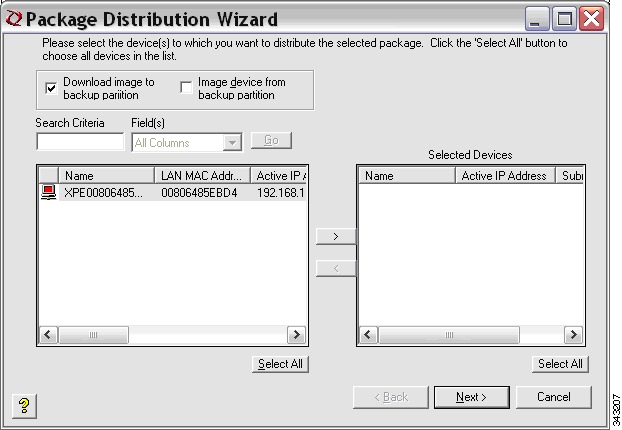
Case 1: Performing the Downloading and Imaging Processes Separately
Process 1: To download the image to the backup partition:
Step 1
Step 2
Step 3
Step 4
Figure I-5 Package Distribution
Step 5
•
•
•
•
Step 6
Step 7
Step 8
Caution
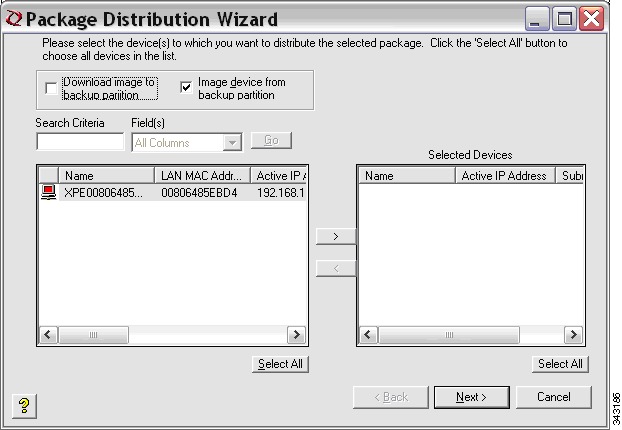
Process 2: To schedule imaging the device from the backup partition:
Figure I-6 Image Device
Step 1
Step 2
Step 3
Step 4
Step 5
•
•
Step 6
Case 2: Performing the Downloading and Imaging Processes Together
To download the image to the backup partition and schedule imaging the device from the backup partition:
Procedure
Step 1
Step 2
Step 3
Step 4
Step 5
Autogenic Imaging Technical Details
Be aware of the following Update Manager and Cisco VXC Manager details.
Update Manager (Autogenic Imaging Technical Details)
When an Autogenic Image is scheduled to a device, a form must be designed to schedule the Autogenic Image.
Refer to the figures in Case 1: Performing the Downloading and Imaging Processes Separately.
•
•
•
•
Cisco VXC Manager (Autogenic Imaging Technical Details)
Cisco VXC Manager expects the HAgent to check in with a flag
|SupportImgBackup = 1|BackupImagePresent=1|BackImageVer=XXXX|
Procedure
Step 1
Step 2
•
•
Step 3
•
•
•
Step 4
•
•
•
Step 5
Step 6
Step 7