-
Cisco Content Security and Control SSM Administrator Guide, 6.1
-
Preface
-
Introducing the Content Security and Control SSM
-
Verifying Initial Setup
-
Configuring Mail Traffic (SMTP and POP3)
-
Configuring Web (HTTP) and File Transfer (FTP) Traffic
-
Managing Updates and Log Queries
-
Administering Trend Micro InterScan for Cisco CSC SSM
-
Monitoring Content Security
-
Troubleshooting Trend Micro InterScan for Cisco CSC SSM
-
Reimaging and Configuring the CSC SSM Using the Command Line
-
Using CSC SSM with Trend Micro Control Manager
-
Glossary
-
Index
-
 Feedback
Table Of Contents
Using CSC SSM with Trend Micro Control Manager
Opening the Control Manager Console
Access the HTTPS Management Console
About the Control Manager Product Directory
Download and Deploy New Components
Deploy New Components from the TMCM Product Directory
View Managed Products Status Summaries
Query and View Managed Product Logs
Using CSC SSM with Trend Micro Control Manager
This appendix describes how to begin managing Trend Micro InterScan for CSC SSM from Trend Micro Control Manager™ (TMCM). This Appendix assumes that you have already installed the TMCM agent and registered CSC SSM with TMCM using the SCS SSM the Administration > Register to TMCM screen.
About Control Manager
Trend Micro Control Manager™ (TMCM) is a central management console that allows you to manage multiple Trend Micro products and services from a central console. Control Manager allows you to monitor and report on activities such as infections, security violations, or virus entry points
In the Control Manager environment, CSC SSM is a managed product, and will appear as an icon in the Control Manager management console Product Directory . You can administer CSC SSM and other managed products, individually or by group, through the Product Directory.
With TMCM you can download and deploy update components throughout the network, helping ensure that protection is consistent and up-to-date. Example update components include virus pattern files, scan engines, and anti-spam rules. Control Manager allows both manual and pre-scheduled updates, and allows the configuration and administration of products as groups or as individuals.
Control Manager benefits include:
•
Enterprise-Wide Coordination
•
•
•
•
•
•
An explanation of the TMCM interface begins on the next page.
Control Manager Interface
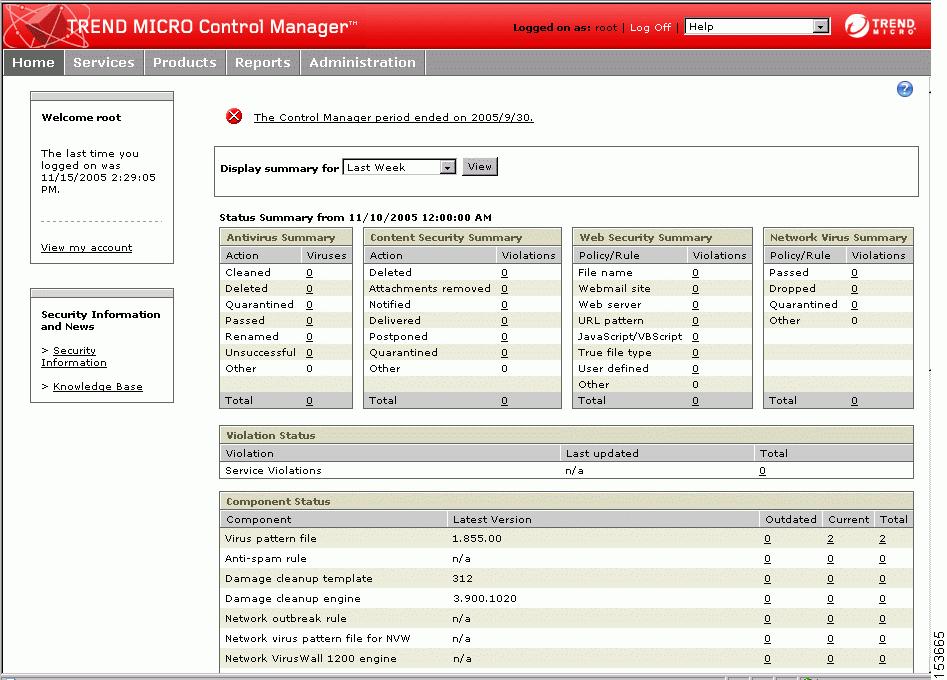
Trend Micro Control Manager uses a management console for administration of managed products. When you first log in to TMCM, the default screen is the Home screen shown below:
Figure B-1 The Control Manager Management Console "Home" Screen.
Using the Management Console
The management console consists of the following elements:
•
•
•
•
•
Opening the Control Manager Console
There are two ways to access the Control Manager console, locally, from the Control Manager server, and remotely, via Web browser from any connected computer. The latter method is explain below.
To open the TMCM console from a remote computer:
Step 1
http://{hostname}/ControlManager
Where {hostname} is the Control Manager server's fully qualified domain name (FQDN), IP address, or server name.The TMCM log on screen appears.
Step 2
Step 3
Upon opening the console, the initial screen will show the status summary for your whole Control Manager system. This is identical to the status summary generated from the Product Directory. User rights determine the Control Manager functions you can access.
Access the HTTPS Management Console
If you want to encrypt the configuration data as it passes from the Web-based console to the Control Manager server, you must first assign HTTP to Control Manager Web access and then alter the management console URL to use the HTTPS protocol through port 443. For details on how to set up HTTPS access, refer to your TMCM documentation.
To open the TMCM console using HTTPS:
Step 1
https://{hostname}:443/ControlManager
Where {hostname} is the Control Manager server's fully qualified domain name (FQDN), IP address, or server name. The number 443 is the port allotted during an HTTPS session.
Note
About the Control Manager Product Directory
The Product Directory is a logical grouping of managed products in the TMCM console that allows you to perform the following for administering managed products:
•
•
•
•
Newly registered managed products usually appear in the TMCM New entity folder, depending on the user account specified during the agent installation. Control Manager determines the default folder for the managed product by the privileges of the user account specified during the product agent installation.
You can use the TMCM Product Directory to administer CSC SSM after it has been registered with the Control Manager server.
Note
Download and Deploy New Components
Update Manager is a collection of functions that help you update the antivirus and content security components on your Control Manager network. Trend Micro recommends updating the antivirus and content security components to remain protected against the latest virus and malware threats. By default, Control Manager enables virus pattern, damage cleanup template, and Vulnerability Assessment pattern download even if there is no managed product registered on the Control Manager server.
The following are the components to update (listed according to the frequency of recommended update):
•
•
•
•
Note
Deploy New Components from the TMCM Product Directory
Manual deployments allow you to update the virus patterns, spam rules, and scan engines of CSC SSM on demand. This is useful especially during virus outbreaks. Download new components before deploying updates to specific or groups of managed products.
To manually deploy new components using the Product Directory:
Step 1
Step 2
Step 3
Step 4
Step 5
Step 6
Step 7
Step 8
View Managed Products Status Summaries
The Product Status screen displays the Antivirus, Content Security, and Web Security summaries for all managed products present in the Product Directory tree.
There are two ways to view the managed products status summary:
•
•
To access through the Home page
•
To access through the Product Directory:
Step 1
Step 2
•
•
Note
Configure CSC SSM Products
You can configure one or more instances of CSC SSM from TMCM, either individually or in groups, according to folder division. When performing a group configuration, verify that you want all managed product in a group to have the same configuration. Otherwise, add managed products that should have the same configuration to Temp to prevent the settings of other managed products from being overwritten.
•
To configure a product:
Step 1
Step 2
Step 3
Step 4
Step 5
Step 6
Step 7
Issuing Tasks to CSC SSM
Use the Tasks tab to invoke available actions to a group or specific managed product. Depending on the managed product, all or some of the following tasks are available:
•
•
•
•
•
You can deploy the latest spam rules, patterns, or scan engine to managed products with outdated components (the Control Manager server already be updated with the latest components from the Trend Micro ActiveUpdate server). Perform a manual download to ensure that current components are already present in the Control Manager server.
To issue tasks to managed products:
Step 1
Step 2
Step 3
Step 4
Step 5
Step 6
Query and View Managed Product Logs
Use the Logs tab to query and view logs for a group or specific managed product.
To query and view managed product logs:
Step 1
Step 2
Step 3
Step 4
Step 5
For additional information and instructions on using Trend Micro Control Manager, see that product's online help and PDF documentation.