-
Cisco Content Security and Control SSM Administrator Guide, 6.1
-
Preface
-
Introducing the Content Security and Control SSM
-
Verifying Initial Setup
-
Configuring Mail Traffic (SMTP and POP3)
-
Configuring Web (HTTP) and File Transfer (FTP) Traffic
-
Managing Updates and Log Queries
-
Administering Trend Micro InterScan for Cisco CSC SSM
-
Monitoring Content Security
-
Troubleshooting Trend Micro InterScan for Cisco CSC SSM
-
Reimaging and Configuring the CSC SSM Using the Command Line
-
Using CSC SSM with Trend Micro Control Manager
-
Glossary
-
Index
-
 Feedback
Table Of Contents
Managing Updates and Log Queries
Logging of Scanning Parameter Exceptions
Managing Updates and Log Queries
This chapter describes managing updates, proxy and syslog settings, and log queries, and includes the following sections:
Updating Components
New viruses and other security risks are released "into the wild" (meaning perpetrated on the global computing community) via the Internet or other distribution means at any time and on any day of the week. TrendLabs immediately analyzes a new threat, and takes appropriate steps to update the components required to detect the new threat, such as the virus pattern file. This quick response enables Trend Micro InterScan for Cisco CSC SSM to detect, for example, a new worm that was launched from the computer of a malicious hacker in Amsterdam at 3:00 A.M. this morning.
It is vital that you keep your components up-to-date to help ensure that a new threat does not penetrate your network. To accomplish this, you can:
•
Perform a manual update of the components at any time, on demand
•
The components managed, either manually or via a schedule, are:
•
•
•
•
•
•
The PhishTrap pattern file, anti-spam rules, and anti-spam engine components are active and updated only if you purchased the Plus License.
To find out whether you have the most current components installed, go to the Manual Update window and check the component status.
Note
Manual Update
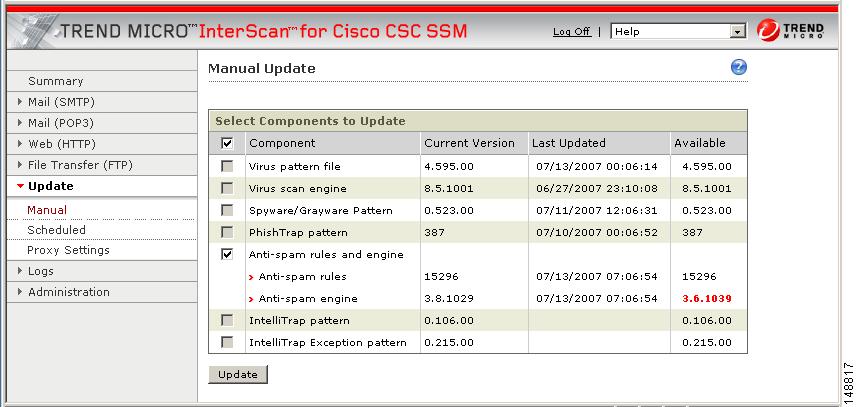
To view component status, or manually update components, go to Updates > Manual. The Manual Update window displays (shown in Figure 5-1).
Figure 5-1 Manual Update Window
You can see at a glance whether any of the components are out of date by scanning the Available column on the right side of the window. If a more current component is available, the component version displays in red.
For example, click Update to download the latest pattern file version. A progress message displays while the new pattern is downloading. When the update is complete, the Manual Update window refreshes, showing that the latest update has been applied.
See the online help for more information about this feature.
Scheduled Update
The Scheduled Update window enables you to configure component updates as often as every 15 minutes. Go to Updates > Scheduled to view the Scheduled Update window. Choose the components to be updated per the update schedule.
Leave the schedule as is, or change it to more or less frequent. See the online help for more information. Click Save to update your configuration.
Configuring Proxy Settings
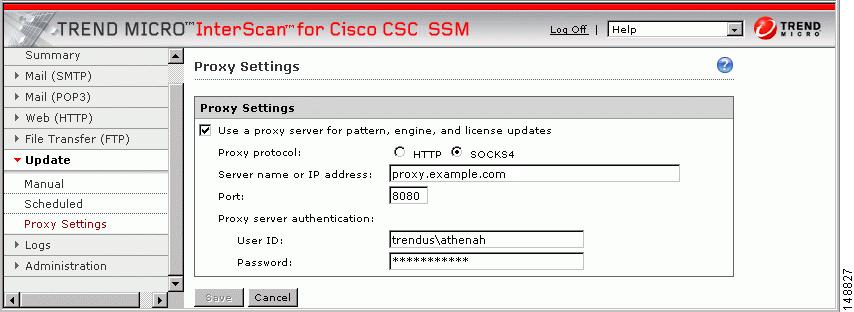
If you are using a proxy server to communicate with the Trend Micro ActiveUpdate server, you specified a proxy server IP and port during installation. Click Update > Proxy Settings to view these selections on the Proxy Settings window, shown in Figure 5-2.
Figure 5-2 Proxy Settings Window
If you set up a proxy during installation, by default the HTTP proxy protocol is configured. To change to SOCKS4, click the SOCKS4 radio button. See the online help for more information.
The only other change you might want to make on this window is to add an optional proxy authentication user name and password in the User ID and Password fields. Click Save to update your configuration when you are finished.
Configuring Syslog Settings
After installation, log data such as virus or spyware/grayware detections is saved temporarily. To store log data, configure at least one (up to three) syslog servers. Go to Logs > Settings to display the Log Settings window.
Configure at least one syslog server. Click the Enable check box, then enter the syslog server IP, port, and preferred protocol (either UDP or TCP). See the online help for more information.
By default, detected security risks are logged. You can turn off logging for features you are not using, for example, you can turn off URL blocking/Anti-phishing and URL filtering if you did not purchase the Plus License.
For information on choosing and viewing log data, see the "Viewing Log Data" section. Syslogs are also viewable from the ASDM. See the online help for ASDM for more information.
Viewing Log Data
After you have installed and configured Trend Micro InterScan for Cisco CSC SSM, security risks are being detected and acted upon according to the actions you chose for each type of risk. These events are recorded in the logs. To conserve system resources, these logs may be purged periodically.
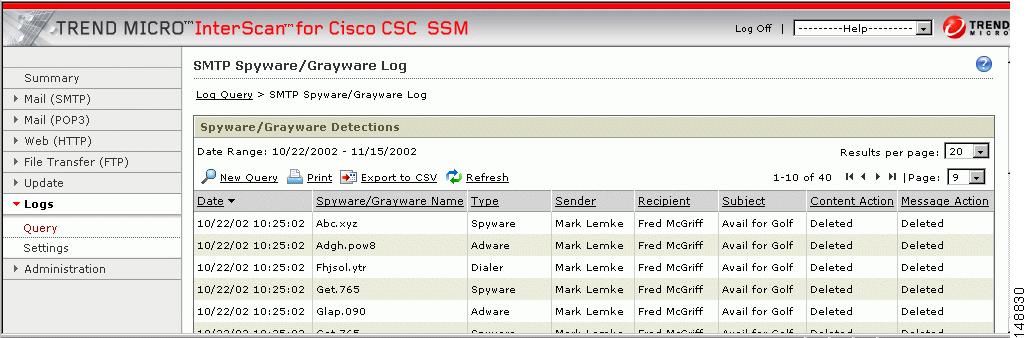
To view the log, go to Logs > Query to display the Log Query window. Specify the inquiry parameters and click Display Log to view the log. See the online help for more information.
Figure 5-3 shows an example of the spyware/grayware log.
Figure 5-3 Spyware/Grayware Log
Logging of Scanning Parameter Exceptions
Exceptions to the following scanning parameters, which are specified on the Target tab, display in the Virus/Malware log.
For SMTP, POP3, HTTP and FTP:
•
•
•
•
•
For HTTP and FTP only:
•
In place of the virus/malware name, these files are identified with messages similar to the following:
•
•