-
Cisco Content Security and Control SSM Administrator Guide, 6.1
-
Preface
-
Introducing the Content Security and Control SSM
-
Verifying Initial Setup
-
Configuring Mail Traffic (SMTP and POP3)
-
Configuring Web (HTTP) and File Transfer (FTP) Traffic
-
Managing Updates and Log Queries
-
Administering Trend Micro InterScan for Cisco CSC SSM
-
Monitoring Content Security
-
Troubleshooting Trend Micro InterScan for Cisco CSC SSM
-
Reimaging and Configuring the CSC SSM Using the Command Line
-
Using CSC SSM with Trend Micro Control Manager
-
Glossary
-
Index
-
 Feedback
Table Of Contents
Configuring Web (HTTP) and File Transfer (FTP) Traffic
Default Web and FTP Scanning Settings
Blocking Via Pattern File (PhishTrap)
Configuring Web (HTTP) and File Transfer (FTP) Traffic
After installation, by default your HTTP and FTP traffic is being scanned for viruses, worms and Trojans. Malware such as spyware and other grayware require a configuration change before they are detected. This chapter describes how to make these configuration updates, and includes the following sections:
•
Default Web and FTP Scanning Settings
Default Web and FTP Scanning Settings
Table 4-1 summarizes the Web and file transfer configuration settings, and the default values that are in operation after installation.
These default settings give you some protection for your Web and FTP traffic after you install Trend Micro InterScan for Cisco CSC SSM. You may change these settings; for example, you may prefer to use the Scan by specified file extensions... option rather than All Scannable Files for malware detection. Review the online help carefully for more information about these selections before making changes.
There are additional configuration settings that you may want to update post-installation to get the maximum protection for your Web and FTP traffic. These additional settings are described in the remaining pages of this chapter.
If you purchased the Plus License, which entitles you to receive URL blocking, anti-phishing, and URL filtering functionality, you must configure these features; they are not operable by default.
Downloading Large Files
The Target tabs on the HTTP Scanning and FTP Scanning windows allow you to define the size of the largest download you want scanned. For example, you might specify that a download under 20MB is scanned, but a download larger than 20 MB is not scanned.
In addition, you can:
•
•
By default, the CSC SSM software specifies that files under 50 MB are scanned, and files 50MB and over are delivered without scanning to the requesting client.
Deferred Scanning
The deferred scanning feature is not enabled by default. This feature, when enabled, allows a user to begin downloading data without scanning the entire download. Deferred scanning thus allows a user to begin viewing the data without a prolonged wait while the entire body of information is scanned.
Caution
If deferred scanning is not enabled, the entire content of the download must be scanned before it is presented to the user. However, some client software may timeout due to the time it takes to collect sufficient network packets to compose complete files for scanning.
To summarize:
Scanning HTTPS Traffic
Traffic moving via HTTPS protocol cannot be scanned for viruses and other threats by the CSC SSM software.
Detecting Spyware/Grayware
Grayware is a category of software that may be legitimate, unwanted, or malicious. Unlike threats such as viruses, worms, and Trojans, grayware does not infect, replicate, or destroy data, but it may violate your privacy. Examples of grayware include spyware, adware, and remote access tools.
Spyware/grayware detection is not enabled by default. To begin detecting spyware and other forms of spyware and other grayware in your Web and file transfer traffic, configure this feature on the following windows:
•
•
You can go directly to the Target tab of the HTTP Scanning window by clicking the Configure Web Scanning link on Configuration > Trend Micro Content Security > Web in ASDM. You can go directly to the Target tab of the FTP Scanning window by clicking the Configure File Scanning link on Configuration > Trend Micro Content Security > File Transfer in ASDM.
See the "Enabling SMTP & POP3 Spyware/Grayware Detection" section on page 3-3 for more information. Also see the online help for the above-mentioned windows.
Scanning Webmail
Caution
As mentioned in Table 4-1, Webmail scanning for Yahoo, AOL, MSN, and Google are already configured by default. To add additional sites, click the Configure Web Scanning link on Configuration > Trend Micro Content Security > Web in ASDM. The Target tab of the HTTP Scanning window displays. Click the Webmail Scanning tab.
Enter the Webmail site in the Name field using:
•
•
•
Note
See the online help for more information about how to configure additional Webmail sites for scanning. Configured sites are scanned until you remove them from the Scan Webmail at following sites section of the window by clicking the trashcan icon. Click Save to update your configuration.
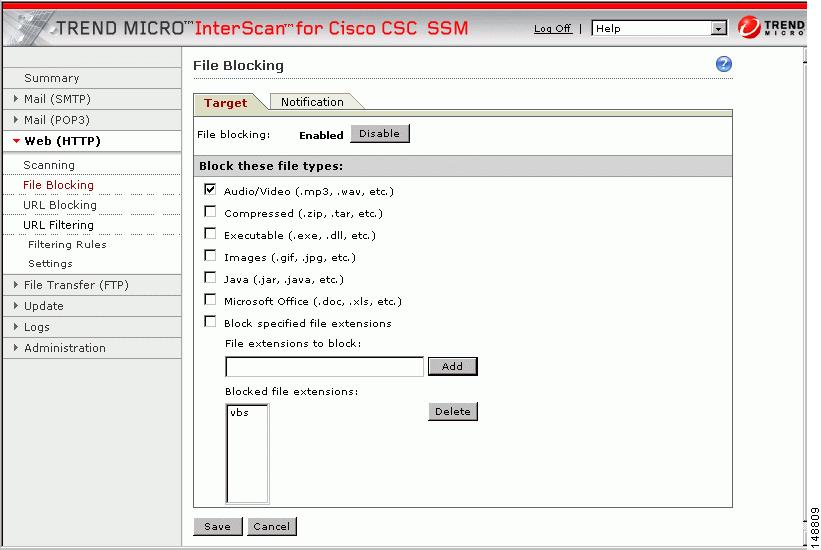
File Blocking
This feature is enabled by default, but doesn't block any files until you specify the types of files you want blocked. File blocking helps you enforce your organization's policies regarding the use of the Internet and other computing resources during work time. For example, suppose your company does not allow downloading of music, both because of legal issues as well as employee productivity issues.
To block downloads via HTTP protocol, click the Configure File Blocking link on Configuration > Trend Micro Content Security > Web in ASDM to display the File Blocking window. To block downloads via FTP protocol, click the Configure File Blocking link on Configuration > Trend Micro Content Security > File Transfer in ASDM. The File Blocking window is the sam e for both protocols.
On the Target tab of the File Blocking window, block transferring of music files by choosing Audio/Video, as shown in Figure 4-1.
Figure 4-1 Enable File Blocking
You can specify additional file types by file name extension. Click Block specified file extensions to enable this feature. Then, add additional file types in the File extensions to block field, and click Add. In the example, .vbs files are also blocked.
See the online help for more information about file blocking, and for information on deleting file extensions you no longer want to block.
Click the Notifications tab of the File Blocking window to view the default notification that displays in the user's browser/FTP client when a file blocking event is triggered. You can customize the text of these messages by highlighting and typing over the default message. An optional notification to the administrator is available for HTTP file-blocking events, but is turned off by default. Click Send the following message... check box to activate the notification.
Click Save when you are finished, to update your configuration.
URL Blocking
Note
The URL blocking feature helps you prevent employees from accessing prohibited websites. For example, suppose you want to block some sites because policies in your organization prohibit use of dating services, online shopping services, or viewing offensive sites.
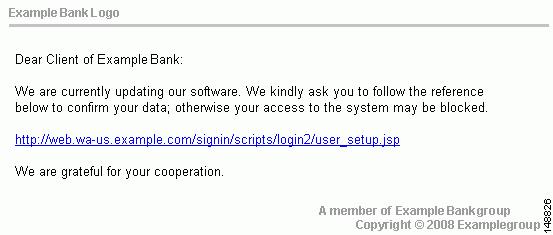
You may also want to block sites that are known for perpetrating fraud, such as phishing. Phishing is a technique used by criminals who send email messages that appear to be from a legitimate organization, leading users into revealing private information such as bank account numbers. Figure 4-2 shows a common example of an email message used for phishing.
Figure 4-2 Example of Phishing
By default, URL blocking is enabled, but only sites in the TrendMicro PhishTrap pattern file are blocked, until you specify additional sites for blocking.
Blocking Via Local List
To configure URL blocking, perform the following steps:
Step 1
Step 2
•
•
•
See the online help for more information about formatting entries in the Match field.
Step 3
Note
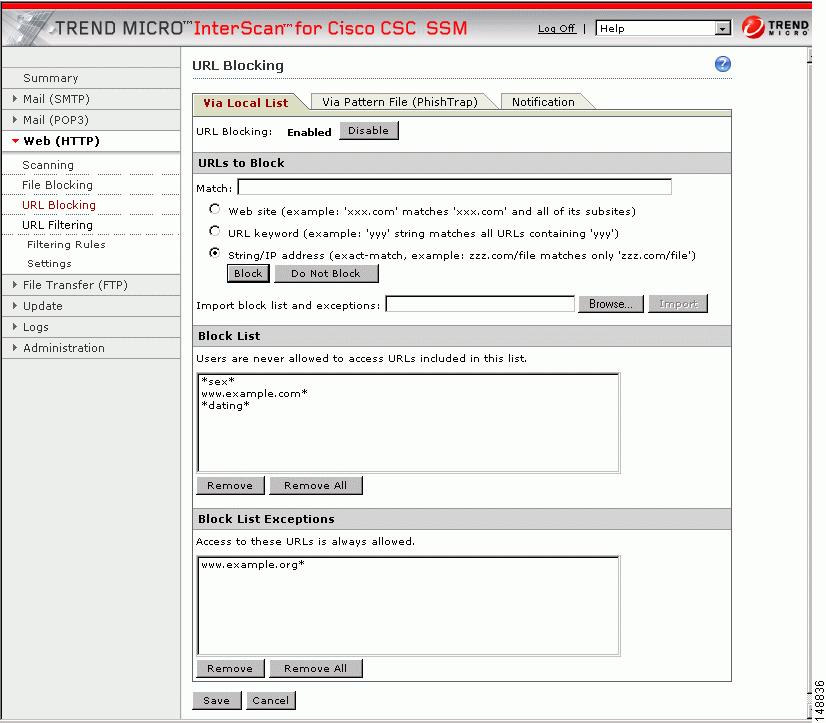
Figure 4-3 shows an example of the URL Blocking window (Via Local List tab) with some entries.
Figure 4-3 URL Blocking Window
Blocking Via Pattern File (PhishTrap)
Click the Configure URL Blocking link on Configuration > Trend Micro Content Security > Web in ASDM to display the URL Blocking window. Then click the Via Pattern File (PhishTrap) tab.
By default, the Trend Micro PhishTrap pattern file detects and blocks known phishing sites, spyware sites, virus accomplice sites (sites associated with known exploits), and disease vectors (websites that exist only for malicious purposes). Use the Submit the Potential Phishing URL to TrendLabs fields to submit sites that you suspect should be added to the PhishTrap pattern file. TrendLabs evaluates the site and may add the site if such action is warranted.
Click the Notification tab to review the text of the default message that appears in a user's browser when an attempt is made to access a blocked site. An example is shown in the online help. Customize the text by highlighting and typing over the default message.
Click Save when you are finished to update your configuration.
URL Filtering
Note
URLs defined on the URL Blocking windows described previously are either always allowed or always disallowed. The URL filtering feature, however, allows you to configure URLs in categories, which you can schedule to allow during certain times (defined as leisure time) and disallow during work time.
There are six URL categories:
•
•
•
•
•
•
By default, company-prohibited sites are blocked during both work and leisure time.
Filtering Settings
To configure the URL filtering feature, perform the following steps:
Step 1
Step 2
Step 3
•
•
•
See the online help for more information about formatting entries in the Match field.
Step 4
Note
Step 5
Step 6
Click the Reclassify URL tab to submit questionable URLs to TrendLabs for evaluation.
Filtering Rules
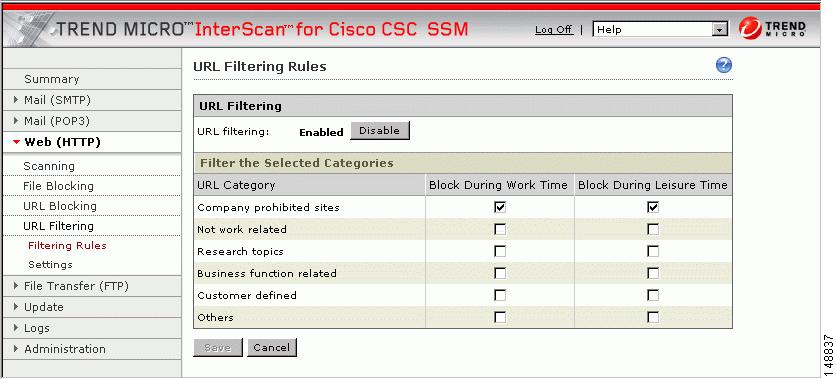
Now that you have assigned your URL sub-categories to categories appropriate for your organization, defined exceptions (if any), and created the work/leisure time schedule, assign the filtering rules that determine when a category is filtering. Click the Configure URL Filtering Rules link on Configuration > Trend Micro Content Security > Web in ASDM to display the URL Filtering Rules window, shown in Figure 4-4.
Figure 4-4 URL Filtering Rules Window
For each of the six major categories, specify whether the URLs in that category are blocked, and if so, during work time, leisure time, or both. See the online help for more information. Click Save to update your configuration.