-
Cisco Content Security and Control SSM Administrator Guide, 6.1
-
Preface
-
Introducing the Content Security and Control SSM
-
Verifying Initial Setup
-
Configuring Mail Traffic (SMTP and POP3)
-
Configuring Web (HTTP) and File Transfer (FTP) Traffic
-
Managing Updates and Log Queries
-
Administering Trend Micro InterScan for Cisco CSC SSM
-
Monitoring Content Security
-
Troubleshooting Trend Micro InterScan for Cisco CSC SSM
-
Reimaging and Configuring the CSC SSM Using the Command Line
-
Using CSC SSM with Trend Micro Control Manager
-
Glossary
-
Index
-
 Feedback
Table Of Contents
Introducing the Content Security and Control SSM
Introducing the ASDM Content Security Tab
Introducing the CSC SSM Console
Windows That Require Plus Licensing
Introducing the Content Security and Control SSM
This chapter introduces the Content Security and Control Security Services Module (CSC SSM), and includes the following sections:
•
Introducing the ASDM Content Security Tab
•
Overview
Trend Micro InterScan for Cisco CSC SSM (Content Security and Control Security Services Module) provides an all-in-one antivirus and spyware management solution for your network. This guide provides a conceptual explanation of how to manage the CSC SSM, which is resident in your Cisco appliance to do the following:
•
Note
•
•
The above features are available to all customers with the Base License for the CSC SSM software. If you purchased the Plus level of the CSC SSM license in addition to the Base License, you can also:
•
•
•
•
See the "Licensing" section for more information about the Base License and Plus License.
To start scanning traffic, you need to create one or more service policy rules to send traffic to CSC SSM for scanning. Refer to the ASA 5500 series security appliance documentation for information about how to create service policy rules using th e command line or using ASDM.
With Trend Micro InterScan for Cisco CSC SSM, you do not have to install separate applications for virus protection, spyware blocking, spam detection, or content filtering—all of these functions are available in a single package. Trend Micro InterScan for Cisco CSC SSM provides protection for major traffic protocols—SMTP, HTTP, and FTP, as well as POP3 traffic, to ensure that employees don't accidentally introduce viruses from their personal email accounts. And, the application is easy to maintain.
For information about installing the appliance, see your Cisco documentation. A setup wizard guides you through the installation process.
This guide familiarizes you with the Trend Micro InterScan for Cisco CSC SSM user interface, and describes configuration settings that you may want to fine-tune after installation. This guide does not include a field-by-field description of windows in the user interface. For a description of fields on a specific window, see the CSC SSM online help.
Features and Benefits
Trend Micro InterScan for Cisco CSC SSM helps you manage threats to your network. Table 1-1 provides an overview of the features and benefits:
Available Documentation
The documentation for this product assumes that you are a system administrator who is familiar with the basic concepts of managing firewalls and administering a network. It is also assumed that you have privileges to manage the security applications in your network.
Before proceeding, you might also want to read Cisco ASA 5500 Series Adaptive Security Appliance Getting Started Guide. The Quick Start Guide includes documentation for installing the CSC SSM if the appliance you purchased does not have the SSM already installed.
The documentation available for Trend Micro InterScan for Cisco CSC SSM includes the following:
•
•
–
–
•
kb.trendmicro.com/solutions/solutionSearch.asp
Important Terms
Terms are used throughout the documentation and online help that may not be familiar to you, or may be used in an alternate way from what you might expect. A definition of terms is available in the Glossary.
Introducing the ASDM Content Security Tab
The ASDM Home page features a tab called Content Security. The main ASA system home page is the default view. Click the Content Security tab to view a summary of CSC SSM activity.
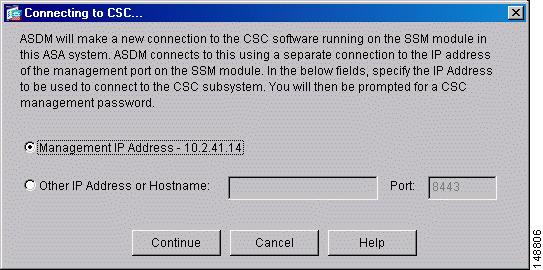
You are prompted for a connection to the CSC SSM. A dialog box appears, allowing you to choose the IP address that ASDM is aware of, or an alternate. The alternate might be used if you are accessing ASDM through a NAT device, where the IP address of the CSC SSM that is visible from your computer is different from the actual IP address of the CSC SSM management port.
The dialog box appears as follows:
Figure 1-1 Prompt to Connect to CSC SSM
Click Continue after choosing the localhost or the alternate. Next, you are prompted to enter your CSC SSM password, configured during installation. Enter the password and click OK.
The Content Security tab appears. See Features of the Content Security Tab, page 7-1 for more information.
Configuring Content Security
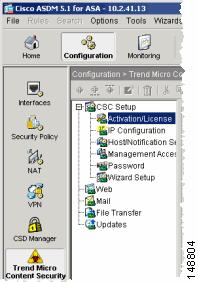
From the ASDM console, click Configuration > Trend Micro Content Security to display the configuration options. These options are:
•
•
•
•
•
Figure 1-2 Configuration Options on ASDM
The Setup options are described in the Cisco ASA5500 Adaptive Security Appliance Getting Started Guide. Also, see the online help for more detailed information about each of these options.
The Web, Mail, File Transfer, and Updates options are described in more detail in other chapters of this Administrator Guide:
•
•
•
•
Introducing the CSC SSM Console
After you have successfully installed Trend Micro InterScan for Cisco CSC SSM, and have configured ASA to send traffic to CSC SSM, the virus scanning and detection feature is activated and your network traffic is being scanned using the default settings. Additional features, such as spyware/grayware detection, are not enabled by default and can be configured in the CSC SSM interface.
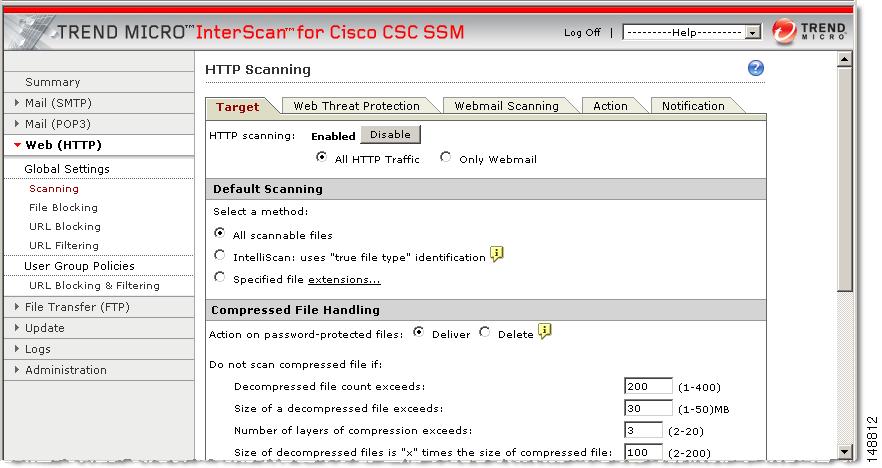
To enter the CSC SSM interface, click Configuration > Trend Micro Content Security. From the Configuration menu (shown in Figure 1-2), select a task. For example, to configure Web scanning, select Web from the Configuration > Trend Micro Content Security menu. On the right side of the Configuration window (not shown in Figure 1-2) are links to perform the task of interest. For example, clicking the Configure Web Scanning link takes you to the HTTP Scanning screen in the CSC SSM interface, where you can configure Web scanning settings.
The first time you log in to the CSC SSM interface, ASDM displays a security certificate, followed by the Connecting to CSC <link name> screen. If you leave the CSC SSM interface and then return without logging out of ASDM, only the security certificate displays.
The CSC SSM interface displays in a browser window. The default view in the Trend Micro InterScan for Cisco CSC SSM console is context-sensitive, depending on the link selected. For example:
Figure 1-3 HTTP Scanning Window Displays When You Click the Configure Web Scanning Link
To log off, click Log Off, which appears in the screen header as shown in Figure 1-3. Then close the browser window.
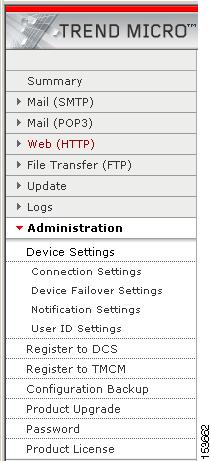
Navigation Panel
The left pane of the Trend Micro CSC SSM console is the main menu, which also serves as a navigation pane. Click a selection in the navigation pane to open the corresponding window. A selection is compressed when the arrow is pointing right, a selection is expanded when the arrow is pointing down. The corresponding panes do not refresh until you click a selection on the navigation pane.
Figure 1-4 Navigation Pane in the Trend Micro CSC SSM Console
The pathname Mail (SMTP) > Scanning > Incoming > Action, indicates the following:
•
•
•
•
Tab Behavior
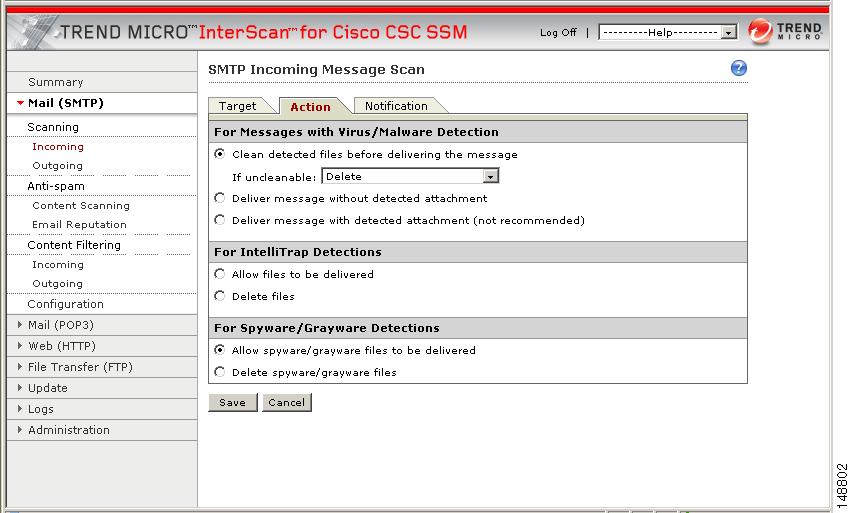
The interactive screens for your selection display on the right side of the CSC SSM console. Most windows in the user interface have multiple views. For example, the SMTP Incoming Message Scan window has 3 views; Target, Action, and Notification. Switch between views by clicking the appropriate tab for the information to be viewed.The active tab name appears in reddish-brown; inactive tab names appear in black text.
Typically the tabs are related and work together. For example, in the following figure, all three tabs are needed to configure virus scanning of incoming SMTP traffic.
Figure 1-5 Tabs Work Together
•
•
•
For related tabs such as these, clicking Save once saves work on all three tabs.
Save Button
The appearance of the Save button indicates whether saving is necessary. The Save button is unavailable when the window first opens. After you perform tasks on the window, the appearance of the Save button changes so the text on the button appears black instead of gray. This is an indication that a Save is necessary to validate the work you have done.
Default Values
Many windows in the Trend Micro for Cisco CSC SSM user interface include fields that contain default selections. A default selection represents the choice that is best for most users, but you are free to change the default if another choice is better for your environment. Consult the online help for more information about entries in a particular field.
Fields that allow you to compose a notification contain a default message. You can change default notifications by typing over the existing entry.
Tooltip Icons
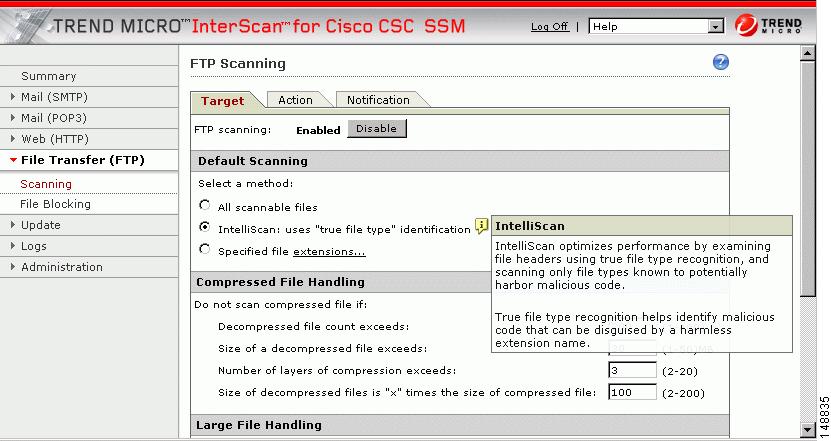
Some windows in the CSC SSM console contain an information icon called a tooltip. Position your mouse over the tooltip icon to display a popup text box with additional information that helps you make a decision or complete a task. In the following example, mousing over the tooltip icon displays more information about IntelliScan, one of several virus scanning options.
Figure 1-6 Information Icon (Tooltip)
Online Help
There are two types of online help available with Trend Micro InterScan for Cisco CSC SSM. These are general help, and context-sensitive help.
Figure 1-7 General and Context-sensitive Online Help
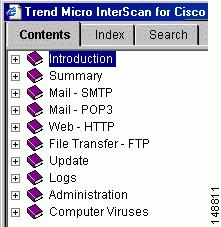
Invoke general help by clicking the Contents and Index tabs from the Help drop-down menu in the Trend Micro InterScan for Cisco CSC SSM banner. A secondary browser window opens, which allows you to view the help contents. Click the plus symbol to expand a help topic.
Figure 1-8 Online Help Contents
Following an introduction, the organization of the online help topics mimics the organization of the left menu in the user interface. Some helpful information about computer viruses is available at the end of the online help contents.
Click the Index tab to view the online help index, or click Search to search for information using a keyword.
To invoke context-sensitive help, click the window help icon (
). A secondary browser window appears, which includes information for the window that you are currently viewing in the user interface.
Links in Online Help
The online help contains links, indicated by blue underlined text. Clinking a link either takes you to another help window or displays a popup text box with additional information, such as a definition. Disable popup blocking in your browser to use this feature of the online help.
Most of the documentation in the online help is not repeated in this Administrator Guide. Be sure to read the online help for more information about Trend Micro InterScan for Cisco CSC SSM.
Licensing
As described in the introduction to this chapter, there are two levels of the Trend Micro InterScan for CSC SSM license; the Base License and the Plus License. The Base License provides antivirus, anti-spyware, and file blocking capability. The Plus License adds anti-spam, anti-phishing, content filtering, URL blocking, and URL filtering capability. The Base License is required for Plus license activation.
If you purchased only the Base License, you may be able to view unlicensed features via the CSC SSM console, but unlicensed features are not functional. You can, however, view online help for an unlicensed feature. You can also purchase the additional functionality offered with the Plus License at a later time.
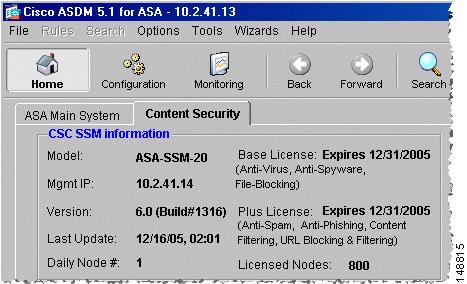
If you are not sure which level of the license your organization purchased, look at the CSC SSM Information section of the Content Security tab. Your license information is summarized there.
Figure 1-9 Location of License Information on the Content Security Tab
Alternatively, in the CSC SSM console, click Administration > Product License to display the Product License window. Scroll to the Plus License section of the window, and check the Status field. If this field contains "Activated," you have the Plus License functionality. Otherwise this field indicates "Not Activated."
Windows That Require Plus Licensing
Table 1-2 indicates which windows in the CSC SSM console are functional under the Base License only, and which are functional only when you purchase the additional Plus License.
Process Flow
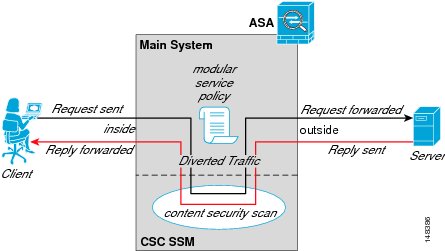
Figure 1-10 illustrates the flow of traffic when the CSC SSM is installed in your security appliance. A request is sent from a client workstation to a server. As the request is processed through the security appliance, it is diverted to CSC SSM for content security scanning. If no security risk is detected, the request is forwarded to the server. The reply follows the same pattern in reverse.
Figure 1-10 Process Flow
If a security risk is detected, it can be cleaned or removed, depending on how CSC SSM is configured.