-
Cisco Prime Network User Guide, 3.9
-
Preface
-
Cisco Prime Network Client Overview
-
Working with the Cisco Prime Network Vision Client
-
Viewing Network Element Properties
-
Working with Prime Network Vision Maps
-
Working with Links
-
Working with Business Tags and Business Elements
-
Working with the Prime Network Events Client
-
Tracking Faults Using Prime Network Events
-
Working with Tickets in Cisco Prime Network Vision
-
Working with Reports
-
Using Cisco PathTracer to Diagnose Problems
-
Monitoring Carrier Ethernet Services
-
Monitoring Carrier Grade NAT Properties
-
Monitoring DWDM Properties
-
Viewing Ethernet Operations, Administration, and Maintenance Tool Properties
-
IPv6 and IPv6 VPN over MPLS
-
Monitoring MPLS Services
-
Monitoring MToP Services
-
Viewing SBC Properties
-
Viewing Mobile Technologies in Prime Network
-
Icon and Button Reference
-
Index
-
 Feedback
Table Of Contents
Working with the Prime Network Events Client
User Roles Required to Work with Prime Network Events
Launching Prime Network Events
Launching Prime Network Events from Prime Central
Launching Prime Network Events as a Standalone Application
Prime Network Events Right-Click Options
Selecting Prime Network Events Viewing Options
Working with the Prime Network Events Client
These topics describe the Cisco Prime Network Events (Prime Network Events) application and the options you can use to view system events and tickets that are generated within the Prime Network system:
•
User Roles Required to Work with Prime Network Events
•
•
•
User Roles Required to Work with Prime Network Events
This topic identifies the roles that are required to work with Prime Network Events. Prime Network determines whether you are authorized to perform a task as follows:
•
•
For more information on user authorization, see the topic on device scopes in the Cisco Prime Network 3.9 Administrator Guide.
Only users with the Administrator role can log into Prime Network Events (see Table 7-1).
Launching Prime Network Events
Prime Network provides two methods for launching Prime Network Events:
•
•
Prime Network Events is password protected to ensure security. Before you start working with Prime Network Events, make sure you know your username and password. If you use the standalone application, you also need to know the Prime Network Events gateway IP address or hostname.
Note
The following conditions apply when working with Prime Network Events:
•
•
The following topics describe how to launch Prime Network Events:
•
•
Launching Prime Network Events from Prime Central
If Prime Central is available in your environment, you can launch Prime Network applications from the main Prime Central page.
To launch Prime Network Events from Prime Central, choose Assure > Prime Network > Events in the menu bar.
The Prime Network Events application is opened in a separate window.
For more information about using Prime Network Events with the Prime Central suite of products, see:
•
•
Launching Prime Network Events as a Standalone Application
To launch Prime Network Events as a standalone application:
Step 1
Note
The Cisco Prime Network Events login dialog box is displayed.
Step 2
The Server field should already be populated with the hostname/IP address of the Prime Network gateway.
Step 3
When you launch Prime Network Events, messages are displayed if the server and client have different versions of the application that launches the client. For more information about these messages, see the Cisco Prime Network 3.9 Installation Guide.
The first time you log in, the Ticket tab is displayed in the Cisco Prime Network Events window.
When you log in again, the tab and filter that were visible when you last logged out of the application are displayed.
Prime Network Events Window
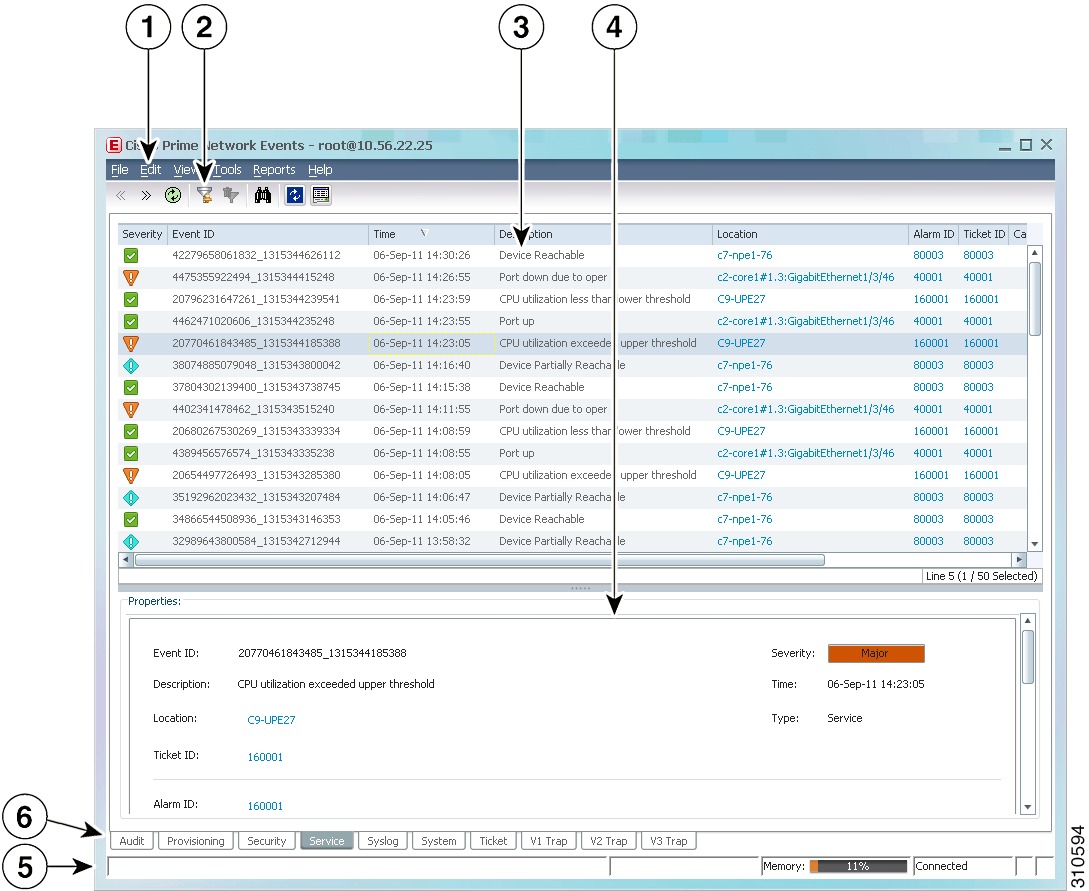
The Prime Network Events window displays the events generated in the system. Figure 7-1 shows an example of the Prime Network Events window.
Figure 7-1 Prime Network Events Window
Menu bar
Details or properties pane
Toolbar
Status bar
Table pane
Prime Network Events tabs
Prime Network Events displays events for the last two hours by default. To modify the default number of hours for which events are displayed, see Selecting Prime Network Events Viewing Options. Increasing the number of hours can affect how long it takes for the events to be displayed. Also, if you want to find specific events and you are not interested in browsing all the available events, you can set Prime Network Events to operate in Find mode. To enable and use Find mode, see Selecting Prime Network Events Viewing Options.
You can display the events table with or without the properties pane, and select the specific type of information to display, such as provisioning events or SNMPv3 traps. For details on the information that is displayed in each tab, see Viewing Events and Tickets in Cisco Prime Network Events.
You can also use the Prime Network Events window and menu options to:
•
•
Event Status Indicators
The Severity column contains color-coded icons that reflect the severity of the event. An icon appears for each ticket or event in the Prime Network Events tabs (based on its severity) as shown in Table 7-2.
Table 7-2 Severity Indicators
Red
Critical
Orange
Major
Yellow
Minor
Light Blue
Warning
Green
Cleared, Normal, or OK
Medium Blue
Information
Dark blue
Indeterminate
Event Types and Categories
Every event that occurs in the Prime Network system and the Prime Network gateway is logged. This includes events that are performed as part of the normal operation of the Prime Network system, as well as events that might need further attention. Events are categorized, and any of the log entries can be viewed in the Prime Network Events tabs as described in Table 7-3.
Prime Network Events Toolbar
Table 7-4 describes the tools that are displayed in the Prime Network Events toolbar.
Table 7-4 Prime Network Events Toolbar Tools
Displays the previous page of events in the Prime Network Events window.
Displays the next page of events in the Prime Network Events window.
Refreshes the events displayed in the log by querying the database. If a filter is active, the refresh is done according to the filter. The log returns to the beginning of the list, displaying the events in ascending or descending order depending on the order of the current list. Descending order means that the last event is displayed first. For more information, see Refreshing Cisco Prime Network Events Information.
Displays the Filter Events dialog box, which enables you to define a filter for the events displayed in the Prime Network Events log. For more information, see Filtering Events.
Clears the existing filter.
Displays the Find Events dialog box so that you can view events matching specific criteria. When finished selecting your criteria, click OK. The Prime Network Events window updates and displays the matching events. Note the following:
•
•
For a description of the items in the Find Events dialog box, see Table 8-23.
Toggles automatic refresh of event data on and off. You define the refresh-time period (in seconds) in the Prime Network Events Options dialog box. The default is 60 seconds. If a filter is active, the refresh is done according to the filter. For more information, see Selecting Prime Network Events Viewing Options.
Displays the properties of the selected event or ticket in the Properties pane.
Prime Network Events Menu Bar
Table 7-5 describes the options available in the Prime Network Events main menus. In addition to these options, Prime Network Events displays a Properties option when you right-click an event or ticket (see Viewing Event Properties).
Table 7-5 Prime Network Events Menu Options
Export
Exports the log event information displayed in the Prime Network Events window according to the criteria defined in the Prime Network Events Options dialog box.
Open 3.6.x Tabs
Displays the following tabs:
•
•
•
•
•
This option is available only if Prime Network was upgraded from Cisco ANA 3.6.x to the current version of Prime Network.
Open All Tab
Displays the All tab so you can view a flat list of all events and tickets sorted only by time.
Exit
Exits Prime Network Events.
Filter
Defines a filter for the events displayed in the Prime Network Events window according to the tab selected. See Filtering Events.
Purge
This option is unavailable.
Refresh
Refreshes the information displayed in the Prime Network Events window.
Go To
Navigates through the pages of the Prime Network Events window.
Properties
Displays the properties of the selected event, such as the root cause and source, in a separate window. For more information, see Viewing Event Properties.
Details Pane
Displays or hides the Details pane. If an event is selected, the properties of the selected event are displayed in the Details pane.
Change User Password
Allows you to change the password used when logging into the Prime Network Events client application suite. The change takes effect the next time you log into the application.
Options
Defines the display options for the Prime Network Events window. For more information, see Selecting Prime Network Events Viewing Options
Report Manager
Opens the Reports Manager dialog box so you can create, run, and manage reports.
Run Report
Enables you to run standard event, inventory, and network service reports on demand.
Cisco Prime Network Events Help
Opens the online help for Prime Network Events and Prime Network Vision.
Cisco.com
This option is unavailable.
About Cisco Prime Network Events
Displays application information, such as the version number.
Prime Network Events Right-Click Options
Prime Network Events offers the following right-click options in its tabs. Not all options are available in all tabs.
•
•
•
•
Selecting Prime Network Events Viewing Options
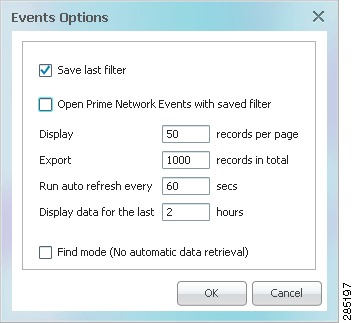
The Prime Network Events Options dialog box enables you to define the options for displaying events in the Prime Network Events window.
To define Prime Network Events options:
Step 1
The Prime Network Events Options dialog box is displayed, as shown in Figure 7-2.
Figure 7-2 Prime Network Events Options Dialog Box
Step 2
Step 3