-
Basic Dial NMS Implementation Guide
-
Preface
-
Overview of Basic SNMP Building Blocks
-
Network Design for a Dial NMS Case Study
-
Task 1--Enabling SNMP in a Cisco IOS Device
-
Task 2-- Exploring SNMP Capabilities by Using UCD-SNMP
-
Task 3--Using MRTG to Monitor and Graph Traffic Loads
-
Task 4--Using Syslog, NTP, and Modem Call Records to Troubleshoot Faults
-
Task 5--Setting Up a Web Portal for the Dial NMS
-
Task 6--Managing IP Addresses by Using DNS
-
Task 7--Using HP OpenView to Create the SNMP Framework
-
Task 8--Using CiscoWorks 2000 Resource Manager Essentials
-
Dial MIBs and OIDs Used in the Case Study
-
Index
-
 Feedback
Table Of Contents
Task 7—Using HP OpenView to Create the SNMP Framework
Verifying the SNMP Configuration
Performing an SNMP Demand Poll
Troubleshooting SNMP and a Demand Poll
Verifying that SNMP Traps Are Received
Setting Up and Editing a Discovery Filter
Using the HPOV CLI to Enter a Device into the Database
Task 7—Using HP OpenView to Create the SNMP Framework
About HP OpenView
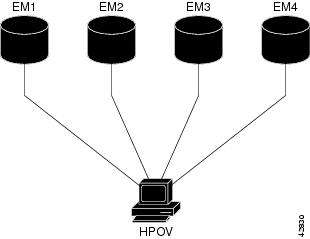
The primary function of HP OpenView (HPOV) is to manage faults.
In this case study, HP OpenView:
•
Discovers all the devices in the network.
•
•
–
–
Figure 25 Other Element Managers Start from HPOV
Note
Describing the advanced capabilities of HPOV is outside the scope of this document. For more information, go to http://ovweb.external.hp.com/lpe/doc_serv/ and http://www.openview.hp.com
For Cisco IOS SNMP configurations, see the "Task 1—Enabling SNMP in a Cisco IOS Device" section.
Verifying the SNMP Configuration
To verify that the HPOV daemons are running and the SNMP configuration is correct, follow these steps:
Step 1
aurora:/opt/OV/bin ->ovw&[1] 5079Step 2
aurora:/ ->ovstatusobject manager name: OVsPMDstate: RUNNINGPID: 430exit status: -object manager name: ovwdbstate: RUNNINGPID: 431last message: Initialization complete.exit status: -object manager name: ovtrapdstate: RUNNINGPID: 433last message: Initialization complete.exit status: -object manager name: ovactiondstate: RUNNINGPID: 434last message: Initialization complete.exit status: -object manager name: pmdstate: RUNNINGPID: 432last message: Initialization complete.exit status: -object manager name: ovtopmdstate: RUNNINGPID: 435last message: Connected to native database: "openview".exit status: -object manager name: netmonstate: RUNNINGPID: 450last message: Initialization complete.exit status: -object manager name: snmpCollectstate: RUNNINGPID: 451last message: No values configured for collection.exit status: -object manager name: ovrepldstate: RUNNINGPID: 452last message: Initialization Complete.exit status: -
Note
Step 3
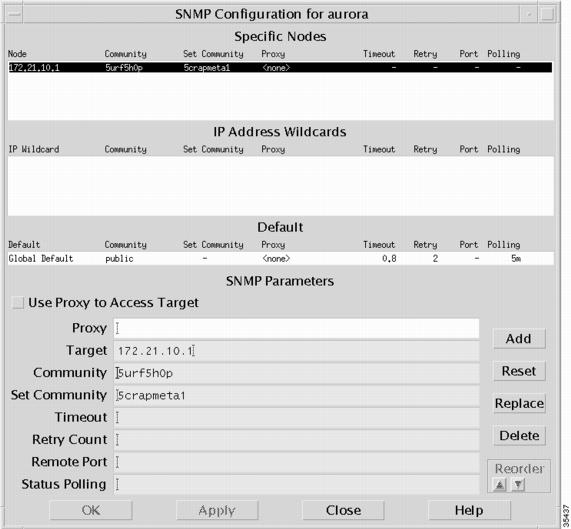
In the SNMP Configuration screen, enter the following information:
•
•
•
Note
Caution
Figure 26
SNMP Configuration: Loopback IP Address and Community Strings
Step 4
About SNMP Demand Polls
Perform an SNMP demand poll for a new managed device if you do not want to wait for the next automatic topology poll. HPOV performs less frequent automatic topology demand polls as your network and the HPOV device database becomes more static.
When the HPOV daemons start, HPOV discovers the devices in your network. Depending on which discovery options are configured, the device map is based on Layer 2 or Layer 3 information. Choosing discovery options is outside the scope of this document.
Depending on the number of devices that need to be discovered, it could take hours or even days for HPOV to discover a device. If HPOV cannot find a device, enter the device manually in to the database. See the "Using the HPOV CLI to Enter a Device into the Database" section.
To organize and adjust the top-level map, see the "Creating and Adjusting Maps" section.
Performing an SNMP Demand Poll
To perform an SNMP demand poll, follow these steps:
Step 1
Step 2
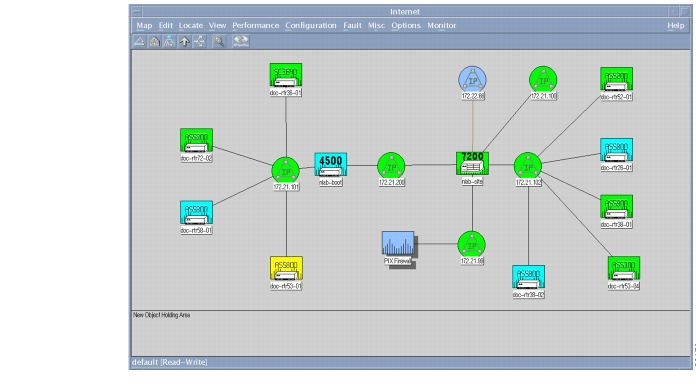
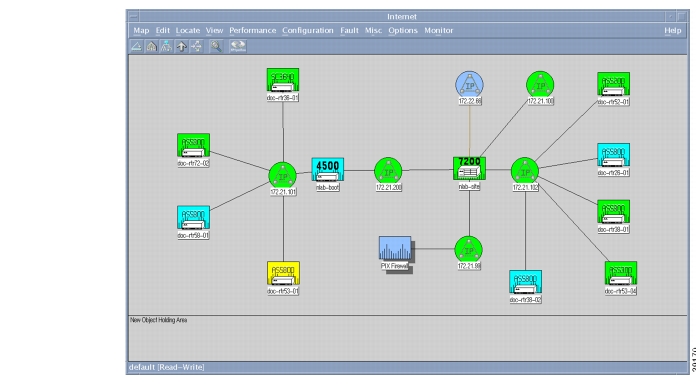
Figure 27
The Top-Level Device Map
Map color legend:
•
•
•
•
•
Step 3
Step 4
Step 5
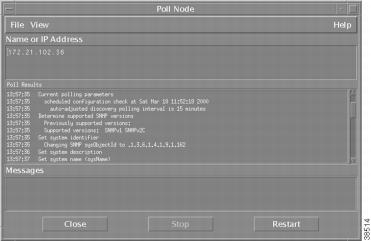
Figure 28
SNMP Walk-Polling Results
Demand polls enable HPOV to:
•
•
•
Testing SNMP Get Requests
To test that a device responds to SNMP Get requests, follow these steps:
Step 1
Step 2
Figure 29
Successful SNMP Test
This action performs one ICMP echo, one TCP connection, and one SNMP get. SNMP is working if the "OK" message appears under the SNMP Get field.
Table 32 describes the important fields in Figure 29.
Troubleshooting SNMP and a Demand Poll
If a device is not responding to a demand poll, follow these steps:
Step 1
Step 2
Note
Step 3
Step 4
The syntax for the snmpget command line is as follows:
snmpget [options] node object-id [object-id]...Options:-d dump ASN.1 packet trace-v version protocol version (1 or 2c)-c community community string-p port remote port-t timeout retransmission timeout (1/10th seconds)-r retries maximum retransmission attempts
Caution
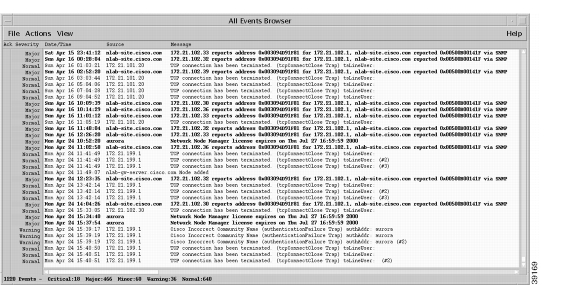
Verifying that SNMP Traps Are Received
Traps appear in the All Events Browser, which reports what is happening in the network. The events are updated every few seconds. Understanding the severity level of a trap is important. One trap can be critical; whereas, another trap can be informative.
Other ways to look for traps include:
•
•
To monitor the limits of a network, configure thresholds to set off alarms. For example, set up an alarm for a CPU that sustains a 98 percent utilization for a specific amount of time.
Common mistakes include:
•
•
Setting up alarms for different kinds of traps is outside the scope of this document.
To verify that HPOV is receiving traps from devices in the network, follow these steps:
Step 1
Figure 30
Traps in the All Events Browser
Step 2
Caution
Step 3
Unmanaging the Dial Ports
Do not poll the asynchronous and serial interfaces on Cisco access servers. The reasons for this recommendation include:
•
•
To unmanage the asynchronous and serial interfaces for a Cisco access server, follow these steps:
Step 1
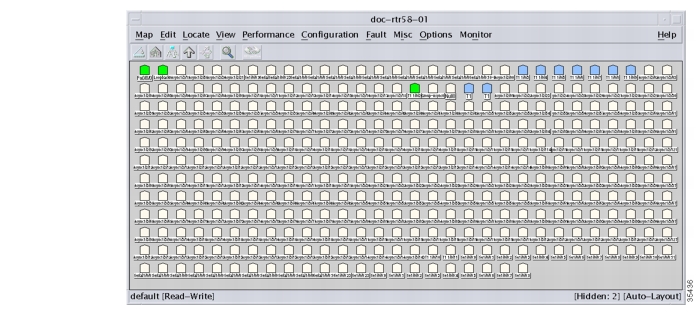
Figure 31
Available Interfaces and Ports for a Cisco AS5800
Color legend:
•
•
•
•
Step 2
•
•
Step 3
Step 4
Note
Tips
Creating and Adjusting Maps
Maps provide a view of the network topology, and they enable you to quickly troubleshoot faults in the network. HPOV automatically polls devices and builds maps for you; however, devices often get stacked in the map, which is undesirable.
The following procedure saves you from having to refresh all your submaps each time a new device appears in the network. After you implement the following procedure, new devices will appear in the New Object Holding Area.
Caution
To manually re-structure device maps to adequately represent your network and turn off the automatic-layout function for the top-level map, follow these steps:
Step 1
Figure 32
Top-Level Map Adjustments
Step 2
Step 3
Step 4
About Discovery Filters
A discovery filter is an ASCII file that HPOV reads to limit the discovery of devices on the network.
Use a discovery filter to:
•
•
Sometimes HPOV discovers too many devices. If HPOV discovers devices beyond your target network, such as the entire Internet, the performance of the Unix host decreases significantly. If the device maps begin filling up with networks, routers, and other devices that do not belong to you, use a discovery filter.
After a filter is set up, HPOV will not discover devices unless they are defined by the filter. Edit the filter each time a new device is added to the network.
For more information about discovery filters, go to http://www.openview.hp.com
Setting Up and Editing a Discovery Filter
The filter file is located in the /etc/opt/OV/share/conf/C directory. A sample file is shown in the following step-by-step example. The file has been manually edited and abbreviated to include a specific node list and filter list for this case study:
•
•
The following are examples of complete filter files. These filters are examples which may be useful in your environment. Feel free to modify these filters or add your own.
The following example is the default filter file:
aurora:/etc/opt/OV/share/conf/C ->lsfilters oid_to_sym trapd.confaurora:/etc/opt/OV/share/conf/C ->cat filters@(#)$OV_CONF/$LANG/filters@(#)HP OpenView NNM Release B.05.01 Jun 21 1997@(#)Copyright (c) 1990-1997 Hewlett-Packard Company$Revision: /main/TORNADO/NNM_NT/5 $ $Date: 1997/01/13 19:35 UTC $
Note
Sets are a simple way to list string values to test against in a filter. The IN operator tests a field value for membership in a set defined in the following example:
servers "Set of Servers" { "sv1", "sv2", "sv3" }gateways "Backbone gateways " { "gw1", "gw2", "gw3" }TheNetNodes "TheNet Node List" { "AS5800-1", AS5800-2" }Filters and filter expressions are used as topology, discovery, map, or persistence filters. Applications that use filters (like ipmap(1), ovtopmd(1m), ovtopodump(1), and ovtopofix(1m)) can take the name of a filter or a filter expression.
The following filters are potentially useful as either discovery or topology filters, or components for building map filters.
Discovery Filters
Networks and segments are not directly testing with discovery filters, so there is no need to include isNetwork || isSegment in these filters. You can include networks or segments in a discovery filter, but they are not acted upon.
Because nodes are only discovered in managed networks, the network must already exist and be managed before the filtering test can be applied. New networks connected to discovered nodes can be discovered unmanaged. For discovery filters, a node and all its interfaces can be thought of as a single object. If any interface or the node itself passes the filter, the node and all of its interfaces will pass the filter.
The file called ovtopofix -f follows the discovery filter semantics and only applies to locally monitored objects. However, if a network or segment is empty after the processing of the nodes with the -f option, that segment or network is also removed. The ovtopodump(1) file also follows the discovery filter semantic, and the filter only applies to nodes and interfaces.
The following are discovery filter examples:
Networks "Any network" { isNetwork }Segments "Any segment" { isSegment }Nodes "Any node" { isNode }Map and Topology Filters
For these filters, all objects are subject to filtering. You must specify the networks and segments to be passed. Furthermore, objects are displayed and included only if all their parent objects (submaps) pass the map and topology filter. For example, if no networks would pass the filter (isNetwork is not included), then all segments and non-gateways nodes would be filtered out. Like discovery filters, if any interface or node passes a map filter, the node and all of its interfaces also pass the filter.
See the Filter Expressions section for map and topology filter examples.
Note
The following filters are primarily for example purposes, though they might be useful as discovery filters. They do not generally make sense as map or topology filters because they do not specify the inclusion of networks and segments. They also make sense as parts of a filter expression.
Routers "Any Router" { isRouter }IPRouters "Any IP Router" { isIPRouter }Bridges "Any bridge" { isBridge }Hubs "Any multi-port repeater" { isHub }SNMPNode "Any node supporting SNMP" { isNode && isSNMPSupported }LocalLAN "Nodes with interfaces on the 15.2.112-119 subnet" { "IP Addre}NeighborLANs "Node with interfaces on the neighboring LANs on site"{ "IP Address" ~ 192.1.2-10.* }HPNodes "Hewlett-Packard nodes"{ isNode && ( vendor == "Hewlett-Packard" ) }UBNodes "Ungermann-Bass Nodes"{ isNode && vendor == "Ungermann-Bass" }NonHPNodes "Non-HP nodes"{ isNode && ( vendor != "Hewlett-Packard" ) }The following example filters use the sets defined above:
GatewaysSet "Any designated Gateway node" { "IP Hostname" in gateways }ServersSet "Any designated Server node" { "IP Hostname" in servers }The next two filters are useful for defining map and topology filters (see the Filter Expressions section). They are not particularly useful as discovery filters because all networks and segments automatically pass discovery filters. Nor are they useful as standalone map filters, since they do not pass any nodes.
NetsNSegs "All networks & segments" { isNetwork || isSegment }The network name below assumes an entry in /etc/networks. If no such entry exists, the actual network name can be something like "15.2.112."
MyNet "The network in which I'm interested"{ isNetwork && "IP Network Name" == "yellow-lan" }The next filter example shows a way to pass all objects contained in the subnet 15.2.112.0 with a subnet mask of 255.255.248.0 (so the subnet range is 15.2.112.0 to 15.2.119.255). The inclusion of isSegment is not a concern, because all segments outside of this network would be filtered out because the networks containing them were filtered out. You must have some specification of segments if you want the segment contents to be included.
EngrLan "The 15.2.112 subnet used by engineering"{ ("IP Address" ~ 15.2.112-119.* ) || isSegment }The following filter accomplishes the same thing as the above example but is more restrictive in the specification of segments to only include segments in that engineering network. This assumes there is an entry in /etc/networks to make sure that the subnet gets the name engr-LAN, and the segments in that network all have a name of form engr-LAN.<variable>. Generally, the filter in the previous example can accomplish most tasks, but using the following example might be necessary in some situations if you want specific segments. In particular, it works well if you want to use this to EXCLUDE the objects in this network. See the example in the Filter Expressions section below.
EngrLan2 "The 15.2.112 subnet used by engineering"{ ( "IP Address" ~ 15.2.112-119.* ) ||( "IP Segment Name" ~ "engr-LAN.*" ) }The following filter example specifies that only objects that support IP should be included. This filter should be used as a topology filter on any collection station discovering non-IP information (Level 2 or IPX only nodes or networks) that is forwarding to an NNM 4.X management station. This filter does not completely remove all non-IP information (for example, IPX interfaces on a node that also supports IP do come through), but it does limit the impact on the management station and make migration to NNM 5.X easier.
IPOnlyObjects "Only objects that support IP"{ isIP || isSegment }Filter Expressions
Filter expressions are simply combinations of filters defined in the same filter file (as above). Filter expressions make it simple to combine filters without reproducing the expressions of each filter again.
The following example combines the two set filters defined above into one filter expression. It works unmodified as a discovery filter. To make it work as a map filter, network and segment filtering must be added (see below).
VitalNodes "All Gateways and Servers" { GatewaysSet || ServersSet }You can turn the filters defined above into viable map or topology filters by simply adding the following input:
|| NetsNSegs
Adding this input does not invalidate the filters as discovery filters; it just adds a superfluous test.
VitalNodesMap "All nets & segs, but only gateway and server nodes"{ GatewaysSet || ServersSet || NetsNSegs}LocalLANView "All nets & segs, but only local nodes"{ LocalLAN || NetsNSegs }NetInfrastructure "Any network connecting device and what they connect"{ Routers || Bridges || Hubs || NetsNSegs }NetBackbone "Networks and gateways/routers"{ Routers || Networks }Using the filters defined above that include only a specific network, you can also exclude the specific network. Note the use of the more specific form to exclude only the segments in the engineering LAN. This could have been specified directly as a negation in the filter portion, but this form works well if you have several networks to manipulate in this manner.
EverythingButEngr "Everything but the engineering LAN"{ !EngrLan2 }In the filter expressions above, when used as map filters, you can pass all networks and segments. You might want to see only a particular network. The following map filters accomplish this.
Note
Note
MyNetMap "Only the network of interest and all its constituent parts"{ MyNet || Segments || Nodes}MyVitalNodesMap "Gateways, servers and segments in the net of interest"{ MyNet || Segments || GatewaysSet || ServersSet }TheNetNodeList "The this the filters for TheNet nodeslist{ TheNetNodes || TheNetFilters }The following example shows a map persistence filter, which ensures that all Ungermann-Bass are kept in memory and up to date. This will also keep any containing submaps in memory.
PersFilter "Objects to keep in map memory" { UBNodes }To set up and edit a discovery filter, follow these steps:
Step 1
aurora:/etc/opt/OV/share/conf/C ->lsfilters oid_to_sym trapd.confStep 2
aurora:/etc/opt/OV/share/conf/C ->vi filters//// @(#)$OV_CONF/$LANG/filters// @(#)HP OpenView NNM Release B.05.01 Jun 21 1997// @(#)Copyright (c) 1990-1997 Hewlett-Packard Company// $Revision: /main/TORNADO/NNM_NT/5 $ $Date: 1997/01/13 19:35 UTC $//// This is the default filter file. These filters are examples// which may be useful in your environment. Feel free to modify// these filters and/or add your own. See OVfilterIntro(5)// for more information on this file.// NOTE: The behavior of topology filters in a distributed environment// changed as of DFIX 5027. This file documents the behavior as of that// patch level. This should be considered the correct specification of// how topology filtering behaves in a distributed environment.//// Sets are a simple way to list string values to test// against in a filter. The "IN" operator tests a field value// for membership in a set defined here.//Sets {//// These are simple examples of sets.//servers "Set of Servers" { "sv1", "sv2", "sv3" }gateways "Backbone gateways " { "gw1", "gw2", "gw3" }TheNetNodes "TheNet Node List" { "AS5800-1", "AS5800-2" }}...FilterExpressions {//// The following combines the two set filters// defined above into one FilterExpression.// It works unmodified as a discovery filter.// To work as a map filter, network and segment filtering// must be added (see below).VitalNodes "All Gateways and Servers" { GatewaysSet || ServersSet }//// One can turn the filters defined above into viable map or// topology filters by simply adding "|| NetsNSegs". (Doing so// does not invalidate the filters as discovery// filters. It just adds a superfluous test.)//VitalNodesMap "All nets & segs, but only gateway and server nodes"{ GatewaysSet || ServersSet || NetsNSegs}LocalLANView "All nets & segs, but only local nodes"{ LocalLAN || NetsNSegs }NetInfrastructure "Any network connecting device and what they connect"{ Routers || Bridges || Hubs || NetsNSegs }NetBackbone "Networks and gateways/routers"{ Routers || Networks }// Using the filters defined above that include only a specific// network, we can also exclude the specific network like this// Note the use of the more specific form to exclude only the segments// in the engineering lan. This could have been specified directly// as a negation in the filter part, but this form works well if you// have several networks to manipulate in this manner.EverythingButEngr "Everything but the engineering LAN"{ !EngrLan2 }// Of course the above filter expressions, when used as// map filters, pass all networks and segments. You// may wish to see only a particular network. The following map// filters accomplish this. Note that though segments// and nodes from other networks will pass the filters, IP Map// will ignore them because their parent networks will not pass.// NOTE: These filters will not work as Discovery// filters because all network and segments automatically pass// Discovery and Topology filters.//MyNetMap "Only the network of interest and all its constituent parts"{ MyNet || Segments || Nodes}MyVitalNodesMap "Gateways, servers and segments in the net of interest"{ MyNet || Segments || GatewaysSet || ServersSet }TheNetNodeList "This is the filter for TheNet nodeslist{ TheNetNodes || TheNetFilters }// This is a map persistence filter which ensures that// all Ungermann-Bass are kept in memory and up to date.// Note that this will also keep any containing submaps in memory.//PersFilter "Objects to keep in map memory" { UBNodes }}Using the HPOV CLI to Enter a Device into the Database
Sometimes devices do not appear in the device map, or they are accidentally deleted from the HPOV database.
To manually load devices in to the HPOV database by using the CLI, follow these steps:
Step 1
aurora:/ ->ovstop netmonaurora:/ ->ovstatus netmonobject manager name: netmonstate: NOT_RUNNINGPID: 450last message: Exited due to user requestexit status: Exit(0)Step 2
aurora:/ ->loadhosts -m 255.255.255.0 <<EOF> 10.10.10.104 hostname> 14.14.14.14 host2name> EOFaurora:/ ->
Note
Step 3
aurora:/ ->ovstart netmon
aurora:/ ->ovstatus netmonobject manager name: netmonstate: RUNNINGPID: 12812last message: Initialization complete.exit status:Step 4
Step 5