-
Basic Dial NMS Implementation Guide
-
Preface
-
Overview of Basic SNMP Building Blocks
-
Network Design for a Dial NMS Case Study
-
Task 1--Enabling SNMP in a Cisco IOS Device
-
Task 2-- Exploring SNMP Capabilities by Using UCD-SNMP
-
Task 3--Using MRTG to Monitor and Graph Traffic Loads
-
Task 4--Using Syslog, NTP, and Modem Call Records to Troubleshoot Faults
-
Task 5--Setting Up a Web Portal for the Dial NMS
-
Task 6--Managing IP Addresses by Using DNS
-
Task 7--Using HP OpenView to Create the SNMP Framework
-
Task 8--Using CiscoWorks 2000 Resource Manager Essentials
-
Dial MIBs and OIDs Used in the Case Study
-
Index
-
 Feedback
Table Of Contents
Task 6—Managing IP Addresses by Using DNS
Using Cisco Network Registrar CLI Commands
Using a Batch File to Make Changes to a DNS Configuration
Creating a Primary Forward Zone
Creating an IP Tracker Web Page
How to Create a Reverse DNS Zone
Task 6—Managing IP Addresses by Using DNS
About Managing IP Addresses
Managing IP addresses is a primary network administration function. Assigning and removing IP addresses can be tedious and error prone. Regardless—you must manage IP addresses to avoid duplicate IP subnets and addresses.
Domain Name System (DNS) servers provide two kinds of fundamental lookup services:
•
Forward lookups—Used for looking up the IP address of a provided device name. This is the most common kind of lookup performed.
•
In this case study, the dial engineers at THEnet:
•
•
•
Note
Using Cisco Network Registrar CLI Commands
Database locking prevents multiple users from writing to the same database records concurrently. However, an administrator may occasionally not exit a session properly, and the database may be left locked. To release the lock on the database, use the force-lock network registrar command.
Network registrar commands sent from the Unix shell lock the database only while commands are running.
The name for a reverse zone is the inverse of your Internet network number, added to the special domain in-addr.arpa. For example if the network number is 1.2.3.0, the reverse zone name is 3.2.1.in-addr.arpa. A second example is the network number 1.2.0.0 with the reverse zone of 2.1.in-addr.arpa.
For a description of the network registrar CLI commands, go to http://www.cisco.com/univercd/cc/td/doc/product/rtrmgmt/ciscoasu/nr/nr30t/cliref/cli01.htm#68483
To quickly perform administrative tasks by using CNR CLI commands, follow these steps:
Step 1
/opt/nwreg2/usrbin/nrcmdnrcmd>After logging in, the command mode is accessed and the prompt "nrcmd>" appears.
Step 2
nrcmd> admin bob create password=xyzIn this example, the administrator name is bob. The password is xyz.Step 3
nrcmd> admin listbob: password=********;omar: password=********;padma: password=********;
Note
Step 4
nrcmd> zone 101.21.172.in-addr.arpa. listRR100 OkStatic Resource Records@ IN SOA onionring.the.net. netadmin.the.net 1997121601 3600 1800 86400 86400@ IN NS onionring.the.net.com.205 IN PTR unused-205.the.net.203 IN PTR unused-203.the.net.210 IN PTR unused-210.the.net.204 IN PTR unused-204.the.net.1 IN PTR unused-1.the.net.10 IN PTR unused-10.the.net.101 IN PTR unused-101.the.net.102 IN PTR unused-102.the.net.103 IN PTR unused-103.the.net.104 IN PTR unused-104.the.net.(truncated for brevity)Step 5
nrcmd> zone 101.21.172.in-addr.arpa. addRR 7 PTR bobslake-nas-01.the.netStep 6
nrcmd> zone 101.21.172.in-addr.arpa. removeRR 7 PTR unused-07.the.netStep 7
/opt/nwreg2/usrbin/nrcmd "zone 101.21.172.in-addr.arpa. listRR"
Note
Step 8
/opt/nwreg2/usrbin/nrcmd "zone 101.21.172.in-addr.arpa. listRR" | sort -n | moreusername: password:0 IN PTR broadcast-0.the.net.@ IN NS onionring.the.net.@ IN SOA onionring.the.net. netadmin.the.net.101. 21.172.in-addr.arpa. 1997121606 3600 1800 86400 86400Dynamic Resource RecordsStatic Resource Records1 IN PTR unused-1.the.net.2 IN PTR unused-2.the.net.3 IN PTR unused-3.the.net.4 IN PTR unused-4.the.net.5 IN PTR unused-5.the.net.6 IN PTR unused-6.the.net.7 IN PTR unused-7.the.net.8 IN PTR unused-8.the.net.9 IN PTR unused-9.the.net.10 IN PTR unused-10.the.net.(truncated for brevity)Step 9
nrcmd> zone the.net. addRR bobslake-nas-02 A 172.21.10.18@ IN NS onionring.the.net.@ IN SOA onionring.the.net. netadmin.the.net. 56 108003600 604800 86400Dynamic Resource RecordsStatic Resource Recordsaurora IN A 172.21.100.100bobslake-nas-01 IN A 172.21.10.10bobslake-nas-02 IN A 172.21.10.18doc-2610-01 IN A 172.21.10.13doc-3810a-01 IN A 172.21.10.14doc-3810d-01 IN A 172.21.10.15doc-AS5800-01 IN A 172.21.10.11doc-core-01 IN A 172.21.10.5doc-core-02 IN A 172.21.10.6doc-core-03 IN A 172.21.10.7(truncated for brevity)In the previous example, the zone command:
•
•
Step 10
nrcmd> server dns reload
Note
Using a Batch File to Make Changes to a DNS Configuration
CNR can use batch files to make large and small-scale changes to the DNS configuration within your network.
To use the batch-file facility to add and remove entries, follow these steps:
Step 1
zone the.net. addRR doc-core-02 A 172.21.10.6zone the.net. addRR doc-core-03 A 172.21.10.7zone 10.21.172.in-addr.arpa. removeRR 6 PTR unused-6.the.net.zone 10.21.172.in-addr.arpa. removeRR 7 PTR unused-7.the.net.zone 10.21.172.in-addr.arpa. addRR 6 PTR doc-core-02.the.net.zone 10.21.172.in-addr.arpa. addRR 7 PTR doc-core-03.the.net.server dns reloadThe previous batch-file example shows how to add two new device/IP addresses. In addition to adding two "A" records (lines 1 and 2), remove the "unused" PTR records from the reverse zone (lines 3 and 4) before adding the new "PTR" records, in place of the unused records, to the reverse zone (lines 5 and 6). See line 7 to reload the DNS server.
Step 2
nrcmd> -b < 172.21.10.batchThe following output appears:
nrcmd>zone the.net. addRR doc-core-02 A 172.21.10.6100 Okdoc-core-02 IN A 172.21.10.6nrcmd>zone the.net. addRR doc-core-03 A 172.21.10.7100 Okdoc-core-03 IN A 172.21.10.7nrcmd>zone 10.21.172.in-addr.arpa. removeRR 6 PTR unused-6.the.net.100 Okremoving 6 IN PTR unused-6.the.net.nrcmd>zone 10.21.172.in-addr.arpa. removeRR 7 PTR unused-7.the.net.100 Okremoving 7 IN PTR unused-7.the.net.nrcmd>zone 10.21.172.in-addr.arpa. addRR 6 PTR doc-core-02.the.net.100 Ok6 IN PTR doc-core-02.the.net.nrcmd>zone 10.21.172.in-addr.arpa. addRR 7 PTR doc-core-03.the.net.100 Ok7 IN PTR doc-core-03.the.net.nrcmd>server dns reload100 OkCreating a Primary Forward Zone
To create a domain (or forward zone) and include all forward mapping (the "A" records) for the domain, follow these steps:
Step 1
nrcmd> zone the.net create primary file=the.net.zone.txtTo create new subnets by using the CLI, import a BIND zone definition file, which can be edited by using an ASCI text editor. The following example shows an edited BIND file.
@ IN SOA onionring.the.net. netadmin.the.net. (2000071600 ; serial number3600 ; Refresh 1 hours1800 ; Retry 30 minutes86400 ; Expire 24 hours86400 ; TTL 24 hours)IN NS onionring.the.net.doc-rtr58-01 IN A 172.21.101.20doc-rtr54-01 IN A 172.21.101.21doc-rtr53-01 IN A 172.21.101.22doc-rtr53-05 IN A 172.21.101.23doc-3810a-01 IN A 172.21.10.14doc-3810d-01 IN A 172.21.10.15doc-ubr7246-01 IN A 172.21.10.16doc-switch-02 IN A 172.21.10.17Step 2
nrcmd> zone the.net listRR100 OkStatic Resource Records@ IN SOA onionring.the.net.netadmin.the.net.0@ IN NS onionring.the.net.doc-rtr58-01 IN A 172.21.101.20doc-rtr54-01 IN A 172.21.101.21doc-rtr53-01 IN A 172.21.101.22doc-rtr53-05 IN A 172.21.101.23(Truncated for brevity)Dynamic Resource RecordsCreating an IP Tracker Web Page
An IP tracker web page:
•
•
•
To create an IP tracker web page, follow these steps:
Step 1
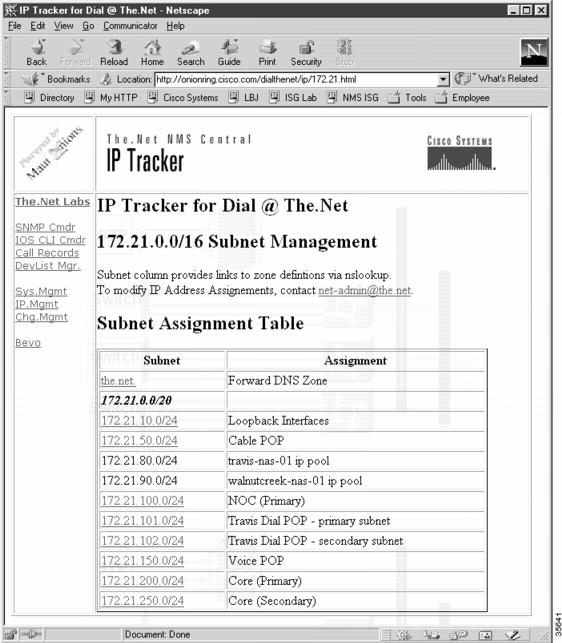
Figure 24
IP Tracker Web Page
Step 2
There are two scripts that work together to return an NSLOOKUP list query (ls) for a specified zone in a CGI link.
•
The active link is coded as:
<td><a href="/cgi-lwt/dnszone.pl?zone=10.21.172.in-addr.arpa.">172.21.10.0/24</a></td>
Once invoked, dnszone.pl calls the second script, dnszone_dump.
•
ls 10.21.172.in-addr.arpa.[www.the.net]0 host = broadcast-0.the.net1 host = unused-1.the.net2 host = unused-2.the.net3 host = unused-3.the.net4 host = unused-4.the.net5 host = doc-core-01.the.net6 host = doc-core-02.the.net7 host = doc-core-03.the.net8 host = doc-ls1010-01.the.net9 host = doc-switch-01.the.net10 host = doc-pix-01.the.net10.21.172.in-addr.arpa. server = onionring.the.net11 host = doc-AS5800-01.the.net12 host = doc-oob-03.the.net13 host = doc-2610-01.the.net14 host = doc-3810a-01.the.net15 host = doc-3810d-01.the.net16 host = doc-ubr7246-01.the.net17 host = doc-switch-02.the.netDownload the source code for the scripts and customize them for your environment. The following is an example of a return using http, which shows the list of hosts and their address numbers for a specified reverse DNS zone:
######################### DNSZONE.PL ##########################!/usr/local/bin/perl -wuse CGI_Lite;#--------------------------------------------------------------------# Script Name: dnszone.pl# Version: 1.0# Last modified by: xxx July 11, 2000# Requirements: dnszone_dump (Expect script)# CGI_Lite.pm# Description: Returns via http the list of hosts and their address numbers# of a specified reverse DNS zone.# Created by: xxx# Date: May 15, 2000# Contact: coe-iae@cisco.com#---------------------------------------------------------------------# POST method to extract parameter strings.# Single value extracted# Create an instance of CGI_Litemy $query = new CGI_Lite;# Send an appropriate MIME header to the browserprint "Content-type: text/html\n\n";# Send the beginning HTMLprint "<HTML><Head><Title>Hello!</Title>\n";print "</Head></Body>\n";# Get the form data into a hashmy %FORM = $query->parse_form_data;# Get the user's name from the hashmy $zone = $FORM{"zone"};# Now that we have retrieved the zone, we get the dump from expect$data=`/opt/CSCOlwt/bin/dnszone_dump $zone`;# we print it outprint "<pre>";print "$data";print "</pre>";print "</Body></HTML>\n";######################### DNSZONE_DUMP ##########################!/usr/local/bin/expect --#--------------------------------------------------------------------# Script Name: dnszone_dump# Version: 1.0# Last modified by: xxx July 11, 2000# Requirements: dnszone.pl (calls this script)# Description: Uses nslookup to produce a zone list of the# zone name passed to it by dnszone.pl# Created by: xxx# Date: May 15, 2000# Contact: coe-iae@cisco.com#---------------------------------------------------------------------if {$argc != 1} {puts "USAGE: zonedump <reversezone>"puts "e.g. zonedump 61.32.172.in-addr.arpa."exit}set zone [lindex $argv 0]log_user 0spawn /usr/sbin/nslookupexpect ">"sleep 1log_user 1send "ls $zone\r\n"expect ">"log_user 0sleep 1send "exit\r\n"exitHow to Create a Reverse DNS Zone
By creating reverse lookup zones for each IP subnet, you gain a robust database that can be used to track assignments within an IP address space. Reverse lookups can determine the allocation status of any address from any DNS client.
Network operators must account for used and unused IP addresses. It is recommended that each IP address be given a DNS PTR Resource Record, even if the address is unused. For example, you can look up and resolve an IP address as "unused-XXX.the.net."
See the following example to create a zone from a BIND file by entering the zone command:
nrcmd> zone 101.21.172.in-addr.arpa. create primary file=the.net_rev_zone.txtThe following edited BIND definition file is for "the.net_rev_zone.txt."
@ IN SOA onionring.the.netesupport-austin.the.net. (2000071600 ; serial number3600 ; Refresh 1 hours1800 ; Retry 30 minutes86400 ; Expire 24 hours86400 ; TTL 24 hours);IN NS onionring.the.net.;0 IN PTR broadcast-0.the.net.1 IN PTR unused-1.the.net.2 IN PTR unused-2.the.net.3 IN PTR unused-3.the.net.4 IN PTR unused-4.the.net.5 IN PTR unused-5.the.net.6 IN PTR unused-6.the.net.7 IN PTR unused-7.the.net.8 IN PTR unused-8.the.net.9 IN PTR unused-9.the.net.10 IN PTR unused-10.the.net.11 IN PTR unused-11.the.net.12 IN PTR unused-12.the.net.13 IN PTR unused-13.the.net.14 IN PTR unused-14.the.net.15 IN PTR unused-15.the.net.16 IN PTR unused-16.the.net.17 IN PTR unused-17.the.net.18 IN PTR unused-18.the.net.19 IN PTR unused-19.the.net.20 IN PTR doc-rtr58-01.the.net.21 IN PTR doc-rtr54-01.the.net.22 IN PTR doc-rtr53-01.the.net.23 IN PTR doc-rtr53-01.the.net.(Truncated for brevity..)253 IN PTR unused-253.the.net.254 IN PTR unused-254.the.net.255 IN PTR broadcast-255.the.net.The following are sample BIND files that can be used as a template and edited for your environment.
Note
city.business.slb.com. IN SOAhostmaster.city.business.slb.com. 1997121600 serial number 3600Refresh 1 hours 1800Retry 30 minutes 86400Expire 24 hours 86400TTL 24 hourshost.city.business.slb.com. IN NS
Note
0.city.business.slb.com. 1 IN PTR broadcast-1.city.business.slb.com. 2 IN PTR unused-2.city.business.slb.com. 3 IN PTR unused-1.city.business.slb.com. 2 IN PTR unused-2.city.business.slb.com. 3 IN PTR unused-3.city.business.slb.com. 4 IN PTR unused-4.city.business.slb.com. 5 IN PTR unused-5.city.business.slb.com. 6 IN PTR unused-6.city.business.slb.com. 7 IN PTR unused-7.city.business.slb.com. 8 IN PTR unused-8.city.business.slb.com. 9 IN PTR unused-9.city.business.slb.com. 10 IN PTR unused-10.city.business.slb.com. 11 IN PTR unused-11.city.business.slb.com. 12 IN PTR unused-12.city.business.slb.com. 13 IN PTR unused-13.city.business.slb.com. 14 IN PTR unused-14.city.business.slb.com. 15 IN PTR unused-15.city.business.slb.com. 16 IN PTR unused-16.city.business.slb.com. 17 IN PTR unused-17.city.business.slb.com. 18 IN PTR unused-18.city.business.slb.com. 19 IN PTR unused-19.city.business.slb.com. 20 IN PTR unused-20.city.business.slb.com. 21 IN PTR unused-21.city.business.slb.com. 22 IN PTR unused-22.city.business.slb.com. 23 IN PTR unused-23.city.business.slb.com. 24 IN PTR unused-24.city.business.slb.com. 25 IN PTR unused-25.city.business.slb.com. 26 IN PTR unused-26.city.business.slb.com. 27 IN PTR unused-27.city.business.slb.com. 28 IN PTR unused-28.city.business.slb.com. 29 IN PTR unused-29.city.business.slb.com. 30 IN PTR unused-30.city.business.slb.com. 31 IN PTR unused-31.city.business.slb.com. 32 IN PTR unused-32.city.business.slb.com. 33 IN PTR unused-33.city.business.slb.com. 34 IN PTR unused-34.city.business.slb.com. 35 IN PTR unused-35.city.business.slb.com. 36 IN PTR unused-36.city.business.slb.com. 37 IN PTR unused-37.city.business.slb.com. 38 IN PTR unused-38.city.business.slb.com. 39 IN PTR unused-39.city.business.slb.com. 40 IN PTR unused-40.city.business.slb.com. 41 IN PTR unused-41.city.business.slb.com. 42 IN PTR unused-(Truncated for brevity..)234.city.business.slb.com. 235 IN PTR unused-235.city.business.slb.com. 236 IN PTR unused-236.city.business.slb.com. 237 IN PTR unused-253.city.business.slb.com. 254 IN PTR unused-254.city.business.slb.com. 255 IN PTR unused-255.city.business.slb.com. 255 IN PTR broadcast-