-
Cisco MWR 2941 Mobile Wireless Edge Router Software Configuration Guide, Release 15.0(1)MR
-
About This Guide
-
Cisco MWR 2941 Router Overview
-
Cisco IOS Software Basics
-
First-Time Configuration
-
Configuring Gigabit Ethernet Interfaces
-
Configuring Layer 2 Interfaces
-
Configuring HWIC-9ESW Interfaces
-
Configuring VLANs
-
Configuring IEEE 802.1Q Tunneling, VLAN Mapping, 802.1ad, and Layer 2 Protocol Tunneling
-
Configuring STP
-
Configuring MSTP
-
Configuring Optional Spanning-Tree Features
-
Managing the MAC Address Table
-
Configuring Cisco Express Forwarding
-
Configuring Resilient Ethernet Protocol
-
Configuring Ethernet Link Operations, Administration, and Maintenance
-
Configuring Clocking and Timing
-
Configuring Synchronous Ethernet ESMC and SSM
-
Configuring MLPPP Backhaul
-
Configuring Multiprotocol Label Switching
-
Configuring Routing Protocols
-
Configuring Bidirectional Forwarding Detection
-
Configuring Pseudowire
-
Configuring Layer 3 Virtual Private Networks
-
Configuring Quality of Service
-
Configuring Link Noise Monitor
-
Configuring Cisco Discovery Protocol
-
Monitoring and Managing the Cisco MWR 2941 Router
-
Index
-
 Feedback
Table Of Contents
Understanding the Cisco MWR 2941 Router Interface Numbering
Verifying the Cisco IOS Software Version
Configuring the Hostname and Password
Verifying the Hostname and Password
First-Time Configuration
This chapter describes the actions to take before turning on your router for the first time. This chapter includes the following sections:
•
Understanding the Cisco MWR 2941 Router Interface Numbering
•
•
Understanding the Cisco MWR 2941 Router Interface Numbering
Each network interface on a Cisco MWR 2941 router is identified by a slot number and a port number.
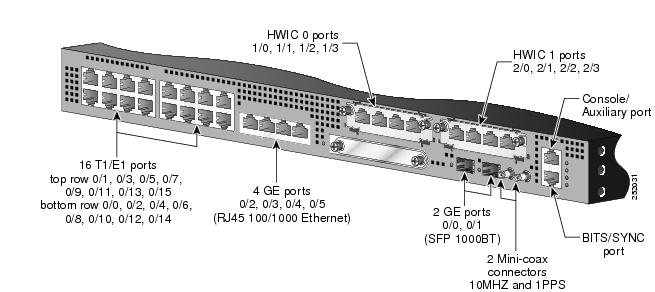
Figure 3-1 shows an example of interface numbering on a Cisco MWR 2941 router:
•
•
•
•
Note
Note
Figure 3-1 Cisco MWR 2941 Router Port Numbers
Slot and Port Numbering
The Cisco MWR 2941 router chassis contains the following interface types:
•
•
•
•
•
•
Note
•
•
The logical slot numbers are 0 for all built-in interfaces.
The numbering format is:
Interface type Slot number/Interface numberInterface (port) numbers begin at logical 0 for each interface type.
Following is an explanation of the slot/port numbering:
•
•
•
•
Setup Mode
The setup mode guides you through creating a basic router configuration. If you prefer to configure the router manually or to configure a module or interface that is not included in setup mode, go to "Chapter 2 "Cisco IOS Software Basics" to familiarize yourself with the command-line interface (CLI).
Note
Before Starting Your Router
Before you power on your router and begin using the setup mode, follow these steps:
Step 1
Step 2
Using Setup Mode
The setup command facility appears in your PC terminal emulation program window. To create a basic configuration for your router, do the following:
•
•
Note
1900#).
Configuring Global Parameters
Use the following procedure to configure global parameters.
Step 1
Caution
The messages look similar to the following:
Note
rommon 1 >bootprogram load complete, entry point:0x80008000, size:0xc200Initializing ATA monitor library.......program load complete, entry point:0x80008000, size:0xc200Initializing ATA monitor library.......program load complete, entry point:0x80008000, size:0xc35eecSelf decompressing the image:########################################################################################################################################################################################################################################################################################################################################################################################################################################################################################################################################################################### [OK]Smart Init is enabledsmart init is sizing iomemID MEMORY_REQ TYPE0035C 0X005F3C00 MWR2941 Mainboard0X000F3BB0 public buffer pools0X00843000 public particle poolsTOTAL: 0X06894CB0If any of the above Memory requirements are "UNKNOWN", you may be using anunsupported configuration or there is a software problem and system operationmay be compromised.Rounded IOMEM up to: 104Mb.Using 20 percent iomem. [104Mb/512Mb]Restricted Rights LegendUse, duplication, or disclosure by the Government issubject to restrictions as set forth in subparagraph(c) of the Commercial Computer Software - RestrictedRights clause at FAR sec. 52.227-19 and subparagraph(c) (1) (ii) of the Rights in Technical Data and ComputerSoftware clause at DFARS sec. 252.227-7013.cisco Systems, Inc.170 West Tasman DriveSan Jose, California 95134-1706Cisco IOS Software, 2900 Software (MWR2900-IPRAN-M),Experimental Version 12.4(20050412:070057),Copyright (c) 1986-2009 by Cisco Systems, Inc.Compiled Sat 10-Jan-09 03:19 by cbrezoveImage text-base:0x60008F60, data-base:0x6106A000Cisco Systems, Inc. MWR-2941-DC (MPC8347E) processor (revision 0x400) with 417196K/107092K bytes of memory.Processor board IDMPC8347E CPU Rev: Part Number 0x8032, Revision ID 0x3001 RTM Module: ASM-M2900-TOP daughter card6 Gigabit Ethernet interfaces1 terminal line128K bytes of non-volatile configuration memory.125440K bytes of ATA CompactFlash (Read/Write)--- System Configuration Dialog ---Would you like to enter the initial configuration dialog? [yes/no]: yesAt any point you may enter a question mark '?' for help.Use ctrl-c to abort configuration dialog at any prompt.Default settings are in square brackets '[]'.Step 2
Basic management setup configures only enough connectivityfor management of the system, extended setup will ask youto configure each interface on the systemWould you like to enter basic management setup? [yes/no]:yesConfiguring global parameters:Step 3
Configuring global parameters:Enter host name [Router]: 2941-1Step 4
The enable secret is a password used to protect access toprivileged EXEC and configuration modes. This password, afterentered, becomes encrypted in the configuration.Enter enable secret: ciscoenable
Note
Step 5
The enable password is used when you do not specify anenable secret password, with some older software versions, andsome boot images.Enter enable password: ciscoenableStep 6
The virtual terminal password is used to protectaccess to the router over a network interface.Enter virtual terminal password: ciscoterminalStep 7
Configure SNMP Network Management? [yes]:Community string [public]: publicStep 8
Current interface summaryAny interface listed with OK? value "NO" does not have a valid configurationInterface IP-Address OK? Method Status ProtocolGigabitEthernet0/0 unassigned NO unset up upGigabitEthernet0/1 unassigned NO unset up upStep 9
Enter interface name used to connect to themanagement network from the above interface summary: GigabitEthernet0/0Step 10
Configuring interface GigabitEthernet0/0:Configure IP on this interface? [no]:
Completing the Configuration
When you have provided all of the information prompted for by the setup command facility, the configuration appears. Messages similar to the following appear:
The following configuration command script was created:!hostname 2941-1enable secret 5 $1$5fH0$Z6Pr5EgtR5iNJ2nBg3i6y1 enable password ciscoenable line vty 0 4password ciscoenablesnmp-server community public !no ip routing!interface GigabitEthernet0/1shutdown!endTo complete your router configuration, do the following:
Step 1
[0] Go to the IOS command prompt without saving this config.[1] Return back to the setup without saving this config.[2] Save this configuration to nvram and exit.Enter your selection [2]: 2Building configuration...[OK]Use the enabled mode 'configure' command to modify this configuration.Press RETURN to get started!If you answer:
•
•
Step 2
The
2941-1>prompt indicates that you are now at the CLI and you have just completed a basic router configuration.
Note
Verifying the Cisco IOS Software Version
To verify the version of Cisco IOS software, use the show version command. The show version command displays the configuration of the system hardware, the software version, the names and sources of the configuration files, and the boot images.
Configuring the Hostname and Password
First configure the hostname and set an encrypted password. Configuring a hostname allows you to distinguish multiple Cisco routers from each other. Setting an encrypted password allows you to prevent unauthorized configuration changes.
Note
To configure a hostname and to set an encrypted password, follow these steps:
Step 1
Router> enableThe Password prompt appears. Enter your password.
Password: passwordWhen the prompt changes to
Router,you have entered enable mode.Step 2
Router#configure terminalEnter configuration commands, one per line. End with CNTL/Z.When the prompt changes to
Router#,Enter configuration commands, one per line. End with CNTL/Z.you have entered global configuration mode.Router(config)#Step 3
Router(config).Router(config)#hostname RouterRouter(config)#Step 4
), you must enter the enable secret password to access configuration mode. Enter your secret password.Router(config)#enable secret secret passwordStep 5
Router(config)#exit
Verifying the Hostname and Password
To verify that you have correctly configured the hostname and password, follow these steps.
Step 1
Router# show configUsing 1888 out of 126968 bytes!version XX.X...!hostname Router!enable secret 5 $1$60L4$X2JYOwoDc0.kqa1loO/w8/...Step 2
Step 3
Router# exit..Router con0 is now availablePress RETURN to get started.Router> enablePassword: passwordRouter#