Feedback
Table Of Contents
Guidelines for a Standalone Deployment
Guidelines for a Clustered Deployment
Obtaining and Installing Licenses
Configuring the Input and Output Media Directories
Enabling System Administration E-mail Notifications
Configuring the Video Conversion Interface (SUI) Feature
Accessing the Shared Folder Access Settings Page
Creating Folder Attendant Directory and Watch
Change Time Zone on the Linux OS
Change Time Zone on the Windows OS
Testing a Cisco MXE 3500 Deployment
Test 1: Submit a Job Using File Job Submission
Test 2: Submit a Job Using Folder Attendant
Test 3: Verify a Licensed Feature is Enabled
Configuration Tasks
This chapter describes the deployment options and guidelines, and the additional required and optional configurations after you have completed the initial configuration of the Cisco MXE 3500 appliance.
The following information is described:
Required Configuration
•
Obtaining and Installing Licenses
•
•
•
Optional Tasks
•
•
•
•
Deployment Options
The Cisco MXE 3500 with Release 3.3 can be configured for a standalone or a clustered deployment.
Standalone Deployment
A standalone deployment consists of one or more Cisco MXE 3500 running as individual appliances; each appliance has its own set of user accounts, job profiles, licensed features, and user interfaces. Each standalone appliance runs the Enterprise Control System (ECS), Configuration and Monitoring (CAM) service, and Local Control System (LCS) components.
Clustered Deployment
A clustered deployment consists of one or more Cisco MXE 3500 appliance running as a single group with one set of user accounts, job profiles, licensed features, and user interfaces. A clustered deployment also provides user-management functionality, such as the ability to create users with specific roles and access to specific sections of the web UI.
There are two types of Cisco MXE 3500 appliances in a clustered deployment: a single Resource Manager (RM) and up to nine Resource Nodes (RNs).
Resource Manager—Similar to a standalone appliance, the RM runs the Enterprise Control System (ECS), Configuration and Monitoring (CAM) service, and Local Control System (LCS) components on the same Cisco MXE 3500 appliance and is aware of all RNs in the group. The RM functions as a multinode manager by assigning various transcoding jobs to RNs, balancing the job loads uniformly based on the Capacity, Limit, and Expense values that you configure in the RM for each RN. Because the RM also runs LCS, it functions also as a RN and can process jobs.
Resource Node—Runs only the LCS component and performs transcoding jobs scheduled by the RM. A single RM appliance can support up to 10 RNs, including the RM itself as a node.
Deployment Guidelines
This section describes the configuration guidelines and restrictions for standalone and clustered deployments.
•
•
Guidelines for a Standalone Deployment
The following configuration guidelines and restrictions apply to standalone deployments:
•
•
•
•
Guidelines for a Clustered Deployment
The following configuration guidelines and restrictions apply to clustered deployments:
•
•
•
•
•
•
Installing QuickTime
The QuickTime encoder is separately installed because of Apple licensing requirements. It is required for transcoding to and from specific formats.
Note
Follow these steps to install QuickTime:
Step 1
Step 2
Note
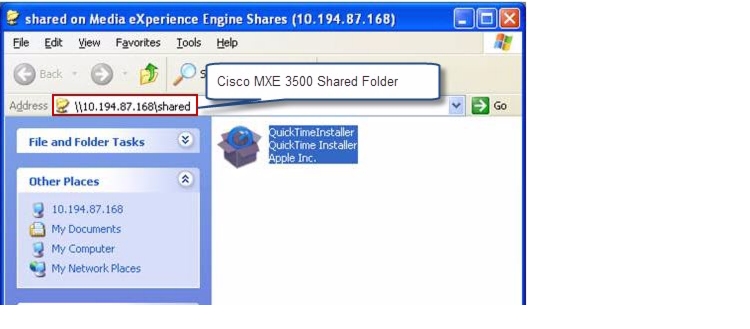
Figure 1 Downloading and Saving the QuickTime Installer
Step 3
Step 4
Step 5
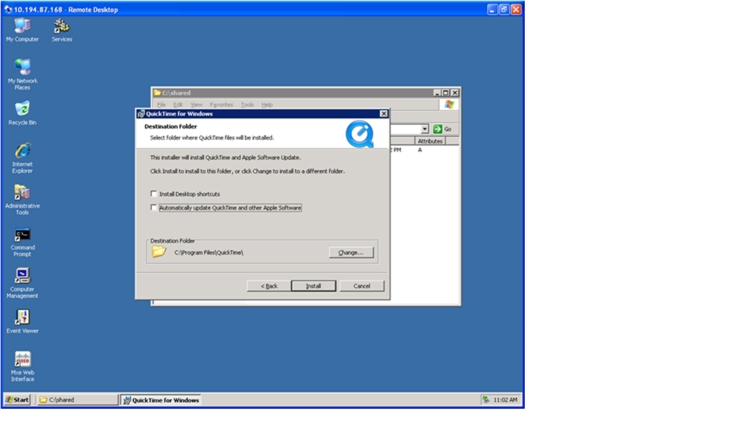
Figure 2 Launching the QuickTime Installer
Step 6
Step 7
Step 8
Obtaining and Installing Licenses
Obtain and install the full Cisco MXE 3500 Release 3.3 license with the base PID and any optional feature PIDs.
The Software License Claim Certificate that ships with your Cisco MXE 3500 appliance contains instructions on how to obtain licenses.
Instructions on how to obtain and install a license are also detailed in Obtaining and Installing a License, page 3-1.
Configuring the Host Settings
The following procedure describes how to configure Host settings.
Note
Step 1
The Configured Hosts pane shows the IP address of the standalone or RM appliance.
Step 2
a.
b.
c.
d.
Note
Step 3
All workers, except two, will go green.
Note
Step 4
Step 5
a.
b.
c.
Configuring the Input and Output Media Directories
For the Cisco MXE 3500 to obtain input and store output media, you must configure the input and output directories.
Before You Begin
Ensure that any directories that you are going to configure exist and are shared.
Procedure
Step 1
Step 2
Step 3
•
•
•
•
Note
Step 4
Note
Step 5
See also System Administration.
Enabling System Administration E-mail Notifications
For Cisco MXE 3500 to send e-mails for job completion or failure notifications, it must be configured to point to an e-mail server that allows e-mails to be relayed from it.
Note
Follow these steps to enable e-mail notifications:
Step 1
Step 2
a.
b.
•
•
c.
Step 3
a.
b.
c.
d.
•
•
•
Check the Enabled box to enable this profile for job processing.
In the From field, select System Administrator.
In the To field, select System Administrator.
Step 4
a.
b.
c.
d.
e.
See also "System Administration" section.
Configuring User Settings
Note
Access the User Administration page from the Toolbox by clicking Administration > User to set user access and permissions.
The top pane of the User Administration page displays the predefined user. The lower pane displays the permissions for each user. The New or Edit Users pop-up allows you to create and modify system users.
See also: Role Administration, Profile Spaces.
Configuring the Video Conversion Interface (SUI) Feature
This configuration allows end users to use the Video Conversion Interface to encode and share videos.
•
•
Configuring Shared Folders
The default setting allows open access to the shared folders. Secure the shared folders by configuring Active Directory (AD) mode or Local User Access mode.
•
Accessing the Shared Folder Access Settings Page
From the Toolbox, expand Administration, and click Shared Folder Access Settings. The Shared Folder Access page displays.
Active Directory Mode
Before You Begin
•
•
The applications on the Cisco MXE 3500 run as a service. These services are associated with the preconfigured mxe-service user . When AD is implemented, the user associated with the Cisco MXE 3500 services must be changed to a user configured in the AD system.
Enable Active Directory Mode
To enable AD, do the following in the Shared Folder Access Settings page:
Step 1
Step 2
Step 3
Step 4
Step 5
The AddServiceUser.bat script creates the new user on the Windows platform. It then associates all MXE services to the new user.
Step 6
a.
b.
c.
d.
Local User Access Mode
Use the local user access mode if your Enterprise does not have an AD or chooses not to tie the system with the AD.
To enable local user access mode, do the following in the Shared Folder Access Settings page:
Step 1
Step 2
Step 3
Step 4
See also:LDAP Settings, Shared Folder Access Settings
Creating Folder Attendant Directory and Watch
One of the key features of Folder Attendant is its ability to monitor directories and automatically initiate job processing when new or updated media/XML files appear. When a new or updated file, meeting the specified criteria, appears in a directory being monitored, Folder Attendant automatically initiates job processing based on the configured job parameter settings, such as profile and priority.
You must first define directories to be watched on the Folder Attendant Administration page. Then, multiple watches can be configured per directory.
Note
This section includes the following topics:
Creating a Directory
Procedure
Step 1
Step 2
Step 3
Note
Creating a Watch
Procedure
Step 1
Step 2
Step 3
Step 4
Configuring Timezone
This section describes how to configure the NTP server and timezone on the Cisco MXE 3500. The following information is described:
•
•
Before You Begin
Before you configure the NTP server, ensure that DNS has been configured. If you did not enter the DNS address and NTP server during initial configuration, SSH to mxe_IP_address and login as admin. The Configuration Menu displays. Select the Configure DNS address and Configure NTP Sever to enter the DNS address and NTP server.
Tip
See also Linux Administration Utility, Administrative Accounts.
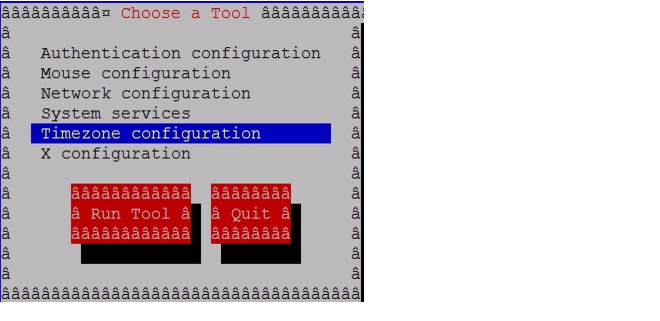
Change Time Zone on the Linux OS
Follow these steps to change the time zone on the Linux OS:
Step 1
Step 2
Step 3
Step 4
Step 5
Step 6
Figure 3 Changing the Time Zone on the Linux OS
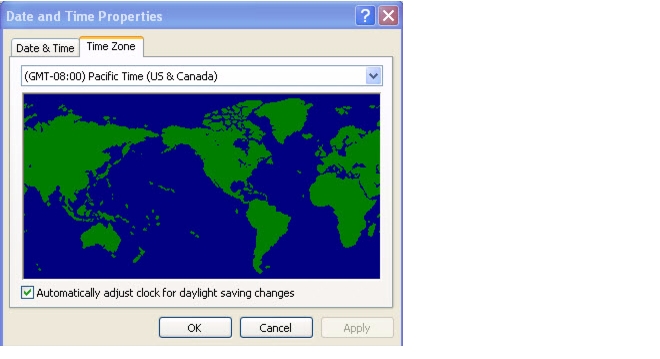
Change Time Zone on the Windows OS
Follow these steps to change the time zone on the Linux OS:
Step 1
Step 2
Step 3
Figure 4 Changing the Time Zone on the Windows OS
Configuring Licensed Features
To configure the following licensed features see Chapter 3, "Configuring Licensed Features."
•
•
•
To configure Pulse video analytics see Chapter 4 "Configuring Pulse Video Analytics (Licensed Feature)."
Testing a Cisco MXE 3500 Deployment
To ensure your system has been correctly deployed and configured, perform the following tests:
•
•
•
Test 1: Submit a Job Using File Job Submission
Before You Begin
In the \\Resource_Manager_IP_Address\media folder, look for any sample media file, e.g., within \SpeechToTextFiles, or copy an existing media file to the \\Resource_Manager_IP_Address\media directory.
Procedure
Step 1
Step 2
Step 3
Step 4
a.
b.
Step 5
Step 6
Step 7
Test 2: Submit a Job Using Folder Attendant
Before You Begin
If you completed Test 1: Submit a Job Using File Job Submission, delete the media files from the \\Resource_Manager_IP_Address\media and \\Resource_Manager_IP_Address\output folders.
Procedure
Step 1
Step 2
a.
b.
c.
Step 3
a.
a.
b.
c.
d.
Step 4
Step 5
Step 6
Step 7
Step 8
Test 3: Verify a Licensed Feature is Enabled
•
–
•
–
–