Feedback
Table Of Contents
Introduction to the Index Profile
Scene Change Detection (Index Profile)
Thumbnail Properties (Index Profile)
Adding an Index Profile to a Job Profile
Introduction to the Thumbnail Profile
Understanding Thumbnail Settings
Frame Selection (Thumbnail Profile)
Thumbnail Properties (Thumbnail Profile)
Adding a Thumbnail Profile to a Job Profile
Other Profiles
The Other Profile Class allows you to create the following types of profiles:
•
Index Profile—Choose this option to set automatic scene detection parameters and optional thumbnail generation.
•
Index Profile
This section includes the following topics:
•
•
Introduction to the Index Profile
Adding an Index Profile to a Job Profile is optional. Scene change detection is a separately licensed feature of the Cisco MXE 3500.
The Index Profile is used to define parameters that specify how to perform scene change detection, whether to capture thumbnail images as representative samples of the scene changes, as well as the format, size, and quality of the thumbnail image(s). See also: Introduction to the Thumbnail Profile.
Understanding Index Settings
An Index Profile allows you to adjust the following settings:
•
•
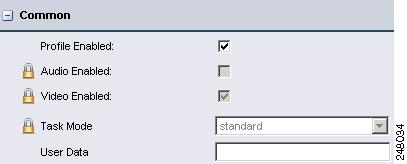
Common (Index Profile)
Figure 11-1 shows Common settings. Table 11-1 describes the settings.
Figure 11-1 Index Profile: Common Settings
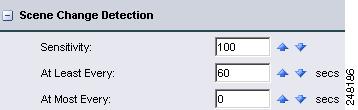
Scene Change Detection (Index Profile)
Figure 11-2 shows Scene Change Detection settings. Table 11-2 describes the settings.
Figure 11-2 Index Profile: Scene Change Detection Settings
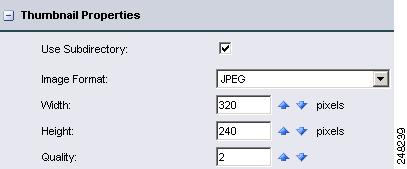
Thumbnail Properties (Index Profile)
Figure 11-3 shows Thumbnail Properties settings. Table 11-3 describes the settings.
Figure 11-3 Index Profile: Thumbnail Properties Settings
Adding an Index Profile to a Job Profile
Procedure
Step 1
Step 2
Step 3
Step 4
Step 5
Thumbnail Profile
This section includes the following topics:
•
•
•
Introduction to the Thumbnail Profile
Use a Thumbnail Profile to set up thumbnail images, specify their format, and specify the conditions for capturing them. Thumbnails are basically images from single frames of video. Despite the name, you may set the images to any size. The Thumbnail Profile also allows you to set up periodic thumbnail captures. See the "Index Profile" section if you want to trigger thumbnails on scene changes.
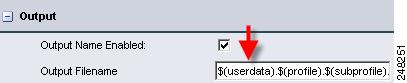
Thumbnails are placed in a subfolder of the Thumbnail Output Directory. All the thumbnails from one encoding job will be held in a subfolder. The subfolder is named according to the Cisco MXE 3500 naming conventions for output files. For example, if the output name is $(basename).$(profile).$(subprofile).$(extension), the thumbnail subfolder will be named $(basename)_$(profile)_$(subprofile)_tmb with the periods converted to "_" and the $(extension) converted to "_tmb".
The subfolder will contain a text file with an .index extension that contains a list of the thumbnail files and times (measured from the beginning of the video clip) where the thumbnails were captured.
The thumbnail files themselves are named 0000.ext, 0001.ext, 0002.ext, ... etc, where "ext" is one of the allowed graphics formats. See also: Image Format in Thumbnail Properties (Index Profile).
The OLD convention uses the Cisco MXE 3500 naming convention to name each thumbnail file. So, the example above produces a thumbnail named: $(basename)_$(profile)_$(subprofile)0000.ext instead of 0000.ext.
Understanding Thumbnail Settings
The Thumbnail Profile is used to define parameters that specify when to capture thumbnail images, as well as the format, size, and quality of the thumbnail image(s). A Thumbnail Profile allows you to adjust the following settings:
•
•
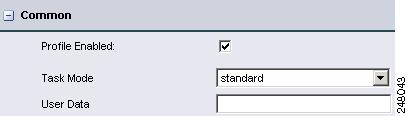
Common (Thumbnail Profile)
Figure 11-4 shows common settings. Table 11-4 describes the settings.
Figure 11-4 Thumbnail Profile: Common Settings
Frame Selection (Thumbnail Profile)
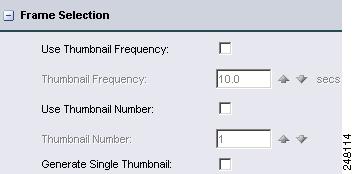
Figure 11-5 shows Frame Selection settings. Table 11-5 describes the settings.
Figure 11-5 Thumbnail Profile: Frame Selection Settings
Note
Table 11-5 Thumbnail Profile: Frame Selection Settings and Descriptions
Use Thumbnail Frequency
Check this box to capture thumbnails within the period entered in the field below. The default period is 10 seconds, meaning that every ten seconds an image is captured. The number of images captured depend on the length of the video clip, and will be approximately (Clip Length)/(Thumbnail Period).
Thumbnail Frequency
When the Use Thumbnail Frequency box is checked, the time in this field determines the spacing between captured images. If the time of a requested thumbnail does not match the time of any video frame, the nearest frame is selected. The time must be greater than zero.
Use Thumbnail Number
Check this box to enable the capture of a fixed number of thumbnails per clip. The fixed number is identified in the Thumbnail Number field. You may use any number except zero. The spacing between thumbnails depends on the length of the video clip, and will be approximately (Clip Length)/(Number of Thumbnails).
Thumbnail Number
When the Use Thumbnail Number box is checked, the number in this field determines the number of thumbnails to be generated during the video clip. The thumbnails are equally spaced across the clip (except for irregularities caused by rounding to the nearest video frame). This may not represent the total number of thumbnails captured if other checkboxes enable other methods of requesting thumbnails. The number must be greater than zero.
To figure out which frames are captured: Divide the length of the video by the number of thumbnails, and multiply by the frame rate. The thumbnail image will be taken at the center of the interval rounded down to the nearest frame.
Example: 5 thumbnails taken from a 60 second video @ 30 fps will result in thumbnails taken at 6 seconds (frame 180), 18 seconds (frame 540), 30 seconds (frame 900), 42 seconds (frame 1260), and 54 seconds (frame 1620).
Generate Single Thumbnail
Check this box to enable the capture of a single thumbnail image at the time specified in the Thumbnail Time box on the File Job Submission page. These submission parameters are intended to be set on a per-submission basis, and are not saved in the profiles. See also: File Job.
Thumbnail Properties (Thumbnail Profile)
Figure 11-6 shows Thumbnail Properties settings. Table 11-6 describes the settings.
Figure 11-6 Thumbnail Profile: Thumbnail Properties Settings
Adding a Thumbnail Profile to a Job Profile
Procedure
Step 1
Step 2
Step 3
Step 4
Step 5