Administration Guide for Cisco Media Experience Engine 3500 Release 3.3
Job Profiles

Table Of Contents

Job Profiles

Introduction to Job Profiles

What must go into a Job Profile?

What can go into a Job Profile?

Job Profile File Extension

Setting the Default Profile Directory

Creating a New Job Profile

Creating a New Job Profile

Creating a New Job Profile from an Existing Job Profile

Creating a New Job Profile from the Profile Browser

Standard Cisco MXE 3500 Job Profiles

Using the Profile Browser to Select a Job Profile

Editing an Existing Job Profile

Deleting Profiles

Copying Job Profiles


Job Profiles


Job profiles are templates that define how jobs should be processed; they can contain part or all of the settings required to process jobs from beginning to final distribution.

This chapter includes the following topics:

Introduction to Job Profiles

Setting the Default Profile Directory

Creating a New Job Profile

Standard Cisco MXE 3500 Job Profiles

Using the Profile Browser to Select a Job Profile

Editing an Existing Job Profile

Deleting Profiles

Copying Job Profiles

Introduction to Job Profiles

A Job Profile is a template that defines how a job should be processed. Saved Job Profiles can contain part or all of the settings required to process jobs from ingest/encoding to final distribution. Job Profiles can be optimized for different types of input media, encoding output, and distribution. Profiles can be stored in a location accessible to all users or can be saved to individual locations.

Job Profile: A is a collection of subprofiles, similar to a template, that tells the Cisco MXE 3500 what settings should be used at each stage of production. The Job Profile consists of multiple task-specific subprofiles, which taken together include all the information needed to process an incoming signal from start to finish.

Subprofile: The Cisco MXE 3500 offers four types of subprofiles that may be part of a Job Profile:

Distribution Profiles

Encoder Profiles

Other Profiles

Preprocessor Profiles

For example, if you want to transform MPEG-2 content into Flash 8 and Real, report the job completion and then distribute the output, you need to create a Job Profile that, at a minimum, includes the following:

Preprocessor Profile

Encoder Profile that includes Flash 8 and Real encoders

Distribution Profile that includes notification information

This section includes the following topics:

What must go into a Job Profile?

What can go into a Job Profile?

Job Profile File Extension

What must go into a Job Profile?

At a minimum to process a job, a Job Profile must consist of a Preprocessor Profile and an Encoder Profile.

What can go into a Job Profile?

In addition, a Job Profile may contain:

Multiple encoder profiles that generate multiple output files.

A Distribution Profile that copies or FTPs the output media and that notifies operators or other downstream systems of the failure or completion of a transcoded/encoded job.

Job Profile File Extension

Job profiles and subprofiles both have an .awp extension.

Setting the Default Profile Directory

Follow these steps to set the default profile directory:


Step 1 From the Toolbox, click Administration > System.

Step 2 In the Input section, enter the information in the Profile Directory field. See Figure 6-1.

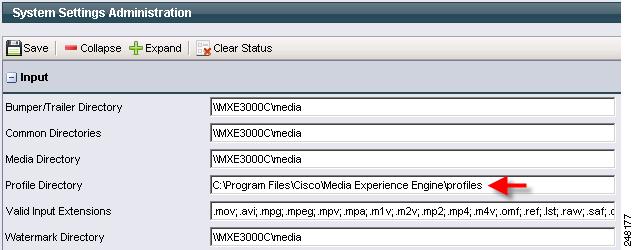
Figure 6-1 Profile Directory Field

Step 3 Click Save.


To manage multiple profile directories or switch between profile directories while working, see the "Profile Spaces" section.

Creating a New Job Profile

This section includes the following topics:

Creating a New Job Profile

Creating a New Job Profile from an Existing Job Profile

Creating a New Job Profile from the Profile Browser

Creating a New Job Profile

Follow these steps to create a new Job Profile:


Step 1 From the Toolbox, expand Profile Management, and click New Profile. The New Profile pop-up displays. See Figure 6-2.

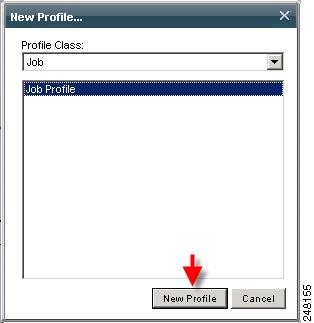
Figure 6-2 New Profile Pop-Up

Step 2 From the Profile Class drop-down, select Job, and click the New Profile button. The New Job Profile page displays. See Figure 6-3.

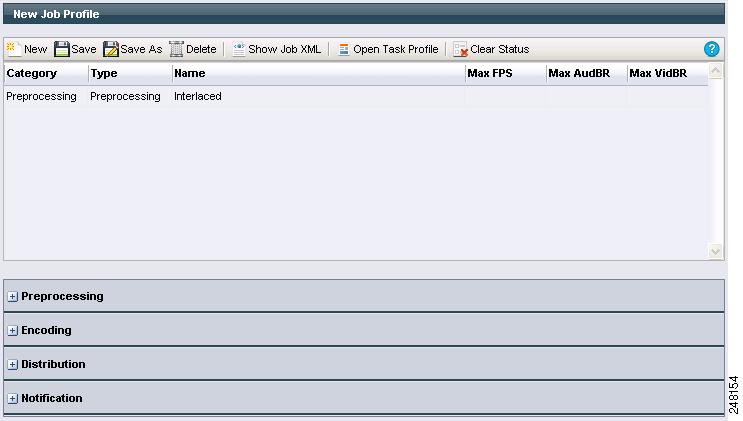
Figure 6-3 New Job Profile Page

Step 3 Expand the Preprocessing section, and from the drop-down, select a Preprocessor Profile.

Step 4 Expand the Encoding section, and select one or more encoders.

Step 5 (Optional) Expand the Distribution section, and select one Output Profile, one or more Delivery and/or Source Delivery Profiles, and one Webcast Profile.

Step 6 (Optional) Expand the Notification section, and select one or more Notification Profiles.

Step 7 Click Save.


Creating a New Job Profile from an Existing Job Profile

Follow these steps to crate a new Job Profile from an existing Job Profile:


Step 1 From the Toolbox, click Profile Management > Open Profile > Job.

Step 2 Highlight a Job Profile, and click the Open Profile button.

Step 3 Expand the Preprocessing, Encoding, Distribution, and/or Notification sections, and make any necessary changes.

Step 4 Click Save As, and provide a new name for the new Job Profile.


Tip You can also use the Save As option to rename a Job Profile that displays in the Video Conversion Interface.


Creating a New Job Profile from the Profile Browser

Follow these steps to crate a new Job Profile from the Profile Browser:


Step 1 From the Profile Browser, in the Browse Type, select Job Profile.

Step 2 Leave Filter Text blank, and click the Search button.

Step 3 From the Results drop-down, double-click Create New Profile. The New Job Profile page displays.

Step 4 Expand the Preprocessing section, and from the drop-down, select a Preprocessor Profile.

Step 5 Expand the Encoding section, and select one or more Encoder Profiles.

Step 6 (Optional) Expand the Distribution section, and select one Output Profile, one or more Delivery and/or Source Delivery Profiles, one Webcast Profile, and one IP Stream profile.

Step 7 (Optional) Expand the Notification section, and select one or more Notification Profiles.

Step 8 Click Save.


Standard Cisco MXE 3500 Job Profiles

The Cisco MXE 3500 provides many pre-installed Job Profiles.


Note These profiles often need to be adjusted to meet individual encoding or transcoding needs.


Android: Designed to produce a video for playout on Android devices.

Audio_Podcast: Designed to produce MP3 (128K bit rate) audio.

Blackberry_320x240_1MB_30: Designed to produce a 320x240 (1MB bit rate, 30FPS) video for playout on Blackberry devices.

Blackberry_320x240_500K_30: Designed to produce a 320x240 (500K bit rate, 30FPS) video for playout on Blackberry devices.

Blackberry_480x320_1.5MB_24: Designed to produce a 480x320 (1.5MB bit rate, 24FPS) video for playout on Blackberry devices.

Blackberry_480x360_1.5MB_24: Designed to produce a 480x360 (1.5MB bit rate, 24FPS) video for playout on Blackberry devices.

Blackberry_480x360_2MB_30: Designed to produce a 480x360 (2MB bit rate, 30FPS) video for playout on Blackberry devices.

Cisco_DMP_4300.job.awp: Designed to produce a video for playout on Cisco DMP4300 Digital Media Player.

Cisco_DMP_4400.job.awp: Designed to produce a video for playout on Cisco DMP4400 Digital Media Player.

Flash_16x9.job.awp: Designed to produce Flash FLV 16x9 video.

Flash_4x3.job.awp: Designed to produce Flash FLV 4x3 video.

h.264_16x9.job.awp: Designed to produce H264 16x9 video.

h.264_4x3.job.awp: Designed to produce H264 4x3 video.

iPad_720p.job.awp: Designed to produce a 720P video for playout on the iPad.

iPhone-iPod-iPad_320x240_250K.job.awp: Designed to produce a 320x240 (250K bit rate) video for playout on iPhone, iPod Touch, or iPad.

iPhone-iPod-iPad_320x240_500K.job.awp: Designed to produce a 320x240 (500K bit rate) video for playout on iPhone, iPod Touch, or iPad.

iPhone-iPod-iPad_640x480_1M.job.awp: Designed to produce a 640x480 (1MB bit rate) video for playout on iPhone, iPod Touch, or iPad.

Real_640x480_500K: Designed to produce a 640x480 (500K bit rate) Real 10 video.

SNS_16X9_FLV.job.awp: Designed to produce a 16x9 Flash video for upload to Show and Share.

SNS_16X9_h.264.job.awp: Designed to produce a 16x9 H264 video for upload to Show and Share.

SNS_4X3_FLV.job.awp: Designed to produce a 4x3 Flash video for upload to Show and Share.

SNS_4X3_h.264.job.awp: Designed to produce a 4x3 H264 video for upload to Show and Share.

SNS_5.2.3_mezz_16x9: Designed to produce high quality intermediate 16x9 H264 video for producing additional output formats and sizes, adding keywords, and identifying speakers before publishing to Cisco Show and Share version 5.2.3.

SNS_5.2.3_mezz_4x3: Designed to produce high quality intermediate 4x3 H264 video for producing additional output formats and sizes, adding keywords, and identifying speakers before publishing to Cisco Show and Share version 5.2.3.

SNS_5.3.0_mezz_16x9: Designed to produce high quality intermediate 16x9 H264 video for producing additional output formats and sizes, adding keywords, and identifying speakers before publishing to Cisco Show and Share version 5.3.

SNS_5.3.0_mezz_4x3: Designed to produce high quality intermediate 4x3 H264 video for producing additional output formats and sizes, adding keywords, and identifying speakers before publishing to Cisco Show and Share version 5.3.

WebEx_SNS_h.264: Designed to produce H264 video from WebEx ARF recording for publishing to Cisco Show and Share.

WebEx_SNS_WMV: Desinged to porduce WMV video from WebEx ARF recording for publishing to Cisco Show and Share.

WMV_16x9.job.awp: Designed to produce a 16x9 Windows Media video

WMV_4x3.job.awp: Designed to produce a 4x3 Windows Media video

To view or use these Job Profiles, see the "Profile (File Job)" section.


Note When you upload a video for transcoding by using an iPhone or iPad, the Cisco MXE 3500 transcodes the file in the lowest resolution setting. This is because the iPhone or iPad application compresses the video on the client side to a lower resolution. The uploaded video causes Cisco Show and Share to automatically request the low resolution version from the Cisco MXE 3500. For best results, you should upload the video by using a PC.


Using the Profile Browser to Select a Job Profile

Follow these steps to use the Profile Browser to select a Job Profile:


Step 1 In the Profile Browser, from the Browse Type drop-down, select Job Profile.

Step 2 In the Filter Text box, type all or part of the Job Profile name, and click Search. A list of Job Profiles defined in the system displays in the Results area.

Step 3 Double-click a Job Profile. In the main window, all of the Job Profile's settings display.


Editing an Existing Job Profile


Note Jobs in the Job Status window (submitted jobs) will not be affected by Job Profile changes.


Follow these steps to edit a Job Profile:


Step 1 From the Toolbox, click Profile Management > Open Profile > Job.

Step 2 Highlight a Job Profile, and click the Open Profile button.

Step 3 Expand the Preprocessing, Encoding, Distribution, and/or Notification sections, and make any necessary changes.

Step 4 Click Save.


Deleting Profiles


Note Jobs in the Job Status window (submitted jobs) will not be affected by Job Profile deletions.


Follow these steps to delete a Job Profile:


Step 1 From the Toolbox, click Profile Management > Open Profile > Job.

Step 2 Highlight a Job Profile, and click the Open Profile button.

Step 3 Click Delete. The confirm file delete pop-up window displays.

Step 4 Click OK to confirm the deletion.


Copying Job Profiles

Follow these steps to copy a Job Profile:


Step 1 From the Toolbox, click Profile Management > Open Profile > Job.

Step 2 Highlight a Job Profile, and click the Open Profile button.

Step 3 Click Save As, and provide a new name for the Job Profile copy.