Feedback
Table Of Contents
Configuring Pulse Video Analytics
(Licensed Feature)Workflow for Implementing Keyword Tagging
Create a Document Repository Manually
Create a Document Repository Using the Crawler Tool
Generate the Vocabulary List Using the AutoVocab Tool
Configure the Speech Recognition Engine
Update the Document Repository and the Vocabulary List
Generate a New Vocabulary List
Download and Merge Vocabulary Lists
Upload the Merged Vocabulary List
Cisco Show and Share Integration
Configuring Pulse Video Analytics
(Licensed Feature)
Activation
To use this feature, you must purchase and install the Pulse video analytics feature license on the Cisco MXE 3500 appliance.
The Pulse video analytics feature enables keyword tagging and speaker identification in video content. The enhanced video content is shared through Cisco Show and Share.
Note
Note
This section contains the following information:
•
Keyword Tagging
Keyword tagging automatically identifies the relevant keywords spoken in a video and tags their location.
The Cisco MXE 3500 uses a vocabulary list to automatically identify and tag spoken words in a video with the matching keywords. The keywords are displayed in Cisco Show and Share, and the viewer can search or go to the specific section of the video where the keyword was spoken by clicking on the keyword.
•
•
•
•
Workflow for Implementing Keyword Tagging
1.
–
–
Tip
2.
3.
Note
Guidelines and Limitations
•
•
Create a Document Repository
Create a document repository using either one or both of the following methods:
•
•
Create a Document Repository Manually
Before You Begin
Identify the relevant documents to create a vocabulary list.
Copy the Documents
Step 1
Step 2
Step 3
Step 4
Note
Step 5
OR
Go to Generate the Vocabulary List Using the AutoVocab Tool.
Create a Document Repository Using the Crawler Tool
Before You Begin
Identify the web domains for the crawler tool to extract documents from.
Limitations
Only enter URLs starting with http://. The crawl fails when secure web domains (web domains with https://) are entered.
Create a local document repository
Step 1
Step 2
Step 3
Step 4
Step 5
The URL is the web domain, for example http://www.cisco.com, the Crawler tool crawls and extracts the documents from.
When completed, a document repository with a directory structure similar to the directory structure of the web domain is created.
Note
If you have multiple web domains, enter each URL separated by a space. For example, /mnt/shared/crawler_output URL1 URL2 URL3
Tip
Tip
Step 6
Generate the Vocabulary List Using the AutoVocab Tool
Step 1
Step 2
Step 3
Step 4
Step 5
/mnt/shared/crawler_output is the directory containing the source documents for extracting the vocabulary words. The AutoVocab tool generates the vocabulary list, AVTerms.csv, and saves it to /mnt/shared/autovocab_output.
Tip
Step 6
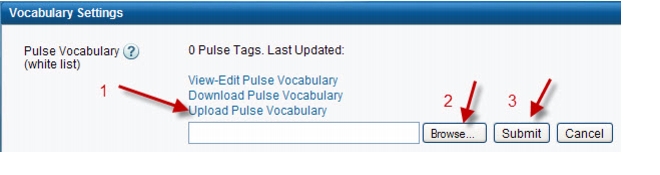
Upload the Vocabulary List
Step 1
Step 2
Note
Step 3
Step 4
Figure 4-1 Upload Pulse Vocabulary
Step 5
Step 6
Step 7
Step 8
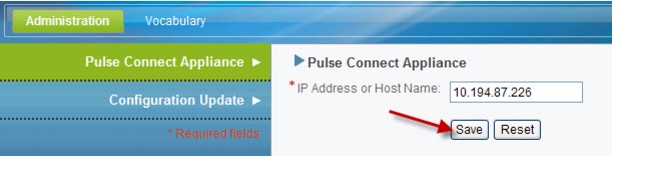
Figure 4-2 Save Pulse Vocabulary
Step 9
This updates Pulse video analytics with the new vocabulary list. If not, the Pulse video analytics is updated at the scheduled update.
Figure 4-3 Update Pulse Vocabulary
Step 10
Configure the Speech Recognition Engine
A separate engagement with Cisco Advanced Services is required to configure the speech recognition engine used by Pulse video analytics. Please contact your Cisco representative for details.
Update the Document Repository and the Vocabulary List
•
•
•
Update Document Repository
Update the document repository when there are significant number of new documents created or added to your web domain.
Follow the steps detailed in Create a Document Repository.
Generate a New Vocabulary List
Follow the steps in Generate the Vocabulary List Using the AutoVocab Tool
The AutoVocab tool generates a new list which may include keywords already generated from the previous AutoVocab run.
After a new vocabulary list is created, follow the steps in Download and Merge Vocabulary Lists to merge the old and new vocabulary lists.
Download and Merge Vocabulary Lists
Step 1
Step 2
Note
Step 3
Step 4
Figure 4-4 Download Pulse Vocabulary
Step 5
Tip
Upload the Merged Vocabulary List
See Upload the Vocabulary List.
Speaker Identification
Pulse video analytics automatically identifies and labels speakers in a video and tags each speech segment. Speaker identification requires user input in Cisco Show and Share.
Each unique speaker is identified by a separate color bar in Cisco Show and Share. Each speech segment is identified by the speaker's unique color bar. The user selects a color bar to tag it with the speaker's name.
In subsequent videos, the corresponding speech segments are automatically labeled with the speaker name.
Cisco Show and Share Integration
For information on how to integrate the Cisco MXE 3500 with Cisco Show and Share, see Integration Note for Configuring Cisco MXE 3500 Release 3.3 with Cisco Show and Share on Cisco.com.
Checking Pulse Usage Hours
Step 1
Step 2
Step 3
Step 4
Step 5
Enter cp /opt/mgmt/lib/slf4j-jdk14-1.5.0.jar lib.Step 6
Example Output[root@mxe queryindex]# ./usage_status.shcurrent total video duration = 30 hours 10 minutes 7 seconds