-
User Guide for the Cisco Mobile Wireless Transport Manager 6.0
-
About this Guide
-
Overview
-
Configuring Security
-
Setting Up Your Server
-
Getting Started
-
Basic Operations
-
Understanding Basic Object Functions
-
Managing Views
-
Understanding Detailed Object Functions
-
Managing Events
-
Viewing Network Topology
-
Accessing Data from the Web Interface
-
Managing ITP Reports
-
Editing an ITP Route Table File
-
Editing an ITP Global Title Translation Table
-
Editing ITP MLR Address Table Files
-
Object Map Reference
-
Command Reference
-
FAQs
-
Troubleshooting MWTM and the Network
-
Status Definitions
-
MIB Reference
-
Trap Reference
-
Configuring MWTM to Run with Various Networking Options
-
Archived Reports File Formats
-
MWTM Ports
-
Open Source License Notices for the Cisco Mobile Wireless Transport Manager
-
Glossary
-
Index
-
 Feedback
Table Of Contents
Viewing Basic Information for All Events
Right-Click Menu for All Events
Right-Click Menu for a Specific Event
Viewing Events for a Specific Object
Loading an Existing Event Filter
Viewing Archived Event Files on the Web
Viewing the Event Metrics Report on the Web
Status Change Messages/Day Table
Changing the Way the MWTM Processes Events
Specifying a List of SNMP Servers for Trap Forwarding
Changing Event Severities and Colors
Configuring Trap, Status Alarm, or User Action Events
Forwarding Events as Traps to Other Hosts
Setting Sounds for Events at an MWTM Client
Creating a New Event Sound Filter
Adding a Sound File to the MWTM
Changing an Existing Event Sound Filter
Deleting an Event Sound Filter
Playing and Muting Event Sounds
Right-Click Menu for All Alarms
Right-Click Menu for a Specific Alarm
Managing Events
You can use the Cisco Mobile Wireless Transport Manager (MWTM) to view information about all discovered events, including their associated network objects and other information.
This chapter includes:
•
Viewing Basic Information for All Events
•
•
•
•
•
•
•
Viewing Basic Information for All Events
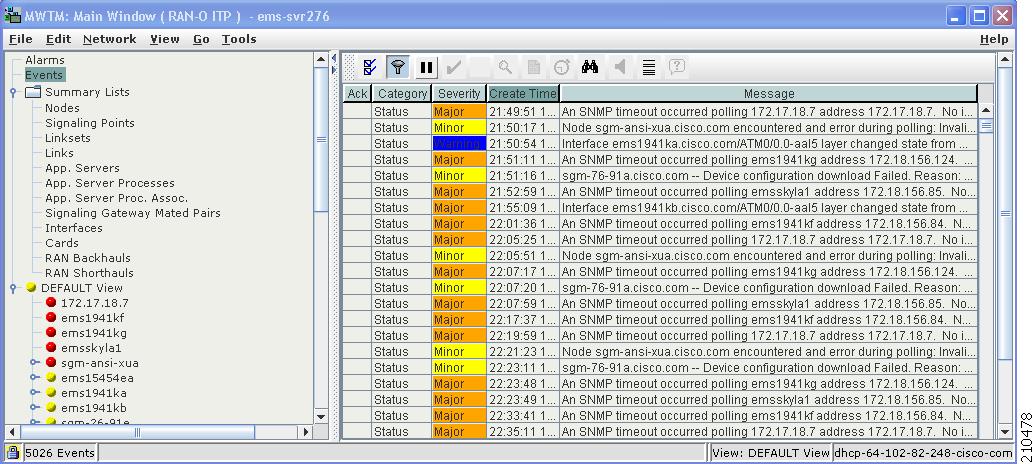
To view basic information for all events, click Events in the navigation tree of the MWTM in either the client interface or the web interface. The Event window appears.
Note
Figure 9-1 Event Window of the Client Interface
The Event window shows information about the events that the MWTM event logger and event processor deliver for all objects in the current network view.
Note
The Event window is composed of these sections:
•
•
Event Toolbar Buttons
The Event window within the client and the Web may provide these toolbar buttons:
Right-Click Menu for All Events
Note
To see the right-click menu for all events, select Events in the navigation tree left pane and click the right mouse button. The events right-click menu provides these options:
Right-Click Menu for a Specific Event
Note
The Event window provides a subset of the MWTM main menu as a right-click menu. To see this menu, select an event and click the right mouse button. The event right-click menu provides these options:
Edit Notes
Opens the Edit Event dialog box for the selected event.
Go To > Object
Shows the window for the object associated with the selected event.
If no object is associated with the event, this option is not visible.
Change Severity
Changes the severity of the event. Severities include:
•
•
•
•
•
•
•
You can customize this field (see Changing Event Severities and Colors).
Acknowledge
Makes the event acknowledged and records the user ID.
Unacknowledge
Makes a previously acknowledged event unacknowledged.
Event Properties
Opens the Event Properties window.
Create Sound Filter
Opens the Event Sound Filters dialog box and the Event Sound Filters List dialog box, with fields populated based on the selected event.
Help for Event
Shows context-sensitive help for the selected event in a separate browser window.
Event Table
The event table shows information about events that the MWTM event logger and event processor deliver.
You can resize each column, or sort the table based on the information in one of the columns. By default, the MWTM shows all of the columns in the event table except Internal ID, Event Name, Element Name, Original Severity, Count, Note, Change Time, Change By, Ack By, Node, Card, SP, Linkset, Link, SGMP, ASP, AS, ASPA, Interface, or RAN Backhaul.
For more information about resizing, sorting, displaying, or hiding columns, see Navigating Table Columns, page 5-23.
To see detailed information about an event, right-click the event in a window, then select Event Properties in the right-click menu.
Note
Internal ID
Internal ID of the event. The internal ID is a unique ID for every object, that the MWTM assigns for its own internal use. This ID can also be useful when the Cisco Technical Assistance Center (TAC) is debugging problems.
Ack
Indicates whether the event has been acknowledged. To:
•
•
Event Name
Name of the event.
Element Name
Network element name associated with the event.
Category
Type of the event. Default values include:
•
•
•
•
•
•
•
•
•
•
•
•
•
•
You can customize this field (see Changing Event Categories).
Severity
Severity of the event. Default values include:
•
•
•
•
•
•
•
You can customize this field (see Changing Event Severities and Colors).
Original Severity
Original severity of the event.
Count
Number of times this event occurred.
Note
Indicates whether a note associated with the event.
Create Time
Time this event was received.
Change Time
Time this event was last updated.
Change By
User who last changed this event.
Ack By
If you have not implemented the MWTM User-Based Access, name of the node that last acknowledged the event.
If you have implemented the MWTM User-Based Access, name of the user who last acknowledged the event.
If no one has acknowledged the event, this field is blank.
Node
Name of the node associated with the event. If no node is associated with the event, None appears.
Card (RAN-O only)
Card associated with this event.
SP (ITP only)
Name of the signaling point associated with the event. If no signaling point is associated with the event, None appears.
Linkset (ITP only)
Name of the linkset associated with the event. If no linkset is associated with the event, None appears.
Link (ITP only)
Name of the link associated with the event. If no link is associated with the event, None appears.
SGMP (ITP only)
Name of the signaling gateway-mated pair associated with the event. If no signaling gateway-mated pair is associated with the event, None appears.
ASP (ITP only)
Name of the application server process associated with the event. If no application server process is associated with the event, None appears.
AS (ITP only)
Name of the application server associated with the event. If no application server is associated with the event, None appears.
ASPA (ITP only)
Name of the application server process association associated with the event. If no application server process association is associated with the event, None appears.
Interface
Interface associated with this event.
RAN Backhaul (RAN-O only)
RAN backhaul associated with this event.
Viewing Events for a Specific Object
You can use the MWTM to view events for a selected object. To do so, right-click an object (for example, a node) in a window, then choose View > Recent Events from the right-click menu. The MWTM shows recent events for the selected object (see Viewing Recent Events, page 8-44).
Setting an Event Filter
You can use the MWTM to change the way event information appears.
Note
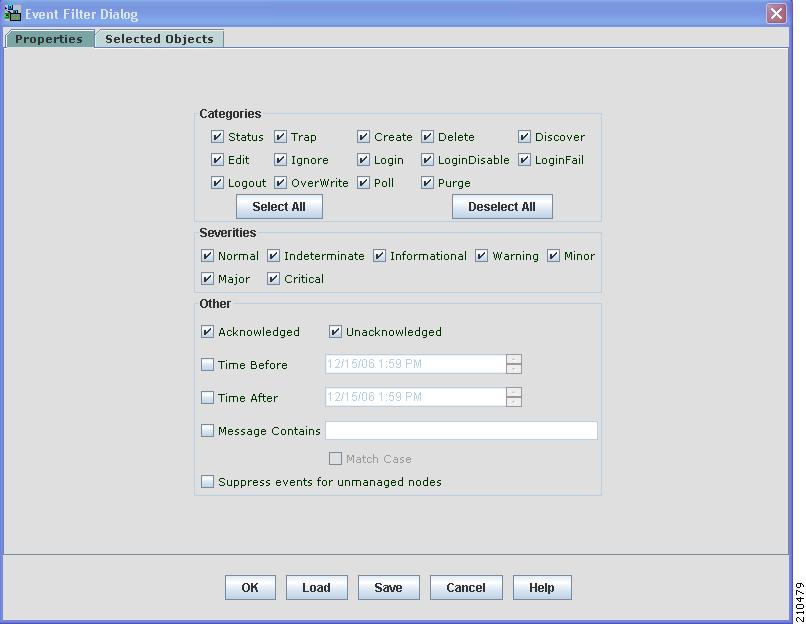
To change the way the MWTM presents event information, click Events in the navigation tree, then click the Event Filter tool at the top of the Event window. The Event Filter dialog box appears with the Properties tab selected.
Figure 9-2 Event Filter Dialog, Showing Event Properties
For more information about the Event Filter dialog box, see these sections:
Related Topics:
•
Event Filter Buttons
The Event Filter dialog box contains:
Properties Settings
You use the Properties settings in the Event Filter dialog box to specify the types of event the MWTM should display in the Event window, including the category and severity of event, whether the event is acknowledged, and other properties.
To display the Properties settings, click the Properties tab in the Event Filter dialog box.
The Properties settings contain these panes:
Categories
Use the Categories pane of the Properties settings to specify which event categories you want to display in the Event window.
The Categories pane contains these default fields and buttons:
Note
Severities
Use the Severities pane of the Properties settings to specify which event severities you want to display in the Event window.
The Severities pane contains these default fields:
Note
Other
Use the Other pane of the Properties settings to further define the event filter for the Event window. These settings are applied to all event displays in the current view.
Acknowledged
Check box indicating whether only acknowledged events appear in the Event window. This check box is unchecked by default.
Unacknowledged
Check box indicating whether only unacknowledged events appear in the Event window. This check box is checked by default.
Time Before
Check box indicating whether only events that the MWTM logs prior to a specified date and time appear in the Event window. This check box is unchecked by default.
Time Before
Specifies the date and time prior to which events that the MWTM logs appear in the Event window. This field is dimmed unless the Time Before check box is checked.
Time After
Check box indicating whether only events that the MWTM logs after a specified date and time appear in the Event window. This check box is unchecked by default.
Time After
Specifies the date and time after which events that the MWTM logs appear in the Event window. This field is dimmed unless the Time After check box is checked.
Message Contains
Check box indicating whether only events that contain the specified message text appear in the Event window. This check box is unchecked by default.
Match Case
Check box indicating whether only events that match the case of the text in the Message Contains field appear in the Event window. This field is dimmed unless the Message Contains check box is checked. If the Message Contains check box is checked, the default setting for this check box is unchecked.
Suppress events for unmanaged nodes
Check box for suppressing events for any objects that have been set to the unmanaged state (see Unmanaging and Managing Nodes or ITP Signaling Points, page 6-38, for steps to set an object to the unmanaged state). To suppress events for unmanaged objects, check the check box. To retain events for unmanaged objects, uncheck the check box.
If you are viewing events for a specific object in the navigation tree of the MWTM main window, this button is not available.
Selected Objects Settings
Note
•
•
To specify an object for which the MWTM should display events in the Event window:
Step 1
The Events window appears in the right pane.
Step 2
The Event Filter dialog box appears with the Properties tab selected.
Step 3
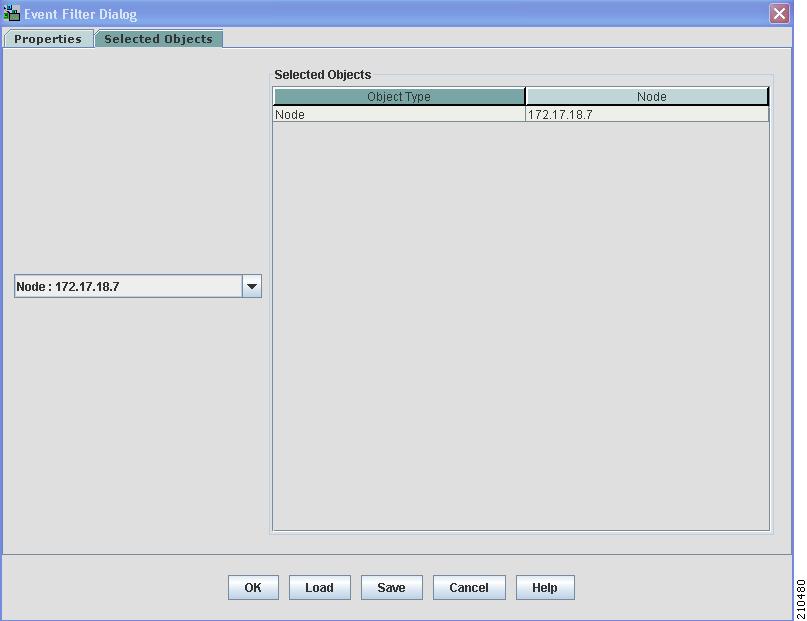
The Event Filter dialog box appears with the Selected Objects tab highlighted.
Figure 9-3 Event Filter Dialog, Showing Event Selected Objects
The Selected Objects settings contains:
Event Filter Example
This example shows how to set an event filter to display trap messages for warning events for a specific node.
Step 1
Step 2
The Event Filter dialog box appears with the Properties tab selected.
Step 3
Step 4
Step 5
Step 6
Step 7
Step 8
a.
b.
c.
d.
In the future, to view traps for warning events for Node109, click Load in the Event Filter dialog box, choose the Node109-WarningTraps filter, then click OK. The Events window will only display warning traps for Node109 until you load a different event filter or change the current one.
Loading an Existing Event Filter
You use the MWTM to load a specific event filter file and change the list of event filter files.
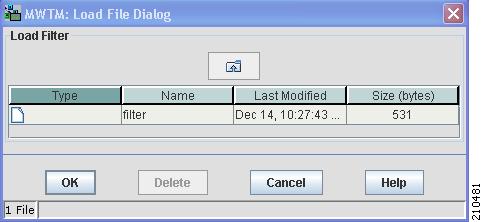
To load an existing event filter, click Load in the Event Filter dialog box. The Load File Dialog: Load Filter dialog box appears.
Figure 9-4 Load File Dialog: Load Filter Dialog
The Load File Dialog: Load Filter contains:
Saving an Event Filter File
You use the MWTM to save a specific event filter file and change the list of event filter files.
When you are satisfied with the filter settings, click Save in the Event Filter dialog box. The Save File Dialog:Save Filter dialog box appears.
Figure 9-5 Save File Dialog: Save Filter Dialog
The Save File Dialog: Save Filter contains:
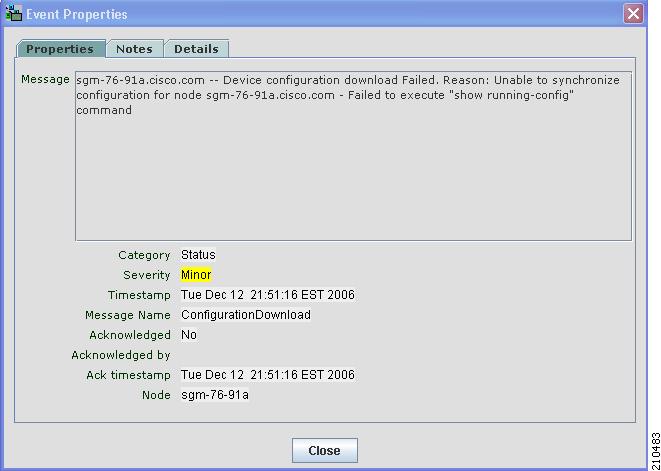
Viewing Event Properties
You use the MWTM to view detailed information about a selected event, including its associated object, status, and other information.
To view detailed information about an event, right-click the event in a window, then select Event Properties in the right-click menu.
The Event Properties dialog box appears.
Figure 9-6 Event Properties Dialog
The Event Properties dialog box contains:
Properties
Tab that shows detailed information about the selected event.
Message
Message text for the event.
You can customize this field (see Changing the Way the MWTM Processes Events).
Category
Type of the event. Default values are:
•
•
•
•
•
•
•
•
•
Category (continued)
•
•
•
•
•
You can customize this field (see Changing Event Categories).
Severity
Severity of the event. Default values are:
•
•
•
•
•
•
•
You can customize this field (see Changing Event Severities and Colors).
Timestamp
Date and time the event was logged.
Message Name
User-specified message name for the event that the MWTM uses for trap forwarding. The default message name is MWTM.
For more information about user-specified message names and trap forwarding, see Forwarding Events as Traps to Other Hosts.
Acknowledged
Indicates whether the event has been acknowledged.
Acknowledged By
Name of the node that last acknowledged the event. If no one has acknowledged the event, this field is blank.
Ack Timestamp
Date and time the event was last acknowledged or unacknowledged.
Node
Name of the node associated with the event. If no node is associated with the event, None appears.
Signaling Point (ITP only)
Name of the signaling point associated with the event. If no signaling point is associated with the event, None appears.
Linkset (ITP only)
Name of the linkset associated with the event. If no linkset is associated with the event, None appears.
Link (ITP only)
Name of the link associated with the event. If no link is associated with the event, None appears.
AS (ITP only)
Name of the application server associated with the event. If no application server is associated with the event, None appears.
ASP (ITP only)
Name of the application server process associated with the event. If no application server process is associated with the event, None appears.
ASPA (ITP only)
Name of the application server process association associated with the event. If no application server process association is associated with the event, None appears.
SGMP (ITP only)
Name of the signaling gateway-mated pair associated with the event. If no signaling gateway-mated pair is associated with the event, None appears.
Rtr Interface
Name of the interface associated with the event.
Ran Backhaul (RAN-O only)
Name of the RAN backhaul associated with the event.
Card (RAN-O only)
Name of the card associated with the event.
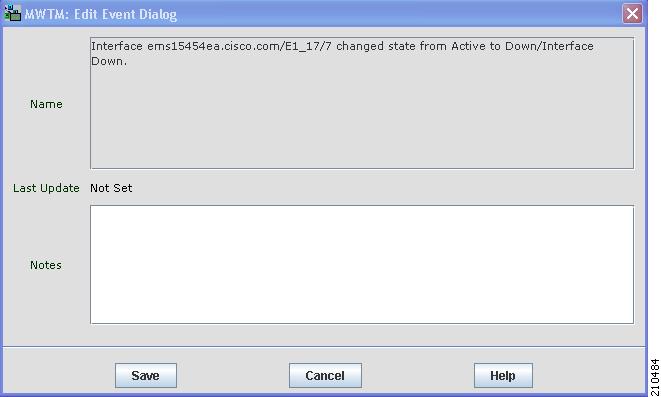
Notes
Tab that shows notes associated with this event.
Last Update
Date and time the Notes field for this event was last updated. If no note is currently associated with this event, this field shows the value Not Set.
Notes
Notes associated with this event. If no note is currently associated with this event, this field shows the value No Notes.
Close
Closes the Event Properties dialog box.
Details
Tab that shows specific event attributes.
Related Topic:
Viewing Basic Information for All Events
Attaching a Note to an Event
You use the MWTM to annotate an event, attaching a descriptive string to the event.
To annotate an event, right-click an event in the Event window, then select Edit Notes in the right-click menu.
The Edit Event dialog box appears.
Figure 9-7 Edit Event Dialog
The Edit Event dialog box contains:
Related Topics:
•
Viewing Archived Event Files on the Web
The All Network Event Archived Files page provides access to archived event files within ITP or RAN-O networks for the server to which you are connected.
To access archived event files:
Step 1
Step 2
Within the Last Modified Date column, choose the day you want to view archived event files for.
Step 3
Viewing the Event Metrics Report on the Web
The Event Metrics Report page shows a number of metrics for the MWTM, based on the number of messages of each type and severity that the MWTM receives. This report is applicable for both ITP and RAN-O networks.
To view the event metrics report using the MWTM Web interface:
Step 1
Step 2
The Event Metrics Report page contains the following tables:
•
Message Types Table
The Message Types table contains the following columns:
Message Severity Table
The Message Severity table contains the following columns:
Status Messages Table
The Status Messages table contains the following columns:
Trap Messages Table
The Trap Messages table contains the following columns:
Messages/Day Table
The Messages/Day table contains the following columns:
Status Change Messages/Day Table
The Status Change Messages/Day table contains the following columns:
SNMP Trap Messages/Day Table
The Status Change Messages/Day table contains the following columns:
Files Processed Table
The Files Processed table lists all files that the MWTM has processed.
Date Range Table
The Date Range table displays the date and time when the MWTM began collecting metrics, and the date and time of the most recent metrics.
Changing the Way the MWTM Processes Events
The three types of MWTM events are:
•
•
•
Within those broad types, there occur subordinate types of events, each with a default category, severity, color, message text, and event help file. You use the MWTM to change the default characteristics of each type of event, tailoring them to meet your needs.
Note
To change the MWTM event processing, use one of these procedures:
•
•
•
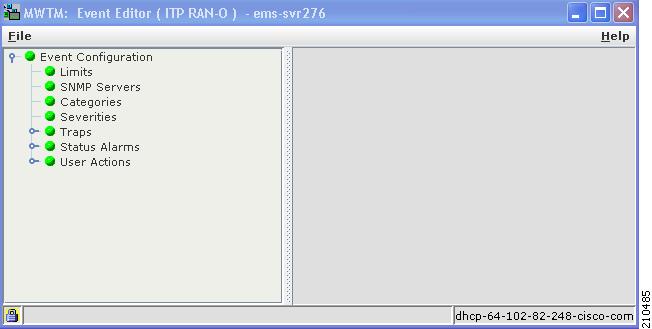
The MWTM launches the MWTM Event Editor.
Figure 9-8 MWTM Event Editor
You use the Event Editor to customize the visible category, severity, color, and message associated with events; and load, save, and deploy customized event configurations. You can also specify a list of SNMP servers to which the MWTM should forward events in the form of traps.
The high-level MWTM event processing settings appear in the navigation tree in the left pane in the MWTM Event Editor window. The detailed settings for each high-level setting appear in the content area in the right pane.
The MWTM Event Editor menu provides these options:
This section provides this information:
•
•
•
Changing Event Limits
To change limits for the MWTM event database, select the turner beside Event Configuration, then click Limits. The Limits Configuration window appears in the right pane.
Specifying a List of SNMP Servers for Trap Forwarding
You use the MWTM to specify a list of SNMP servers, or hosts, to which the MWTM should forward events in the form of traps.
For more information about enabling MWTM trap forwarding, see Forwarding Events as Traps to Other Hosts.
To specify the list of hosts, select the turner beside Event Configuration, then click SNMP Servers. The SNMP Servers Configuration window appears in the content area in the right pane.
Changing Event Categories
To change categories for the MWTM event database, click the turner beside Event Configuration, then click Categories. The Categories Configuration window appears in the content area in the right pane.
Changing Event Severities and Colors
To change severities or colors for the MWTM event database, select the turner beside Event Configuration, then click Severities. The Severities Configuration window appears in the content area in the right pane.
Severity Name
Lists the names of the currently defined MWTM event severities.
By default, the MWTM provides these event severities:
•
•
•
•
•
•
•
To change the name of an existing event severity, highlight the severity name and type over it with the new name. For example, you could replace every occurrence of Normal with Clean.
Severity Color
Lists the colors of the currently defined MWTM event severities.
By default, the MWTM provides these event colors:
•
•
•
•
•
•
•
To change the color associated with an existing severity, select the current color, then select a new color from the drop-down list box. For example, you can display Warning events in maroon instead of yellow.
Add
Adds a new severity name to the bottom of the list. Type over the default severity name with the new name, then select a color from the drop-down list box. The default color is white.
Delete
Deletes the selected severity name from the list.
If events in the MWTM database use the deleted severity name, the Entry Substitution dialog box appears. Use this dialog box to select a new severity name in place of the deleted severity name. Select an existing severity name from the drop-down list box, or enter a new severity name. If you enter a new severity name, the MTWM adds it to the Severity Name field.
Move Up
Caution
Moves the selected severity up in the list.
The order of the severities that appear in this list determines the sort order of the Severity column in the event table (see Event Table).
To move a severity higher in the order of severities, click Move Up.
Move Down
Caution
Moves the selected severity down in the list.
The order of the severities that appear in this list determines the sort order of the Severity column in the event table (see Event Table).
To move a severity lower in the order of severities, click Move Down.
Configuring Trap, Status Alarm, or User Action Events
The MWTM can detect these event types:
•
•
•
To configure the event parameters for any of these event types:
Step 1
Step 2
Step 3
The MWTM lists the currently defined events in the navigation tree under the event type.
Step 4
The MWTM opens the Add Entry dialog box, which lists the events that the MWTM supports but have not yet been configured.
Step 5
The MWTM adds the selected event to the list of configured events and creates a Default entry for the event in the left pane.
Step 6
The Event Configuration pane appears in the right pane.
Step 7
Step 8
The Event Configuration pane contains:
Name
Name of the event, such as cItpRouteStateChange. You cannot change this field.
Event Keys and Setting
Names of the event keys, such as RouteDestinationState, and their settings, such as False.
You cannot change the names of the event keys, but you can change their settings. To change an event key setting, select a new setting from the drop-down list box. For example, you can change the setting for RouteDestinationState from Accessible to Unknown.
Category
Category of the event, such as Trap.
To change the category, select a new category from the drop-down list box.
Severity
Severity of the event, such as Normal.
To change the severity, select a new severity from the drop-down list box.
Note
Event Name
User-specified name for the event, that the MWTM uses for trap forwarding.
If you want the MWTM to forward this event in the form of a trap to another host, you can specify a new, more meaningful name for the event. The new name can be from 1 to 30 characters, and can contain any letters (upper- or lowercase), any numbers, and any special characters. If you do not specify a new name, the MWTM uses the default name, MWTM.
For more information about trap forwarding, see Forwarding Events as Traps to Other Hosts.
Message
Message text associated with the event.
To change the message text, type over the message text.
You can also insert variable text in the message. To do so, right-click in the message text area. A popup menu of the valid substitutions for this event appears. To insert a variable in the text area, select from the popup menu.
Help File
Help file associated with the event.
By default, the MWTM provides extensive type-specific help for events. However, you can use the MWTM to provide your own enterprise-specific instructions to operators in the help file.
To change the help file, create a new HTML help file or change the default MWTM help file. If you installed the MWTM in:
•
•
If you use an MWTM help file as a basis for your help file, rename it when you save it; do not use the existing MWTM name. If you do, the next time you install the MWTM, the MWTM overwrites the file and you lose your changes.
When you have created your new help files, store them in the /opt/CSCOsgm/apache/share/htdocs/customHelp directory. This directory and its contents are preserved when you upgrade to a new MWTM release. If you do not store your new help files in the /customHelp directory, the files are lost the next time you upgrade to a new MWTM release.
When you have created your new help files and stored them in the /customHelp directory, enter the new help file path and filename in the Help File field.
After you deploy the new event settings and restart the MWTM server, whenever you display help for the trap, the MWTM shows your new, custom help file.
Open
Opens the help file associated with the event.
To see the help file, click Open. The MWTM shows context-sensitive help for the selected event in a separate web browser.
Action: Run
Automation command or script for the event that a UNIX process runs.
You use the MWTM to automate events. That is, you can configure the MWTM to call a UNIX script to drive automatic paging or e-mail, for example, whenever the MWTM logs an event for which you have defined an automation script.
To configure automation for an event, enter a Run line with this format:
UNIXCommand EventParameters
where:
•
•
Action: Run (continued)
For example, this Run line:
/users/johndoe/auto-inhibit.exp $NodeDisplayName $Usercauses these automatic actions whenever the MWTM logs the associated event:
•
•
After you deploy the new event settings and restart the MWTM server, the specified event causes the automation script to run.
When configuring automation for events, remember:
•
•
•
•
Action: Poll (available only for Trap events)
Check box indicating whether MWTM should poll the associated nodes. If you:
•
•
Action: Send Trap
Check box indicating whether the MWTM should forward the event as a trap to other systems. If you:
•
•
Raise Alarm
Caution
If the Raise Alarm check box is checked, then, when this event happens, an alarm appears in the Supplemental Alarms table.
Correlate
Caution
When you check the this check box, you can then define a key in the Key field.
Key
Caution
You can define a key to correlate appropriate events. The EPM notification includes this key for use by the north-bound system. Right-click in the text field to select a key.
Disable
Check box to disable this event without removing the event configuration from the /opt/CSCOsgm/etc file.
Errors
Error messages associated with the event. Correct all errors before deploying the new event configuration.
Forwarding Events as Traps to Other Hosts
You use the MWTM to forward MWTM events to other hosts, in the form of SNMP traps. This operation enables the MWTM to integrate with high-level event- and alarm-monitoring systems such as the Cisco Info Center (CIC). These systems can provide a single high-level view of all alarm monitoring in your network, making it easier to detect and resolve problems.
To forward MWTM events to other hosts:
Step 1
Step 2
a.
b.
Step 3
Step 4
Note
Setting Sounds for Events at an MWTM Client
You use the MWTM to create and change event sound filters for the MWTM client. Event sound filters determine the sounds that the MWTM client plays when specific events are logged. The MWTM client plays the sounds even if the Event window is not currently visible.
On Solaris and Linux systems, the root user can access the sound feature from a local or remote device. However, users other than the root user must use a local device and client, not a remote MWTM client accessed by using the xhost + UNIX command.
This section includes:
•
•
•
•
•
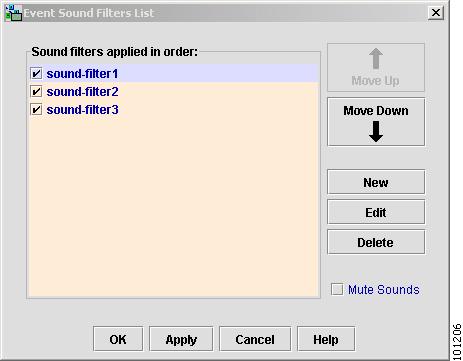
Listing Event Sound Filters
You use the MWTM to change the list of event sound filters that the MWTM client applies to events, or prevent the MWTM client from playing sounds for events.
To work with the list of event sound filters, choose Tools > Event Sounds from the MWTM main menu. The Event Sound Filters List dialog box appears.
Figure 9-9 Event Sound Filters List Dialog
The Event Sound Filters List dialog box lists all event sound filters that have been defined.
Related Topics:
•
Creating a New Event Sound Filter
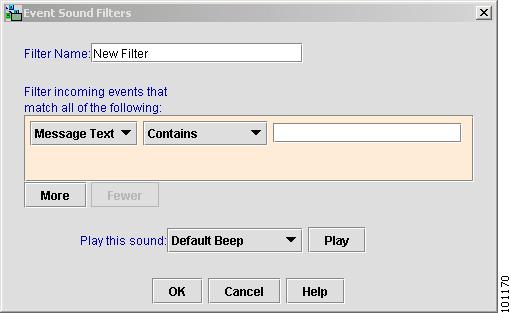
You use the MWTM to create a new event sound filter. Open the Event Sound Filters List dialog box, as described in Listing Event Sound Filters, then click New. The Event Sound Filters dialog box appears.
Figure 9-10 Event Sound Filters Dialog
The Event sound filters dialog box contains:
Filter Name
Name of the event sound filter file.
Enter a name for the filter, then specify filter criteria for this event sound filter in the Event Sound Filter Criteria field.
Event Sound Filter Criteria
Table listing the filter criteria for this event sound filter. To add a criteria, select options from the drop-down list boxes:
•
a.
b.
c.
•
a.
b.
c.
Event Sound Filter Criteria
(continued)•
a.
b.
c.
•
a.
b.
c.
More
Adds one or more additional filter criteria to the event sound filter.
To add a filter criteria to the event sound filter, click More. The MWTM adds a new criteria to the bottom of the list.
Fewer
Removes one or more filter criteria from the event sound filter.
To remove a filter criteria from the event sound filter, click Fewer. The MWTM deletes the last criteria in the list.
Play this sound:
Drop-down list box indicating the sound to play if an event matches this event sound filter.
The MWTM client sound files are stored in the MWTM client's /sounds directory. If you installed the MWTM client:
•
•
•
To add a sound file to the MWTM, add it to the /sounds directory (see Adding a Sound File to the MWTM).
Play
Plays a sample of the sound selected in the Play this sound drop-down list box.
OK
Applies any changes you made to the event sound filter criteria and closes the Event Sound Filters dialog box.
When you are satisfied with the changes you made to the event sound filters, click OK.
Cancel
Closes the Event Sound Filters dialog box without applying any changes to the event sound filter criteria.
Help
Shows online help for the current window.
Related Topics:
Adding a Sound File to the MWTM
You can add sound files to an MWTM client. The MWTM clients can play these sound file formats:
•
•
•
•
•
Note
The MWTM client sound files are stored in the MWTM client's /sounds directory. If you installed the MWTM client:
•
•
•
If for some reason the MWTM cannot play a specified sound file, the MWTM plays a default beep. For example, the MWTM cannot play a sound file if one of these conditions exists:
•
•
•
•
Related Topics:
•
Changing an Existing Event Sound Filter
You use the MWTM to change an existing event sound filter. Open the Event Sound Filters List dialog box, as described in Listing Event Sound Filters, select the filter in the Sound filters applied in order list, then click Edit. The MWTM shows the Event Sound Filters dialog box (Figure 9-9), populated with the selected filter's settings.
Change the settings as needed, then click OK. The MWTM applies your changes and closes the Event Sound Filters dialog box.
Deleting an Event Sound Filter
You use the MWTM to delete an existing event sound filter. Open the Event Sound Filters List dialog box, as described in Listing Event Sound Filters, select the filter in the Sound filters applied in order list, then click Delete. The MWTM deletes the selected filter.
Playing and Muting Event Sounds
You use the MWTM to specify whether you want the MWTM client to play event sounds. To do so, open the Event Sound Filters List dialog box, as described in Listing Event Sound Filters. To:
•
•
Displaying Alarms
You use the MWTM to view a summary of all currently active alarms in your network, including the current status of the associated network object. An active alarm is a network object with this status:
•
•
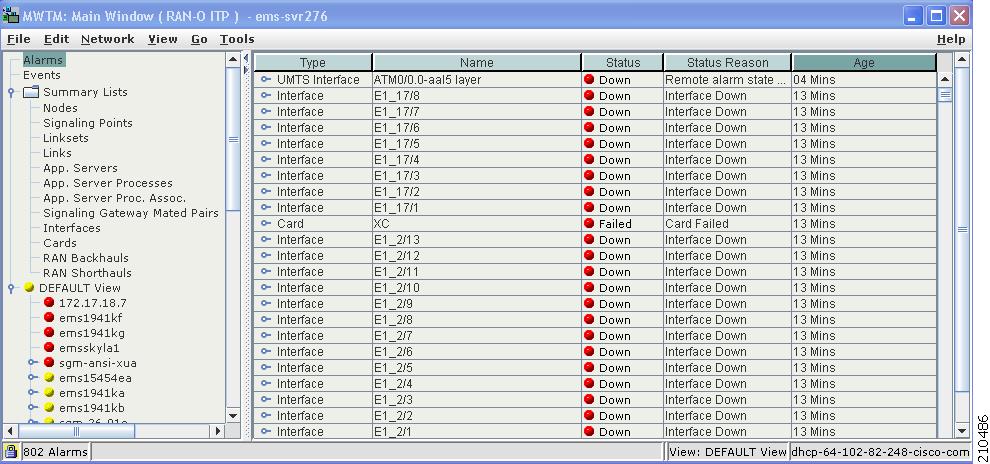
To see a summary of all currently active alarms, click Alarms in the navigation tree left pane. The MWTM shows the Active Alarms window in the right pane (see Figure 9-11).
•
•
Figure 9-11 Active Alarms Window
The Active Alarms window provides basic information about all currently active alarms in your network, that are not excluded from your current view. The MWTM updates the information in the window at least once every minute.
To see the tooltip for each column in the table, place the cursor over a column heading.
If a cell is too small to show all of its text, place the cursor over the cell to see the complete text in a tooltip.
You can resize each column, or sort the table based on the information in one of the columns. By default, this table is sorted by Age, with the most recent alarms at the top, and the MWTM shows all of the columns in the table except Last Status Change.
•
•
For more information about resizing, sorting, displaying, or hiding columns, see Navigating Table Columns, page 5-23.
The Active Alarms window contains:
Type
Type of network object associated with the selected alarm.
To see all higher-level alarms associated with the network object, select the turner beside the object. The MWTM shows the higher-level alarms underneath the selected alarm. For example, if you select the turner beside a link, the MWTM shows the alarms for the linkset, signaling point, and node associated with that link.
Name
Name of the network object associated with the selected alarm.
Status
Current status of the network object associated with the selected alarm. Possible values include:
•
•
•
•
•
•
•
•
•
•
•
Status (continued)
•
•
•
•
•
•
•
For detailed definitions of each status for each type of network object, see Status Definitions, page E-1.
Status Reason
Reason for the current status of the network object associated with the selected alarm.
For a full list of possible reasons, see the stateReasons.html file. If you installed the MWTM in:
•
•
If the cell is too small to show all of the status reason, place the cursor over the cell to see the full status reason in a tooltip help popup.
The status reasons are listed in order of decreasing magnitude. If two or more reasons apply, the reason of greatest magnitude appears.
If the status reason is Unsupported Configuration, correct the configuration and enter the mwtm cleandiscover command to delete all current network data and begin a discovery of the network. If the status reason remains Unsupported Configuration, enter the mwtm clean command to restore the MWTM server to a state that would exist after a new installation of the MWTM, excluding the log files, which the MWTM retains. To also remove the log files, enter the mwtm cleanall command. For more information on the use of these commands, see Command Reference, page B-1.
Last Status Change
Date and time that the status of the network object associated with the selected alarm last changed.
Age
Age of the selected alarm, in days, hours, and minutes.
Right-Click Menu for All Alarms
To see the right-click menu for all active alarms, select Alarms in the navigation tree and right-click the mouse button.
Right-Click Menu for a Specific Alarm
The active alarms table provides a subset of the MWTM main menu as a right-click menu. To see this menu, select an alarm and right-click the mouse button.
The alarm right-click menu provides the same options as the right-click menu for the associated network object, plus these additional options:
Caution