-
Cisco IP Solution Center Traffic Engineering Management User Guide, 4.1
-
Document Type Definition (DTD) File
-
Index
-
About This Guide
-
Introduction
-
Setting Up the Service
-
TE Network Discovery
-
TE Resource Management
-
Basic Tunnel Management
-
Primary Tunnel Management
-
Protection Planning
-
Traffic Admission
-
Administration
-
Task Monitoring
-
TE Topology
-
Traffic Engineering Management GUI
-
Managing Service Requests
-
Warnings and Violations
-
 Feedback
Table Of Contents
Memory Shortage on Large Networks
Setting Up Management Interfaces
TE Network Discovery
After completing the preconfiguration process and creating a seed router, you can discover the TE network for a particular TE provider. This populates the repository with the network topology. Also, you might need to set up the management interfaces. The necessary steps are described in this chapter.
This chapter includes the following sections:
–
Memory Shortage on Large Networks
•
•
Overview
The purpose of the discovery process is to populate the repository with the network topology, tunnels, and static routes to tunnels present in the live network.
The discovery process uses a seed device to discover the MPLS TE network topology using either Telnet or SSH. All the Traffic Engineering routers in the network should be accessible via their TE ID if the device entry does not exist in the repository. The Management IP address will be used to access the device if the device entry exists in the Repository.
TE Discovery is a schedulable task that can be run once or on a periodic basis. Any inconsistencies between the repository and the network are reported in the Discovery log. The service state information is updated incrementally by logging tunnel in-use Label Switched Paths (LSPs) and updating the service request (SR) state.
TE Discovery Prerequisites
The following prequisites apply mainly to TE discovery.
For an overview of the general ISC TEM prerequisites, see Prerequisites and Limitations.
Accessibility
To successfully run a TE Discovery task, the seed router must be directly accessible from the management station.
ALL TE routers must be accessible from the ISC machine via their TE router ID. This is often the a loopback ip address, but not always.
For Telnet/SSH, there must be either direct Telnet/SSH access from the Cisco IP Solution Center Traffic Engineering Management (ISC TEM) management station to each device.
See Preconfiguration Process Overview for instructions on how to select Telnet or SSH when setting up a seed router.
Memory Shortage on Large Networks
When running discovery on a large network (250+ devices or 5000+ tunnels, for example) or an OutOfMemoryException is encountered, do the following:
Edit the watchdog.server.worker.java.flags property in the vpnsc.properties file to a value, for example -Xmx1024m, instead of the default value -Xmx512m. This increases the heap size of the discovery task, which will clear up the OutOfMemoryException problem.
Revert the watchdog.server.worker.java.flags property back to its original value to reduce the resource usage when no longer needed.
IOS-XR and Enable Passwords
If an IOS-XR device is to be used as a seed device, the enable password should be set in its device record even though IOS-XR does not require an enable password,for itself. That way IOS devices in the network, which do require an enable password, may be fully discovered
When creating an IOS-XR device through the Devices tab (Service Inventory > Inventory and Connection Manager > Devices) to act as a seed device for an initial discovery, it is strictly speaking not necessary to specify the enable password - ISC TEM will be able to log in and get all the data it needs.
However, if there are other IOS devices in the same network, ISC TEM will not be able to enter enable mode for those devices. As a result, these are not fully discovered in the sense that the inability to enter e nable mode stops ISC TEM from gathering all the relevant data. These other IOS routers will show up as 'unknown' devices in the Devices window).
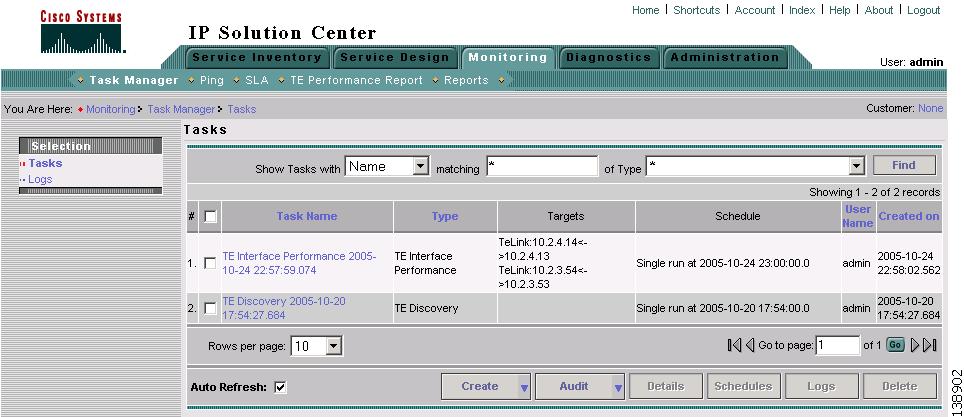
Creating a TE Discovery Task
To create a TE Discovery task on the TE network, use the following steps:
Step 1
Figure 3-1 Tasks
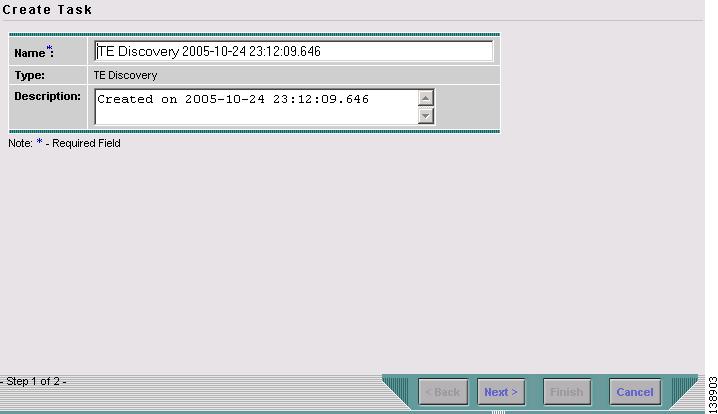
Step 2
Figure 3-2 Create TE Discovery Task (Step 1)
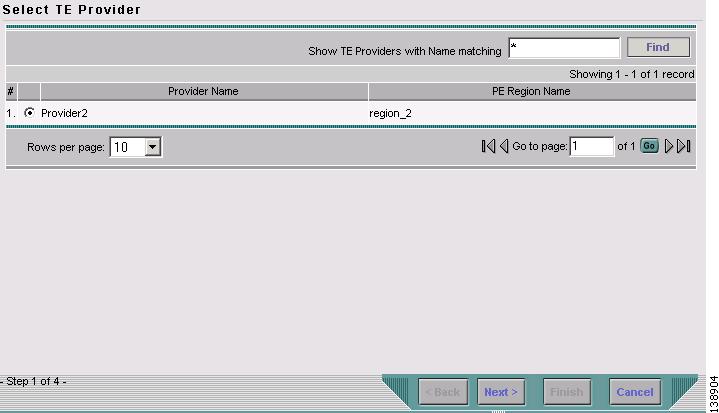
Step 3
Figure 3-3 Select TE Provider
Step 4
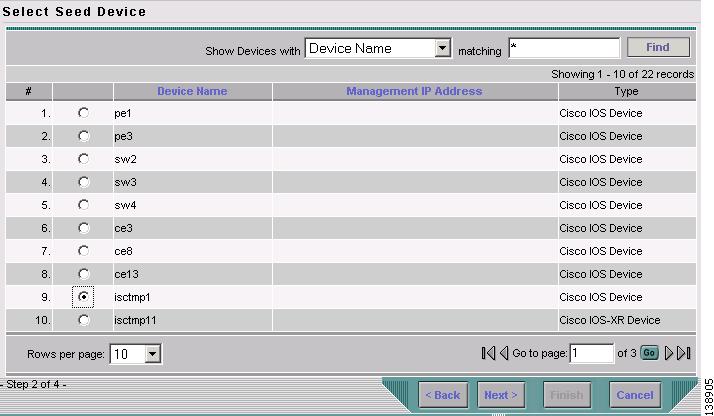
Non-Cisco devices, if any, are excluded from the list.
Figure 3-4 Select Seed Device
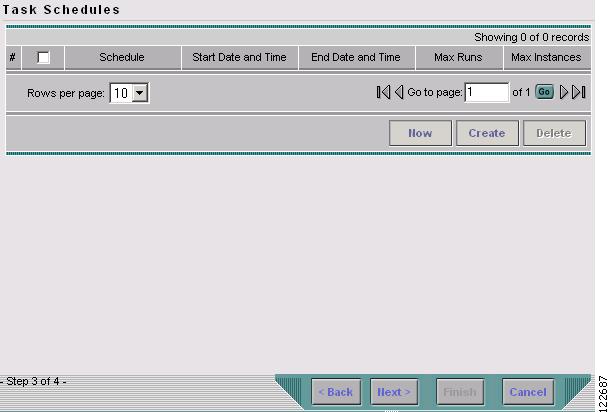
Step 5
Figure 3-5 TE Discovery Task Schedules Window Before Scheduling
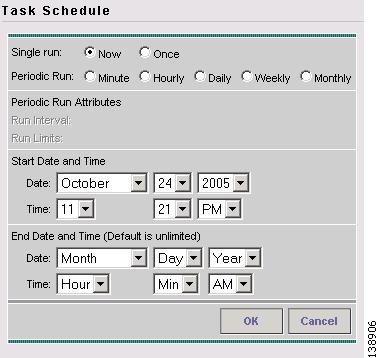
Step 6
•
•
Figure 3-6 Task Schedule
Step 7
Note
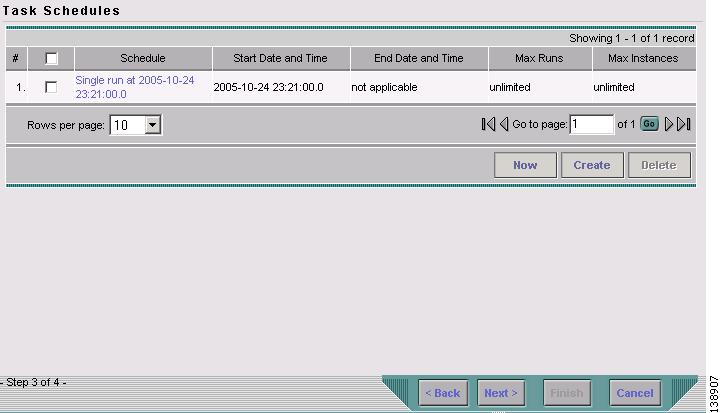
Step 8
Figure 3-7 TE Discovery Task Schedules Window After Scheduling
Step 9
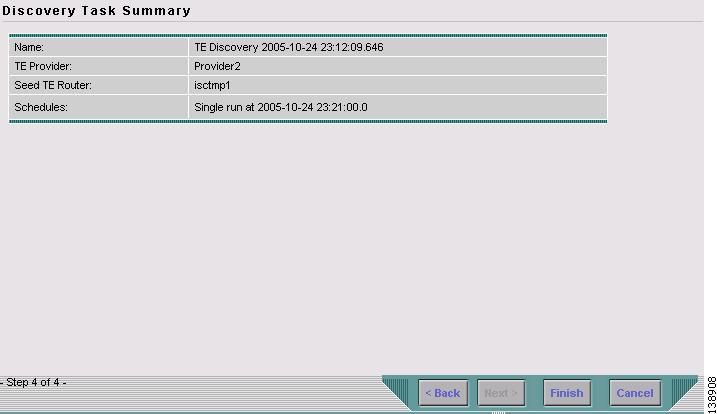
Figure 3-8 Discovery Task Summary
Step 10
Verifying a TE Discovery Task
The result of running the TE Discovery task can be assessed in three ways:
•
•
•
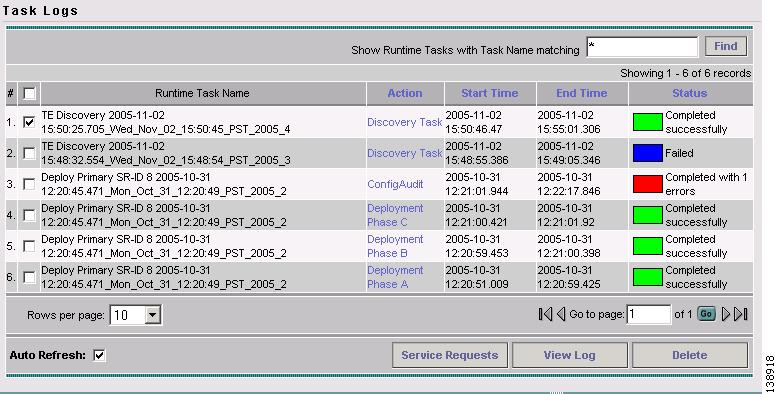
Task Logs
The TE Discovery log captures the state of the network and compares it with the most recent snapshot of the repository.
To view the task log for a TE Discovery task, use the following steps:
Step 1
Step 2
Figure 3-9 Task Logs - TE Discovery
For an explanation of the various window elements, see Task Log.
The status of each task is shown in Status column. This updates automatically and indicates when the discovery process is complete.
If the task is not completed and Auto Refresh is selected, the table continues to update periodically until it is completed.
Step 3
Note
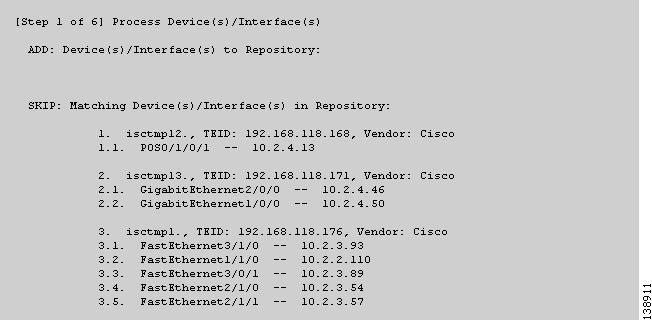
Figure 3-10 TE Discovery Task Log - Devices/Interfaces
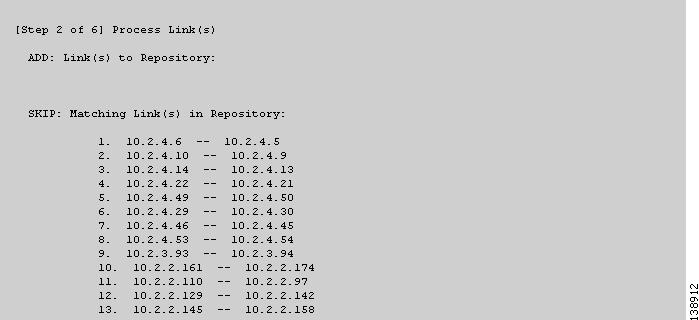
Figure 3-11 TE Discovery Task Log - Links
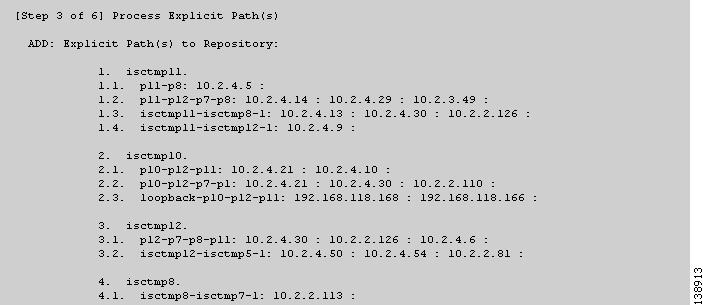
Figure 3-12 TE Discovery Task Log - Explicit Paths
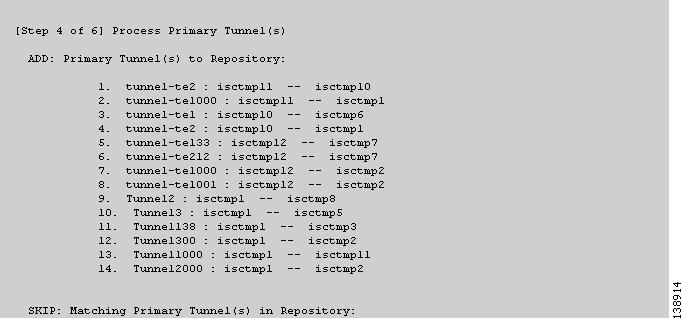
Figure 3-13 TE Discovery Task Log - Primary Tunnels
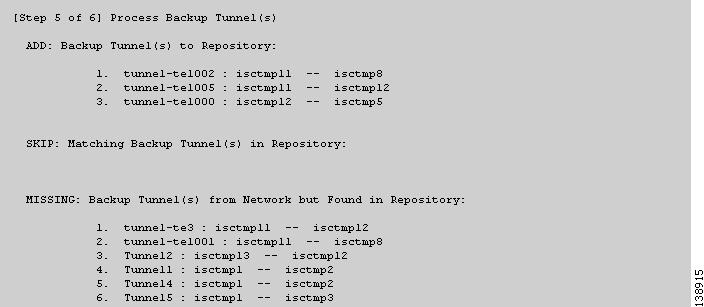
Figure 3-14 TE Discovery Task Log - Backup Tunnels
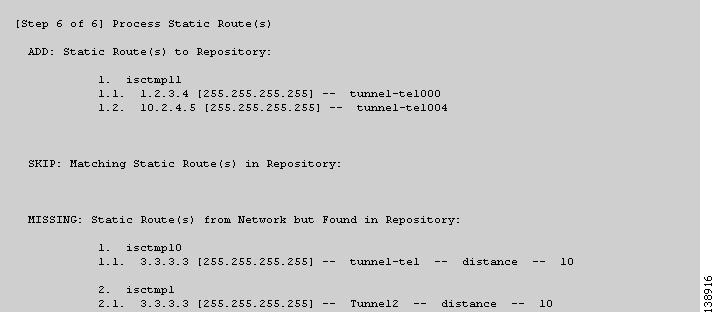
Figure 3-15 TE Discovery Task Log - Static Routes
The TE Discovery task log window is organized into sections that each describes particular events in the TE network:
•
•
The summary of changes in the network is reported in six steps:
1.
2.
3.
4.
5.
6.
As seen in the figures, in each step a log table reports the changes in the following reporting categories:
•
•
•
•
•
Step 4
TE Topology
The TE Topology tool provides a visual snapshot of the current state of the network. It cannot be used to determine changes that have taken place in the network.
The steps required to generate a topology graph of the network are described in "TE Topology."
View Network Element Types
Another way to check the state of the network after running TE discovery is to go to the Traffic Engineering Management Services window and select the type of elements you want to verify.
For example, to check the status of the nodes after running TE discovery, navigate Service Inventory > Inventory and Connection Manager > Traffic Engineering Management > TE Nodes. Look at the updated list of TE nodes to assess which nodes are in the network.
Do the same for TE Links, TE Primary Tunnels, TE Backup Tunnels, and so on.
Setting Up Management Interfaces
Before commencing tunnel management operations, you need to set up management interfaces. However, this step is only necessary if the network devices are not accessible by the hostname from the management station.
For a detailed description of how to set up management interfaces on specific devices, see Cisco IP Solution Center Infrastructure Reference, 4.1 in the section on creating devices.
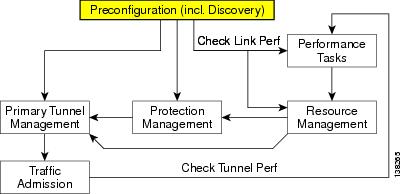
MPLS-TE Management Process
The MPLS-TE management process involves the following steps:
1.
2.
3.
4.
You will then be in a position to run the other MPLS-TE functions available in ISC TEM.
Note
Making SSH Work With IOS-XR
To make SSH work with IOS-XR, enter the following commands on the IOS-XR device:
(config)# domain name <domain name>
# crypto key gen rsa
Verify the crypto configuration by way of the following command:
# sh crypto key mypubkey rsaNext, configure all links as point-to-point as described in Configuring Ethernet Links.
Configuring Ethernet Links
Only point-to-point links are supported in ISC TEM. POS links are point-to-point by default but otherwise Ethernet links need to be configured as point-to-point.
For IOS, enter the following command:
# ip ospf network point-to-pointFor IOS-XR, enter the following command:
# router ospf <id> area 0 interface <name> network point-to-point