Feedback
Table Of Contents
Video and Audio Control Buttons
Home Window
This chapter describes the layout of the home window of the encoder user interface, and includes the following sections:
Home Window Overview
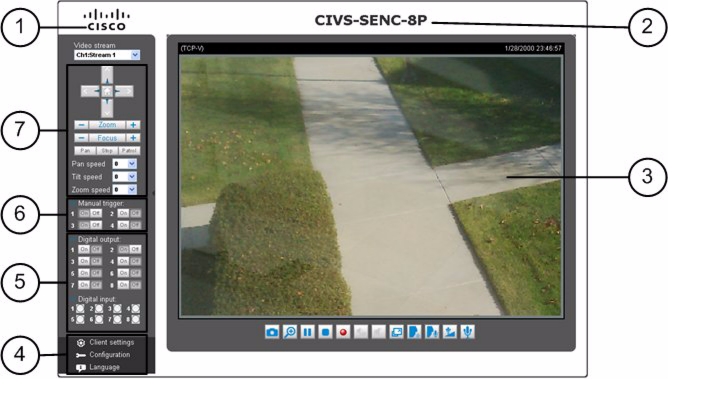
Figure 3-1 provides an overview of the main features on the home window of the encoder user interface.
Figure 3-1 Encoder User Interface Home Window
Cisco logo. Click this logo to go to the Cisco website.
DI/O control area. For more information, see the "DI/DO Control Area" section.
Host name. This can be customized to fit your needs. For more information, see the "System Window" section.
Manual trigger area. For more information, see the "Manual Trigger Area" section.
Live view window. For more information, see the "Live Video Window" section.
Camera control area. For more information, see the "Camera Control Area" section
Configuration area. For more information, see the "Configuration Area" section.
Home Window Features
Camera Control Area
Table 3-1 describes the features available in the camera control area.
Table 3-1 Camera Control Area Features
Video Stream
The CIVS-SENC-4P model supports four channels for live video viewing, and the CIVS-SENC-8P model supports eight channels. Each channel allows you to view only one stream. You can choose from channels1,2,3,4,(5,6,7,8), and Quad View. For more information about video settings, see the "Video Settings" section.
PTZ Control Area
The PTZ navigation panel is available only when a PTZ camera is attached. The up/down/left/right/zoom/focus/pan buttons allow you to adjust the video in the viewing window to the view you want to watch. Click the Home
button to return to the center of the screen. Click the Patrol button to move from one point to another, and click it again to stop patroling. Click Stop to stop the pan movement. For more information about controlling the camera, see the "Camera Control Window" section.
Pan/Tilt/Zoom Speed
In the Pan, Tilt, and Zoom Speed drop-down lists, choose speed ranges from -5 (slow) to 5 (fast).
Manual Trigger Area
Click to enable/disable an event trigger manually. Event triggers must be configured on the Application window before enabling this function. Up to four event settings can be configured. For more information about event settings, see the "Event Settings" section.
Tip
If you want to hide this feature on the home window, uncheck the Show manual trigger button checkbox on the Homepage layout window. For more information, see the "Homepage Layout Window" section.
DI/DO Control Area
Table 3-2 describes the features available in the DI/O control area.
Configuration Area
Table 3-3 describes the features available in the Configuration area.
Table 3-3 Configuration Area Features
Client Settings
Click this button to access the client settings window. For more information, see the "Client Settings" section.
Configuration
Click this button to access the configuration window of the encoder UI. It is recommended that a password be applied to the encoder so that it can only be configured by the administrator. For more information, see the "Configuration" section.
Language
Click this button to select a language for the user interface.
Live Video Window
Table 3-4 describes the features available in the live video window.
Table 3-4 Live Video Window Features
Video Title
Located above the live video window, in the upper-left corner. The video title can be configured. For more information, see the "Video Settings" section.
MPEG-4 Protocol and Media Options
The transmission protocol and media options for MPEG-4 video streaming are located above the live video window, in the upper-left corner. For information about configuring these settings, see the "Client Settings" section.
Time
Displays the current time. For information about configuring this setting, see the "Video Settings" section.
Title and Time
The video title and time can be stamped on the streaming video. For more information about configuring these settings, see the "Video Settings" section.
Video and Audio Control Buttons
Located along the bottom of the live video window. Depending on the encoder model and configuration, some buttons may not be available. For more information about the video and audio control buttons, see "Video and Audio Control Buttons" section.
Go To
Located to the right of the video and audio control buttons, this drop-down menu enables you to locate and move to a preset location instantly on the viewing window.
Video and Audio Control Buttons
Table 3-5 describes the video and audio control buttons.
Table 3-5 Video and Audio Control Buttons

Snapshot—Click this button to capture and save still images. The captured images are displayed in a pop-up window. Right-click on the image and select Save Picture As to save it in JPEG (*.jpg) or BMP (*.bmp) format.

Digital Zoom—Click this button to display the Digital Zoom dialog box, and uncheck the Disable digital zoom checkbox to enable the zoom operation. The Digital Zoom dialog box contains a navigation area on the right-hand side. The shaded box on the navigation area indicates the part of the image that is currently being magnified. Drag the shaded box to move to a different area of the image. To control the zoom level, drag the slider bar on the Digital Zoom dialog box.

Pause—Pause transmission of the streaming media. This button becomes the Resume
button when the Pause button is clicked.

Stop—Stop transmission of the streaming media. To continue transmission, click the Resume
button.

Start MP4 Recording—Click this button to record video clips in MP4 file format that can be saved to your computer. Press the Stop MP4 Recording
button to end recording. When you exit the web browser, video recording stops automatically. For information about saving and naming files, see the "Video Settings" section.

Volume—When the
Mute function is not activated, move the slider bar to adjust the volume on the local computer.

Full Screen—Click this button to switch to full screen mode. Press the Esc key to switch back to normal mode.

Talk—Click this button to talk to people around the encoder. Sound projects from an external speaker connected to the encoder. Click
again to end talking transmission.

Broadcast—Click this button to broadcast to all channels.

Mic Volume—When the Mic Mute button
is not activated, click the Mic volume button and drag the slider bar to adjust the microphone volume on the local computer.

Mic Mute—Click this button to turn off the Mic volume on the local computer.