-
Cisco 3800 Series Hardware Installation
-
Cisco Access Router USB Flash Module and USB eToken Hardware Installation Guide
-
Introduction to Cisco 3800 Series Routers Hardware Documentation
-
Overview of Cisco 3800 Series Routers
-
Preinstallation Requirements and Planning for Cisco 3800 Series Routers
-
Installing Cisco 3800 Series Routers in an Equipment Rack
-
Connecting Cables to Cisco 3800 Series Routers
-
Powering Up Cisco 3800 Series Routers
-
Troubleshooting Cisco 3800 Series Routers
-
Installing Network Modules in Cisco 3800 Series Routers
-
Installing Interface Cards in Cisco 3800 Series Routers
-
Installing SFP Modules in Cisco 3800 Series Routers
-
Installing CompactFlash Memory Cards in Cisco 3800 Series Routers
-
Installing and Upgrading Internal Components in Cisco 3800 Series Routers
-
 Feedback
Table Of Contents
Installing Interface Cards in Cisco 3800 Series Routers
Installing and Removing Slot Dividers
Installing Slot Dividers in HWIC Slots
Removing Slot Dividers from HWIC Slots
Installing Blank Faceplates over Empty HWIC Slots
Installing Interface Cards in Cisco 3800 Series Routers
This document describes how to install interface cards in Cisco 3800 series integrated services routers. It contains the following sections:
•
Installing and Removing Slot Dividers
•
Installing Interface Cards
Interface cards install either into slots in the rear of the router, or into slots in network modules. Interface cards come in the following types:
•
•
•
•
Note
The Cisco 3825 and 3825-NOVPN router and the Cisco 3845 and 3845-NOVPN router each provide four interface card slots, labeled on the rear panel by HWIC and a number. Each of these slots can be occupied by one single-wide WIC, VIC, VWIC, or HWIC.
In addition, the HWIC 0 and HWIC 1 slots can be combined to hold one double-wide HWIC. The HWIC 2 and HWIC 3 slots can also be combined to hold one double-wide HWIC.
Note
The maximum capacity of Cisco 3800 series routers for interface cards inserted directly into the chassis is four WICs, VWICs, or HWICs, or two double-wide HWICs.
Caution
Caution
The Cisco Interface Cards Installation Guide describes how to install interface cards in router slots and network modules.
Empty slots must be covered with blank faceplates for cooling, electromagnetic interference (EMI) reduction, and safety. Procedures for installing slot dividers and blank faceplates are described in the following sections.
Warning
Installing and Removing Slot Dividers
You can remove a slot divider to combine two single-wide HWIC slots into a double-wide slot, or install a slot divider to convert a double-wide slot into two single-wide slots.
Installing Slot Dividers in HWIC Slots
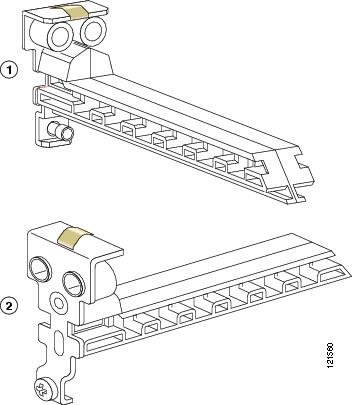
Cisco 3800 series routers use two different type of HWIC slot dividers:
•
•
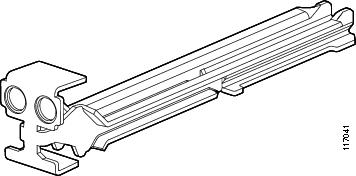
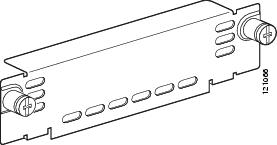
Figure 37 Slot Divider for Cisco 3825 and 3825-NOVPN HWIC Slot
Figure 38 Slot Divider for Cisco 3845 and 3845-NOVPN HWIC Slot
To install slot dividers into HWIC slots, follow these steps:
Step 1
Note
When the slot divider is fully seated, its outer end is flush with the router's rear panel.
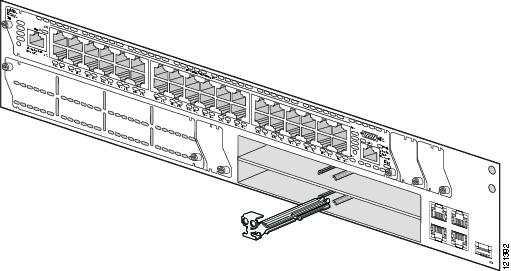
Figure 39 Inserting Slot Divider into HWIC Slot (Cisco 3825 and 3825-NOVPN Router)
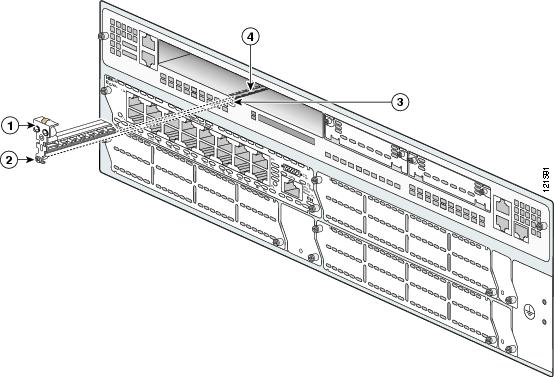
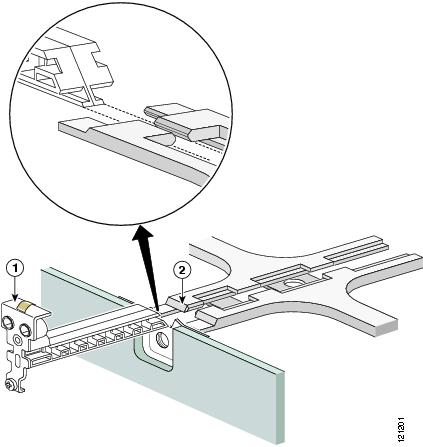
For a Cisco 3845 and 3845-NOVPN router, insert the plastic rail on the bottom of the slot divider into the track in the router slot. Tighten the screw with a number 1 Phillips screwdriver. See Figure 40 and Figure 41.
When the slot divider is fully seated, its outer end is flush with the router's rear panel.
Figure 40 Inserting Slot Divider into HWIC Slot (Cisco 3845 and 3845-NOVPN Router)
Figure 41 Inserting Slot Divider into HWIC Slot (Cisco 3845 and 3845-NOVPN Router), Detail
Step 2
Removing Slot Dividers from HWIC Slots
Note
To remove slot dividers from HWIC slots, follow these steps:
Step 1
Step 1
Tip
Step 2
Tip
Installing Blank Faceplates over Empty HWIC Slots
All interface card slots must be covered by interface cards or blank faceplates for cooling, electromagnetic interference (EMI) reduction, and safety.
Warning
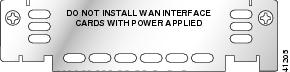
The high-speed WAN interface card (HWIC) hardware kit for Cisco 3800 series routers contains four blank faceplates. Each blank faceplate covers one single-wide HWIC slot.
Figure 42 and Figure 43 show a blank faceplate for an interface card slot.
Figure 42 Blank Faceplate for Interface Card Slot
Figure 43 Blank Faceplate for Interface Card Slot (Perspective View)
To install blank faceplates over empty HWIC slots, follow these procedures:
•
•
Tip