Cisco Prime Analytics 1.0 User Guide
Launching the User Console

Table Of Contents

Navigating the Prime Analytics User Console

Logging Into the User Console

Navigating the User Console


Navigating the Prime Analytics User Console


After you connect the data source to Prime Analytics, you start the Prime Analytics user console and begin reviewing the data. The following topics tell you how to log into the user console and how to navigate to different data review and analysis options:

Logging Into the User Console

Navigating the User Console

Logging Into the User Console

Follow these steps to log into the Prime Analytics user console:


Step 1 Start a Web browser session.

Step 2 In the browser URL field, enter the Prime Analytics server IP address or hostname and connection port 8080: yourserver:8080.


Note Port 8080 is the default; this can be changed during installation.


Step 3 In the login window, enter your username and password, then click Log in.

You are now logged into the Prime Analytics user console. Proceed to one of the following topics:

Navigating the User Console


Navigating the User Console

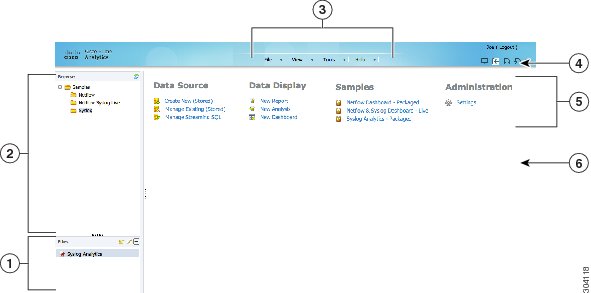
The Prime Analytics user console is the starting point for displaying your project data in many different ways. The user console contains the following elements:

Browse—Displays a directory containing your project files. you can create new directories to store your data files, including reports, dashboards, and analytics files. You can add, delete, or move directories as you would any standard directory. The NetFlow and Syslog directories provided in the default installation contain sample files that you can use to build your own NetFlow and syslog data files.

Files—Clicking a directory displays the files it contains here. Selecting a file display icons that you can use to perform actions on the file: Open, Edit, Open in New Window, Run in Background, Delete, Share, Schedule, and Properties.

Menus—Contain items that invoke all user console actions:

File—Provides all file management options: creating new files, saving files, displaying file properties, scheduling, sharing, and other file management actions. Every data view you create, whether a new report, a new dashboard, or a new analysis, is considered a file, so all standard file actions, save, save as, edit, can be performed on them.

View—Provide options for viewing your projects and project files. Browser displays the default web browser view; Workspace displays the status of reports you submitted to run in the background. Other options are defaults that canot be changed.

Tools—Provides options to refresh of all BI elements, from the repository cache and systems settings to global variables and reporting data cache. The CDA cache manager is also accessed from this menu.

Help—Provides links to Prime Analytics help.

Main toolbar—Provides tools that invoke common actions:

Workspace—Opens the Workspace window. The Workspace screen will report what you have submitted to run in the background on the server. Within this screen, you can cancel reports that have not run yet, and you can view or delete ones that have. This action can be achieved by going to View -> Workspace. You can also toggle between the Workspace view and the Browser view within the View menu.

Toggle Browser—This button will allow you to show or hide the Browse Pane.

New Report—Opens the Report tab where you can create a new report.

New Analytics—Opens the Analytics tab where you can create a new analysis.

New Dashboard—Opens the Dashboard tab where you can create a new dashboard.

Browse Pane - The browse pane on the left allows you to navigate through your existing solution folders. Solutions and content files such as dashboards and reports reside inside the folder. You can create and delete solution folders by right-clicking inside the navigation pane. You can also examine information associated with solution folder contents by right-clicking and selecting Properties.

Work area—Displays your report, dashboard, or analysis project data. If no files are open, the following menus are displayed:

Data Source—Provides options to create new and manage existing data sources. For information, see Chapter 4 "Setting Up the Data Sources."

Data Display—Provides options that allow you to create and manage the display of Prime Analytics data. For information, see Chapter 6 "Creating Reports," Chapter 7 "Creating an Analysis,"and Chapter 5 "Creating Dashboards."

Samples—Allows you to display the sample applications provided with Prime Analytics. For information, see "Sample Applications."

Administration—Displays a Settings option that allows you to modify Prime Analytics settings. For information, see Chapter 8, "Managing Prime Analytics."

Figure 3-1 Prime Analytics User Console

1

Files contained in the selected folder

4

User Console toolbar

2

Folders

5

Menus

3

User Console menus

6

Work Area


The Prime Analytics user console is a starting point for creating and managing your data files. For more detailed information, see one or more of the following:

Chapter 5 "Creating Dashboards."

Chapter 6 "Creating Reports."

Chapter 7 "Creating an Analysis."