-
Cisco TelePresence Manager 1.8 Administration and Installation Guide
-
Preface
-
General Information About Cisco TelePresence Manager
-
Pre-Install System Setup for Cisco TelePresence Manager
-
Configuring Microsoft Exchange for Cisco TelePresence Manager
-
Configuring IBM Domino for Cisco TelePresence Manager
-
Configuring Scheduling API for Cisco TelePresence Manager
-
Configuring Cisco Unified CM for Cisco TelePresence Manager
-
Installing and Configuring for Cisco PreQualification Assistant
-
Configuring UCS Server and VMware for Cisco TelePresence Manager
-
Installing or Upgrading Cisco TelePresence Manager
-
Initializing Cisco TelePresence Manager
-
Additional Installation Configurations for Cisco TelePresence Manager
-
Configuring Cisco TelePresence WebEx OneTouch for Cisco TelePresence Manager
-
Monitoring Cisco TelePresence Manager
-
Cisco TelePresence Manager Emails and Meeting Manager
-
Supported MIBs for Cisco TelePresence Manager
-
Troubleshooting Cisco TelePresence Manager
-
Cisco TelePresence Manager System Messages
-
Replacing a Cisco TelePresence System Codec
-
Reconfiguring Cisco TelePresence Manager and CTMS Addressing
-
 Feedback
Table Of Contents
Installing and Configuring Cisco PreQualification Assistant
Pre-Configuration Procedure Guidelines for Checking Initial Network Setup
Installing the PreQualification Assistant Tool
Running the Tool - Using the Tool Application Window
Using PreQualification Configuration Forms
Cisco Unified Communications Manager Configuration Form
Test(s) Enabled by the Host Configuration Form
Test Host Configuration Forms in a Generic Environment
LDAP (Generic) Test Configuration Form
Test Configuration Forms in a Microsoft Exchange Environment
LDAP Server (Active Directory) Test Configuration Form
Calendar Server (Microsoft Exchange) Host Configuration Form
Test Configuration Forms in an IBM Domino Environment
LDAP (Domino Directory) Host Configuration Form
Calendar Server (IBM Domino) Configuration Form
Cisco Unified Communications Manager Server (IBM Domino) Configuration Window
LDAP (Domino Directory) Host Configuration Form
Test Configuration Forms in a Microsoft Exchange Web Services (EWS) Environment
LDAP Server (Active Directory) Add/Edit Configuration Form
LDAP Server Microsoft Exchange EWS Calendar Server Configuration Form
Installing and Configuring Cisco PreQualification Assistant
First Published: Nov 2, 2011, OL-22226-01Contents
•
Pre-Configuration Procedure Guidelines for Checking Initial Network Setup
•
•
•
•
•
•
•
Introduction
This chapter explains how to install and configure the Cisco TelePresence Manager PreQualification Assistant tool.
It is important to install and run the PreQualification Assistant to ensure that the preconfiguration setup is performed correctly. The data you enter into the Tool Test Configuration forms are used to verify connections to the servers and validate data from them that is used to configure CTS-Manager.
Pre-Configuration Procedure Guidelines for Checking Initial Network Setup
This table provides a guideline for the procedures you will need to reference in order to check the setup of the network before installing Cisco TelePresence Manager.
This table also lists the next couple to tasks to be performed when installing the CTS-Manager system.
Table 7-1 Pre-Configuration Guidelines for Testing the System Network Setup for CTS-Manager
Install and configure PreQualification Assistant
Install, configure, and run the PreQualification Assistant to ensure that your preconfiguration setup is performed correctly. The data you enter into the Tool Test Configuration forms are used to verify connections to the servers and get data from them to be used to configure CTS-Manager
Current Chapter.
Next Step after Pre-Configuration
(For installations on UCS server only) Configuring the UCS Server and VMware for Cisco TelePresence Manager
l
Chapter 8 "Configuring UCS Server and VMware for Cisco TelePresence Manager"
Install or Upgrade Cisco TelePresence Manager
Chapter 9 "Installing or Upgrading Cisco TelePresence Manager"
Installing the PreQualification Assistant Tool
After you have downloaded the PreQualification executable, use the following procedures to install the tool.
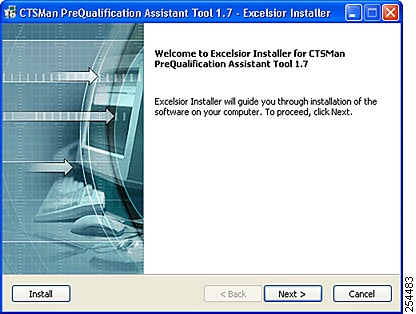
Step 1
Figure 7-1 PreQualification Assistant Installer Window
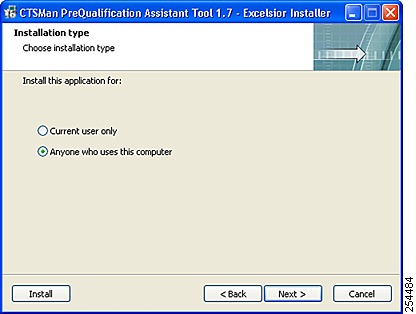
Step 2
Figure 7-2 Installation Type Window
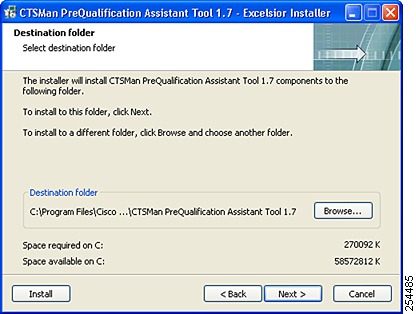
Step 3
Figure 7-3 Destination Folder Window
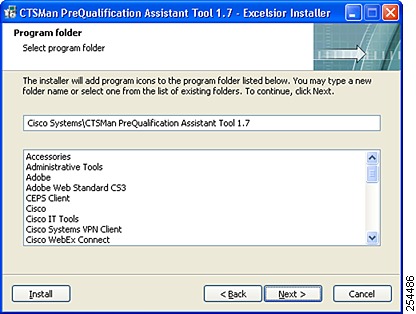
Step 4
Figure 7-4 Program Folder Window
Step 5
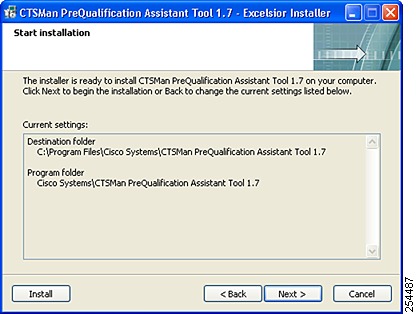
Figure 7-5 Start Installation Window
Step 6
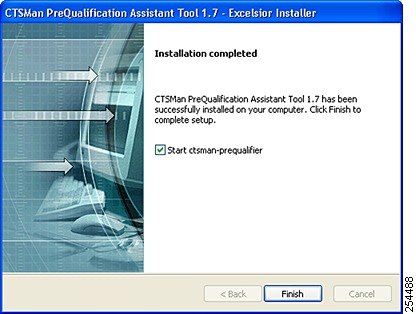
Note
Figure 7-6 Installation Completed Window
Uninstalling a Previous Version
Uninstall previous versions using the PreQualification uninstaller.
Note
To uninstall the CTS-Manager PreQualification Assistant Tool:
Step 1
Step 2
Step 3
Step 4
Running the Tool - Using the Tool Application Window
The CTS-Manager PreQualification tool allows administrators to determine if any changes are needed to their network to support a CTS-Manager installation.
The tool runs a series of tests to determine if your LDAP server, Calendar server, and Cisco Unified CM configurations meet the requirements to support CTS-Manager. The set of tests you run are determined by the Calendar server running on your network (IBM Domino or Microsoft Exchange). You can also run a set of tests without specifying a calendar server.
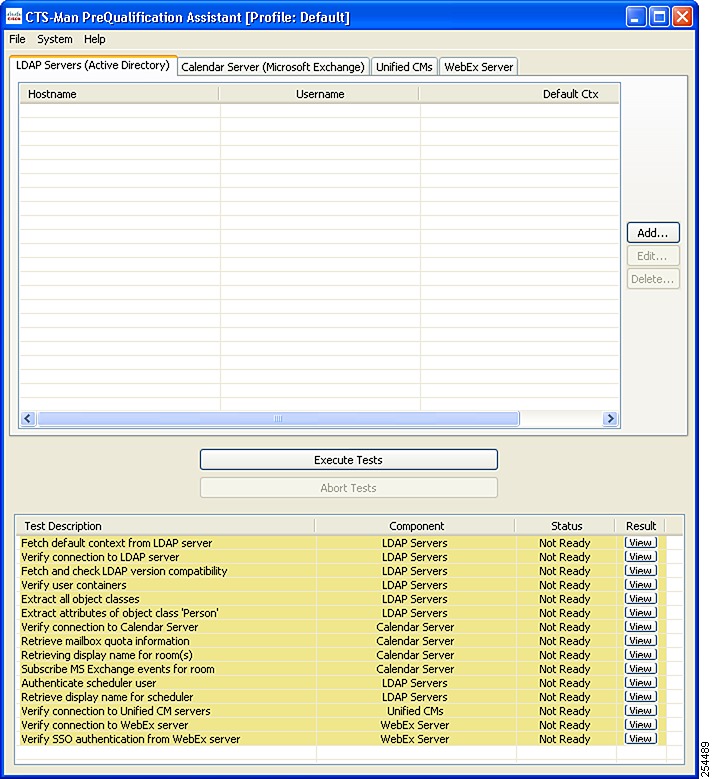
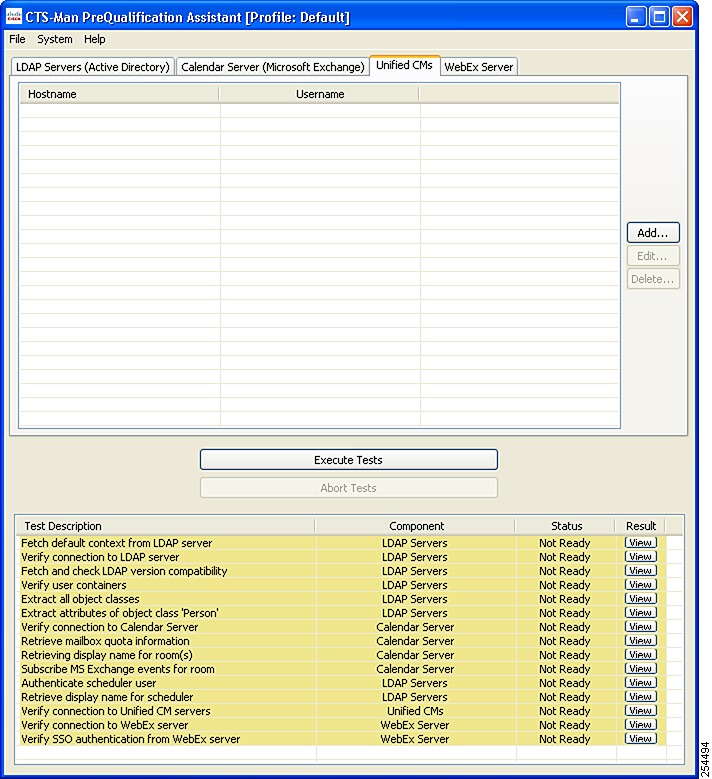
In order to run a series of tests you need to provide the tool with configuration information for your LDAP servers, Calendar server, Cisco Unified CM servers and WebEx server. The four-tabbed window displays the information that is configured for the servers. To add, edit or delete this information, use the Add, Edit, or Delete buttons to access the host configurations forms used to enter configuration data.
Figure 7-7 Tool Application Window
The Tool application runs a series of tests to determine if your LDAP server, Calendar server, and Cisco Unified CM server configurations meet the requirements to support CTS-Manager. The set of tests you run are determined by the Calendar server running on your network (IBM Domino, Microsoft Exchange (Active Directory), or Microsoft Exchange EWS). You can also run a set of tests without specifying a Calendar server.
The lower part of the window displays the status of each test after clicking the Execute Tests button. Once you have run a set of tests you can view the results of each test in a Test Result window. The test results contain troubleshooting data needed to prepare your LDAP servers, Calendar server, and Cisco Unified CM servers to work with CTS-Manager.
If additional analysis is required to prepare your network, you can create a zip file for technical support that includes all the test results.
The Tool application window has three main areas which are explained in the following sections.
Menu Commands
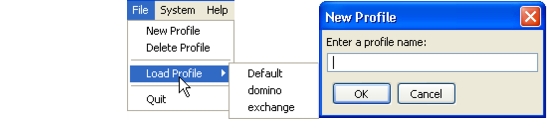
The following sections describe the commands in the File menu.
File Menu Commands
•
•
•
Figure 7-8 File Menu Commands
System Menu Command
•
•
•
–
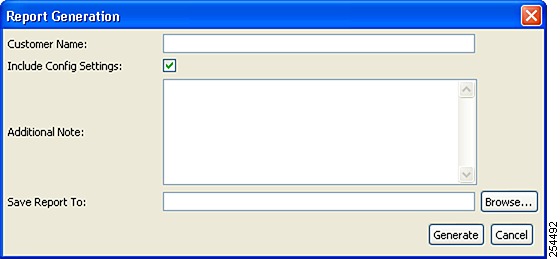
Figure 7-9 Report Generation Window
•
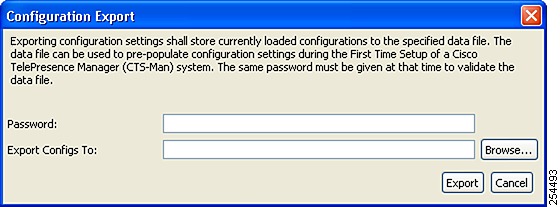
Figure 7-10 LDAP Configuration Export Window
Host Configuration Window
The PreQualification Configuration window presents four areas, selected by individual tabs. The tabs display the LDAP server, Calendar server and Unified CM server configurations you've chosen from the Select Calendar Server command in the System menu.
Note
Test Status Window
The bottom of the application window lists the tests available. This will change depending on which server type is chosen. The Component area lists which tests are available for each server type.
Figure 7-11 The Test Status Window
Using PreQualification Configuration Forms
There are three Test Configuration forms (LDAP server, Calendar server, and Cisco Unified CM). There are also four network environments (Exchange calendar server, Domino calendar server, Microsoft Exchange EWS, and no calendar server). There are set up windows, Add servers, Edit server configuration forms which are used to collect the data required to run the relevant tests for each network environment The sections below define the different windows and configuration forms for each network environment.
Cisco Unified Communications Manager Configuration Form
The Cisco Unified CM (Unified CM) Configuration form requires the same data for all three network environments.
Figure 7-12 The Cisco Unified CM List Configuration Form
This window lists all the Cisco Unified CM servers that have been configured for the CTS-Manager. If all of the Unified CM servers have been configured, use the Execute Tests button to make sure that they have been configured correctly.If it is necessary to change the configuration of one, highlight the line, and click the Edit button to change the configuration.
To remove one, highlight it and then click the Delete button.
When adding a Unified CM, click the Add button and the following Host Configuration window appears.
Figure 7-13 The Cisco Unified CM Add/Edit Configuration Form
Test(s) Enabled by the Host Configuration Form
•
Test Host Configuration Forms in a Generic Environment
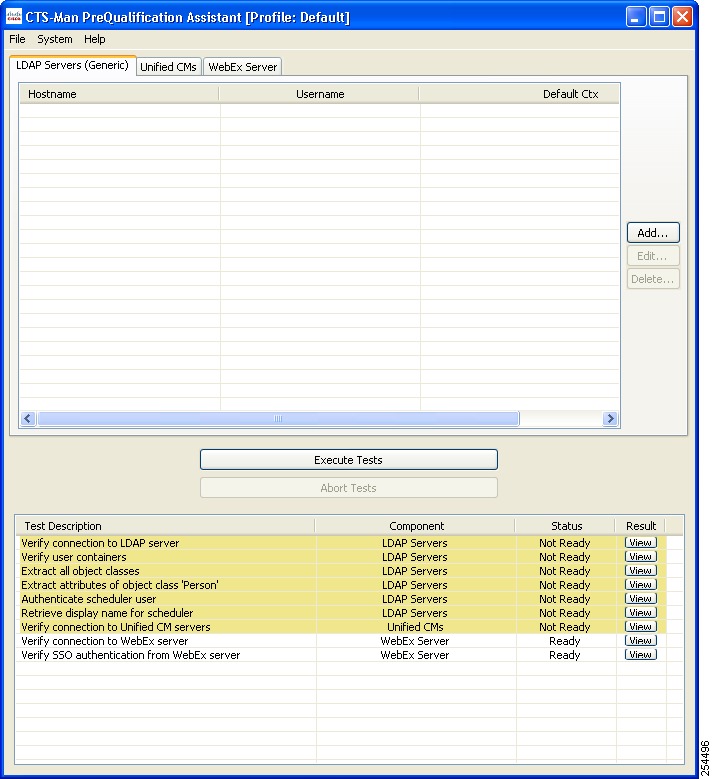
You can use the PreQualification Tool to test your LDAP server without specifying a calendar server. This applies when the user selects Calender Server, "None."
This window lists all the generic LDAP servers that have been configured for the CTS-Manager. If all of the servers have been configured, use the Execute Tests button to make sure that they have been configured correctly.
Figure 7-14 LDAP Server Generic Window
If it is necessary to change the configuration of one, highlight the line, and click the Edit button to change the configuration and the Host Configuration window appears, refer to Figure 7-15.
To remove one, highlight it and then click the Delete button.
When adding another LDAP server, click the Add button and the following configuration window appears.
Select the Unified CM's tab. This window lists all the generic Cisco Unified CMs that have been configured for the CTS-Manager. If all of the Unified CMs have been configured, use the Execute Tests button to make sure that they have been configured correctly.
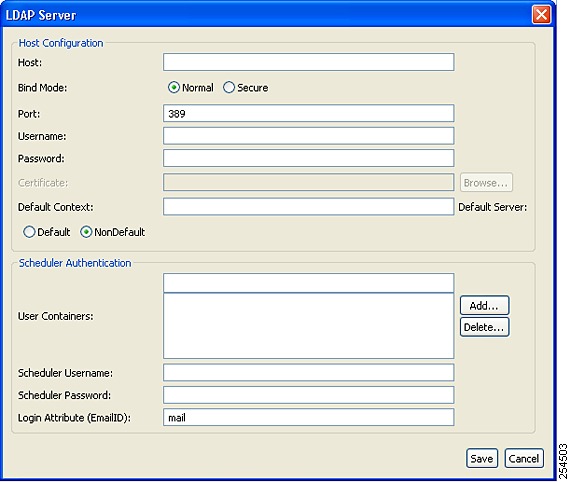
LDAP (Generic) Test Configuration Form
Figure 7-15 The LDAP Server (Generic) Add/Edit Configuration Form
Test(s) Enabled by this Test Configuration Form
•
•
•
•
Test Configuration Forms in a Microsoft Exchange Environment
You can use the PreQualification Tool to test your LDAP server when specifying a Microsoft (Active Directory) calendar server. This applies when the user selects Calender Server, "Microsoft Exchange."
This window lists all the LDAP servers that have been configured for the CTS-Manager. If all of the servers have been configured, use the Execute Tests button to make sure that they have been configured correctly.
Figure 7-16 LDAP Server Microsoft Active Directory Window
This window lists all the LDAP (Active Directory) servers that have been configured for the CTS-Manager. If all of the LDAP servers have been configured, use the Execute Tests button to make sure that they have been configured correctly.
If it is necessary to change the configuration of one, highlight the line, and click the Edit button to change the configuration.
To remove one, highlight it and then click the Delete button.
When adding a LDAP server, click the Add button and the following configuration window appears.
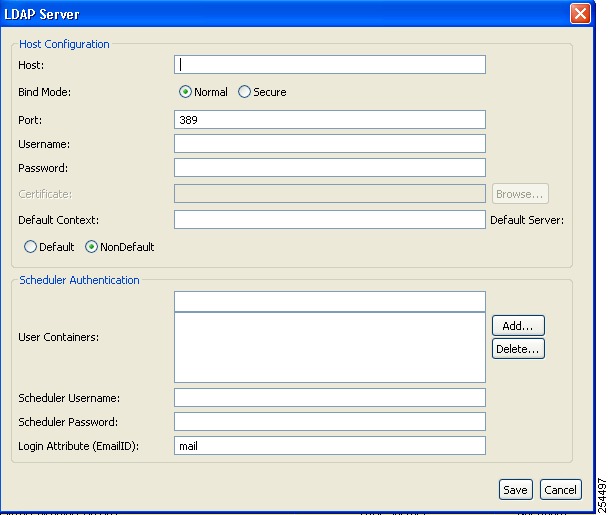
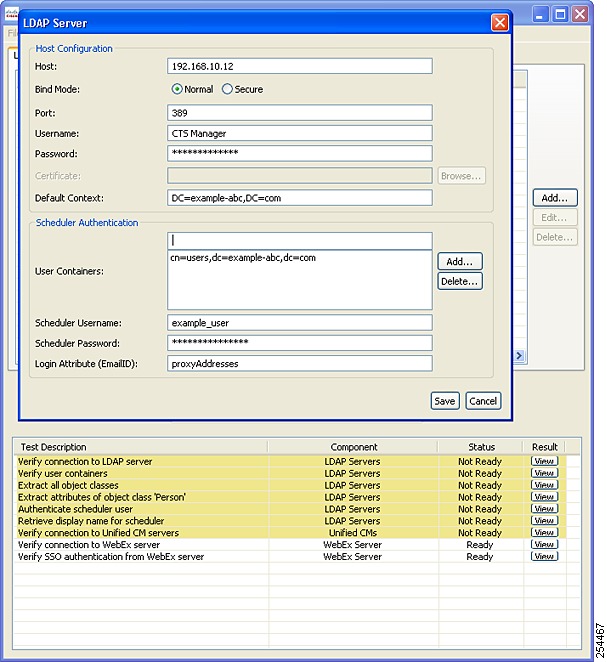
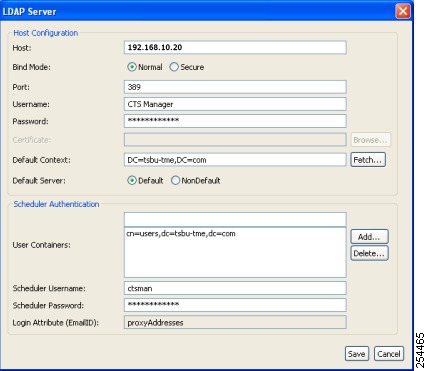
LDAP Server (Active Directory) Test Configuration Form
Figure 7-17 The LDAP Server (Active Directory) Add/Edit Configuration Form
Test(s) Enabled by this Test Configuration Form
•
•
•
•
•
•
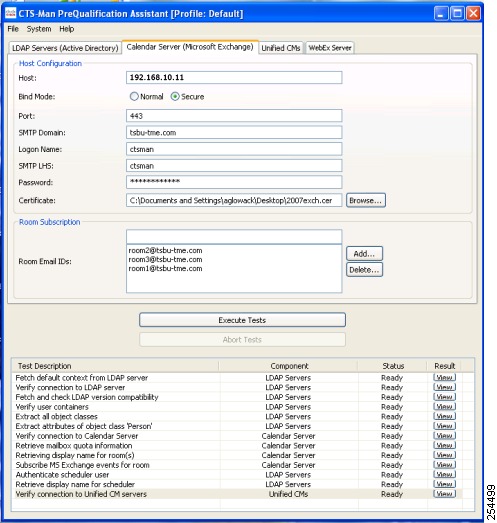
Calendar Server (Microsoft Exchange) Host Configuration Form
Figure 7-18 The Calendar Server (Microsoft Exchange) Host Configuration Form
Test(s) Enabled by this Test Configuration Form
•
•
•
•
Test Configuration Forms in an IBM Domino Environment
You can use the PreQualification Assistant to test your LDAP server when specifying a IBM Domino calendar server. This applies when the user selects Calender Server, "Microsoft Exchange."
This window lists all the LDAP servers that have been configured for the CTS-Manager. If all of the servers have been configured, use the Execute Tests button to make sure that they have been configured correctly.
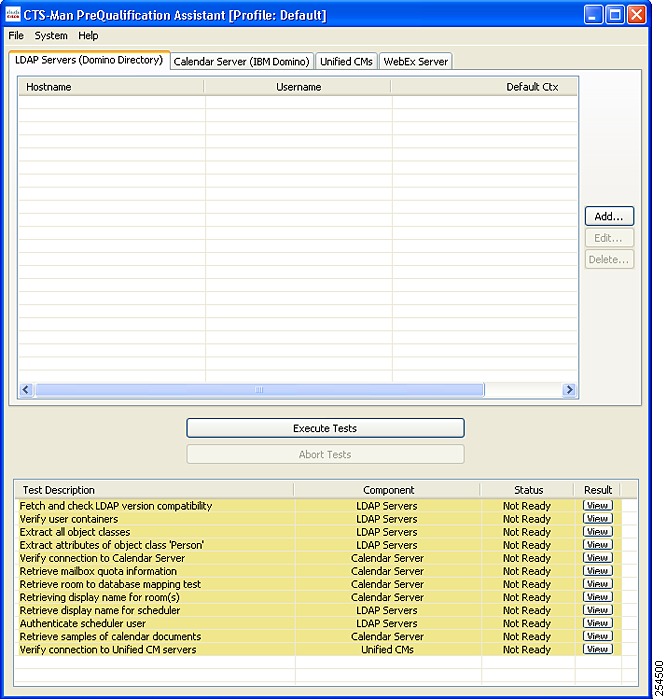
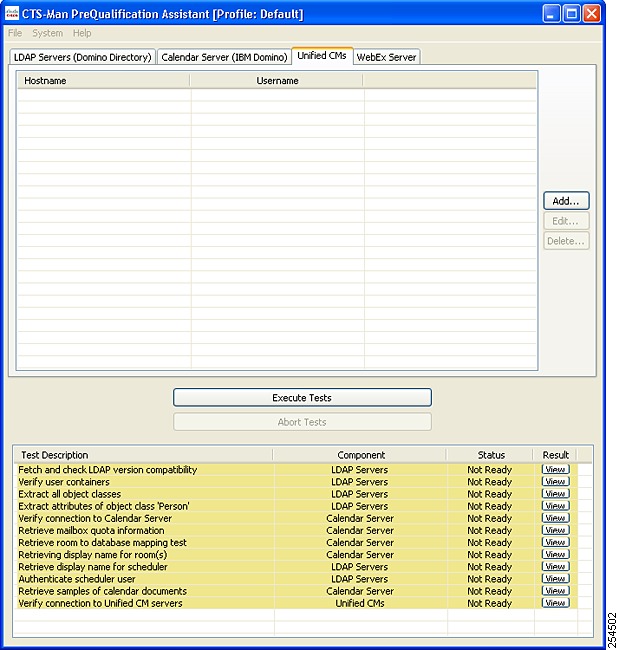
Figure 7-19 LDAP Server IBM Domino Window
This window lists all the LDAP (Domino Directory) servers that have been configured for the CTS-Manager. If all of the LDAP servers have been configured, use the Execute Tests button to make sure that they have been configured correctly.
If it is necessary to change the configuration of one, highlight the line, and click the Edit button to change the configuration.
To remove one, highlight it and then click the Delete button.
When adding a LDAP server, click the Add button and the following configuration window appears.
LDAP (Domino Directory) Host Configuration Form
Figure 7-20 The LDAP Server (Domino Directory) Add/Edit Configuration Form
Test(s) Enabled by the Execute Tests button
•
•
•
•
•
•
•
Calendar Server (IBM Domino) Configuration Form
You can use the PreQualification Assistant to test your LDAP Calendar server configurations when specifying a IBM Domino Calendar server. This applies when from the pull-down menu, the user selects System > Select Calendar Server > IBM Domino.
The Calendar Server (IBM Domino) window appears as shown in Figure 7-21
Figure 7-21 The Calendar Server (Domino Directory) Add/Delete Configuration Form
This window lists the Calendar server that has been configured for the CTS-Manager. If the server and the room (endpoint) subscriptions have been configured, use the Execute Tests button to make sure that they have been configured correctly.
If it is necessary to add the room email ID, enter the room email ID and click the Add button.
To remove one, highlight it and then click the Delete button.
Test(s) Enabled by the Execute Tests button
•
•
•
•
•
Cisco Unified Communications Manager Server (IBM Domino) Configuration Window
This window lists all the Cisco Unified CM (Unified CM) servers that have been configured for the CTS-Manager. If all of the Unified CM servers have been configured, use the Execute Tests button to make sure that they have been configured correctly.
If it is necessary to change the configuration of one, highlight the line, and click the Edit button to change the configuration.
To remove one, highlight it and then click the Delete button.
When adding a Unified CM, click the Add button and the following Host Configuration window appears.
Figure 7-22 Unified Communications Manager Server (IBM Domino) Window
This window lists all the LDAP (Domino Directory) servers that have been configured for the CTS-Manager. If all of the LDAP servers have been configured, use the Execute Tests button to make sure that they have been configured correctly.
If it is necessary to change the configuration of one, highlight the line, and click the Edit button to change the configuration.
To remove one, highlight it and then click the Delete button.
When adding an LDAP server, click the Add button and the following configuration window appears.
LDAP (Domino Directory) Host Configuration Form
Figure 7-23 The Cisco Unified CM Add/Edit Configuration Form
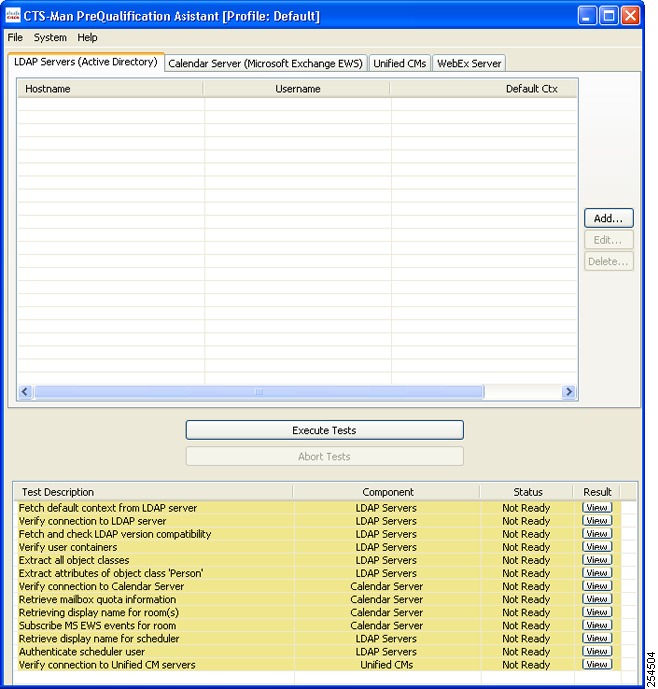
Test Configuration Forms in a Microsoft Exchange Web Services (EWS) Environment
You can use the PreQualification Tool to test your LDAP server when specifying a Microsoft Exchange EWS calendar server. This applies when the user selects Calendar Server, "Microsoft Exchange EWS."
This window lists all the LDAP servers that have been configured for the CTS-Manager. If all of the servers have been configured, use the Execute Tests button to make sure that they have been configured correctly.
Figure 7-24 LDAP Servers with Microsoft Exchange EWS Calendar Server window
This window lists all the Microsoft LDAP servers that have been configured for the CTS-Manager. If all of the servers have been configured, use the Execute Tests button to make sure that they have been configured correctly.
If it is necessary to change the configuration of one, highlight the line, and click the Edit button to change the configuration and the Host Configuration window appears, refer to Figure 7-25.
To remove one, highlight it and then click the Delete button.
When adding another LDAP server, click the Add button and the following configuration window appears.
LDAP Server (Active Directory) Add/Edit Configuration Form
This is the same configuration form that appears when adding any Microsoft Exchange server.
Figure 7-25 The LDAP Server (Active Directory) Add/Edit Configuration Form
Test(s) Enabled by the Execute Tests Button
•
•
•
•
•
•
•
•
•
•
•
•
LDAP Server Microsoft Exchange EWS Calendar Server Configuration Form
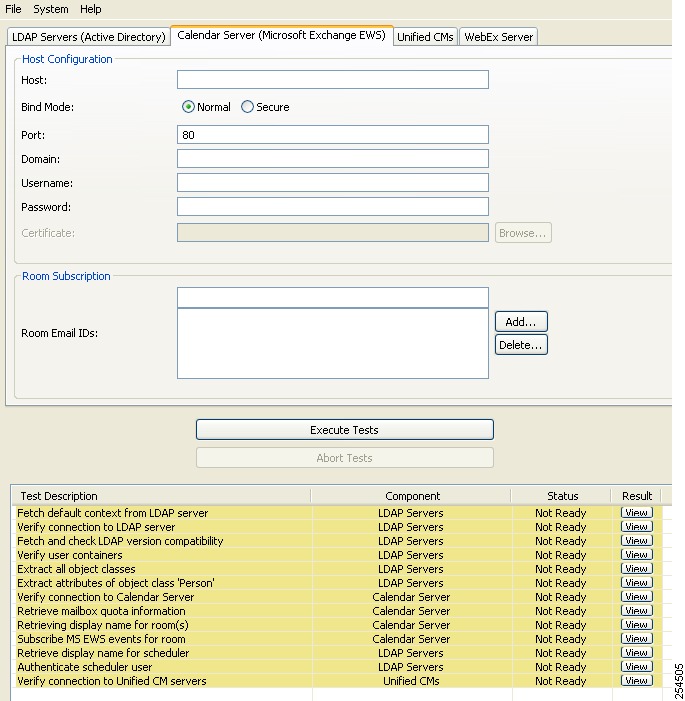
When you select the Calendar Server tab, Figure 7-26 appears. This window allows you to configure the calendar server for Microsoft Exchange EWS and add or delete room (endpoint) subscriptions.
Figure 7-26 LDAP Calendar Server Microsoft Exchange EWS Configuration Window
WebEx Server
On this tab you configure a connection to the WebEx scheduling server, necessary for enabling the WebEx feature in CTS-Manager. The purpose of this is to test connectivity to the WebEx site. This information is not imported into CTS-Manager during first-time setup.
Figure 7-27 WebEx Server Window
Table 7-12 WebEx Server Host Configuration Form Fields
Field
Description or Settings
Host
The configured hostname of the WebEx scheduling server.
Site URL
The address used to construct the URL that's used to access this meeting. This is the actual URL that CTS-Manager uses to communicate with WebEx. This is published in the email from CTS-Manager, and is displayed to users on the WebEx page of the CTS phone UI.
Admin Username
WebEx administrator's username (provided by the WebEx team)
Admin Access Code
WebEx administrator's access code (provided by the WebEx team)
Certificate
Certificate from the hostname (WebEx scheduling server)
Note