-
Cisco TelePresence Manager 1.8 Administration and Installation Guide
-
Preface
-
General Information About Cisco TelePresence Manager
-
Pre-Install System Setup for Cisco TelePresence Manager
-
Configuring Microsoft Exchange for Cisco TelePresence Manager
-
Configuring IBM Domino for Cisco TelePresence Manager
-
Configuring Scheduling API for Cisco TelePresence Manager
-
Configuring Cisco Unified CM for Cisco TelePresence Manager
-
Installing and Configuring for Cisco PreQualification Assistant
-
Configuring UCS Server and VMware for Cisco TelePresence Manager
-
Installing or Upgrading Cisco TelePresence Manager
-
Initializing Cisco TelePresence Manager
-
Additional Installation Configurations for Cisco TelePresence Manager
-
Configuring Cisco TelePresence WebEx OneTouch for Cisco TelePresence Manager
-
Monitoring Cisco TelePresence Manager
-
Cisco TelePresence Manager Emails and Meeting Manager
-
Supported MIBs for Cisco TelePresence Manager
-
Troubleshooting Cisco TelePresence Manager
-
Cisco TelePresence Manager System Messages
-
Replacing a Cisco TelePresence System Codec
-
Reconfiguring Cisco TelePresence Manager and CTMS Addressing
-
 Feedback
Table Of Contents
Initializing Cisco TelePresence Manager
Post-Install Guidelines for CTS-Manager
Initializing CTS-Manager After Installation
Required Information and Equipment
Configure Database Backup Schedule
Dashboard for Verification of Installation Status
Initializing Cisco TelePresence Manager
First Published: Nov 2, 2011, OL-22226-01Content
•
Post-Install Guidelines for CTS-Manager
•
•
–
•
Introduction
After a first-time or fresh installation of Cisco TelePresence Manager, the next step is to initialize the program.
Note
Initializing Cisco TelePresence Manager enables access to information sources such as Microsoft Exchange Server for meeting requests from Microsoft Outlook, Active Directory for accessing user and conference room (endpoint) information, and Cisco Unified Communications Manager for room (endpoint) availability and telephone support.
The tasks for initializing the Cisco TelePresence Manager are described in the following sections.
Post-Install Guidelines for CTS-Manager
The purpose of this section is to outline the information you need to initialize CTS-Manager after either a fresh or first-time installation.
The tasks required for additional configurations of CTS-Manager are provided in the following table.
Table 10-1 Post-Install Procedure Guidelines for Setting Up CTS-Manager
Initializing CTS-Manager
After first-time installation of the CTS-Manager software, the next process is initializing CTS-Manager to enable access to information sources such as Microsoft Exchange Server for meeting requests from Microsoft Outlook, Active Directory for accessing user and conference room (endpoint) information, and Cisco Unified Communications Manager for conference room (endpoint) availability and telephone support
Current Chapter
Additional Configuration Procedures for CTS-Manager
The administrator makes use of the System Configuration window to perform system configuration tasks such as uploading licenses, synchronizing system databases, managing security, and reconfigure system settings
Chapter 11 "Additional Installation Configurations for Cisco TelePresence Manager"
Configuring Cisco TelePresence WebEx OneTouch for CTS-Manager
Describes how to set up Cisco TelePresence WebEx OneTouch in CTS-Manager, which allows WebEx participants to join TelePresence meetings.
Chapter 13 "Configuring Cisco WebEx OneTouch for Cisco TelePresence Manager"
Monitoring and Supporting CTS-Manager
Describes the support features available when you log into CTS-Manager using a Live Desk role.
Chapter 14 "Monitoring and Supporting Cisco TelePresence Manager"
Email and Meeting Action Requirements
The Calendar service (either Microsoft Exchange or IBM Domino) sends an acceptance email to the meeting organizer, with the notice that the rooms (endpoints) have been reserved and placed on the calendar. CTS-Manager also sends either a Confirmation email or an Action Required email to the meeting organizer when a meeting is scheduled.
If at any time you encounter problems, go to Chapter 17 "Troubleshooting Cisco TelePresence Manager" to see how to correct the problem.
Initializing CTS-Manager After Installation
This section contains the following topics pertaining to initialization:
•
To initialize Cisco TelePresence Manager, you must enter contact and access information for your Microsoft Exchange Server, Lightweight Directory Access Protocol (LDAP) server, and Cisco Unified CM in a series of one-time-only, post-installation initialization windows.
Required Information and Equipment
To set up and initialize Cisco TelePresence Manager, you need the information previously entered or created during pre-installation.
Additionally, Cisco TelePresence Manager must have network access to a computer running Windows Internet Explorer version 6.1.3, Microsoft Exchange Server and Active Directory, (set to level 2) server, Microsoft EWS server, or IBM Domino Server and Domino Directory Server, and Cisco Unified Communications Manager.
You must also have an endpoint license in order to fully initialize CTS-Manager. If you do not have this license, you will not be able to add rooms (endpoints) to CTS-Manager. After installation and initialization, go to the Configure > License window and click the License Files tab to upload the license.
Initialization Procedure
To initialize CTS-Manager, follow these steps:
2.
7.
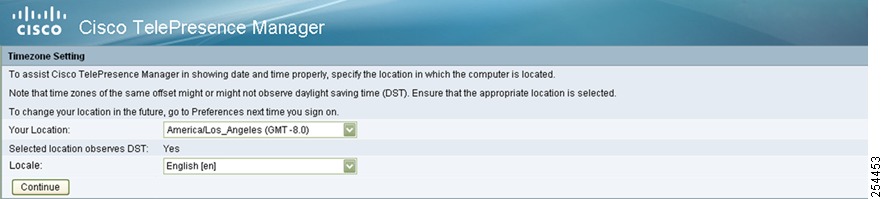
Log In and Set Time Zone
To log in and set your time zone:
Step 1
https://server hostname or IP addressStep 2
Step 3
Note
The Time Zone Setting window appears.
Figure 10-1 Timezone Setting Window
Step 4
A window pops up asking you if you want to apply changes.
Step 5
The first-time setup welcome window appears displaying the following information about the CTS-Manager server hardware and software you have installed:
•
•
•
•
•
•
•
•
Step 6
The License Agreement window appears.
Step 7
Step 8
Step 9
Server Roles
The Server Roles window allows you to choose how you want to deploy the CTS-Manager server.
The options are:
•
Choose this to set up CTS-Manager as a standalone server to manage up to 500 endpoints.
•
Choose this to set up CTS-Manager as part of a cluster to manage more than 500 endpoints.
WarningSelect a server role and click Next.
Select Configuration Options
The Configuration Options window allows you to configure the system manually or to restore the configuration settings from a database backup.
Figure 10-2 Configuration Options Window - Manual Configuration
The Configuration Options window provides three options for configuring CTS-Manager:
•
•
•
Configure the System Manually
This option allows you to set up your configurations for a first-time setup. You are not able to do a restore or use the PreQualification data files.
You will have to add the server information in all the screens.
If you are setting up Microsoft Exchange as your calendar server for the first time:
•
The Calendar Server window appears.
Go to Select Calendar Server for more information
Configure the System with PreQualification Assistant Data File
If you choose to configure CTS-Manager using the PreQualification data, this option allows you to select the data file that you have previously set up. Refer to Chapter 7 "Installing and Configuring Cisco PreQualification Assistant"
Figure 10-3 Configuration Options - PreQualification Configuration
To configure the system using the Pre-Qualification Assistant data file:
Step 1
Step 2
Step 3
The Calendar Server Selection window appears.
Go to Select Calendar Server.
Note
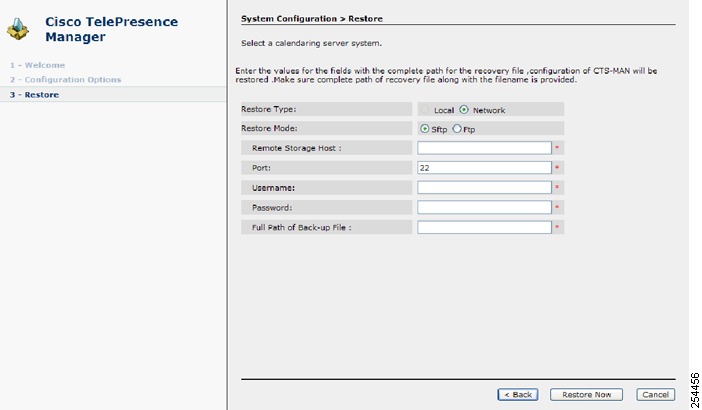
Restore Configuration Settings from a Database Backup
This option allows you to select the data that you have previously backed up. Refer to Chapter 11 "Additional Installation Configurations for Cisco TelePresence Manager", section, Database - Status, Backup, and Restore for further details on backing up your system database.
Note
To restore configuration settings from a database backup:
Step 1
Step 2
Step 3
Figure 10-4 System Configuration - Restore Window
Step 4
After selecting the configuration option and setting up the data, the next step is to set up the calendar server. Go to Select Calendar Server.
Select Calendar Server
The Calendar Server Selection window allows you to select the calendaring server for your system. The options are:
•
•
•
•
•
To select a calendar server:
Step 1
Note
Step 2
The LDAP Servers window opens.
Go to Configure LDAP Servers.
Figure 10-5 Calendar Service Window
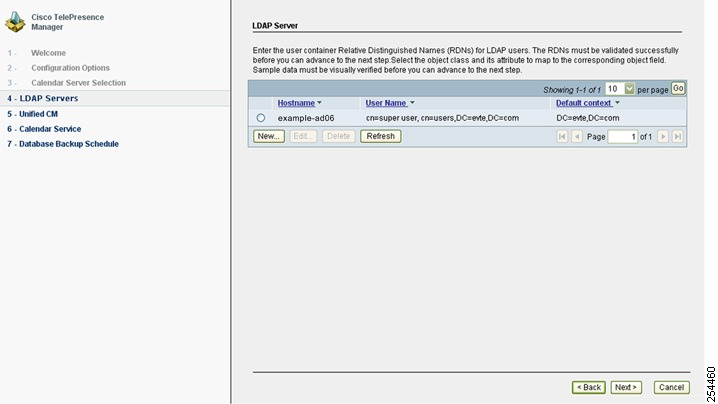
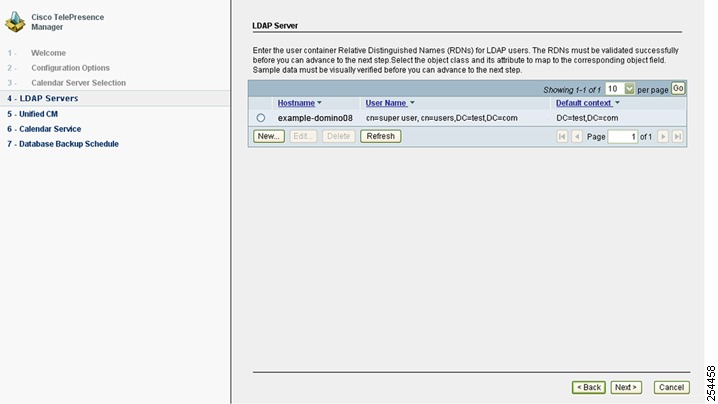
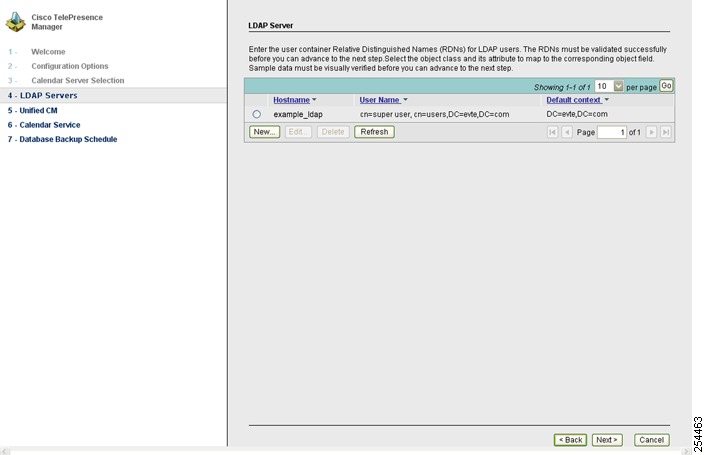
Configure LDAP Servers
Lightweight Directory Access Protocol (LDAP) is a protocol definition for accessing directories. This window provides you with the records of the LDAP servers that have been set up. To add new ones or to edit the one listed, select the record that is listed, then click either the New or Edit button. For more information about setting up LDAP servers, refer to Chapter 11 "Additional Installation Configurations for Cisco TelePresence Manager"
If you have selected the "Configure the system with PreQualification Assistant data file" option, you must select the server record and click Edit. The next window that appears gives you the setup information, you must test the connection. You have to do this with all the LDAP servers that you have configured before you can click the Next button.
To configure an LDAP Server:
Step 1
Step 2
Click the Test Connection button.
•
Step 3
Step 4
The Unified CM window appears. Go to Configure Unified CM.
Note
Figure 10-6 LDAP Server Window for Microsoft Exchange
Exchange LDAP Mappings
The following table describes the settings for the Person fields in both the New and Edit windows.
Figure 10-7 LDAP Servers Window for IBM Domino
Domino LDAP Mappings
These attributes are used by the Domino LDAP server to retrieve the user's e-mail and display name information. For most of the Domino deployments, this information does not have to be changed.
Caution
Figure 10-8 LDAP Servers Window for Scheduling API
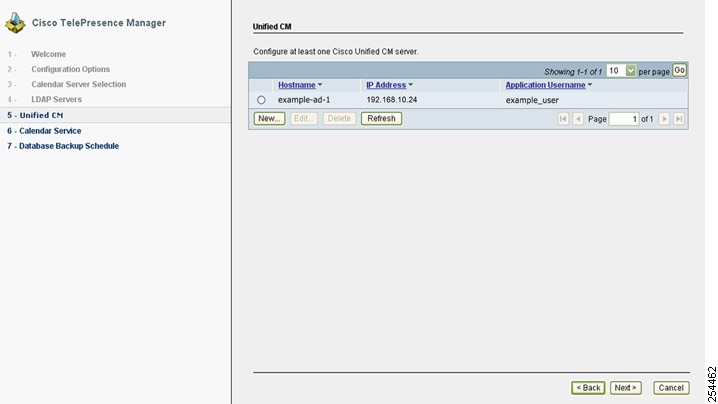
Configure Unified CM
This window allows you to add a new Cisco Unified Communications Manager (Unified CM) server or review configured Unified CM server(s) and verify their setup.
To configure Unified CM:
Step 1
Step 2
•
Step 3
Step 4
Note
The calendar server window appears. Go to Configure Calendar Server.
Figure 10-9 Unified CM Window for Microsoft Exchange
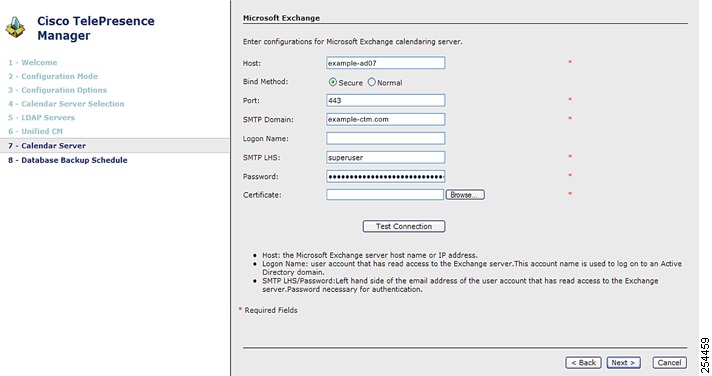
Configure Calendar Server
This window allows you to review the calendar server that was configured, make changes if needed, and verify the configuration. Microsoft Exchange and Domino calendaring server examples are shown below. For further information about calendar server configurations, refer to Chapter 11 "Additional Installation Configurations for Cisco TelePresence Manager".
To configure the calendar server:
Step 1
•
•
•
Step 2
Step 3
The Database Backup Schedule window appears. Go to Configure Database Backup Schedule.
Figure 10-10 Calendar Server Window for Microsoft Exchange
Explanation of Microsoft Exchange Fields
•
Host is the hostname or IP address of the Microsoft Exchange Server host.
•
The bind method indicates the desired level of security.
–
–
•
The default value is 80, for secure mode the value is 443.
•
This field requires a sequence of case-insensitive ASCII labels separated by dots (for example, "cisco.com")—defined for subtrees in the Internet Domain Name System and used in other Internet identifiers, such as hostnames, mailbox names, and URLs.
•
The logon username should have read access to the Exchange server and rooms (endpoints). This account name is used to logon to an Active Directory domain.
•
Left hand side of the email address of the user account that has read access to the Exchange Server. Password is necessary for authentication.
•
The user password allows access to the Microsoft Exchange Server.
•
A certificate is a digital representation of user or device attributes, including a public key, that is signed with an authoritative private key. In a self-signature, the signature can be verified using the public key contained in the certificate.
Note
If you selected Secure bind method, this value is required.
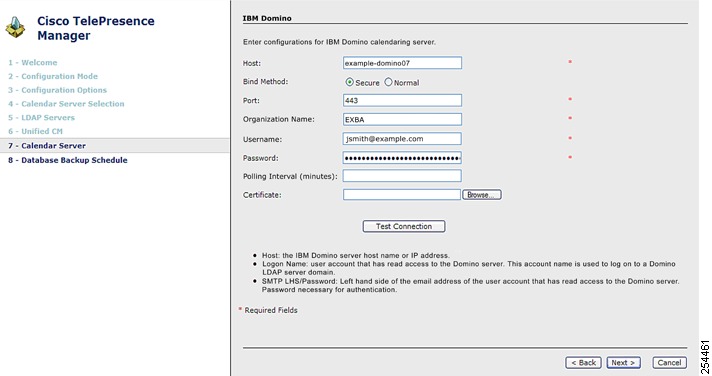
Figure 10-11 Calendar Server Window for IBM Domino
Explanation of IBM Domino Fields
•
Host is the hostname or IP address of the IBM Domino host.
•
The bind method indicates the desired level of security.
–
–
Note
•
The default value is 80.
•
This field requires a sequence of case-insensitive ASCII labels separated by dots (for example, "cisco.com")—defined for subtrees in the Internet Organization Name System and used in other Internet identifiers, such as hostnames, mailbox names, and URLs.
•
The username provides login access to the IBM Domino server.
•
The user password allows access to the IBM Domino server.
•
This is the amount of time between intervals that the CTS-Manager will poll for Calendar information. The interval times for polling are from a minimum of 1 to a maximum of 360 minutes.
•
A certificate is a digital representation of user or device attributes, including a public key, that is signed with an authoritative private key. In a self-signature, the signature can be verified using the public key contained in the certificate.
Note
Figure 10-12 Calendar Server Window for Scheduling API
Explanation of Scheduling API Fields
•
Host is the hostname or IP address scheduling API server.
•
The bind method indicates the desired level of security.
–
–
•
The default value is 80. You can use 80 or 8080.
•
The username provides login access to the calendar server.
•
The user password allows access to the calendar server.
•
A certificate is a digital representation of user or device attributes, including a public key, that is signed with an authoritative private key. In a self-signature, the signature can be verified using the public key contained in the certificate.
•
Validates Logon Name and Password against the LDAP server.
Note
If you selected Secure bind method, this value is required.
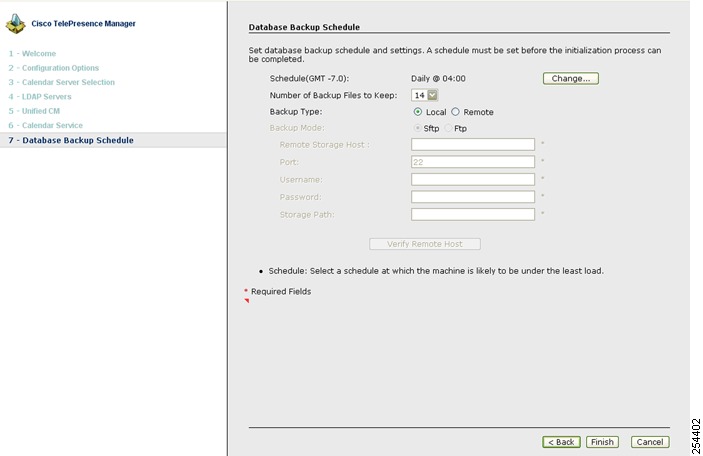
Configure Database Backup Schedule
The Database Backup Schedule window allows you to set the database backup schedule. This schedule must be set in order to complete the initialization process.
To configure the database backup schedule:
Step 1
For information about these fields, see Explanation of Database Backup Schedule Fields.
Step 2
For additional information about Database Backup, refer to Database - Status, Backup, and Restore in Chapter 11 "Additional Installation Configurations for Cisco TelePresence Manager."
Note
Step 3
The Cisco TelePresence Manager Status Dashboard window appears. Go to Dashboard for Verification of Installation Status.
Figure 10-13 Database Backup Schedule Window
Explanation of Database Backup Schedule Fields
The Cisco Unified Communications Manager uses an Informix Database server to store information. This window allows the administrator to set up regular backup operations of the database.
Note
The Database Backup Schedule window contains the following fields:
•
Click Change... to set the backup schedule. The following choices are available:
–
Enter the hour and minute, in UTC 24-hour format, for when you want your backup to begin. UTC is the atomic clock version of Universal Time (UT), formerly known as Greenwich Mean Time. Time zones around the world are expressed as positive and negative offsets from UT. For example, Midnight Pacific Standard Time (+8 UT) is 08:00 UT.
–
Choose Daily or Weekly database backups. If you choose Weekly, select the radio button beside the day of the week on which you want your backup to occur.
•
From the drop-down menu, choose the number of backup files to keep before deleting. Choices range from 1 to 14 (two week's worth of daily backups). The default is 14.
•
Choose Local or Remote to designate the server for backups. If you select Local, the backup files are stored on your local server.
If you choose Remote, you must fill in the following values for the remote server:
–
The network path to the remote Secure File Transfer Protocol (SFTP) storage host.
–
Port number designated for the backup process. The default is port 22.
–
Username for login to the remote server.
–
Password for login to the remote server.
–
The file path to the location where you want to store the backup data.
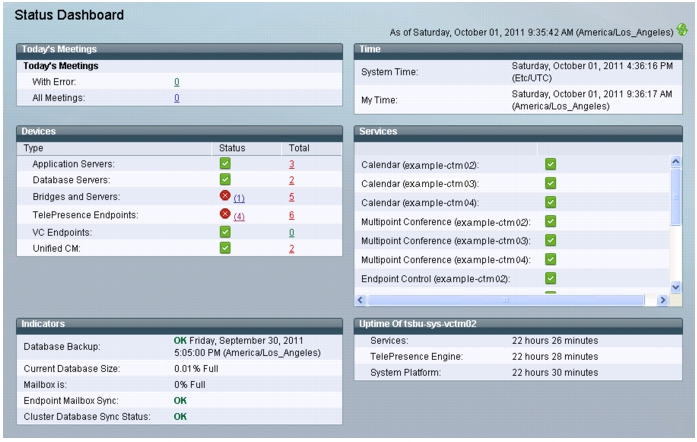
Dashboard for Verification of Installation Status
The Status Dashboard window appears after initialization is complete, allowing you to verify installation and to check the status of the system services. In the future, you can come to this window to see a snapshot of meetings that are scheduled for the day. Click highlighted links in this window for quick access to other windows that provide meeting and room(endpoint)-scheduling functions.
Figure 10-15 describes the dashboard report information. To update the reports, click Refresh.
For additional configurations and an introduction to the CTS-Manager administration software, go to Chapter 11 "Additional Installation Configurations for Cisco TelePresence Manager".
Figure 10-14 Cisco TelePresence Manager Monitor > Status Dashboard Window
Figure 10-15 Status Dashboard Report
Today's Meetings
Status of current and upcoming meetings:
•
•
Click the link associated with each meeting or device's information to go to the Meetings window.
Devices
Status information for the following devices:
•
•
Clustering Support Discontinued
Cisco no longer provides support for the clustering feature originally introduced in release 1.8.
For questions, contact Ron Lewis: ronlewis@cisco.com.•
Clustering Support Discontinued
Cisco no longer provides support for the clustering feature originally introduced in release 1.8.
For questions, contact Ron Lewis: ronlewis@cisco.com.•
•
•
Note
Indicators
Status Indicators for:
•
•
•
•
Time
Status of the following times:
•
•
Services
Status information for the following system services:
•
•
•
•
•
•
•
Status is either OK or is a highlighted link listing the number of errors. You can click a link to see further system log status information and troubleshoot problems. You can also roll your mouse over a highlighted link to see a brief description of the error.
Uptime
Status information about the elapsed running time since the last restart.
•
•
•