Cisco TelePresence Manager 1.8 Administration and Installation Guide
Configuring Microsoft Exchange for Cisco TelePresence Manager

Table Of Contents

Configuring Microsoft Exchange for Cisco TelePresence Manager

Contents

Introduction

Pre-Configuration Setup Guidelines

Configuring Microsoft Exchange for CTS-Manager

Deploying with Microsoft Exchange 2003

Deploying with Microsoft Exchange 2007 - WebDAV

Deploying with Microsoft Exchange 2007 and 2010 EWS

Exchange Migration Guide

Migrating from Exchange Server 2003 to 2007

Continue Using WebDAV Protocol

Use EWS Access

Migrating from Exchange Server 2003 to 2010

Migrating from Exchange Server 2007 to 2010

Applying CTS-Manager Throttling Policy for Exchange 2010 SP1

Throttling Policy Parameter Definitions and Values

Restoring the Microsoft Throttling Policy for Exchange 2010 SP1


Configuring Microsoft Exchange for Cisco TelePresence Manager


First Published: Nov 2, 2011, OL-22226-01

Contents

Introduction

Pre-Configuration Setup Guidelines

Configuring Microsoft Exchange for CTS-Manager

Deploying with Microsoft Exchange 2003

Deploying with Microsoft Exchange 2007 - WebDAV

Deploying with Microsoft Exchange 2007 and 2010 EWS

Exchange Migration Guide

Migrating from Exchange Server 2003 to 2007

Migrating from Exchange Server 2003 to 2010

Migrating from Exchange Server 2007 to 2010

Applying CTS-Manager Throttling Policy for Exchange 2010 SP1

Introduction

This chapter explains how to set up the Microsoft Outlook messaging software to be able to receive reminders and allow users to connect to a remote meeting site with the touch of a button.

To enable these features, you must provide CTS-Manager with the contact and access information it requires to connect to and talk with your network.

This chapter describes the steps needed to configure Microsoft Exchange 2003, 2007 and 2010.


Note CTS-Manager supports the English language version of Microsoft Exchange only.


Table 3-1

Exchange Version
Integration Method

2003

WebDav

2007

WebDav or EWS

2010

EWS


Exchange Configuration Options


Note Microsoft Exchange with Entourage client is not supported.


It is recommended that Chapter 10 "Initializing Cisco TelePresence Manager" Manager, LDAP sections be reviewed to ensure that user set up is performed correctly.

Pre-Configuration Setup Guidelines

The purpose of this section is to reference the chapters you will next need in order to preconfigure supporting software before installing the Cisco TelePresence Manager.

The flow of tasks you need to do for additional configurations before installing the CTS-Manager are provided in the following table.

Table 3-2 Microsoft Exchange Pre-Configuration Guidelines Before Installing CTS-Manager

Setup Procedures before Installing CTS-Manager
Description
Location

Configure Microsoft Exchange

This chapter describes the steps needed to configure Microsoft Exchange and Active Directory for the CTS-Manager system.

Current Chapter.

Next Steps After Microsoft Exchange Setup


Configuring Cisco Unified CM.

Before installation, you must verify that Cisco Unified Communications Manager is configured for the CTS-Manager system.

Chapter 6 "Configuring Cisco Unified Communications Manager for Cisco TelePresence Manager"

Install and Configure PreQualification Assistant

Install and run the PreQualification Assistant to ensure that your pre-installation setup is performed correctly. The data you enter into the Tool Test Configuration forms are used to verify connections to the servers and get data from them in order to configure CTS-Manager

Chapter 7 "Installing and Configuring Cisco PreQualification Assistant"


Configuring Microsoft Exchange for CTS-Manager

To configure Microsoft Exchange for CTS-Manager:

If you are using secure mode, a certificate request must exist. If a certificate was not requested when Microsoft Exchange was installed, you can follow the procedure described in the tutorial found at the following Microsoft Exchange URL:
http://www.msexchange.org/tutorials/Securing-Exchange-Server-2003
-Outlook-Web-Access-Chapter5.html

See the sections "Installing the Microsoft Certificate Service" and "Creating the Certificate Request."

Make a copy of the certificate and place it in a folder accessible to the computer with browser access to the Cisco TelePresence Manager server.


Note Only one certificate can be used. Do not reuse it or give it a new name and then try to upload it to CTS-Manager. Also, if a certificate is expired, it cannot be uploaded.


A copy of the certificate for Active Directory exists. To request a certificate for Active Directory, follow the below steps:

1. By default, the certificate file is named _.crt. An enterprise certificate authority (CA) automatically publishes the root certificates, and enterprise domain controllers automatically enroll for all domain controller certificates.

2. Make sure the certificate, the CA, and the CA web interface are all installed on the same server. Using Internet Explorer, connect to https://<CA server>/certsrv.

3. Authenticate as the administrator, making sure you specify the proper domain, for example, demotest\administrator. The Active Directory domain needs to be set to at least level 2.

4. Choose Download CA Certificate, using Distinguished Encoding Rules as the encoding method.

Deploying with Microsoft Exchange 2003

To deploy CTS-Manager with Microsoft Exchange 2003:


Step 1 Create an account in Microsoft Exchange 2003 for CTS-Manager, e.g. ctsmanaccount.

Step 2 Provide an adequate mailbox quota for the ctmmanaccount. Cisco recommends providing at least 1 GB of mailbox quota for a deployment of up to 125 Cisco TelePresence System endpoints. Additional mailbox quota is recommended if feasible.

Step 3 Log onto the ctsmanaccount account once to verify it is set up correctly.

Step 4 Create an account in Microsoft Exchange for each Cisco TelePresence System or video conferencing endpoint. You can use `Active Directory Users and Computers' to create the room (endpoint) accounts, or use any custom script to create the room account. If the room is already created, use the information from the Cisco Unified CM and skip this step.


Caution In Microsoft Exchange software, some special characters are not supported in Recipient Policy Exchange server name, mailbox name, etc. These special characters will also not be supported by CTS-Manager.
Refer to the Microsoft support site for specific information on characters:
http://support.microsoft.com/default.aspx?scid=kb;EN-US;841091
Exchange 2007 Information
http://technet.microsoft.com/en-us/library/dd285491.aspx

Step 5 Log onto the room (endpoint) account once using Outlook Web Access (OWA), or Outlook. This must be done or the room mailbox will not be set up properly in Exchange.

Step 6 The CTS-Manager account (e.g. ctsmanaccount) must have read permission on the Calendar folder for each room's mailbox. You can use Outlook to set the Calendar Properties (the Permissions tab), or use Active Directory ("Full mailbox access" permissions).

Step 7 Verify the CTS-Manager account has permissions for all room accounts.

a. Use a supported browser and log onto the room account with OWA (http://<exchange ip address>/exchange/<roomaccountname>)

b. Log on using the CTS-Manager account (e.g. ctsmanaccount)

c. Validate the setup by sending a test email to any user in the same domain. Validate the user receives the email.

Step 8 Synchronize the system clock in the CTS-Manager server to the same NTP server used by Exchange. Enter the hostname or IP address of one or more NTP servers. NTP Server 1 value is mandatory; NTP Servers 2-5 are optional. Thus, CTS-Manager and Exchange need to point to the same NTP and sync with the NTP to avoid having the room calendar not updating correctly.


Note Cisco strongly recommends that you enter the NTP server by which Cisco Unified CM synchronizes its clock as the primary NTP server. If these servers are out of synchronization, CTS-Manager may not update and delete unwanted meetings.


Cancelling a Meeting that Contains a Tentative or Proxy Room (Endpoint)

After the meeting organizer cancels a meeting, the tentative or proxy room owner must log in to room (endpoint) mailbox, and remove the meeting from the calendar.

Deploying with Microsoft Exchange 2007 - WebDAV

Microsoft Exchange management tools can be found in the start menu in the Exchange server - "Start > All Programs > Microsoft Exchange Server 2007". It is not available in version 2010. There are 2 tools available as options:

Exchange Management Console - GUI version which has online help.

Exchange Management Shell - shell version that can be useful for scripting.


Caution In Microsoft Exchange software, some special characters are not supported in Recipient Policy Exchange server name, mailbox name, etc. These special characters will also not be supported by CTS-Manager.
Exchange 2007 Information:
http://technet.microsoft.com/en-us/library/dd285491.aspxhttp://technet.microsoft.com/en-us/library/dd285491.aspx

To deploy CTS-Manager with Microsoft Exchange 2007 - WebDAV:


Step 1 Create a user account in Exchange for CTS-Manager (e.g. ctsmanaccount).

.The user account is created from "Exchange Management Console" using the User Mailbox by doing the following:

a. Select Recipient Configuration > Mailbox, right-click and select New Mailbox

b. Select User Mailbox type and follow the instructions to create the mailbox.

Step 2 Provide an adequate mailbox quota for the ctsmanaccount account. Cisco recommends providing at least 1 GB of mailbox quota for a deployment of up to 125 Cisco TelePresence System endpoints. Additional mailbox quota is recommended, if feasible.

Step 3 Log onto the CTS-Manager mailbox once to verify the user mailbox is set up correctly.

Step 4 If a new endpoint needs to be added, the Admin needs to create the room (endpoint) in the Calendaring server first with appropriate permissions for the CTS-Manager application account and then create associated device(s) in Unified CM. If admin ends up creating a device in Unified CM beforehand, then the endpoint would appear in error in CTS-Manager. Once the room (endpoint) is configured in the calendaring server, the admin can resync the endpoint in CTS-Manager to resolve the error.

Step 5 Create an account in Exchange for each Cisco TelePresence System or video conferencing endpoint. Use one of the following methods:

a. In Exchange Management Console (EMC), select Recipient Configuration > Mailbox, right-click and select New Mailbox. Select Room Mailbox type and follow the instructions to create the mailbox.

b. Run the Exchange Management Shell (EMS) cmdlet to create a Room mailbox / account.

Step 6 The CTS-Manager account needs to have full access on the Calendar folder of each room (endpoint) mailbox, or at minimum, read permission. Using EMS, run one of the two cmdlets in the following based on your preference:

a. Add-mailboxpermission -identity "TelepresenceRoom9" -accessRights FullAccess -user ctmperf\ctsmanaccount

b. Add-mailboxpermission -identity "TelepresenceRoom9" -accessRights ReadPermission -user ctmperf\ctsmanaccount

You can check the current permission setting of a Room by running one of the following cmdlets:

Get-mailbox -server tsbu-ctmpc19 | get-mailboxpermission

Get-mailboxpermission -identity TelepresenceRoom9

Step 7 Set the DeleteSubject and AddOrganizerToSubject properties in the room mailbox calendar to False. This sets the parameters for the meeting to be displayed on the IP Phone.

a. Set-MailboxCalendarSettings -Identity TelepresenceRoom9 -DeleteSubject $false

b. Set-MailboxCalendarSettings -Identity TelepresenceRoom9 -AddOrganizerToSubject $false

Step 8 It is recommended to set Auto-accept to ON using EMS.

Note This works only with room mailbox, not with user mailbox. Also CTS-Manager will not process meetings that are tentative. Meetings that are accepted if Microsoft AAA Agent is off will only access proxy if accepted.

Set-MailboxCalendarSettings -Identity TelepresenceRoom9 -AutomateProcessing AutoAccept

c. Check if Auto-accept has been configured for the room.

Get-MailboxCalendarSettings -Identity TelepresenceRoom9 | fl


Note Cisco recommends to not switch the room (endpoint) mailbox acceptance mode once it is set. If it is configured to auto-accept and then switched to manual proxy mode, the meeting will not appear in CTS-Manager nor will it be pushed to the phone UI. The user will have to manually accept the meeting again.


Step 9 Log onto the room mailbox once using Outlook Web Access (OWA) or Outlook 2007. This important step ensures the room mailbox is set up correctly in MS Exchange. In Exchange 2007, you won't be able to directly log onto the room* mailbox using the room username, because the user account of the room mailbox is disabled by default. There are two possible scenarios (based on the decision made in step 5):

Note *Only when mailbox is created as the Room Mailbox type. If mailbox is created as "User Mailbox" type, then it would be the same step as it is with Exchange 2003 to log on to the mailbox.

a. The CTS-Manager user (e.g. ctsmanaccount) has been given full access to the room (endpoint) mailboxes. In this case, use the ctsmanaccount credentials to log on to each room mailbox.

First log into ctsmanaccount mailbox using OWA, using a supported web browser (IE 6.x) and typing: http://<exchange ip address>/owa/. Once logged on as the ctsmanaccount user, click the ctsmanaccount tab on the top, enter the room account name, and click Open. It would open the room mailbox in another window.

Alternatively, you can log onto the room (endpoint) account using either Outlook 2007 or Outlook Web Access:
http://<exchange ip address>/owa/<endpoint_name@domain_name>. Again, here you will need to log on using the ctsmanaccount credentials.

b. The second scenario is where the ctsmanaccount was only given read permission to the room(endpoint) mailboxes. In this case, you must have a third user account which has full access to the room mailboxes, let's say this user is "Joe Smith." Use Joe Smith credential to log on to his mailbox using Outlook 2007, then follow the these steps:

i. Once logged on, click Calendar in the left pane.

ii Click Open a Shared Calendar and enter the room (endpoint) name.

iii The room calendar appears under People's Calendar in the left pane. Right-click the room name, and select Properties.

iv. Click Permissions tab

v. Click Add and select the ctsmanaccount account name.

vi. In the Permissions > Permission Level drop-down field, select Reviewer.

vii.In the Permissions > Read section, check Full Details.

viii. Click OK.

ix. Repeat step ii to viii for each room that will be managed by CTS-Manager.

Step 10 Form-based authentication (FBA) is enabled by default in Exchange 2007. For Cisco TelePresence Manager to work, you must disable FBA.

a. Go to EMC > Server Configuration > Client Access > Outlook Web Access > Exchange (Default Web Site) > Properties > Authentication tab.

b. Select Use one or more standard authentication method.

c. Check Integrated Windows Authentication and/or Basic Authentication (password is sent in clear text) boxes.

d. Click OK in the warning message that says IIS restart is required.

e. Run iisreset /noforce from a command prompt, or go to Services Manager and restart IIS Admin service.

Step 11 Open IIS Manager and enable WebDAV.

For Exchange 2007 installed on Windows 2003:

a. Go to Internet Information Services > [server_name] > Web Service Extension

b. Select WebDAV and click the Allow button, if it is showing "Prohibited" for its status.

a. Click the Allow button, if it is showing Prohibited in Status.

For Exchange 2007 installed on Windows 2008:

Refer to the following information from Microsoft on how to configure WebDAV for IIS7:

http://technet.microsoft.com/en-us/library/cc431377.aspx#Install_WebDAV


Note WebDAV is not available for IIS6.


Step 12 Verify that the Web Sites Authentication Method is configured correctly for Exchange website.


Note If using EWS Authentication with CTS-Manager 1.6.2 or earlier: Only Integrated Windows Authentication (NTLM) v1 authentication is supported. Please ensure that NTLMv1 authentication scheme is enabled for EWS site.


Step 13 Repeat these steps for the "Default Web Site" setting:

a. In IIS Manager, go to Internet Information Services > [server_name] > Web Sites > Exchange

b. Right-click Exchange and select Properties.

c. Go to the Directory Security tab

d. In the Authentication and access control section:

Click the Edit button

Check the desired authentication access method - Integrated Windows Authentication and/or Basic Authentication (password is sent in clear text) boxes.

Click OK

e. This step is required only if you need to configure CTS-Manager with the non-secure binding to the Exchange server. In the Secure communications section:

Click the Edit button

Uncheck the Require secure channel (SSL) box, and click OK.

f. Click OK on all the dialog boxes that follow.

Step 14 Synchronize the system clock in the CTS-Manager server to the same NTP server used by Exchange. Enter the hostname or IP address of one or more NTP servers. NTP Server 1 value is mandatory; NTP Servers 2-5 are optional. Thus, CTS-Manager and Exchange need to point to the same NTP and sync with the NTP to avoid having the room calendar not updating correctly.


Note Cisco strongly recommends that you enter the NTP server by which Cisco Unified CM synchronizes its clock as the primary NTP server. If these servers are out of synchronization, CTS-Manager may not update and delete unwanted meetings.


CTS-Manager and Microsoft Exchange server automatically renew subscriptions every 40 minutes. If there are any changes for room status in Exchange, the CTS-Manager will not be notified of the change until that 40 minute update time. The exception is if CTS-Manager is forced to sync with the Exchange server by either doing a reboot or a restart.

Deploying with Microsoft Exchange 2007 and 2010 EWS

Microsoft Exchange 2007 management tools can be found in the start menu in the Exchange server - Start > All Programs > Microsoft Exchange Server 2007. There are two tools available:

Exchange Management Console - GUI version which has online help.

Exchange Management Shell - shell version that can be useful for scripting.


Caution In Microsoft Exchange software, some special characters are not supported in the Recipient Policy Exchange server name, mailbox name, etc. These special characters are also not be supported by CTS-Manager.
Exchange 2007 Information:
http://technet.microsoft.com/en-us/library/dd285491.aspx

To deploy CTS-Manager with Microsoft Exchange 2007 and 2010 EWS:


Step 1 Create a user account in Exchange for CTS-Manager (e.g. ctsmanaccount).

The user account is created from "Exchange Management Console" using the User Mailbox by doing the following:

a. Select Recipient Configuration > Mailbox, right-click and select New Mailbox

b. Select User Mailbox type and follow the dialog to create the mailbox.


Caution If the CTS-Manager user logon name is different from the LHS of the email ID and there is no matching email ID for the user, Microsoft Exchange EWS will fail the mailbox quota test. To avoid this, add a secondary email ID that uses the CTS-Manager logon name as the LHS of the email ID appended with the SMTP domain.

Step 2 Provide an adequate mailbox quota for the ctsmanaccount. Cisco recommends providing at least 1 GB of mailbox quota for a deployment of up to 125 Cisco TelePresence System endpoints. Additional mailbox quota is recommended, if feasible.

Step 3 Log onto the CTS-Manager mailbox once to verify the user mailbox is set up correctly.

Step 4 If a new endpoint needs to be added, the Admin needs to create the room in the calendaring server first with appropriate permissions for the CTS-Manager application account and then create associated device(s) in Unified CM. If the admin creates devices in Unified CM beforehand, then the endpoint would appear in error in CTS-Manager. Once the room is configured in the calendaring server, the admin can resync the endpoint in CTS-Manager to resolve the error.

Step 5 Create an account in Exchange for each Cisco TelePresence System or video conferencing endpoint. Use one of the following methods:

a. In Exchange Management Console (EMC), select Recipient Configuration > Mailbox, right-click and select New Mailbox. Select Room Mailbox type and follow the dialogs to create the mailbox.

b. Run the Exchange Management Shell (EMS) cmdlet to create a room mailbox / account.

Step 6 The CTS-Manager account needs to have full access on the Calendar folder of each room mailbox, or at minimum it needs to have read permission. Using EMS, run one of the two cmdlets in the following based on your preference:

a. Add-mailboxpermission -identity "TelepresenceRoom9" -accessRights FullAccess -user ctmperf\ctsmanaccount

b. Add-mailboxpermission -identity "TelepresenceRoom9" -accessRights ReadPermission -user ctmperf\ctsmanaccount

You can check the current permission setting of a Room by running one of the following cmdlets:

Get-mailbox -server example-ctmpc19 | get-mailboxpermission

Get-mailboxpermission -identity TelepresenceRoom9

Step 7 Set the "DeleteSubject" and "AddOrganizerToSubject" properties in room mailbox calendar to False. This sets the parameters for the meeting to be displayed on the IP Phone.

For Exchange 2007:

a. Set-MailboxCalendarSettings -Identity TelepresenceRoom9 -DeleteSubject $false

b. Set-MailboxCalendarSettings -Identity TelepresenceRoom9 -AddOrganizerToSubject $false

For Exchange 2010:

a. Set-CalendarProcessing -Identity "room5" -DeleteSubject $false

b. Set-CalendarProcessing -Identity "room5" -AddOrganizerToSubject $false

Step 8 It is recommended to set Auto-accept to ON using EMS.

Note This works only with room mailbox, not with user mailbox. Also CTS-Manager will not process meetings that are tentative. Meetings that are accepted if Microsoft AAA Agent is off will only access proxy if accepted.

For Exchange 2007:

Set-MailboxCalendarSettings -Identity TelepresenceRoom9 -AutomateProcessing AutoAccept

For Exchange 2010:

Set-CalendarProcessing -Identity "room1" -AutomateProcessing AutoAccept

c. Check if Auto-accept has been configured for the room (endpoint).

Get-MailboxCalendarSettings -Identity TelepresenceRoom9 | fl


Note It is recommended not to switch room (endpoint) mailbox acceptance mode once set. If it is configured auto-accept then switched to manual proxy mode the meeting does not show up in CTS-Manager Web UI nor is it pushed to the phone UI. The user will have to manually re-accept the meeting.


Step 9 Log onto the room (endpoint) mailbox once using Outlook Web Access (OWA) or Outlook 2007. This is an important step, as room mailbox will not be setup appropriately in MS Exchange. In Exchange 2007, you won't be able to directly log on to the room* mailbox using the room username, because the user account of the room mailbox is disabled by default. There are 2 possible scenarios (based on the decision made in step 5):

Note *Only when mailbox is created as "Room Mailbox" type. If mailbox is created as "User Mailbox" type, then it would be the same step as it is with Exchange 2003 to log onto the mailbox.

a. The CTS-Manager user (e.g. ctsmanaccount) has been given full access to the room mailboxes. In this case, use ctsmanaccount credential to log onto each room (endpoint) mailbox.

First log into ctsmanaccount mailbox using OWA, using a supported web browser (IE 6.x) and typing: http://<exchange ip address>/owa/. Once logged on as ctsmanaccount user, click the ctsmanaccount tab at the top, enter the room account name, and click Open. The room (endpoint) mailbox opens in another window.

Alternatively, you can log on to the room (endpoint) account using either Outlook 2007 or Outlook Web Access:
http://<exchange ip address>/owa/<endpoint_name@domain_name>. Again, here you will need to log on using the ctsmanaccount credential.

b. The second scenario is where the ctsmanaccount was only given read permission to the room(endpoint) mailboxes. In such case, you need to have a third user account which has "full access" to the room (endpoint) mailboxes, let's say this user is "Joe Smith." Use Joe Smith credential to log onto his mailbox using Outlook 2007, then follow the below steps:

i. Once logged on, click Calendar in the left pane.

ii Click Open a Shared Calendar and enter the room (endpoint) name.

iii The room calendar would show up under People's Calendar on the left pane. Right-click the room(endpoint) name, and select Properties.

iv. Click Permissions tab

v. Click Add and select ctsmanaccount account name.

vi. In Permissions > Permission Level drop-down field, select Reviewer.

vii.In Permissions > Read section, check Full Details.

viii. Click OK.

ix. Repeat step ii to viii for each endpoint that will be managed by CTS-Manager.

Step 10 Verify that the Web Sites Authentication Method is configured correctly for "EWS" web site.

Step 11 Repeat these steps for the "Default Web Site" setting:

a. In "IIS Manager," go to "Internet Information Services" > [server_name] > "Web Sites" > "EWS"

b. Right-click the EWS and select Properties.

c. Go to the Directory Security tab

d. In the Authentication and access control section:

Click the Edit button

Check the desired authentication access method - Integrated Windows Authentication and/or Basic Authentication (password is sent in clear text) boxes.

Click OK

e. This step is required only if you need to configure CTS-Manager with the non-secure binding to the Exchange server. In the Secure communications section:

Click the Edit button

Uncheck the Require secure channel (SSL) box, and click OK.

f. Click OK on all the dialog boxes that follow.

Step 12 Synchronize the system clock in the CTS-Manager server to the same NTP server used by Exchange. Enter the hostname or IP address of one or more NTP servers. NTP Server 1 value is mandatory; NTP Servers 2-5 are optional. Thus, CTS-Manager and Exchange need to point to the same NTP and sync with the NTP to avoid having the room calendar not updating correctly.


Note Cisco strongly recommends that you enter the NTP server by which Cisco Unified CM synchronizes its clock as the primary NTP server. If these servers are out of synchronization, CTS-Manager may not update and delete unwanted meetings.


Step 13 If you installed Exchange 2010 SP1, you must apply the CTS-Manager Throttling Policy for Exchange 2010 SP1. For more information, see: Applying CTS-Manager Throttling Policy for Exchange 2010 SP1.


CTS-Manager and Microsoft EWS server automatically renew subscriptions every 20 minutes. If there are any changes for room status in EWS, the CTS-Manager will not be notified of the change until that 20 minute update time. The exception is if CTS-Manager is forced to sync with the EWS server by either doing a reboot or a restart.

Cancelling a Meeting that Contains a Tentative or Proxy Room (Endpoint)

After the meeting organizer cancels a meeting, tentative or proxy room owners may have to log in to the room (endpoint) calendar and remove the meeting from the calendar:

If the Autoprocessing parameter for the room (endpoint) is set to `None', the tentative or proxy room owner must log in to the room (endpoint) mailbox, and remove the meeting from the calendar.

If the Autoprocessing parameter for the room (endpoint) is set to `AutoUpdate', no action is required by the tentative or proxy room owner, because the meeting is automatically removed when the meeting organizer cancels the meeting.

Exchange Migration Guide

CTS-Manager integrates with Exchange Server 2003, Exchange Server 2007 and Exchange Server 2010. This section highlights the steps required in CTS-Manager when an existing Exchange Server is upgraded. Please refer to official Microsoft documentation on how to:

Migrate Exchange Server from a previous release to a newer version

Set up Client Access Server (CAS) against previous version mailbox server

Migrating from Exchange Server 2003 to 2007

CTS-Manager accesses Exchange Server 2003 via the WebDAV protocol. This protocol is supported by Exchange Server 2007. In addition, Microsoft has introduced a new access method via Exchange Web Service (HTTP/SOAP) protocol.

Microsoft does not support in-place upgrade from Exchange Server 2003 to 2007. A separate Exchange Server 2007 must be installed and data can be migrated over time. Depending on the size of your installation, this process can take from hours to months. For more information, refer to the following documentation from Microsoft: http://technet.microsoft.com/en-us/library/bb124008%28EXCHG.80%29.aspx

There are 2 possible migration paths for CTS-Manager:

Continue Using WebDAV Protocol

Use EWS Access

Continue Using WebDAV Protocol

If the CTS-Manager version is earlier than 1.6, this is the only upgrade path available.

To migrate to Exchange 2007 and continue using WebDAV:


Step 1 Set up Exchange Server 2007.

Step 2 Identify the CAS server to which CTS-Manager will integrate.

Step 3 Shut down CTS-Manager.

Step 4 Migrate CTS-Manager account mailbox to 2007 mailbox server at the minimum.


Note Cisco recommends migrating all TelePresence room (endpoint) mailboxes.


Step 5 Start up CTS-Manager.

Step 6 Log in to CTS-Manager.

Step 7 Go to Configure > Microsoft Exchange.

The connection to Exchange may be down. This is expected.

Step 8 Enter the connection parameters identified in step 2, click Test Connection and make sure that the test is successful.

Step 9 Click the Apply button and wait for CTS-Manager to sync up the data from all of the TelePresence mailboxes. This could take from few minutes to a few hours depending on the size of your deployment.


Note Please note that for step 4, if the downtime of CTS-Manager exceeds your company policy about permissible downtime, only the CTS-Manager account mailbox needs to be migrated. The TelePresence room (endpoint) mailboxes can still reside in Exchange 2003 Mailbox server. Ensure that those mailboxes are accessible from the CAS server identified in step 2. Please consult Microsoft documentation on how to set up a CAS server against a previous version's mailbox


Use EWS Access

This upgrade path is only available for CTS-Manager release 1.6 or later.

Upgrading CTS-Manager to the new EWS mode is recommended for the following reasons:

Microsoft discontinued official support for the WebDAV protocol. An extension to the support agreement is required.

EWS is a more secure implementation. CTS-Manager in EWS mode supports basic and integrated Windows authentication (NTLMv1 in CTS-Manager 1.6.2 or earlier, NTLM v1 and v2 in CTS-Manager 1.6.3 or later and NTLMv2 session in CTS-Manager 1.7.2 or later).

EWS is more scalable.

EWS ensures an easier future upgrade. In Exchange 2010, the WebDAV access to Exchange server has been disabled.

To migrate to Exchange 2007 and continue using EWS:


Step 1 Set up Exchange Server 2007.

Step 2 Identify the CAS server to which CTS-Manager will integrate.

Step 3 Shut down CTS-Manager.

Step 4 Migrate the CTS-Manager account mailbox to the 2007 mailbox server. Cisco recommends to also migrate all TelePresence room (endpoint) mailboxes.

Step 5 Start CTS-Manager.

Step 6 Log in to CTS-Manager

Step 7 Go to the Configure > Microsoft Exchange window.

The connection to Exchange may be down. This is expected.

Step 8 Click Configure EWS. The MS Exchange Web Services window appears. See Figure 3-1.

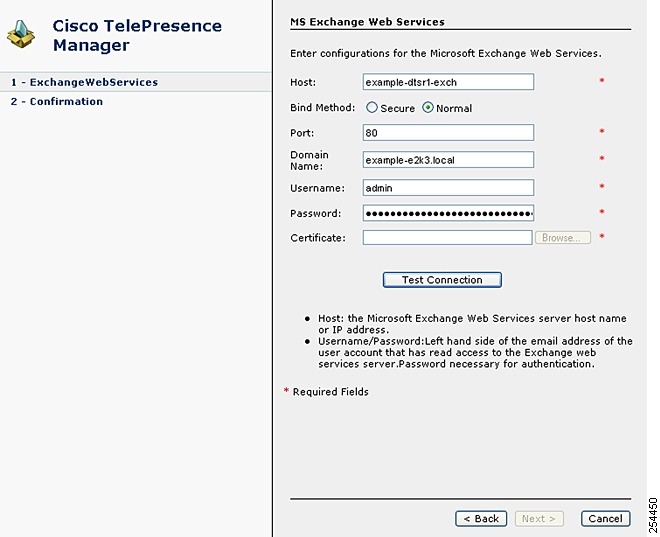
Figure 3-1 Configure EWS Window

Step 9 In the MS Exchange Web Services window, enter the connection parameters identified in step 2, click Test Connection and make sure that the test is a success.

Step 10 Click the Apply button and wait for CTS-Manager to sync up the data from all of the TelePresence mailboxes. This could take from a few minutes to a few hours depending on the size of your deployment.


Migrating from Exchange Server 2003 to 2010

Exchange Server 2010 discontinued WebDAV access; therefore CTS-Manager must be configured in EWS mode before the upgrade process.

Use the following procedure to migrate from Exchange 2003 to Exchange 2010:


Step 1 Install and configure the Exchange 2010 server.

Step 2 In CTS-Manager, go to Configure > Microsoft Exchange.

Step 3 Click the Configure EWS button in the right pane, enter and apply the Exchange 2010 CAS server configuration information.

Step 4 If running in secure mode, add the 2010 CAS server certificate.

Step 5 Click Test Connection and then click Apply.

CTS-Manager will sync all rooms.

Step 6 Shut down the CTS-Manager server.

This is important so that users do not use CTS-Manager during migration.

Step 7 Migrate all Cisco TelePresence endpoints to the Exchange 2010 server.

Verify that all Cisco TelePresence endpoints are of the type "RoomMailbox."

This is required for Auto-Accept to be enabled.

After the migration is complete, add full access permission for the delegates to any proxy.

Step 8 If you installed Exchange 2010 SP1, you must apply the CTS-Manager Throttling Policy for Exchange 2010 SP1. For more information, see: Applying CTS-Manager Throttling Policy for Exchange 2010 SP1.


Migrating from Exchange Server 2007 to 2010

Support for Exchange 2010 is introduced in release 1.7. This upgrade path is only available for CTS-Manager release 1.7 or later.

The migration path depends on how CTS-Manager is configured to access Exchange Server 2007.

WebDAV mode

EWS mode

Use the following procedure to migrate from Exchange 2007 to Exchange 2010:


Step 1 Install and configure the Exchange 2010 server.

Step 2 If CTS-Manager is running in 2007 WebDAV mode, configure EWS (see Deploying with Microsoft Exchange 2007 and 2010 EWS.) and move to 2007 EWS. If CTS-Manager is already running in EWS mode, go to step 3.

Step 3 Shut down CTS-Manager.

Step 4 Migrate the CTS-Manager account mailbox to the 2010 mailbox server.

Step 5 Set the Throttling policy for 2010 (see Applying CTS-Manager Throttling Policy for Exchange 2010 SP1).

Step 6 Move the Exchange 2007 rooms to Exchange 2010.


Note Cisco recommends migrating all TelePresence room mailboxes.


Step 7 Make sure the CTS-Manager account has full permission to the 2010 room mailboxes.

Step 8 Identify the 2010 CAS server to which CTS-Manager will integrate.

Step 9 Start up CTS-Manager.

Step 10 Log in to CTS-Manager.

Step 11 Go to Configure > Microsoft Exchange and click the Configuration tab.

Step 12 Change the Exchange server to 2010 CAS server.

Step 13 If running in secure mode, add the 2010 CAS server certificate.

Step 14 Click Test Connection and then click Apply.

Step 15 CTS-Manager will sync all rooms.


Applying CTS-Manager Throttling Policy for Exchange 2010 SP1

With Exchange 2010 SP1 update, Microsoft has enabled the client throttling policy feature by default. For more information, refer to: http://technet.microsoft.com/en-us/library/dd297964.aspx

If there's no throttling policy already configured, Microsoft will apply a default policy to all users. The default throttling policy is tailored for end-user load and not for an enterprise application like CTS-Manager.

In order for all CTS-Manager features to work, a custom throttling policy must be applied to the CTS-Manager application user.


Note This throttling policy is required for Exchange 2010 SP1.


To apply the CTS-Manager Throttling Policy for Exchange 2010 SP1:


Step 1 Log in to the CAS server for Exchange 2010.

Step 2 Open Exchange Management Shell application.

Step 3 Create a custom throttling policy:

a. Run > New-ThrottlingPolicy Cisco_CTSManager_ThrottlingPolicy

b. Run > Set-ThrottlingPolicy -Identity Cisco_CTSManager_ThrottlingPolicy -EWSFastSearchTimeoutInSeconds 300 -EWSFindCountLimit 6000 -EWSMaxConcurrency $null -EWSMaxSubscriptions 5000 -EWSPercentTimeInAD 200 -EWSPercentTimeInMailboxRPC 300 -EWSPercentTimeInCAS 500

Step 4 Assign the policy to CTS-Manager application user

a. Run > $b = Get-ThrottlingPolicy Cisco_CTSManager_ThrottlingPolicy

b. Run > Set-Mailbox -Identity <superuser account> -ThrottlingPolicy $b


Note If you encounter any errors after applying the CTS-Manager throttling policy, you can revert back to the Microsoft throttling policy. For more information, refer to: Restoring the Microsoft Throttling Policy for Exchange 2010 SP1.


Throttling Policy Parameter Definitions and Values

The default values used in the above steps satisfy most CTS-Manager deployments. If your deployment requires adjustments, you can adjust the Set-ThrottlingPolicy values and rerun step 3b above.


Caution Please contact the Cisco TelePresence support team before adjusting any of the default values.

The following tables describe the policy parameters and values for the Set-Throttling Policy command of Exchange 2010 SP1 for the following deployments:

Throttling Policy Parameters for 300 or Fewer Rooms

Throttling Policy Parameters for More than 300 Rooms

.

Table 3-3 Throttling Policy Parameters for 300 or Fewer Rooms 

Name
Description
CTS-Manager Default Policy Value
Note

EWSFastSearchTimeoutInSeconds

The length, in seconds, of an Exchange Web Services search before it times out. If the length of the search exceeds the specified value, the search ends, and the system returns an error.

300

Each CTS-Manager call has a default time out of 180 second. 300 is granted since each call could be phased out.

EWSFindCountLimit

The maximum number of FindItem or FindFolder requests that the CAS memory can store for the CTS-Manager application user. If the maximum number exceeds the specified value, the system returns an error.

Requests made for an indexed page view are an exception. In this case, search results include only the number of items allowed by the policy limit. Results that are not currently viewable by the user can be accessed using FindItem or FindFolder requests.

6000

This parameter governs the maximum number of entries for all requests combined at a given time.

CTS-Manager only requests for 200 entries to be returned

EWSMaxConcurrency

The maximum number of connections between an Exchange Web Services user and an Exchange server. (A connection begins when a connection request is received and ends after the entire response is sent.) If the maximum number of connections between the two entities is reached, the existing connections are unaffected, but any subsequent connection requests from the user are denied.

The valid range is 0 through 2147483647 inclusive.

500

Due to the nature of EWS notification, you can't measure the number of concurrent requests. $null value is required to indicate that no throttling is necessary for this criteria.

EWSPercentTimeInAD

The portion of each minute, expressed as a percentage, that an Exchange Web Services user can dedicate to handling LDAP requests. For example, if you specify 100, the Exchange Web Services user can spend 100 percent of each minute on LDAP requests.

200

The value is higher than 100 since this counts for all concurrent requests at any given time.

EWSPercentTimeInMailboxRPC

The portion of each minute, expressed as a percentage, that an Exchange Web Services user can dedicate to handling mailbox remote procedure call (RPC) requests.

300

The value is higher than 100 since it counts for all concurrent requests at any given time.

EWSPercentTimeInCAS

The portion of each minute, expressed as a percentage, that an Exchange Web Services user can dedicate to handling CAS code.

500

The value is higher than 100 since this counts for all concurrent requests at any given time.

EWSMaxSubscriptions

The maximum number of active push and pull subscriptions that the CAS can store for a particular user. If the maximum number of subscriptions is reached, any subsequent subscription requests will fail and an event will be recorded in the Event Viewer log.

5000

This number should be set to (2 * the number of managed endpoints). Please allocate a number that allows for future growth.


Table 3-4 Throttling Policy Parameters for More than 300 Rooms 

Name
Description
CTS-Manager Default Policy Value
Note

EWSFastSearchTimeoutInSeconds

The length, in seconds, of an Exchange Web Services search before it times out. If the length of the search exceeds the specified value, the search ends, and the system returns an error.

$null

Each CTS-Manager call has a default time out of 180 second. 300 is granted since each call could be phased out.

EWSFindCountLimit

The maximum number of FindItem or FindFolder requests that the CAS memory can store for the CTS-Manager application user. If the maximum number exceeds the specified value, the system returns an error.

Requests made for an indexed page view are an exception. In this case, search results include only the number of items allowed by the policy limit. Results that are not currently viewable by the user can be accessed using FindItem or FindFolder requests.

$null

This parameter governs the maximum number of entries for all requests combined at a given time.

CTS-Manager only requests for 200 entries to be returned

EWSMaxConcurrency

The maximum number of connections between an Exchange Web Services user and an Exchange server. (A connection begins when a connection request is received and ends after the entire response is sent.) If the maximum number of connections between the two entities is reached, the existing connections are unaffected, but any subsequent connection requests from the user are denied.

The valid range is 0 through 2147483647 inclusive.

$null

Due to the nature of EWS notification, you can't measure the number of concurrent requests. $null value is required to indicate that no throttling is necessary for this criteria.

EWSPercentTimeInAD

The portion of each minute, expressed as a percentage, that an Exchange Web Services user can dedicate to handling LDAP requests. For example, if you specify 100, the Exchange Web Services user can spend 100 percent of each minute on LDAP requests.

$null

The value is higher than 100 since this counts for all concurrent requests at any given time.

EWSPercentTimeInMailboxRPC

The portion of each minute, expressed as a percentage, that an Exchange Web Services user can dedicate to handling mailbox remote procedure call (RPC) requests.

$null

The value is higher than 100 since it counts for all concurrent requests at any given time.

EWSPercentTimeInCAS

The portion of each minute, expressed as a percentage, that an Exchange Web Services user can dedicate to handling CAS code.

$null

The value is higher than 100 since this counts for all concurrent requests at any given time.

EWSMaxSubscriptions

The maximum number of active push and pull subscriptions that the CAS can store for a particular user. If the maximum number of subscriptions is reached, any subsequent subscription requests will fail and an event will be recorded in the Event Viewer log.

$null

This number should be set to (2 * the number of managed endpoints). Please allocate a number that allows for future growth.


Restoring the Microsoft Throttling Policy for Exchange 2010 SP1

If for any reason, you encounter errors applying the CTS-Manager throttling policy for Exchange 2010 SP1, you can revert back to the default Microsoft throttling policy.

To restore the Microsoft throttling policy for Exchange 2010 SP1:


Step 1 Log in to the CAS server for Exchange 2010.

Step 2 Open Exchange Management Shell application.

Step 3 Remove Throttling policy association from CTS-Manager application user:

Run > Set-Mailbox -Identity <superuser account> -ThrottlingPolicy $null

Step 4 Remove the custom policy:

Run > Remove-ThrottlingPolicy Cisco_CTSManager_ThrottlingPolicy