-
Cisco ASA 5500 Series Configuration Guide using the CLI, 8.2
-
About This Guide
-
Glossary
- Getting Started and General Information
- Configuring Access Lists
- Configuring IP Routing
- Configuring NAT
- Configuring High Availability
- Configuring Access Control
- Configuring Application Layer Procotol Inspection
- Configuring Unified Communications
- Configuring Advanced Connection Settings
- Configuring Applications on SSMs and SSCs
-
Configuring VPN
-
Configuring IPSec and ISAKMP
-
Configuring L2TP over IPSec
-
Setting General VPN Parameters
-
Configuring Tunnel Groups, Group Policies, and Users
-
Configuring IP Addresses for VPN
-
Configuring Remote Access VPNs
-
Configuring Network Admission Control
-
Configuring Easy VPN on the ASA 5505
-
Configuring the PPPoE Client
-
Configuring LAN-to-LAN VPNs
-
Configuring Clientless SSL VPN
-
Configuring AnyConnect VPN Client Connections
-
Configuring Certificates
-
- Monitoring
- System Administration
- Reference
-
 Feedback
Table Of Contents
Configuring Cisco Unified Presence
Information About Cisco Unified Presence
Architecture for Cisco Unified Presence
Trust Relationship in the Presence Federation
Security Certificate Exchange Between Cisco UP and the Security Appliance
Licensing for Cisco Unified Presence
Configuring Cisco Unified Presence
Task Flow for Configuring Cisco Unified Presence
Creating Trustpoints and Generating Certificates
Creating the TLS Proxy Instance
Enabling the TLS Proxy for SIP Inspection
Monitoring Cisco Unified Presence
Configuration Example for Cisco Unified Presence
Feature History for Cisco Unified Presence
Configuring Cisco Unified Presence
This chapter describes how to configure the adaptive security appliance for Cisco Unified Presence.
This chapter includes the following sections:
•
Information About Cisco Unified Presence
•
•
•
•
•
Information About Cisco Unified Presence
This section includes the following topics:
•
•
•
Architecture for Cisco Unified Presence
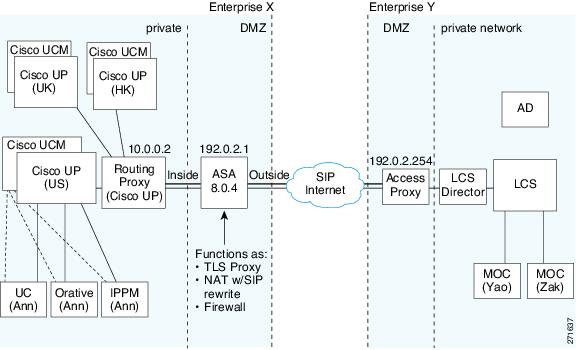
Figure 49-1 depicts a Cisco Unified Presence/LCS Federation scenario with the ASA as the presence federation proxy (implemented as a TLS proxy). The two entities with a TLS connection are the "Routing Proxy" (a dedicated Cisco UP) in Enterprise X and the Microsoft Access Proxy in Enterprise Y. However, the deployment is not limited to this scenario. Any Cisco UP or Cisco UP cluster could be deployed on the left side of the ASA; the remote entity could be any server (an LCS, an OCS, or another Cisco UP).
The following architecture is generic for two servers using SIP (or other ASA inspected protocols) with a TLS connection.
Entity X: Cisco UP/Routing Proxy in Enterprise X
Entity Y: Microsoft Access Proxy/Edge server for LCS/OCS in Enterprise Y
Figure 49-1 Typical Cisco Unified Presence/LCS Federation Scenario
In the above architecture, the ASA functions as a firewall, NAT, and TLS proxy, which is the recommended architecture. However, the ASA can also function as NAT and the TLS proxy alone, working with an existing firewall.
Either server can initiate the TLS handshake (unlike IP Telephony or Cisco Unified Mobility, where only the clients initiate the TLS handshake). There are by-directional TLS proxy rules and configuration. Each enterprise can have an ASA as the TLS proxy.
In Figure 49-1, NAT or PAT can be used to hide the private address of Entity X. In this situation, static NAT or PAT must be configured for foreign server (Entity Y) initiated connections or the TLS handshake (inbound). Typically, the public port should be 5061. The following static PAT command is required for the Cisco UP that accepts inbound connections:
hostname(config)# static (inside,outside) tcp 192.0.2.1 5061 10.0.0.2 5061 netmask
255.255.255.255
The following static PAT must be configured for each Cisco UP that could initiate a connection (by sending SIP SUBSCRIBE) to the foreign server.
For Cisco UP with the address 10.0.0.2, enter the following command:
hostname(config)# static (inside,outside) tcp 192.0.2.1 5062 10.0.0.2 5062 netmask
255.255.255.255
hostname(config)# static (inside,outside) udp 192.0.2.1 5070 10.0.0.2 5070 netmask 255.255.255.255hostname(config)# static (inside,outside) tcp 192.0.2.1 5060 10.0.0.2 5060 netmask 255.255.255.255For another Cisco UP with the address 10.0.0.3, you must use a different set of PAT ports, such as 45062 or 45070:
hostname(config)# static (inside,outside) tcp 192.0.2.1 45061 10.0.0.3 5061 netmask
255.255.255.255
hostname(config)# static (inside,outside) tcp 192.0.2.1 45062 10.0.0.3 5062 netmask 255.255.255.255hostname(config)# static (inside,outside) udp 192.0.2.1 45070 10.0.0.3 5070 netmask 255.255.255.255hostname(config)# static (inside,outside) tcp 192.0.2.1 5070 10.0.0.2 5070 netmask 255.255.255.255hostname(config)# static (inside,outside) tcp 192.0.2.1 45060 10.0.0.3 5060 netmask 255.255.255.255Dynamic NAT or PAT can be used for the rest of the outbound connections or the TLS handshake. The ASA SIP inspection engine takes care of the necessary translation (fixup).
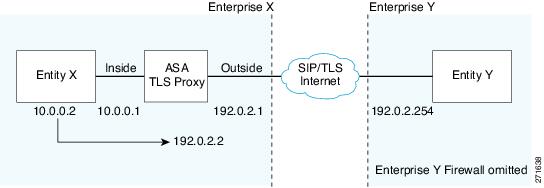
hostname(config)# global (outside) 102 192.0.2.1 netmask 255.255.255.255hostname(config)# nat (inside) 102 0.0.0.0 0.0.0.0Figure 49-2 illustrates an abstracted scenario with Entity X connected to Entity Y through the presence federation proxy on the ASA. The proxy is in the same administrative domain as Entity X. Entity Y could have another ASA as the proxy but this is omitted for simplicity.
Figure 49-2 Abstracted Presence Federation Proxy Scenario between Two Server Entities
For the Entity X domain name to be resolved correctly when the ASA holds its credential, the ASA could be configured to perform NAT for Entity X, and the domain name is resolved as the Entity X public address for which the ASA provides proxy service.
Trust Relationship in the Presence Federation
Within an enterprise, setting up a trust relationship is achievable by using self-signed certificates or you can set it up on an internal CA.
Establishing a trust relationship cross enterprises or across administrative domains is key for federation. Cross enterprises you must use a trusted third-party CA (such as, VeriSign). The ASA obtains a certificate with the FQDN of the Cisco UP (certificate impersonation).
For the TLS handshake, the two entities could validate the peer certificate via a certificate chain to trusted third-party certificate authorities. Both entities enroll with the CAs. The ASA as the TLS proxy must be trusted by both entities. The ASA is always associated with one of the enterprises. Within that enterprise (Enterprise X in Figure 49-1), the entity and the ASA could authenticate each other via a local CA, or by using self-signed certificates.
To establish a trusted relationship between the ASA and the remote entity (Entity Y), the ASA can enroll with the CA on behalf of Entity X (Cisco UP). In the enrollment request, the Entity X identity (domain name) is used.
Figure 49-3 shows the way to establish the trust relationship. The ASA enrolls with the third party CA by using the Cisco UP FQDN as if the ASA is the Cisco UP.
Figure 49-3 How the Security Appliance Represents Cisco Unified Presence - Certificate Impersonate
Security Certificate Exchange Between Cisco UP and the Security Appliance
You need to generate the keypair for the certificate (such as
cup_proxy_key) used by the ASA, and configure a trustpoint to identify the self-signed certificate sent by the ASA to Cisco UP (such ascup_proxy) in the TLS handshake.For the ASA to trust the Cisco UP certificate, you need to create a trustpoint to identify the certificate from the Cisco UP (such as
cert_from_cup), and specify the enrollment type as terminal to indicate that you will paste the certificate received from the Cisco UP into the terminal.Licensing for Cisco Unified Presence
The Cisco Unified Presence feature supported by the ASA require a Unified Communications Proxy license.
The Cisco Unified Presence feature is licensed by TLS session. For the federation proxy, each endpoint utilizes one Unified Communications Proxy session.
Table 49-1 shows the Unified Communications Proxy license details by platform.
A Unified Communications Proxy license is applied the same way as other licensed features (such as, SSL VPN), via the activation-key command. For more information about licensing, see Chapter 3 "Managing Feature Licenses."
Configuring Cisco Unified Presence
This section contains the following topics:
•
•
•
•
Task Flow for Configuring Cisco Unified Presence
To configure a Cisco Unified Presence/LCS Federation scenario with the ASA as the TLS proxy where there is a single Cisco UP that is in the local domain and self-signed certificates are used between the Cisco UP and the ASA (like the scenario shown in Figure 49-1), perform the following tasks.
Step 1
For the inbound connection to the local domain containing the Cisco UP, create static PAT by entering the following command:
hostname(config)# static (real_ifc,mapped_ifc) tcp mapped_ip mapped_port netmask mask
Note
For outbound connections or the TLS handshake, use dynamic NAT or PAT. The ASA SIP inspection engine takes care of the necessary translation (fixup).
hostname(config)# global (mapped_ifc) nat_id mapped_ip netmask maskhostname(config)# nat (real_ifc) nat_id real_ip maskStep 2
Step 3
Step 4
Step 5
Creating Trustpoints and Generating Certificates
You need to generate the keypair for the certificate (such as
cup_proxy_key) used by the ASA, and configure a trustpoint to identify the self-signed certificate sent by the ASA to Cisco UP (such ascup_proxy) in the TLS handshake.
What to Do Next
Install the certificate on the local entity truststore. You could also enroll the certificate with a local CA trusted by the local entity. See Installing Certificates.
Installing Certificates
Export the self-signed certificate for the ASA created in Creating Trustpoints and Generating Certificates and install it as a trusted certificate on the local entity. This task is necessary for local entity to authenticate the ASA.
Prerequisites
To create a proxy certificate on the ASA that is trusted by the remote entity, obtain a certificate from a trusted CA. For information about obtaining a certificate from a trusted CA, see Configuring Digital Certificates.
What to Do Next
Once you have created the trustpoints and installed the certificates for the local and remote entities on the ASA, create the TLS proxy instance. See Creating the TLS Proxy Instance.
Creating the TLS Proxy Instance
Because either server can initiate the TLS handshake (unlike IP Telephony or Cisco Unified Mobility, where only the clients initiate the TLS handshake), you must configure by-directional TLS proxy rules. Each enterprise can have an ASA as the TLS proxy.
Create TLS proxy instances for the local and remote entity initiated connections respectively. The entity that initiates the TLS connection is in the role of "TLS client". Because the TLS proxy has a strict definition of "client" and "server" proxy, two TLS proxy instances must be defined if either of the entities could initiate the connection.
What to Do Next
Once you have created the TLS proxy instance, enable it for SIP inspection. See Enabling the TLS Proxy for SIP Inspection.
Enabling the TLS Proxy for SIP Inspection
Enable the TLS proxy for SIP inspection and define policies for both entities that could initiate the connection. For more information about SIP application inspection,
Monitoring Cisco Unified Presence
Debugging is similar to debugging TLS proxy for IP Telephony. You can enable TLS proxy debug flags along with SSL syslogs to debug TLS proxy connection problems.
For example, use the following commands to enable TLS proxy-related debug and syslog output only:
hostname(config)# debug inspect tls-proxy eventshostname(config)# debug inspect tls-proxy errorshostname(config)# logging enablehostname(config)# logging timestamphostname(config)# logging list loglist message 711001hostname(config)# logging list loglist message 725001-725014hostname(config)# logging list loglist message 717001-717038hostname(config)# logging buffer-size 1000000hostname(config)# logging buffered loglisthostname(config)# logging debug-traceFor information about TLS proxy debugging techniques and sample output, see Monitoring the TLS Proxy.
Enable the debug sip command for SIP inspection engine debugging. See the Cisco ASA 5500 Series Command Reference.
Additionally, you can capture the raw and decrypted data by the TLS proxy by entering the following commands:
hostname# capture mycap interface outside (capturing raw packets)hostname# capture mycap-dec type tls-proxy interface outside (capturing decrypted data)hostname# show capture capture_namehostname# copy /pcap capture:capture_name tftp://tftp_locationConfiguration Example for Cisco Unified Presence
The following sample illustrates the necessary configuration for the ASA to perform TLS proxy for Cisco Unified Presence as shown in Figure 49-4. It is assumed that a single Cisco UP (Entity X) is in the local domain and self-signed certificates are used between Entity X and the ASA.
For each Cisco UP that could initiate a connection (by sending SIP SUBSCRIBE) to the foreign server, you must also configure static PAT and if you have another Cisco UP with the address (10.0.0.3 in this sample), it must use a different set of PAT ports (such as 45062 or 45070). Dynamic NAT or PAT can be used for outbound connections or TLS handshake. The ASA SIP inspection engine takes care of the necessary translation (fixup).
When you create the necessary RSA key pairs, a key pair is used by the self-signed certificate presented to Entity X (proxy for Entity Y). When you create a proxy certificate for Entity Y, the certificate is installed on the Entity X truststore. It could also be enrolled with a local CA trusted by Entity X.
Exporting the ASA self-signed certificate (ent_y_proxy) and installing it as a trusted certificate on Entity X is necessary for Entity X to authenticate the ASA. Exporting the Entity X certificate and installing it on the ASA is needed for the ASA to authenticate Entity X during handshake with X. If Entity X uses a self-signed certificate, the self-signed certificate must be installed; if Entity X uses a CA issued the certificate, the CA's certificated needs to be installed.
For about obtaining a certificate from a trusted CA, see Configuring Digital Certificates.
Installing the CA certificate that signs the Entity Y certificate on the ASA is necessary for the ASA to authenticate Entity Y.
When creating TLS proxy instances for Entity X and Entity Y, the entity that initiates the TLS connection is in the role of "TLS client". Because the TLS proxy has strict definition of "client" and "server" proxy, two TLS proxy instances must be defined if either of the entities could initiate the connection.
When enabling the TLS proxy for SIP inspection, policies must be defined for both entities that could initiate the connection.
Figure 49-4 Typical Cisco Unified Presence/LCS Federation Scenario
static (inside,outside) tcp 192.0.2.1 5061 10.0.0.2 5061 netmask 255.255.255.255static (inside,outside) tcp 192.0.2.1 5062 10.0.0.2 5062 netmask 255.255.255.255static (inside,outside) udp 192.0.2.1 5070 10.0.0.2 5070 netmask 255.255.255.255static (inside,outside) tcp 192.0.2.1 45062 10.0.0.3 5062 netmask 255.255.255.255static (inside,outside) udp 192.0.2.1 45070 10.0.0.3 5070 netmask 255.255.255.255global (outside) 102 192.0.2.1 netmask 255.255.255.255nat (inside) 102 0.0.0.0 0.0.0.0crypto key generate rsa label ent_y_proxy_key modulus 1024! for self-signed Entity Y proxy certificatecrypto ca trustpoint ent_y_proxyenrollment selffqdn nonesubject-name cn=Ent-Y-Proxykeypair ent_y_proxy_keycrypto ca enroll ent_y_proxycrypto ca export ent_y_proxy identity-certificate! for Entity X's self-signed certificatecrypto ca trustpoint ent_x_certenrollment terminalcrypto ca authenticate ent_x_certEnter the base 64 encoded CA certificate.End with a blank line or the word "quit" on a line by itself[ certificate data omitted ]quit! for Entity Y's CA certificatecrypto ca trustpoint ent_y_caenrollment terminalcrypto ca authenticate ent_y_caEnter the base 64 encoded CA certificate.End with a blank line or the word "quit" on a line by itselfMIIDRTCCAu+gAwIBAgIQKVcqP/KW74VP0NZzL+JbRTANBgkqhkiG9w0BAQUFADCB[ certificate data omitted ]/7QEM8izy0EOTSErKu7Nd76jwf5e4qttkQ==quit! Entity X to Entity Ytls-proxy ent_x_to_yserver trust-point ent_y_proxyclient trust-point ent_x_certclient cipher-suite aes128-sha1 aes256-sha1 3des-sha1 null-sha1! Entity Y to Entity Xtls-proxy ent_y_to_xserver trust-point ent_x_certclient trust-point ent_y_proxyclient cipher-suite aes128-sha1 aes256-sha1 3des-sha1 null-sha1access-list ent_x_to_y extended permit tcp host 10.0.0.2 host 192.0.2.254 eq 5061access-list ent_y_to_x extended permit tcp host 192.0.2.254 host 192.0.2.1 eq 5061class-map ent_x_to_ymatch access-list ent_x_to_yclass-map ent_y_to_xmatch access-list ent_y_to_xpolicy-map type inspect sip sip_inspectparameters! SIP inspection parameterspolicy-map global_policyclass ent_x_to_yinspect sip sip_inspect tls-proxy ent_x_to_yclass ent_y_to_xinspect sip sip_inspect tls-proxy ent_y_to_xservice-policy global_policy globalFeature History for Cisco Unified Presence
Table 49-2 lists the release history for this feature.
Table 49-2 Feature History for Cisco Phone Proxy
Cisco Unified Presence
8.0(4)
The Presence Federation Proxy feature was introduced.