-
Cisco Prime Infrastructure 2.0 User Guide
-
Preface
- Getting Started
- Designing the Network
-
Operating the Network
-
Operating and Monitoring the Network
-
Monitoring Alarms
-
Updating Device Inventory
-
Configuring Device Features
-
Working With Device Configurations
-
Maintaining Software Images
-
Working with Wireless Operational Tools
-
Ensuring Consistent Application Experiences
-
Working with Wireless Mobility
-
Configuring the Cisco AppNav Solution
-
Configuring WAAS Container
-
Troubleshooting
-
Reports
-
-
Prime Infrastructure User Interface Reference
-
 Feedback
Table Of Contents
Adding Devices to Prime Infrastructure
Downloading Software Updates Without Cisco.com Access
Configuring Email Server Settings to Receive Notifications
Adding Devices Using Discovery
Understanding the Discovery Process
Sample IPv4 IP Addresses for Ping Sweep
Importing Devices from Another Source
CSV File Requirements for Importing Devices
Validating That Devices Were Added Successfully
Adding NAM HTTP/HTTPS Credentials
Adding Devices to Prime Infrastructure
Before You Add Devices
Before you add devices to Cisco Prime Infrastructure, complete the following tasks:
•
Configure the Prime Infrastructure server backup to prevent the loss of any data—See Configuring Server Backups.
•
•
Configuring Server Backups
To prevent the loss of any acquired data, configure a Prime Infrastructure server backup before you add devices.
To configure a server backup:
Step 1
Step 2
By default, the server is backed up weekly and is stored in the /localdisk/defaultRepo directory with the filename hostname-backup_date_time.tar.gpg. You can also specify a different backup schedule.
Note
Installing Software Updates
Make sure that you have installed any Prime Infrastructure updates by choosing Administration > Software Update. If your Prime Infrastructure server has access to cisco.com, you can view and install any updates. If your Prime Infrastructure server does not have access to Cisco.com, see Downloading Software Updates Without Cisco.com Access.
Step 1
Step 2
Step 3
You might be prompted to restart the Prime Infrastructure server to complete the update.
Downloading Software Updates Without Cisco.com Access
If your Prime Infrastructure server does not have access to cisco.com, you can download software updates by following these steps:
Step 1
Step 2
Step 3
Step 4
Step 5
Step 6
If required, you might be prompted to stop and restart the Prime Infrastructure server.
Configuring Email Server Settings to Receive Notifications
You can configure mail server settings to specify the email addresses that receive notifications when Prime Infrastructure has completed discovering the devices in your network, as well as notifications of alarms and reports.
To configure discovery email notifications:
Step 1
Step 2
Methods for Adding Devices
You can add devices to Prime Infrastructure in one of the following ways:
•
•
•
Adding Devices Using Discovery
When you run discovery, Prime Infrastructure discovers the devices and, after obtaining access, collects device inventory data. We recommend that you run discovery when you are first getting started with Prime Infrastructure.
Prime Infrastructure uses SNMP polling to gather information about your network devices within the range of IP addresses you specify. If you have CDP enabled on your network devices, Prime Infrastructure uses the seed device you specify to discover the devices in your network.
You can discover your devices by:
•
•
Understanding the Discovery Process
Prime Infrastructure performs the following steps during the discovery process:
1.
2.
The device status is Reachable when Prime Infrastructure can reach the device and has verified that the SNMP credentials are correct.
3.
4.
5.
Running Discovery
Prime Infrastructure discovers devices with IPv4 addresses.
To run discovery:
Step 1
Step 2
Step 3
Step 4
•
•
Table 3-1 Discovery Protocol Settings
Ping Sweep Module
Prime Infrastructure gets a list of IP address ranges from a specified combination of IP address and subnet mask, then pings each IP address in the range to check the reachability of devices. See Sample IPv4 IP Addresses for Ping Sweep for more information.
CDP Module
Prime Infrastructure reads the cdpCacheAddress and cdpCacheAddressType MIB objects in the cdpCacheTable from CISCO-CDP-MIB on every newly found device as follows:
1.
2.
Check the Cross Router Boundary check box to specify that Prime Infrastructure should discover neighboring routers.
LLDP
Similar to CDP, but it allows the discovery of non-Cisco devices.
Routing Table
Queries and analyzes routing tables on seed routers to discover subnets and next-hop routers. This process discovers a router for every subnet on its list of known networks.
Address Resolution Protocol
The ARP Discovery Module depends on the Routing Table Discovery Module (RTDM), and is executed only when RTDM is processed. This precondition is identified based on the flags processed by the ARP Discovery Module, which are part of the DeviceObject.
The entries coming out of the ARP Discovery Module do not need to pass through RTDM because (per the router Discovery algorithm) active routers are those that RTDM must process and identify.
When the ARP table is fetched and the entries are not already discovered by RTDM, these entries (though they may represent routers) are not active routers and need not be passed on to RTDM. This is ensured by setting the ARP Discovery Module flag to Processed and leaving the RTDM flag set to Unprocessed.
When the RTDM comes across an entry with the RTDM flag unset and the ARP flag set, RTDM identifies the entry as a inactive router or other device and it leaves the entry as unprocessed. The ARP Discovery Module also ignores the entry according to the algorithm, based on the Processed flag set against the ARP Discovery Module.
When the ARP Discovery Module is checked, the device MAC address needs to be updated in the device information. Applications can retrieve this information in the adapter through the DeviceInfo object. By scanning the device MAC address, the applications can distinguish between Cisco and non-Cisco devices.
ARP cache from the device is collected using CidsARPInfoCollector. The MAC ID of the device is retrieved from this data and set in the DeviceInfo object.
Border Gateway Protocol
The BGP Discovery Module uses bgpPeerTable in the BGP4-MIB to find its BGP peer. The table contains its peers' IP addresses, which are added as clues to the local cache.
OSPF
Open Shortest Path First (OSPF) protocol is an interior gateway routing protocol that uses the ospfNbrTable and ospfVirtNbrTable MIBs to find neighbor IP addresses.
IP Filter
Includes or excludes devices based on IP address. For example, you can enter any of the following strings and specify whether to include or exclude the devices found during discovery:
192.0.2.89
192.0.2.*192.0.
[16-32].89
[192-193].*.55.[16-32]System Location Filter
Includes or excludes devices based on System Location.
System Object ID Filter
Includes or excludes devices based on the sysObjectID string set on the device.
DNS Filter
Includes or excludes devices based on the domain name string set on the device.
SNMPv2 Credential
SNMP community string is a required parameter for discovering devices in the network using SNMPv2. You can enter multiple rows of credentials mapped to a specific IP address, or the IP address can be a wildcard; for example, *.*.*.*, 10.1.1.*. You cannot save or use the discovery settings if you do not specify SNMP credentials.
Telnet Credential
You can specify the Telnet credentials during discovery so that Prime Infrastructure can collect the device configurations and fully manage the devices. If you do not specify Telnet credentials in the discovery settings, Prime Infrastructure discovers the devices but is unable to manage the device until you specify the Telnet credentials.
SSH Credential
For full device support via SSH, you must use SSHv2 with a 1024 bit key. You can configure SSH before running discovery.
Note
SNMP V3 Credential
Prime Infrastructure supports SNMPv3 discovery for devices. The SNMP V3 modes are:
•
•
•
•
•
Use Loopback IP
Prime Infrastructure uses the preferred management IP address from the loop back interface. If the device does not have a loopback interface, Prime Infrastructure uses similar logic to the OSPF algorithm to select the router's preferred management IP address.
Use SysName
Prime Infrastructure gets the preferred management IP address for the device using DNS lookup of the SysName for the device.
Use DNS Reverse Lookup
Prime Infrastructure gets the preferred management IP address by doing a reverse DNS lookup on the device IP address, followed by a forward DNS lookup.
After running discovery, click Device Work Center. See Device Work Center, page 10-4 for more information.
Sample IPv4 IP Addresses for Ping Sweep
Running Quick Discovery
If you want to quickly run discovery without specifying and saving your settings, you can use Quick Discovery.
To run Quick Discovery:
Step 1
Step 2
Step 3
Verifying Discovery
When discovery has completed, you can verify that the process was successful.
To verify successful discovery:
Step 1
Step 2
Step 3
If devices are missing:
•
•
Importing Devices from Another Source
If you have another management system from which you want to import your devices, or if you want to import a spreadsheet that lists all of your devices and their attributes, you can add device information into Prime Infrastructure as explained in the following steps:
Step 1
Step 2
Step 3
Step 4
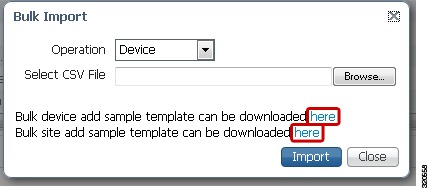
Figure 3-1 Downloading a Sample Template for Importing Devices or Sites
Make sure that you retain the required information in the CSV file as explained in CSV File Requirements for Importing Devices.
Step 5
Step 6
Step 7
Note
CSV File Requirements for Importing Devices
If you want to use a CSV file to import your devices or sites from another source into Prime Infrastructure, you can download a sample template by choosing Operate > Device Work Center, then clicking Bulk Import. Click the link to download a sample template as shown in Figure 3-1.
When you download a sample CSV template for importing devices or sites, the extent to which Prime Infrastructure can manage your devices depends on the information you provide in the CSV file. If you do not provide values for CLI user name, password, and enable password, Prime Infrastructure will have limited functionality and cannot modify device configurations, update device software images, and perform many other valuable functions.
•
–
–
–
–
–
•
–
–
–
–
–
–
You must also provide values for the fields that correspond to the protocol you specify. For example, if you specify SNMPv3, you must specify values for the SNMPv3 fields in the sample CSV file such as the SNMPv3 user name and authorization password.
–
–
–
–
Adding Devices Manually
Adding devices manually is helpful if you want to add a single device. If you want to add all devices in your network, we recommend that you run discovery (see Running Discovery) or import devices from a CSV file (see Importing Devices from Another Source).
To add devices manually:
Step 1
Step 2
Note
Validating That Devices Were Added Successfully
After collecting device information, Prime Infrastructure gathers and displays the configurations and the software images for the devices. To verify that your devices were successfully added to Prime Infrastructure, you can:
•
Table 3-3 describes the possible Admin Status values.
•
See Troubleshooting Unmanaged Devices, page 12-4 for information about how to resolve any errors.
Table 3-3 Descriptions of Device Admin Status
Managed
The inventory collection completed successfully and Prime Infrastructure is managing the device.
Unmanaged
You have exceeded the number of devices allowed by your license. Choose Administration > Licenses to view the status of your license. See the Cisco Prime Infrastructure 2.0 Administrator Guide for information about managing licenses, troubleshooting licensing issues, and verifying license details.
Verifying Device Credentials
In Prime infrastructure, whenever you are adding/editing the device, device credential verification will happen automatically as part of inventory collection and the report can be viewed at Report > Report Launch Pad > Device > Device Credential Verification.
Adding NAM HTTP/HTTPS Credentials
If you are using Cisco Network Analysis Modules (NAMs) to monitor your network, you must add HTTPS credentials so that Prime Infrastructure can retrieve data from them. This is especially important for users who have licensed Assurance features, as most Assurance features depend on NAM data to work.
Prime Infrastructure polls NAMs directly via HTTP (or HTTPS) to collect their data. This type of polling requires Prime Infrastructure to store each NAMs' HTTP credentials. Unlike with SNMP community strings and Telnet/SSH credentials, you cannot enter NAM HTTP credentials during the discovery process. You can only specify NAM HTTP credentials after the modules are discovered or added to inventory.
Follow these steps to add HTTP credentials for a single NAM. You can repeat this task for all NAMs from which you want Prime Infrastructure to collect data.
Step 1
Step 2
Step 3
•
•
•
•
•
Step 4
Exporting Devices
In Prime Infrastructure, you can export device information as a CSV file.
To export devices:
Step 1
Step 2
Step 3
Step 4
Step 5
Next Steps
Now that you have added devices to Prime Infrastructure, you can create device groups and port groups to simplify management, monitoring, and configuration of similar devices and ports. See Grouping Devices and Ports.
You might also want to:
•
•