Cisco Prime Infrastructure 2.0 User Guide
Configuring the Cisco AppNav Solution

Table Of Contents

Configuring the Cisco AppNav Solution

Overview of Cisco AppNav

Components of Cisco AppNav

Prerequisites for Configuring Cisco AppNav

Configuring Cisco AppNav

Configuring Cisco AppNav from the Device Work Center

Interface Roles

Configuring Cisco AppNav Using Templates

Deploying a Cisco AppNav Template

Configuring Cisco AppNav Automatically During ISR-WAAS Container Activation


Configuring the Cisco AppNav Solution


Cisco AppNav, is a hardware and software solution that simplifies network integration of WAN optimization. It also overcomes the challenges related to provisioning, visibility, scalability, asymmetry, and high availability.

Overview of Cisco AppNav

Components of Cisco AppNav

Prerequisites for Configuring Cisco AppNav

Configuring Cisco AppNav

Overview of Cisco AppNav

The Cisco AppNav solution reduces the dependency on the intercepting switch or router by distributing the traffic among Cisco WAAS devices for optimization by using a powerful class and policy mechanism. You can use ISR-WAAS to optimize traffic based on sites or applications. This includes device-level and template-based configurations.

An intelligent load-balancing mechanism in the Cisco IOS-XE software allows the diversion of TCP traffic to various products, including Cisco WAAS and OneFirewall, where Cisco WAAS is the initial target. Router management is performed through the Cisco Prime Infrastructure network management application.

Components of Cisco AppNav

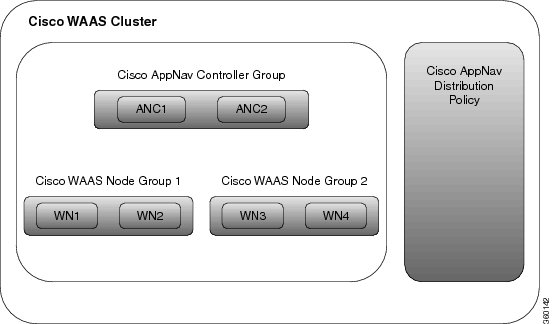
The Cisco AppNav solution, is made up of a distribution unit called the Cisco AppNav Controller (AC), WAAS Service Nodes (SNs). The Cisco AppNav Controller distributes the flow, and the service nodes process the flows. You can group up to four Cisco AppNav-XE (routers) together to form a Cisco AppNav Controller Group (ACG) to support asymmetric flows and high availability. However, must ensure that all of the routers in the ACG are on the same platform and have the same memory capacity.

The Cisco AppNav solution's components perform the following functions:

AppNav Controller—This is component that intelligently distributes traffic from a router to service nodes. The Cisco AppNav Controller is a part of Cisco IOS-XE Release 3.10 on the Cisco ISR-4400, Cisco CSR, and Cisco ASR 1K platforms.

Cisco WAAS Service Nodes—These optimize traffic flows and are available in different form factors, for example, standalone appliances and virtualized ISR-WAAS running in a Cisco IOS-XE container.

Cisco WAAS Central Manager—This is used to monitor and configure the ISR-WAAS.

This chapter describes the configuration of the Cisco AppNav Controller functions on routers. Figure 19-1 describes the components of Cisco AppNav.

Figure 19-1 Components of Cisco AppNav

The advantages of using the Cisco AppNav components are:

They can intelligently redirect new flows based on the load on each service node. This includes loads of individual application accelerators.

If the flows do not require any optimization, service nodes can inform the Cisco AppNav Controller to directly pass the packets, thereby minimizing latency and resource utilization.

There is minimal impact to traffic when adding or removing service nodes.

The Cisco AppNav components support VRF. The VRF information is preserved when traffic returns from a service node. However, Prime Infrastructure does not support VRF.

For specific applications, such as Messaging Application Programming Interface (MAPI) and Virtual desktop infrastructure (VDI), the components ensure that a family of flow is redirected to the same service node.

Asymmetric flows can be optimized in situations where traffic in one direction goes through one Cisco AppNav Controller and the return traffic goes through a different Cisco AppNav Controller. But both redirect the traffic to the same ISR-WAAS. This is achieved using the Cisco AppNav Controller Group.

Inter-box high availability is also supported using the Cisco AppNav Controller Group, which means that if one router goes down, traffic can be redirected to a different router in the Cisco AppNav Controller Group enabling uninterrupted flow.

Intra-box high availability of the Cisco AppNav Controller is supported on those Cisco ASR1000 Series platforms that have dual RP, or dual FP, or both. This means that if the active RP fails, the standby RP takes over or if the active FP fails, the standby FP takes over, and the flows continue uninterrupted.

The Cisco AppNav technology allows IP flows to be intercepted on routers and sent to a set of Cisco WAAS Service Node for processing. The initial application of Cisco AppNav which is supported in Cisco IOS-XE Release 3.10, is in Cisco WAAS.

Prerequisites for Configuring Cisco AppNav

The following are the prerequisites for configuring Cisco AppNav:

The platform must be Cisco 4451-X ISR, Cisco Integrated Services Routers (ISR) G2, Cisco ASR 1000 Series Aggregation Services Routers, or Cisco Cloud Services Router.

The software version of above mentioned platforms must be Version 3.10 and later.

A valid appxk9 license must be enabled on the routers.

A Cisco WAAS Service Node must be available.

Configuring Cisco AppNav

You must configure some parameters on the router before redirecting the traffic to the Cisco WAAS Service Node. If the Cisco AppNav configuration is generated as a part of installing the Cisco WAAS virtual appliance, it is transparent to the corresponding user. If it is configured using a template or through the Device Work Center, the user is more directly involved.

The Cisco AppNav can be configured in three ways:

Configuring Cisco AppNav from the Device Work Center

Configuring Cisco AppNav Using Templates

Configuring Cisco AppNav Automatically During ISR-WAAS Container Activation

The Cisco AppNav configuration involves the use of the following:

Controllers—A list of routers that cooperate to redirect traffic. This is a list of IP addresses, exactly one of which must belong to the router on which Cisco AppNav is being configured.

Cisco WAAS Service Node Groups (SNGs)—There must be one or more SNGs that are the target of redirected traffic and are defined as a set of IP addresses.

Class Maps—A set of class maps that classify incoming and outgoing traffic. Class maps consist of a set of match conditions that together specify traffic of interest. They can match traffic based on three types of conditions:

An access control list (ACL) that selects traffic based on a source and destination IP address and port.

A protocol that is used to select traffic that uses the Microsoft port mapper service rather than depending on fixed port numbers. This includes MAPI and a host of other Microsoft protocols.

A remote device that matches the traffic that has traversed a particular Cisco WAAS Service Node on the remote end. The remote device is identified by a MAC address.

Policy maps—A Cisco AppNav policy map is an ordered list of rules, each of which specify what is to be done with some type of traffic. A rule thus consists of a class map and an action. The action is to either redirect to a service node group or to pass through.

Clusters—A Cisco WAAS cluster is the combination of a policy map, controller group, and a set of service node groups used by the policy map. A cluster can be enabled or disabled. Prime Infrastructure 2.0 allows several clusters to be defined but only one can be enabled at a time. An authentication key is used to secure communication between the controllers and the nodes in a cluster.

Cisco WAAS interfaces—Traffic can be optimized only on interfaces where Cisco WAAS is enabled.

The WAN optimization template and the Device Work Center both have a default policy. The default policy consists of a number of class maps that match different types of traffic (HTTP, CIFS, TCP, and so on) that is optimized by Cisco ISR-WAAS. The template also includes a policy map containing a rule for each of those class maps. By default, all the matched traffic is redirected to a single service node group.

Configuring Cisco AppNav from the Device Work Center

The Device Work Center allows an administrator to view and modify the configuration of individual devices. The Device Work Center can be used to configure Cisco AppNav when a user has a single or few devices. You can individually edit the configurations that are deployed using a template on the devices.

To configure the Cisco AppNav from the Device Work Center:


Step 1 Choose Operate > Device Work Center.

Step 2 Select the device to be configured.

Step 3 On the Configuration tab in the bottom pane, and click WAN Optimization.

The Cisco AppNav configuration is divided into the following sections:

AppNav controllers—The Controllers page shows the IP addresses of routers belonging to the same cluster as the router. You must assign one of the addresses to one of the currently selected router's interfaces. Each router's own IP address is shown in a drop-down list. The IP addresses of other routers in the same cluster are listed in a separate table.

Cisco WAAS clusters —The Cisco WAAS Clusters page is the main Cisco AppNav page. It lists the Cisco WAAS clusters configured on the device and allows new ones to be created. To view the detailed configuration for a cluster, including the policy map, select the cluster, and click Edit.

In this page, cluster settings and policies can be edited. Expand individual rules by clicking the arrow in the third column. This enables the corresponding rule to be edited as well as the class maps and Cisco WAAS service node groups to be viewed, modified, and created. New rules can be added by clicking Add Policy. The order of the rules within a policy map is significant and the table allows the order to modified by dragging rows or selecting a contiguous list of rows and using the Up or Down arrows in the menu bar.

To create a new cluster, select Add WAAS Cluster on the Cisco WAAS Cluster Overview tab. This launches a wizard that prompts for controllers, Cisco WAAS Service Node, interception interfaces, and some general cluster parameters. After providing the necessary information, click Finish for the configuration to take effect.
The wizard creates the cluster with a default policy that works for most small installations. All the TCP flows are redirected to a single node group, with the node group being monitored for overload conditions.


Note Since Prime Infrastructure 2.0 does not support VRFs; therefore, only one Cisco WAAS cluster can be enabled at a time.


Interception—The Interception page lets the administrator select interfaces on which incoming and outgoing traffic should be redirected (subject to policies). All the WAN interfaces on the router should have Cisco WAAS enabled.

Advanced Settings—The Advanced Settings folder contains pages for Cisco WAAS service node groups, class maps, and policy maps. Most of this information is also available in the Cisco WAAS Clusters page, but it is helpful to be able to view the definition of these objects directly.

Cisco WAAS Node Groups—The Cisco WAAS Node Groups page allows the existing Cisco WAAS node groups to be edited and new ones to be created.

Class maps and Policy maps—The Class Maps and Policy Maps page does the same.

Interface Roles

The Cisco AppNav solution redirects traffic only on interfaces on which it has been explicitly enabled. Routers differ in terms of available interfaces and how they are named. Since the templates are intended to be applied to multiple devices, they refer to interface roles instead of actual interfaces.

Interface roles are logical objects that exist only in Prime Infrastructure. They can be used in templates instead of actual interface names. When a template is deployed to a device, the interface role is resolved to a set of actual interfaces.

You can override, the set of interfaces on which Cisco WAAS is enabled during template deployment on a per-device basis. However, we recommend that you to define one or more interface roles and save them as part of the template to simplify the template deployment process.

You can define interface roles in Design > Shared Policy Objects > Interface Role. For more information, see the Creating Interface Roles.

Configuring Cisco AppNav Using Templates

Prime Infrastructure templates contain reusable chunks of configuration that can be deployed to any number of devices. WAN Optimization templates define a policy and other information that can be applied across AppNav routers.

Templates are defined in design view and can later be deployed to one or more devices. As part of the deployment process you can fill in the device-specific parameters and preview the final CLIs before the configuration is pushed to the device. When a template is modified, it is necessary to re-deploy to devices for the changes to take effect.

This method of configuring Cisco AppNav is used when a user needs similar Cisco AppNav configurations on multiple devices. A single template, with similar configurations, and some minor customized values can be deployed to multiple devices at the same type using the deploy option.

To configure the Cisco AppNav using templates:


Step 1 Choose Design > Feature Design.

Step 2 Choose Features and Configurations > WAN Optimization.

Step 3 Select an AppNav Cluster.

Step 4 Enter the configuration details on the following tabs:

Controller IP addresses—A list of controllers can be configured here or during deployment. For example, if the template is used for multiple sites, such as branches, this field must be left empty. However, values can be provided during deployment.

Service nodes—The Cisco WAAS service node groups are used by the policy map. By default, there is a single service node group called WNG-Default. If the template is used for multiple sites, leave the service node groups empty and add the actual IP addresses during deployment. Enter the following details:

Name of the Service Node

Description

IP address of the Cisco WAAS Service Node

Interception—Interface roles for which Cisco WAAS should be enabled. During deployment, an actual list of interfaces is presented. You can make a selection of the actual interfaces belonging to the device, for each device. The purpose of the interface roles is to initialize the selection with a default. Therefore, the list of enabled interface roles can be left empty in the template design view. Here you can do the following:

Check or uncheck the Enable WAAS check box.

General—A valid cluster ID range is between 1 to 32. Enable the check box to enable or disable a cluster. Enter the following details:

Cluster ID

Authentication Key

After this, check or uncheck the Enable Distribution check box.

Traffic redirection—This is a policy-related configuration, policy-map, class-maps and their relationships with ISR-WAAS groups. A basic setting results in a default policy that redirects all the TCP traffic to one node group. Select Advanced to create custom policies and to redirect different types of TCP traffic to a different ISR-WAAS.

Step 5 Click Save as Template.

Step 6 Click Finish.

You can view the configured template by choosing Design > Feature Design > My Templates.


Deploying a Cisco AppNav Template

After a Cisco AppNav template is created, you can deploy the template to begin traffic distribution.

To deploy a Cisco AppNav template:


Step 1 Choose Deploy > Configuration Tasks.

Step 2 Select the My Templates folder in the left window pane.

Step 3 Select the Cisco WAAS template to be deployed and click Deploy.

You can choose a single device or multiple devices and change the required configurations.

Step 4 In the Value Assignment panel, select each target device, one at a time and complete all the fields for that router:

Basic Parameters—Includes an indication about whether the cluster is enabled.

Controllers—The list of controller IP addresses. This must include an IP address assigned to the device itself.

Node Groups—Enter IP addresses belonging to each of the ISR-WAAS groups used in the policy.

Interception—A set of WAN interfaces on which Cisco WAAS interception is enabled.

Step 5 Click Apply.

Step 6 Click OK.

The Cisco AppNav is deployed on multiple devices.


Note When a template is deployed to one or more devices, a job is created. To verify the status of the template deployment, choose Administration > Jobs Dashboard. After you create a template, it can be edited multiple times depending on the requirements. To view detailed status information about failures, success, or warnings, choose Job Dashboard > More Details on Dashboard > Status of the job. To view the details of the job status, select the icon in the status field.


Configuring Cisco AppNav Automatically During ISR-WAAS Container Activation

This method of configuring Cisco AppNav is available only on Cisco 4451-X ISR devices or platform. Also, the software version required for ISR-WAAS activation must be Version 3.10 or later. In this method, the configuration occurs automatically as part of the installation of the Cisco WAAS virtual appliance node, ISR4451X-WAAS.

A single service node group contains the new ISR-WAAS is created.

Class maps are created for different types of traffic optimized by the Cisco WAAS service node.

A default policy map, that redirects all TCP traffic to the Cisco WAAS service node, is generated.

A Cisco WAAS cluster is created.

Cisco WAAS is enabled on interfaces denoted by an interface role (specified at the time of container activation).

For more information on how to configure Cisco AppNav using this method, see the Installing an ISR-WAAS Container.