Table Of Contents
Deploying Templates and Tasks
Planning Template Deployments
Deploying and Monitoring Configuration Tasks
Automating Device Deployment
Automating Device Deployment Using Plug and Play Profiles
Prerequisites for Using Plug and Play Profiles
Creating a Bootstrap Configuration Template
Downloading Software Images
Creating a Configuration Template
Creating Plug and Play Profiles
Deploying a Plug and Play Profile Based on Device ID
Deployment Based on Device Type
Delivering and Applying the Bootstrap
Exporting the Bootstrap Configuration
Delivering the Bootstrap Configuration Using TFTP
Emailing the Bootstrap Configuration
Emailing the PIN
Configuring Controller Deployments
Using the Auto Provisioning Filter List
Adding an Auto Provisioning Filter
Auto Provisioning Primary Search Key Settings
Managing Scheduled Configuration Task Templates
Managing AP Template Tasks
Viewing WLAN Configuration Scheduled Task Results
Managing Software Downloads
Adding a Download Software Task
Modifying a Download Software Task
Selecting Controllers for the Download Software Task
Troubleshooting Template Deployment
Deploying Templates and Tasks
The Deploy menu allows you to deploy previously configured tasks, profiles, and software immediately or at a future time.
•
Planning Template Deployments
•
Deploying and Monitoring Configuration Tasks
•
Automating Device Deployment
•
Configuring Controller Deployments
•
Managing Scheduled Configuration Task Templates
•
Troubleshooting Template Deployment
Planning Template Deployments
Before deploying any object, answer the following questions:
•
What are you deploying? Determine whether you are deploying a template, Plug and Play profile, and so on.
•
Where is being deployed? Determine which devices should be included in the deployment.
•
When is it being deployed? Determine when the deployment should happen.
You can plan your template deployments based on the following device conditions:
•
Existing devices—You can deploy a template to a device that is already in your network.
•
New devices that are known—You can deploy a template based on the device type and function. For example, if a new WAN edge router is discovered, you can deploy a configuration template that configures the necessary features for the WAN edge router (pre-provisioning).
•
New devices that are unknown or generic—You can deploy a generic configuration to a device that will provide a minimum set of configurations.
Deploying and Monitoring Configuration Tasks
After you publish a template and want to deploy it to one or many devices, you can specify the devices, values, and scheduling information to tailor your deployment.
To deploy and manage a template:
Step 1
Choose Deploy > Configuration Deployment > Configuration Tasks.
Step 2
From the left sidebar menu, open the folder that contains the type of template that you want to deploy.
Step 3
Select the check box of the template that you want to deploy, then click Deploy.
Step 4
Provide the information described in the following table, then click OK.
Table 9-1 Deploy > Configuration Task Options
Option
|
Description
|
Device Selection
|
Displays the list of devices to which you want to deploy the template.
|
Value Assignment
|
Allows you to specify a variable other than what was previously defined in the configuration template. Click a name, and the previously defined variables are displayed. To change any of the values, click the variable that you want to change, enter a new value, and click Apply.
You can also update the variables for all selected devices. Click All Selected Devices and update variables to apply the changes on all selected devices at the same time. If you want to update variables for a particular device in the list that need not be applicable to other devices, then choose the device and update its variables. All of the other devices will continue to use the variables that were previously defined except for the device for which variables are updated.
Note The changes you make apply only to the specific configuration you are deploying. To change the configuration template for all future deployments, choose Design > Configuration > Feature Design and change the template.
|
Schedule
|
Allows you to create a meaningful deployment job name, then specify whether to run the job now or in the future.
|
Summary
|
Summarizes your deployment option selections.
|
Step 5
Use the Monitoring Deployment option to manage deployed templates. To quickly redeploy, deactivate, undeploy, or view the deployment history for a template, choose Deploy > Configuration Deployment > Monitoring Deployment.
Note
Undeploy option is applicable only for the controller templates listed under Templates > Features and Technologies > Controller and will be active only if the controller template has been deployed to a device.
Automating Device Deployment
Cisco Prime Infrastructure helps automate the deployment of new devices on the network by obtaining and applying the necessary software image and configuration on a new network device. Using features such as Cisco Network Services (CNS) call-home and Cisco IOS auto-install (which uses DHCP and TFTP), Prime Infrastructure reduces the time a new device takes to join the network and become functional.
The Plug and Play feature of Prime Infrastructure allows you to create templates to define features and configurations that you can reuse and apply to new devices. You can streamline new device deployment by creating bootstrap templates, which define the necessary initial configuration, to communicate with Prime Infrastructure. You can specify (and predeploy) software images and configurations for devices that will be added to the network in the future.
Automating Device Deployment Using Plug and Play Profiles
The Prime Infrastructure Plug and Play feature allows you to perform an initial provisioning of a software image and configuration on a new device.
To automate the deployment of a new device on your network:
Step 1
Create a Plug and Play profile (see Creating Plug and Play Profiles).
Step 2
Based on the Plug and Play method, add a new device with CNS capabilities to the network, and apply a bootstrap configuration to activate the CNS agent on the device. Use any of the bootstrap delivery methods that Prime Infrastructure supports, or use your own mechanism (see Delivering and Applying the Bootstrap).
When you apply the bootstrap configuration:
1.
The device uses the call-home agent capability to connect to the Prime Infrastructure server.
2.
Automated deployment is initiated.
3.
The Prime Infrastructure server receives the ID of the new device and verifies that the device ID matches the device ID in any of the Plug and Play preprovisioning definitions. If there is no match for the device ID, Prime Infrastructure matches the device type with any of the existing type-based Plug and Play preprovisioning definitions.
4.
If there is a match, Prime Infrastructure applies the software image and the configuration specified in the matched Plug and Play profile on the device and adds the device to its inventory.
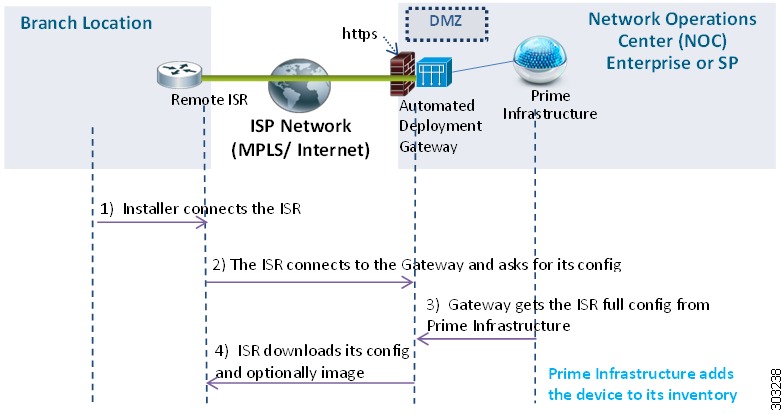
After the bootstrap configuration is applied to the device, the installer connects the device to a WAN at the remote site. The device connects to the Plug and Play gateway using its serial number, and downloads the full configuration and (optional) Cisco IOS image (see Figure 9-1).
Figure 9-1 Plug and Play Branch Deployment
Prerequisites for Using Plug and Play Profiles
Before you can use the Plug and Play feature, you must:
1.
Set up the Cisco Prime Plug and Play gateway.
Note
It is not mandatory to set up Cisco Prime Plug and Play gateway. In Cisco Prime Infrastructure Release 2.0, Plug and Play gateway is integrated with Prime Infrastructure. If the user explicitly wants the gateway setup, then Cisco Prime Plug and Play gateway can be set up. Do not execute the cns config retrieve or cns image retrieve command on a device that has been added using the Plug and Play feature.
2.
Use a CLI template to create a bootstrap configuration template (see Creating a Bootstrap Configuration Template).
3.
Download the software image (see Downloading Software Images). This step is optional.
4.
Create a configuration template (see Creating a Configuration Template).
Creating a Bootstrap Configuration Template
A bootstrap configuration template should have the minimum required CLI configurations so that the new device can communicate with the Prime Infrastructure Plug and Play gateway server.
Note
You can also use the Design > Feature Design >CLI Templates > System Templates-CLI > Plug And Play Bootstrap to create the bootstrap template.
To create a bootstrap configuration template for CNS devices:
Step 1
Choose Design > Feature Design > CLI Template folder > CLI.
Step 2
When you create the bootstrap template, enter "Bootstrap" in the tag field associated with the CLI template. Then the new bootstrap template will be listed in the Bootstrap Template column when a Plug and Play profile is being created.
The CLI template should have these configurations for the device CNS agent to connect to the Prime Infrastructure Plug and Play gateway server:
•
IP reachability to the Prime Infrastructure Plug and Play gateway server (if required)
•
CNS configurations
For more information, see Creating CLI Configuration Templates.
The CNS configurations for Plug and Play deployment is:
ip host <PnP Gateway server fully qualified host name> <IP address>
ip host <PnP Gateway server short hostname> <PnP Gateway IP address>
cns trusted-server all-agents <PnP Gateway server fully qualified host name>
cns trusted-server all-agents <PnP Gateway server short host name>
cns trusted-server all-agents <PnP Gateway IP address>
cns id hardware-serial event
cns id hardware-serial image
cns event <PnP Gateway server fully qualified host name> 11011 keep alive 120 2
reconnect-time 60
cns image server http://<PnP Gateway server fully qualified host
name>/cns/HttpMsgDispatcher status http://<PnP Gateway server fully qualified host
name>/cns/HttpMsgDispatcher
cns config partial <PnP Gateway server fully qualified host name> 80
cns config initial <PnP Gateway server fully qualified host name> 80
Downloading Software Images
To download software images:
Step 1
Choose Operate > Device Work Center > Software Image Management.
Step 2
Click Import, then specify the source from which the software image is to be imported.
Step 3
Specify the collection options and when to import the image file. You can run the job immediately or schedule it to run at a later time.
Note
The image import job will run only once.
Step 4
Click Submit.
Step 5
To view the details of image management job, choose Administration > Jobs Dashboard.
Creating a Configuration Template
Use one of the following templates as the configuration template:
•
A CLI template (for more information, see Creating CLI Configuration Templates)
•
A composite template that contains multiple CLI templates
Creating Plug and Play Profiles
Before creating a Plug and Play profile, you must satisfy the prerequisites (see Prerequisites for Using Plug and Play Profiles).
To create a Plug and Play profile:
Step 1
Select Design > Plug and Play Profiles > Plug and Play Profile.
Step 2
Provide the required information. See the Cisco Prime Infrastructure 2.0 Reference Guide for field descriptions.
Step 3
Click Save as New Plug and Play Profile, then Save to confirm the new profile.
Step 4
Click Publish to publish your profile and make it available for future deployment.
Step 5
Click Deploy to create a pre-provisioning definition for the incoming devices. You can create multiple pre-provisioning definitions for one profile (see Deploying a Plug and Play Profile Based on Device ID).
Deploying a Plug and Play Profile Based on Device ID
To deploy a Plug and Play profile based on the device ID:
Step 1
Choose Deploy > Plug and Play Profiles.
Step 2
In the Plug and Play Profiles page, select a profile and click Deploy.
Step 3
In the Device Provisioning Profiles page, click Add.
Note
One profile can have multiple provisioning settings that can be applied for different devices.
Step 4
Provide the required information. See the Cisco Prime Infrastructure 2.0 Reference Guide for field descriptions.
Step 5
Click OK, then click Close.
Deployment Based on Device Type
To deploy a Plug and Play profile based on the device type, you do not have to associate the device ID with the deployment profile. Device type-based deployment is useful primarily for switches that use the same set of images and configurations. Matching profiles are identified by the device type (PID) of the incoming device that is specified in the profile during the design phase.
During device type-based deployment:
1.
The device type is matched hierarchically; Prime Infrastructure searches for a profile with the same device type as that of the incoming device. If the profile does not match the device type, Prime Infrastructure searches for a profile that is defined for a higher level of the device type in the hierarchy.
For example:
•
If the `switch_profile' in Prime Infrastructure is defined for `Switches and Hubs' and the incoming device is of type Switches and Hubs > Cisco Catalyst 2928 Series Switches > Cisco Catalyst 2928-24TC-C switch, and
•
If there is no profile defined specifically for this switch (Catalyst 2928-24TC-C or Cisco Catalyst 2928 Series Switches), then the `switch_profile' is considered for deployment.
2.
If the Prime Infrastructure have multiple matching deployment profiles for a given device type, then Prime Infrastructure chooses the deployment profile that is created or updated recently.
Delivering and Applying the Bootstrap
Prime Infrastructure lets you define a bootstrap configuration template for a device.
Alternatively, the bootstrap configuration can be defined and delivered outside of Prime Infrastructure; for example, from the factory using Cisco Integrated Customization Services.
Exporting the Bootstrap Configuration
The operator can manually apply the bootstrap on the device. After the bootstrap configuration is applied, the Plug and Play deployment is initiated and the administrator can view the configuration status on Prime Infrastructure.
To export the bootstrap configuration:
Step 1
Choose Deploy > Plug and Play Profiles.
Step 2
From the Plug and Play Profiles page, select a profile from the list and click Deploy.
Step 3
From the Device Provisioning Profiles page, select the device profile from the list, click Bootstrap Configuration > Export Bootstrap, then click OK.
Step 4
After the bootstrap configuration is applied, the Plug and Play deployment is initiated. To check the Plug and Play status, do one of following:
•
To check information about all incoming devices, choose Operate> Plug and Play Status.
•
To check the status of a selected device for a selected profile, choose Deploy > Plug and Play Profiles > History.
•
To check the history of deployment, point to the Quick View icon at the right corner of the Current Status field for the device.
Delivering the Bootstrap Configuration Using TFTP
The TFTP protocol can be used to deliver the bootstrap configuration to the Prime Infrastructure TFTP server. You can specify the file name that should be created on the TFTP server; this file is used by the auto-install enabled devices to get the IP address and other Prime Infrastructure details through the DHCP. In the DHCP server, the TFTP server must be configured as the Prime Infrastructure TFTP server.
To deliver the bootstrap configuration:
Step 1
Choose Deploy > Plug and Play Profiles.
Step 2
From the Plug and Play Profiles page, select a profile from the list and click Deploy.
Step 3
In the Device Provisioning Profiles page, select the Device Profile from the list, click Bootstrap Configuration > TFTP, then click OK.
Step 4
After the bootstrap configuration is applied, the Plug and Play deployment is initiated. To check the Plug and Play status, choose one of these options:
•
To check information about all incoming devices, choose Operate> Plug and Play Status.
•
To check the status of a selected device for a selected profile, choose Deploy > Plug and Play Profiles > History.
•
To check the history of deployment, hover over the Quick View icon at the right corner of the Current Status field for the device.
Emailing the Bootstrap Configuration
The operator can manually apply the bootstrap on the device. After the bootstrap configuration is applied, the automated deployment is initiated. The administrator can view the configuration status on Prime Infrastructure.
Note
Before you can email the bootstrap configuration, you must set the email settings under Administration > System Settings > Mail Server Configuration.
To email the bootstrap configuration to the operator:
Step 1
Choose Deploy > Plug and Play Profile.
Step 2
From the Plug and Play Profiles page, click Deploy.
Step 3
From the Device Provisioning Profiles page, select a profile from the list and click Bootstrap Configuration > Email Bootstrap.
Step 4
Enter the email address to which the bootstrap configuration is be sent, then click OK.
Step 5
After the bootstrap configuration is applied, the Plug and Play deployment is initiated. To check the Plug and Play status, choose one of these options:
•
To check information about all incoming devices, choose Operate> Plug and Play Status.
•
To check the status of a selected device for a selected profile, choose Deploy > Plug and Play Profiles > History.
•
To check the history of deployment, hover over the Quick View icon at the right corner of the Current Status field for the device.
Emailing the PIN
Prime Infrastructure generates a random Personal Identification Number (PIN) per device. This PIN can be used to identify the device and the Plug and Play profile (bootstrap configuration) associated with it. After the pre-provisioning tasks are complete, the administrator must use the Email PIN option (available in the pre-provisioning task of the Prime Infrastructure) to email the unique PIN to the deployment engineer. During installation, the deployment engineer uses this PIN to download the bootstrap configuration from the Plug and Play gateway.
To deliver the PIN for the bootstrap configuration:
Step 1
Choose Deploy > Plug and Play Profile.
Step 2
In the Plug and Play Profiles page, select a profile and click Deploy.
Step 3
In the Device Provisioning Profiles page, select the device profile from the list and click Email PIN.
Step 4
Enter the email address to which the PIN should be sent and click OK.
Step 5
Use one of the following methods to apply the bootstrap configuration:
•
If you are applying the bootstrap configuration using the deployment application, the Prime Infrastructure Plug and Play deployment application communicates to the Prime Infrastructure and applies the bootstrap configuration on the device.
•
If you are manually applying the bootstrap configuration using the PIN:
–
Use the PIN to download the bootstrap configuration from the Prime Infrastructure Plug and Play gateway: https://<pnp-gateway-server>/cns/PnpBootstrap.html. You can also register the ISR's serial number during this process.
–
Apply the bootstrap configuration on the device manually, using a console or USB flash.
Note
For detailed information about Plug and Play deployment, see the Cisco Plug and Play Application 2.0 User Guide.
Step 6
After the bootstrap configuration is applied, the Plug and Play deployment is initiated. To check the Plug and Play status, choose one of these options:
•
To check information about all incoming devices, choose Operate> Plug and Play Status.
•
To check the status of a selected device for a selected profile, choose Deploy > Plug and Play Profiles > History.
•
To check the history of deployment, hover over the Quick View icon at the right corner of the Current Status field for the device.
Configuring Controller Deployments
To view and manage the devices in your network, Prime Infrastructure must first discover the devices and, after obtaining access, collect information about them. For details, see the "Adding Devices Using Discovery" section.
Prime Infrastructure simplifies WLAN deployments with support for auto-provisioning. Auto provisioning allows Prime Infrastructure to automatically configure a new or replace a current Cisco Wireless LAN Controller (WLC). Prime Infrastructure auto provisioning feature can simplify deployments for customers with a large number of controllers.
Note
The controller radio and b/g networks are initially disabled by the Prime Infrastructure startup configuration file. You can turn on those radio networks by using a template, which should be included as one of the automated templates.
Using the Auto Provisioning Filter List
The Auto Provision Filters page allows you to create and edit auto provisioning filters that define the list of allowable devices to be auto provisioned or auto monitored by Prime Infrastructure.
Note
For Auto Provisioning privileges, you must have Admin, Root, or SuperUser status. To allow or disallow a user Auto Provisioning privileges, edit the permitted tasks using Administration > AAA > User Groups > group name > List of Tasks Permitted in Prime Infrastructure. Check or uncheck the check box to allow or disallow these privileges.
Filter parameters include:
Parameter
|
Description
|
Filter Name
|
Identifies the name of the filter.
|
Filter Enable
|
Indicates whether or not the filter is enabled.
Note Only enabled filters can participate in the Auto Provisioning process.
|
Monitor Only
|
If selected, the Cisco WLC defined in this filter is managed by Prime Infrastructure but not configured by Prime Infrastructure if the Cisco WLC contacts Prime Infrastructure during the auto provisioning process.
|
Filter Mode
|
Indicates the search mode for this filter (Host Name, MAC Address, or Serial Number).
|
Config Group Name
|
Indicates the Configuration Group name.
Note All Config-Groups used by auto provision filters should not have any controller defined in them.
|
Adding an Auto Provisioning Filter
To specify the Auto Provision filter contents, you can directly enter the details in the application or import the details from a CSV file. The auto provisioning feature supports the 5500 and non-5500 series controllers. The non-5500 series controllers have AP manager interface configuration information defined, whereas 5500 series controllers do not have this information.
To add an Auto Provisioning Filter:
Step 1
Choose Deploy > Plug and Play Profiles > Controller Deployment.
Step 2
Choose Add Filter from the Select a command drop-down list, then click Go.
Step 3
Enter the required parameters.
Note
You can specify the Dynamic Interface configuration and Device Specific configuration details only when you input a CSV file. These two configurations cannot be performed using the graphical user interface.
Step 4
Click Save.
Auto Provisioning Primary Search Key Settings
Use the Primary Search Key Setting to set the matching criteria search order.
Step 1
Choose Deploy > Plug and Play Profiles > Controller Deployment, then from the left sidebar menu, choose Setting.
Step 2
Click to highlight the applicable search key, then use the Move Up or Move Down buttons to move the search key to a higher or lower priority.
Step 3
Click Save to confirm the changes.
Managing Scheduled Configuration Task Templates
The Scheduled Configuration Tasks page allows you to navigate to any templates, configuration tasks, or software download tasks that have been scheduled earlier and provides a filtered view of these tasks. This page displays the summary information about a task. The information includes the template name, last time the task was run, next time the task is scheduled to run, and a link to view the results of previous runs. You can also edit the template, modify the schedule, enable, disable, or delete a scheduled task.
After you create and schedule a configuration template, configuration group, or a software download task, the scheduled task or template is listed in the Scheduled Configuration Tasks page.
Note
You cannot create any new scheduled task or template in this page. You can only edit the scheduled task or template that is already created.
You can modify, enable, disable, or delete the following scheduled configuration tasks:
•
AP Template
•
Config Group
•
WLAN Configuration
•
Download Software
Managing AP Template Tasks
The AP Template Tasks page allows you to manage current access point template tasks.
Before You Begin
At least one lightweight access point task must exist (see Creating Lightweight AP Configuration Templates).
To modify a current access point template task:
Step 1
Choose Deploy > Configuration Deployment > Scheduled Configuration Tasks.
Step 2
Select the template name of the applicable task.
Step 3
In the AP Radio/Template page, click the Apply/Schedule tab.
Step 4
Make any necessary changes to the current schedule or access point template, and click Schedule.
To enable a current access point template task:
Step 1
Choose Deploy > Configuration Deployment > Scheduled Configuration Tasks.
Step 2
Check the check box of the scheduled task to be enabled.
Step 3
Choose Enable Schedule from the Select a command drop-down list, then click Go.
Viewing WLAN Configuration Scheduled Task Results
Note
There is no drop-down command list for WLAN Configuration.
To view and manage all scheduled WLAN tasks in Prime Infrastructure:
Step 1
Choose Deploy > Configuration Deployment > Scheduled Configuration Tasks.
Step 2
From the left sidebar menu, choose WLAN Configuration to open the WLAN Configuration Task List page.
Step 3
Select the Task Name link to open the WLAN Schedule Detail page. In this page, you can modify the date and time of the scheduled task.
Step 4
Check the check box of the scheduled task and use the Select a command drop-down list to enable, disable, or delete selected tasks.
Managing Software Downloads
Use this feature to manage the software download tasks.
Adding a Download Software Task
To add a download software task:
Step 1
Choose Deploy > Configuration Deployment > Scheduled Configuration Tasks, then from the left sidebar menu, choose Download Software.
Step 2
Choose Add Download Software Task from the Select a command drop-down list, then click Go.
Step 3
Configure the following information:
•
General
–
Task Name—Enter a Scheduled Task Name to identify this scheduled software download task.
•
Schedule Details
–
Download Type—Select the download type. Check the Download software to controller check box to schedule download software to controller or check the Pre-download software APs check box to schedule the pre-download software APs. If you select Download software to controller, specify the image details.
Note
The pre-download option is displayed only when all selected controllers are using the Release 7.0.x.x or later.
Note
To see Image Predownload status per AP, enable the task in the Administration > Background Task > AP Image Predownload Task page, and run an AP Image Predownload report from the Report Launch Pad.
–
Reboot Type—Indicates whether the reboot type is manual, automatic, or scheduled.
Note
Reboot Type Automatic can be set only when the Download software to controller option is selected.
–
Download date/time—Enter a date in the provided text box or click the calendar icon to open a calendar from which you can choose a date. Select the time from the hours and minutes drop-down lists.
–
Reboot date/time—This option appears only if select the reboot type "Scheduled". Enter a date in the provided text box or click the calendar icon to open a calendar from which you can choose a date to reboot the controller. Choose the time from the hours and minutes drop-down lists.
Note
Schedule enough time (at least 30 minutes) between Download and Reboot so that all APs can complete the software pre-download.
Note
If any one of the AP is in pre-download progress state at the time of scheduled reboot, the controller does not reboot. In such a case, wait for the pre-download to finish for all of the APs and reboot the controller manually.
–
Notification (Optional)—Enter the email address of recipient to send notifications via email.
Note
To receive email notifications, configure Prime Infrastructure mail server in the Administration > Settings > Mail Server Configuration page.
•
Image Details—Specify the TFTP or FTP Server Information:
Note
Complete these details if you selected the Download software to controller option in Schedule Details area.
TFTP—Specify the TFTP Server Information:
–
From the File is Located on drop-down list, choose Local machine or TFTP server.
Note
If you choose TFTP server, choose Default Server or add a New server from the Server Name drop-down list.
–
Specify the IP address of the TFTP server. This is automatically populated if the default server is selected.
–
Specify the local filename or click Browse to navigate to the appropriate file.
–
If you selected TFTP server previously, specify the filename.
FTP—Specify the FTP Server Information:
–
FTP Credentials Information—Enter the FTP username, password, and port if you selected the FTP radio button.
–
From the File is Located on drop-down list, choose Local machine or FTP server.
Note
If you choose FTP server, choose Default Server or add a New server from the Server Name drop-down list.
–
Specify the IP address of the FTP server. This is automatically populated if the default server is selected.
–
Specify the local filename, or click Browse to navigate to the appropriate file.
–
If you selected FTP server previously, specify the filename.
Step 4
Click Save.
Modifying a Download Software Task
Before You Begin
At least one download software task must exist (see Adding a Download Software Task).
To modify a download software task:
Step 1
Choose Deploy > Configuration Deployment > Scheduled Configuration Tasks.
Step 2
From the left sidebar menu, choose Download Software.
Step 3
Click the Task Name link to open the Download Software Task page, make any changes, then click Save.
Note
Any changes in Download Type (Download/Pre-download) or Server Type (FTP/TFTP) for the task in 'Enabled' state sets the task to 'Disabled' state and all of the existing controllers are disassociated from the task.
Selecting Controllers for the Download Software Task
This page lists all the supported controllers that can be selected for the scheduled image download/pre-download task.
To select a controller for scheduled image download:
Step 1
Choose Deploy > Configuration Deployment > Scheduled Configuration Tasks.
Step 2
From the left sidebar menu, choose Download Software.
Step 3
Click the Controller to open the Download Software Task details page, then click Select Controller to view the controller list.
Note
If the pre-download option is chosen for the task, then only the controllers with software Release 7.0.x.x or later are listed.
The Select Controllers page can also be accessed from Deploy > Configuration Deployment > Scheduled Configuration Tasks > Download Software, then click the hyperlink in the Select Controller column for any download task that is in the Enabled, Disabled or Expired state.
Note
Controllers with Reachability Status 'Unreachable' cannot be selected for Download Software Task.
Step 4
Make any necessary changes, then click Save.
Troubleshooting Template Deployment
The most common reasons that a template might not be deployed are:
•
One or more devices are unreachable—Verify that the device credentials are correct; ping the device to verify that it is reachable. For more information, see Getting Device Details from the Device 360° View.
•
A device CLI returned an error because the CLI was incorrect—Verify that the CLI commands contained in the template are correct by running the commands on a test device. There are several reasons a device CLI returned an error:
–
The device configuration was modified directly via CLI (out-of-band changes) and the Prime Infrastructure database is not synchronized with those changes. When you deploy a configuration template, it is assumed that the Prime Infrastructure database is up-to-date with the latest device configuration. We recommend that you run an inventory collection for the failing device from the Device Work Center and make sure all out-of-band changes are up-to-date, and then redeploy the template.
–
One or more devices are not in Managed collection state. When you deploy a configuration template, it is assumed that the Prime Infrastructure database is up-to-date with the current device configuration. If a device has a collection status other than Managed, for example Managed with Errors or Managed With Warnings, the template deployment might fail. See Troubleshooting Unmanaged Devices for more information about device collection status.
–
The device does not have the appropriate Cisco IOS software version or the appropriate license to configure the requested feature. Log in directly to the device on which the template deployment failed and verify that the device supports the CLI that is specified in the template.
After you create a new template, you should deploy it to one device only to verify that it works as designed. After you test that your configuration template is working on a single device, you can deploy it to multiple devices as necessary.