-
Provisioning Guide
-
Preface
-
Chapter 1 - Provisioning Overview
-
Chapter 2 - Initial Softswitch Provisioning
-
Chapter 3 - IAD Residential Subscriber Provisioning
-
Chapter 4 - ATA 18x Residential Subscriber Provisioning
-
Chapter 5 - Cable Subscriber Provisioning
-
Chapter 6 - CALEA Provisioning
-
Chapter 7 - Feature Provisioning
-
Chapter 8 - Centrex, MLHG, and Voice Mail Provisioning
-
Chapter 9 - Route Provisioning
-
Chapter 10 - Announcement Server Provisioning
-
Chapter 11 - Provisioning Channel-Associated Signaling
-
Chapter 12 - SS7 Provisioning
-
Chapter 13 - H.323 Provisioning
-
Chapter 14 - SIP Subscriber Provisioning
-
Chapter 15 - ENUM Provisioning
-
Appendix A - Cause Code to Announcement ID Mappings
-
Appendix B - Use Dial Plan Token Routing Impact
-
Appendix C - National Call Type Processing
-
Appendix D - Factory Installed Scripts
-
Appendix E - Defined Cause Codes
-
Appendix F - Admission Reject Cause Code Mapping
-
Appendix G - H323 Trunk Group Cause Code Mapping
-
Appendix H - Session Initiation Protocol Cause Code Mapping
-
Appendix I - Sample Asia Provisioning Script
-
 Feedback
Table Of Contents
Cisco BTS 10200 Softswitch Provisioning Overview
Activating SSH Versions 1 and 2
Preservation of Provisioning Order
Retrieval of Transaction Information
CLI Reference Guide Conventions
Confirming That a Script File Has Been Processed
Extensible Provisioning and Operations Manager
Cisco BTS 10200 Softswitch Provisioning Overview
Revised: May 31, 2010, OL-12777-12This chapter provides an overview of the Cisco BTS 10200 Softswitch provisioning process and tools. It includes the following sections:
•
Extensible Provisioning and Operations Manager
Provisioning Overview
The Cisco BTS 10200 Softswitch provides the major functions performed by traditional Class 4 tandem and Class 5 Central Office (CO) switching systems. It provides call-control intelligence for establishing, maintaining, routing, and terminating voice calls, and it also serves as an interface to enhanced service and application platforms. The Cisco BTS 10200 Softswitch empowers service providers and carriers to gracefully transition to packet-based technology by leveraging the power of packet networks while seamlessly operating with legacy circuit-switched infrastructures.
The Cisco BTS 10200 Softswitch incorporates a comprehensive feature set, including support for local and long-distance voice services that previously required implementation of large, complex telephone switches.
Refer to the Cisco BTS 10200 Softswitch System Description for a complete description of the architecture, components, and features associated with the Cisco BTS 10200 Softswitch.
Provisioning tasks are performed in a sequence that can vary depending on your configuration. However, some provisioning tasks must be performed before certain other tasks are performed. The following list identifies a recommended provisioning sequence:
1.
2.
3.
4.
Secure Shell
Secure shell (SSH) is the default method of access to the Cisco BTS 10200 Softswitch command-line interface (CLI). SSH provides encrypted communication between a remote machine and the Element Management System (EMS) or Call Agent (CA) for executing CLI commands. The SSH server runs on the EMSs and CAs of the Cisco BTS 10200 Softswitch. To connect, the client and server sides must run the secure shell daemon (SSHD).
The SSHD runs as a Solaris daemon process. It is automatically started when the Solaris is brought up, but if it dies, it must be manually restarted. A single unique instance of the SSHD runs on every component of the Cisco BTS 10200 Softswitch.
SSH is an optional login choice. Use the Cisco BTS 10200 Softswitch default application installation option to enable SSH and to disable RSH, REMSH, RLOGIN, Telnet, or REXEC. FTP is not affected. If SSH is not selected, then RSH, REMSH, RLOGIN, Telnet, or REXEC are enabled and FTP is still not affected.
If SSH is enabled, new users are prompted to enter a new password and reenter that password during their first login. From that point, they are prompted once for a password only.
To log in from the client side, enter the following:
ssh -l username IPaddressOn the first SSH login from the client side, expect a message similar to this:
The authenticity of host [hostname] can't be established.
Key fingerprint is 1024 5f:a0:0b:65:d3:82:df:ab:42:62:6d:98:9c:fe:e9:52.
Are you sure you want to continue connecting (yes/no)?
Enter yes and press Enter.
The password prompt appears. From this point on, all communications are encrypted.
Subsequent SSH logins prompt only for a password.
Activating SSH Versions 1 and 2
SSH version 2 is the default SSH version. However, systems such as CALEA can use SSH version 1. The following procedure allows you to activate SSH version 1 so that the Cisco BTS 10200 supports both versions 1 and 2.
Step 1
Step 2
Step 3
Before You Begin
Perform the following tasks before using this guide:
•
•
–
–
–
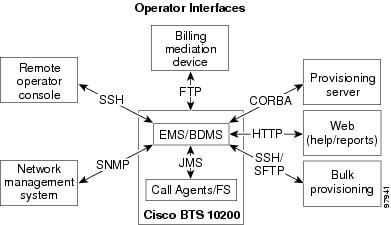
Operator Interfaces
The Cisco BTS 10200 Softswitch Element Management System (EMS) has six major operator interfaces, illustrated in Figure 1-1:
•
•
•
•
•
•
Figure 1-1 EMS Operator Interfaces
The EMS manages these interfaces and forwards the information to external devices over Telnet/SSH, SFTP, and SNMP.
EMS Provisioning Paths
The EMS database interfaces internally with the CA and Feature Server (FS) using the Java Message Service (JMS) protocol over IP protocol. The Cisco BTS 10200 Softswitch uses Oracle to provide database applications. Oracle is flexible and scalable and has its own keep-alive and heartbeat checks for replication.
The Cisco BTS 10200 Softswitch provides two provisioning paths:
•
•
Once the provisioned data enters the EMS, the following occurs:
•
•
•
•
The IDX DB (shared memory) on the CA/FS maintains only the real-time data needed for expedited call call processing. Data is replicated to the standby system.
Provisioning and replication paths are fully redundant, eliminating any single point of failure during failover and support:
•
•
•
Command Line Interface
The command-line interface (CLI) is a command language used to communicate with the Cisco BTS 10200 Softswitch. It is used to provision the entire softswitch and to manually add, delete, or modify objects.
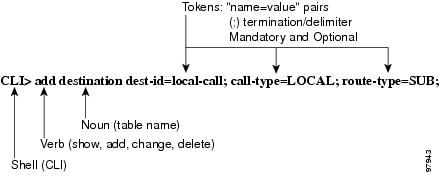
CLI Structure
Figure 1-2 provides an architectural example of the add destination CLI command.
Figure 1-2 Architecture of a CLI Command
.
CLI Command Syntax
The following conventions apply to CLI commands:
•
•
•
•
•
•
•
•
•
•
•
•
•
•
•
•
•
•
% is the wildcard for show, report, and display commands (provisioning tables).
* is the wildcard for status and control commands (OAMP tables).
Preservation of Provisioning Order
The Operations, Administration, Maintenance, and Provisioning (OAM&P) element of the Cisco BTS 10200 Softswitch provides an asynchronous provisioning mechanism. A provisioning request initiated by a user on an external interface, such as CLI, is added into the database on the Element Management System (EMS), and a response is sent to the user indicating success or failure. This response indicates that the transaction has been committed to the database on the EMS and has been added to the Transaction Queue table. An indication of success does not guarantee successful execution of the transaction on the Call Agent or Feature Server.
Control and status commands are executed independently of provisioning commands and use different paths to the Call Agent. Control commands are queued with provisioning commands and ensure execution of the control command after all provisioning commands issued prior to it are executed. The flag, wait=Y/N, is added to all control and status commands to indicate whether control/status commands should be queued or not. If the flag is set to Y, control and status commands are queued. The default flag is set to N.
The following command controls the media gateway in service after all provisioning commands preceding this command have executed:
control mgw id=ubr.100; target-state=INS; mode=GRACEFUL; wait=y;Issue the following command to verify the status of the media gateway:
status mgw id=ubr.100; wait=y;Retrieval of Transaction Information
The following command shows all transactions in the transaction queue:
show transaction-queueSee the Cisco BTS 10200 Softswitch Command Line Interface Reference Guide for a complete list of parameter values.
CLI Reference Guide Conventions
The following conventions are used in this document and in commands used to provision and maintain the Cisco BTS 10200:
•
•
•
•
•
CLI Control Characters
Use the following control key characters for navigation:
•
•
•
•
•
•
•
•
•
•
•
•
•
•
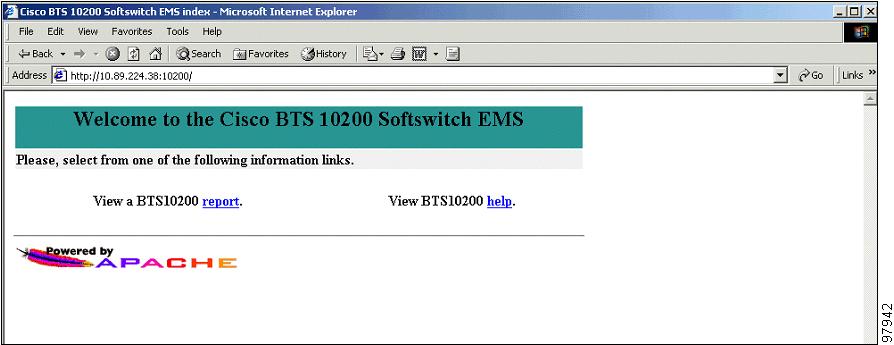
Report Files
Report files are available through XHTML web pages. The URL to get the main report menu, as shown in Figure 1-3, is the Primary EMS DNS or IP address, for example, https://priemstrn1 or https://10.89.52.201.
Figure 1-3 Main Report/Help Menu
From the main window you can
•
•
The Cisco BTS 10200 Softswitch allows you to enable or disable the collection of measurement data and specify the reporting interval on a per report basis. The factory default setting is to enable the collection of all measurement types and to set the reporting intervals to 15 minutes. Currently, there are 13 types of measurement data generated by the Cisco BTS 10200. See the Cisco BTS 10200 Softswitch Command Line Interface Reference for a complete list of report types.
The command in the following example provisions the collection of call processing measurement data:
change measurement-prov type=callp; enable=yes; time-interval=15;Bulk Provisioning
Batch files, called scripts, can be prepared in advance and forwarded, using SFTP, to the EMS for execution. Bulk provisioning involves the following procedures:
•
To bulk provision, make an SFTP connection to the EMS, navigate to the /opt/ems/ftp/deposit directory, and upload a script file. This directory is checked every 20 seconds for script files. Each file is processed line by line as a series of separate commands and deleted when it is finished executing. A report file is created, and you can view it with a web browser by going to the location https://ems<MachineName or IP address>.
Creating a Script
When you order a Cisco BTS 10200 Softswitch, a complete script file is created and delivered in both hard and soft copies. You can modify this script and create additional scripts. Scripts should follow the provisioning steps contained in the Cisco BTS 10200 Command Line Interface Reference Guide.
A script can contain a maximum of 10,000 command lines. We recommend that you have two separate scripts, one for provisioning and one for status and control. Otherwise, the Cisco BTS 10200 Softswitch might try to control a trunk group, trunk, or termination in services that have not yet been provisioned in the system.
Note
Perform the following steps to prepare a script file on your local system:
Step 1
Note
Step 2
Step 3
Note
The following is an example of a response received with 3000 errors:
Reply from command at line 2814(2002-09-30 09:27:21):No Reply received.Reply from command at line 2814(2002-09-30 09:27:21):!!!!!!! Maximum(3000) number of errors reached!!!!!!!Done reading: PRIEMS18_CLI_20_Q02.txt End-time: 2002-09-30 09:27:22Success:-1398 Failed:3000
Executing a Script
You can use bulk provisioning to provision or assist with system recovery. To perform bulk provisioning, use the following steps:
Step 1
Step 2
Step 3
The system executes the script. When the script is complete, a report is created.
Step 4
The following information is captured in the report file:
•
•
•
•
Note
Confirming That a Script File Has Been Processed
To confirm that a bulk provisioning script has executed, verify that the system has generated an output file by going to https://ems<MachineName or IP address>.
All command information is also stored in the activity log and can be accessed by means of the show activity-summary CLI command.
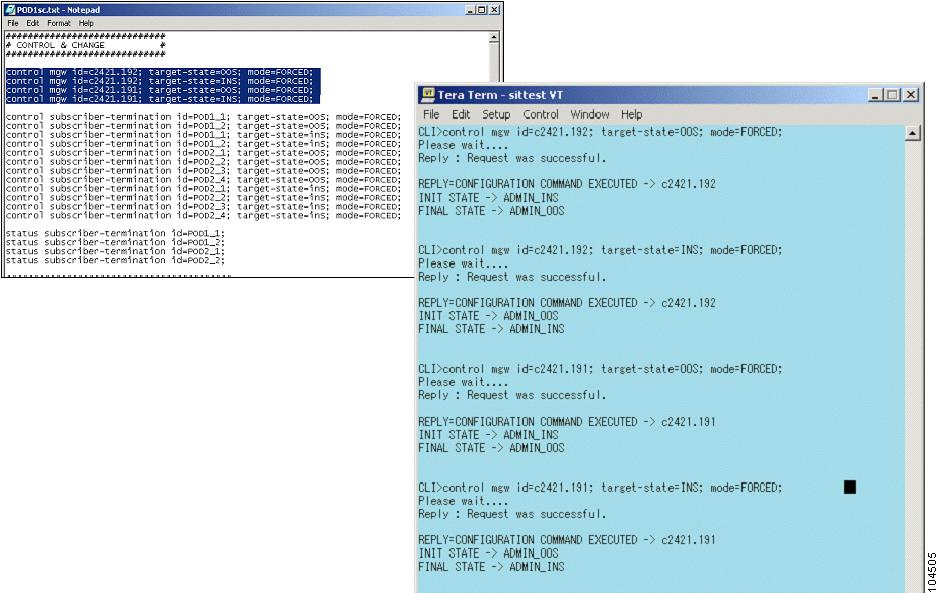
Copy and Paste Provisioning
Figure 1-4 illustrates copy and paste provisioning, which is executed by the copying of CLI provisioning commands from a text file directly into the system at the CLI prompt. No report is generated, but all command information is stored in the activity log.
Figure 1-4 Copy and Paste
.
Extensible Provisioning and Operations Manager
Cisco Extensible Provisioning and Operations Manager (EPOM) is a web-based application for real-time provisioning of the Cisco BTS 10200 Softswitch that allows authorized users to show, add, modify, delete, and check the status of Cisco BTS 10200 Softswitch components.
Provisioning tasks in Cisco EPOM generally match tasks done using the Cisco BTS 10200 Softswitch CLI but are accomplished through a web-browser interface. Common multistep procedures are simplified by being grouped together into tasks executed with task wizards.
Authorized Cisco EPOM administrators set up and manage the Cisco EPOM server software and perform the following Cisco EPOM user administration and network setup tasks:
•
•
•
•
•
•
•
•
•
•
•
For details about these tasks, refer to the Cisco EPOM Getting Started Guide. Real-time provisioning of the Cisco BTS 10200 Softswitch using the Cisco EPOM provisioning wizards is described in the Cisco EPOM Provisioning Guide for the Cisco BTS 10200 Softswitch.
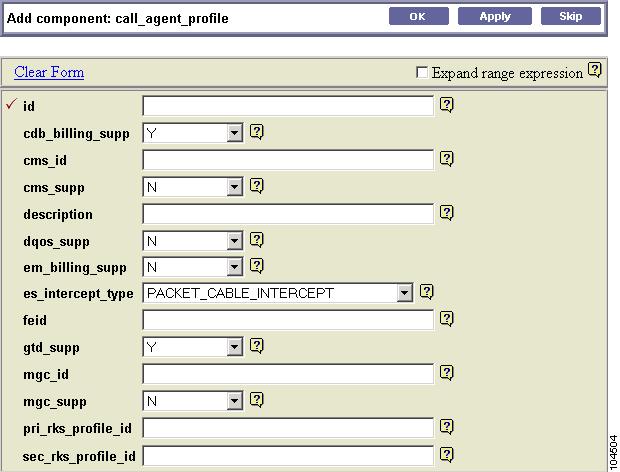
Cisco EPOM Window Example
Figure 1-5 displays an example of a typical EPOM window.
Figure 1-5 Example of an EPOM Window
Cisco EPOM Database
The Cisco EPOM database maintains Cisco EPOM administrative data (users, groups, and domains) and the inventory of Cisco BTS 10200 Softswitch devices. Device-level information (such as subscribers, subscriber features, and communication with media gateways) is retrieved from the Cisco BTS 10200 Softswitch EMS server devices in real time and is not stored in the Cisco EPOM database.