-
Operations and Maintenance Release 4.5
-
Preface
-
Chapter 1 - Cisco BTS 10200 Softswitch Startup and Shutdown Procedures
-
Chapter 2 - Managing Access and Users
-
Chapter 3 - Operations
-
Chapter 4 - Maintaining the BTS 10200 Softswitch
-
Chapter 5 - Maintenance and Diagnostics for External Resources
-
Chapter 6 -- Traffic Measurements
-
Chapter 7 - SNMP Interface
-
Chapter 8 - Congestion Detection and Protection
-
Appendix A - Feature Tones
-
 Feedback
Table Of Contents
Element Management System (SNMP Agent)
Statistics/Traffic Measurement
Querying and Controlling EMS, BDMS, CA and FS
Querying and Controlling Various Components
Querying and Controlling Bulk Status of Various Components
Accessing the Sun Solaris SNMP Agent
Accessing and Querying a Non-Standard SNMP Port Directly
Accessing and Querying the Sun Solaris SNMP Agent
Enabling NMS to Query/Poll Solaris SNMP Agent
SNMP Interface
Revised: July 21, 2009, OL-4495-10Introduction
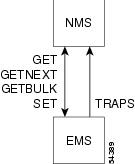
The Cisco BTS 10200 Softswitch supports Simple Network Management Protocol (SNMP) operations that allow communications between the Element Management System (EMS) and a service provider's network management system (NMS). The EMS sends SNMP traps to the NMS, and the NMS can query the EMS for specific data elements (see ). Status and control operations as well as traffic and statistics query operations are supported.
Figure 7-1 NMS/EMS Interaction Via SNMP
Element Management System (SNMP Agent)
The Softswitch SNMP Agent supports SNMPv2c operations defined by the opticall.mib Management Information Base (MIB). The MIB is located in the directory /opt/BTSsnmp/etc on the EMS. The MIB opticall.mib uses variables from three other MIBs: IPCELL-TC, SNMPv2-TC, and SNMPv2-SMI. The NMS needs to load the main MIB (opticall.mib), that will in turn import the three other MIBs.
SNMP Agent Functions
The following functions are supported by the Softswitch SNMP Agent:
•
MIB-II System branch information
•
•
•
•
•
Read access to the SNMP agent is required for the statistics and traffic management queries and for status queries. Write access is required for the control commands. Trap reports do not involve read/write access.
Read/write access to the SNMP agent is restricted by requiring the NMS to pass a valid community string to the agent. The community string passed on by the NMS message is authenticated against a list of community strings maintained by the SNMP agent. The SNMP agent uses each string as a password, and disallows access if the password is not valid.
In addition, to perform Status/Control via SNMP, the community string used must also be at a minimum level to perform those commands as defined by the BTS 10200 Command Line Interface (CLI) security privileges. For example, if the community string used to control a termination in service (INS) is below the minimum level in the CLI, then the SNMP request fails with General Error.
The SNMP community table in the Softswitch database provides persistent storage of community strings for the SNMP agent. The default value for both the read and write communities is "public". This default value can be deleted by the user and replaced with specific communities using the following CLI commands:
–
–
–
–
–
–
The provisioned values must be ASCII strings and can be up to 64 characters long.
Statistics/Traffic Measurement
Statistical data (traffic measurements) are collected for the following components of the Softswitch:
•
•
•
•
•
•
•
•
•
•
•
•
•
•
•
•
•
•
•
•
•
•
•
SNMP Trap Reports
Traps are sent from the Softswitch SNMP agent to the NMS. Traps are mapped to all alarms generated from the EMS. Any alarms that cannot be mapped to a specific trap are mapped to a generic trap. Mapped traps and generic traps contain one or more of the following information types, depending upon availability of the information:
•
•
•
•
•
•
•
•
An operator of an NMS who would like to receive traps from the SNMP agent needs to add an entry to SNMPTRAPDEST via CLI. For the specific CLI command, refer to the CLI Reference Guide.
•
•
•
•
•
•
Once this is done, the NMS will start receiving traps.
Note
Status and Controls
Querying and Controlling EMS, BDMS, CA and FS
Status queries on the following components can be performed by simple GET/GETNEXT operations:
•
•
•
•
•
Controls can be performed on these components using the SET operation, but only on the primary component (primary EMS, primary CA and primary FS). The primary component, in turn, controls the secondary component. If the operator tries to perform a SET operation on the secondary component, the agent returns an error.
Querying and Controlling Various Components
Status queries on the current status of the following components can be performed by GET/GETNEXT operations on the variousState columns in the MIB.
•
•
•
•
•
•
•
In addition, controls can be performed on the following components by SETs on various columns in the MIB.
•
•
•
•
•
Controls can be performed as follows:
Step 1
Step 2
If you perform a GET/GETNEXT operation on the ControlState when all necessary fields are NOT set, then a value of 2 (insufficient-data) is returned. If all necessary fields ARE set, then a value of 3 (ready-to-commit) is returned.
Querying and Controlling Bulk Status of Various Components
Bulk Status queries on the current status of the following components can be performed by GET/GETNEXT operations on the following branch: .iso.org.dod.internet.private.enterprises.ipcell.opticall.statusControlBulk. The results return from querying these components are a Page Number column and a Status Value column. The Status Value column specifies each component id and the statuses in enumerated value correlating to the statuses of those components above.
•
•
•
•
Accessing the Sun Solaris SNMP Agent
There are two possible methods to access and query the Sun Solaris SNMP Agent:
1.
Note
2.
Note
Accessing and Querying a Non-Standard SNMP Port Directly
Perform the following steps to access and query the Sun Solaris SNMP Agent using a non-standard SNMP port:
Step 1
a.
- specify a user-defined community string for read access
- enter only one value
b.
- specify the IP or hostname for querying the entity (NMS)
- you can specify multiple entries delimited by spaces
Note
Step 2
/etc/init.d/S98mibiisa stop/etc/init.d/S98mibiisa startStep 3
Accessing and Querying the Sun Solaris SNMP Agent
Perform the following steps to access and query the Sun Solaris SNMP Agent through the Cisco BTS 10200 Softswitch SNMP Master Agent Using Port 161:
Step 1
a.
- specify a user-defined community string for read access
- enter only one value
b.
- verify that the localhost is one of the entries
Step 2
add snmpconfig type=SETTING; value=COUPLE_SUN_AGENTStep 3
Step 4
kill `ps -ef | grep -i sad | grep -v grep | awk '{print $2}'`Step 5
Enabling NMS to Query/Poll Solaris SNMP Agent
The EMS runs two SNMP agents as follows:
•
•
The active EMS node runs the SAD process, which converts the BTS 10200 specific events/alarms into SNMP traps and sends them to the configured SNMP Trap listeners or the NMSes. The SAD process handles the SNMPWALK/GET/GETNEXT/SET on the OIDs that are defined in the opticall.mib file. The SAD process also runs on the standby EMS, but does not perform any function.
Note
Note
The standard Solaris SNMP agent runs on both the active and standby EMS and CA nodes. Therefore, all the four nodes generate the solaris-level traps. The name of the standard Solaris SNMP agent is mibiisa, which runs on port number 13230. The Solaris SNMP agent can be used to collect the sun box related statistics and/or traps. Note that the mibiisa supports only those OIDs (object identifiers) that are defined in the SUN MIB.
Note
To enable the NMS to directly query the Solaris SNMP agent for a range of OIDs specified by SUN MIBs, and receive Solaris box-level traps, do the following:
1.
2.
3.
4.
5.
/etc/init.d/S98mibiisa stop/etc/init.d/S98mibiisa start6.
snmpwalk -c public -p 13230 prica07 systemThe output appears as given below:
system.sysDescr.0 = Sun SNMP Agentsystem.sysObjectID.0 = OID: enterprises.42.2.1.1system.sysUpTime.0 = Timeticks: (279199168) 32 days, 7:33:11.68system.sysContact.0 = System administratorsystem.sysName.0 = prica07system.sysLocation.0 = System administrators officesystem.sysServices.0 = 72