-
Cisco TelePresence Manager 1.7 Administration and Installation Guide
-
Preface
-
General Information About Cisco TelePresence Manager
-
Pre-Install System Setup for Cisco TelePresence Manager
-
Configuring Microsoft Exchange for Cisco TelePresence Manager
-
Configuring IBM Domino Server for Cisco TelePresence Manager
-
Configuring Scheduling API for Cisco TelePresence Manager
-
Configuring Cisco Unified CM for Cisco TelePresence Manager
-
Installing and Configuring Cisco PreQualification Assistant
-
Installing or Upgrading Cisco TelePresence Manager
-
Initializing Cisco TelePresence Manager
-
Additional Installation Configurations for Cisco TelePresence Manager
-
Configuring Cisco TelePresence WebEx OneTouch for Cisco TelePresence Manager
-
Monitoring Cisco TelePresence Manager
-
Cisco TelePresence Manager Emails and Meeting Organizer UI
-
Supported MIBs for Cisco TelePresence Manager
-
Troubleshooting Cisco TelePresence Manager
-
Cisco TelePresence Manager System Messages
-
Replacing a Cisco TelePresence System Codec
-
Reconfiguring Cisco TelePresence Manager and CTMS Addressing
-
 Feedback
Table Of Contents
Configuring Cisco TelePresence WebEx OneTouch for Cisco TelePresence Manager
Before Configuring Cisco TelePresence WebEx OneTouch
Setting Up Cisco WebEx Administration Site Account
Specifying Cisco TelePresence Integration Options
Specifying a Cisco WebEx Account in CTS-Manager
Cisco WebEx First-Time Setup in CTS-Manager
Configuring a Cisco WebEx Server
Configuring Cisco WebEx Users and Enabling Cisco WebEx
Enabling WebEx Feature and Selecting Default WebEx User Type
Obtaining the Cisco WebEx Site Security Server Certificate
Obtaining Your Certificate Using Internet Explorer
Obtaining Your Certificate Using Firefox
Adding Your Certificate to CTS-Manager
First-Time Scheduling with Cisco TelePresence WebEx OneTouch
Configuring Other Applications
Configuring Cisco TelePresence WebEx OneTouch for Cisco TelePresence Manager
First Published: September 27, 2010, OL-22226-01
Note
You must be running CTS-Manager, CTMS, CTS software release 1.7 to use Cisco WebEx OneTouch features.
Contents
This chapter contains the following sections:
•
•
•
•
•
•
•
•
Introduction
This chapter explains how to set up Cisco TelePresence WebEx OneTouch in CTS-Manager, which allows WebEx participants to join TelePresence meetings.
Before Configuring Cisco TelePresence WebEx OneTouch
Before configuring WebEx OneTouch in CTS-Manager, you must have the following information:
WebEx hostname
Hostname of WebEx scheduling server used by the customer. Example: example.webex.com (provided by WebEx team).
WebEx Admin Username
WebEx site administrator's username (provided by the WebEx team).
WebEx Admin Access Code
WebEx site administrator's access code (provided by the WebEx team).
WebEx Scheduling Server URL
URL for WebEx Scheduling Server (provided by the WebEx team).
WebEx Hostname Certificate
Security certificate of WebEx scheduling server. For more information, see Obtaining the Cisco WebEx Site Security Server Certificate
Default WebEx user setting for new users
You must decide whether you want new users to be Permitted or Non-Permitted users by default.
For more information, see Obtaining the Cisco WebEx Site Security Server Certificate.
LDAP/AD user group name for premium users
LDAP user group name to be assigned to the WebEx Premium user role.
Setting Up Cisco WebEx Administration Site Account
You have access to the Cisco WebEx Administration Site interface through your Cisco WebEx administrator using a unique Cisco WebEx administration URL and access code. As a site administrator, you can log in to access current Cisco WebEx user and administration guides for the services and features that have been configured on your Cisco TelePresence system.
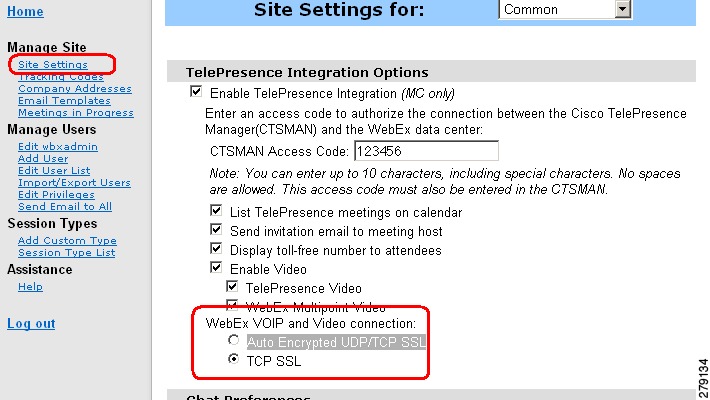
Specifying Cisco TelePresence Integration Options
To integrate Cisco TelePresence to Cisco WebEx on the Cisco WebEx site, follow these steps:
Step 1
Step 2
Figure 11-1 Configuring Cisco WebEx Connection Settings
Step 3
Step 4
Step 5
Step 6
Step 7
Step 8
Step 9
Step 10
Specifying a Cisco WebEx Account in CTS-Manager
To begin using Cisco TelePresence WebEx OneTouch on your Cisco TelePresence System (CTS), you must perform a one-time initial registration so that information from CTS-Manager can be pushed to the Cisco TelePresence Multipoint Switch (CTMS) to enable the audio portion of the Cisco WebEx meeting. The meeting scheduler is validated in Cisco TelePresence Manager using the user's Lightweight Directory Access Protocol (LDAP) login.
Note
Before You Begin
Obtain the following from your Cisco WebEx administrator:
•
•
Cisco WebEx First-Time Setup in CTS-Manager
This section describes how to perform the one-time initial registration in CTS-Manager that specifies the Cisco WebEx account information so that you can add Cisco WebEx functionality to Cisco TelePresence meetings.
Before You Begin
You will need at least one CTMS configured in CTS-Manager before you can configure CTS-Manager for Cisco WebEx. The CTMS communicates with the Cisco WebEx Telephony Gateway to establish the audio portion of a Cisco WebEx meeting.
CTS-Manager requires that all scheduled CTMSes are registered with a WebEx Telepresence Gateway.
To register a CTMS with a WebEx Telepresence Gateway, log in to the CTMS administration UI and go to Configure > WebEx.
Complete the steps in Chapter 2, "Configuring Cisco WebEx OneTouch on the Cisco TelePresence Multipoint Switch."in the "Cisco WebEx OneTouch Configuration Guide for the Cisco TelePresence System" at the following URL: http://www.cisco.com/en/US/docs/telepresence/cts_admin/webex_solutions/guide/cts_webex_ctms.html
Once you have configured the CTMS, proceed with the following tasks:
•
•
Configuring a Cisco WebEx Server
To configure a new server for Cisco WebEx, follow these steps:
Step 1
Step 2
Step 3
Step 4
Step 5
Step 6
Step 7
Step 8
Note
Step 9
Step 10
Step 11
Configuring Cisco WebEx Users and Enabling Cisco WebEx
This section contains the following information:
•
WebEx User Types
The meeting organizer can schedule meetings with options defined in Cisco TelePresence Manager based upon one of three possible WebEx user types configured in CTS-Manager:
•
Note
•
a.
b.
c.
d.
When the meeting is scheduled, CTS-Manager pushes the schedule information, along with the Cisco WebEx meeting details, to the CTMS Conference Manager. This information is maintained in the Conference Manager until the meeting starts.
•
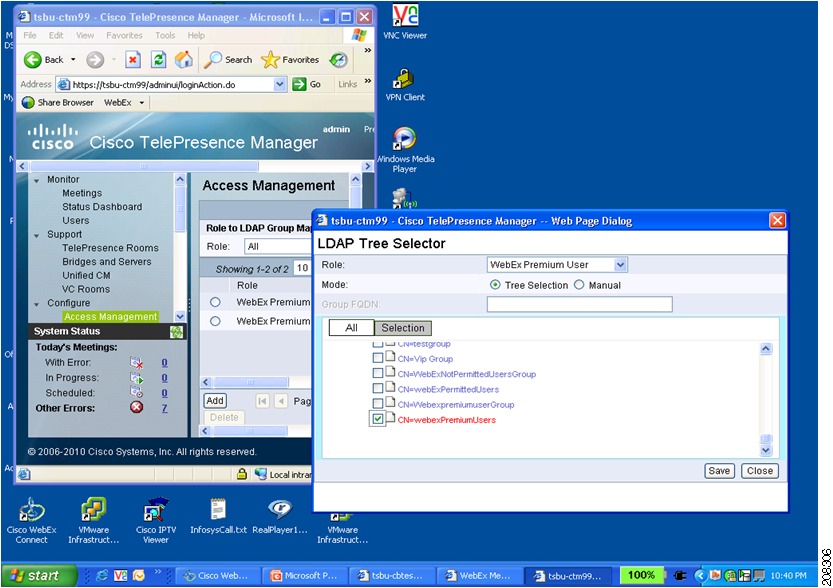
Configuring WebEx Users
Using the Access Management window in CTS-Manager, you can configure the three different types of WebEx users mentioned in the previous section WebEx User Types. To assign a WebEx role, you must add the user group to the WebEx user role by following these steps in the CTS-Manager administration interface:
Step 1
The LDAP Tree Selector window appears.
Step 2
Step 3
Figure 11-2 Assigning a User Group to WebEx User Role
Step 4
The user group is added to the selected WebEx user role.
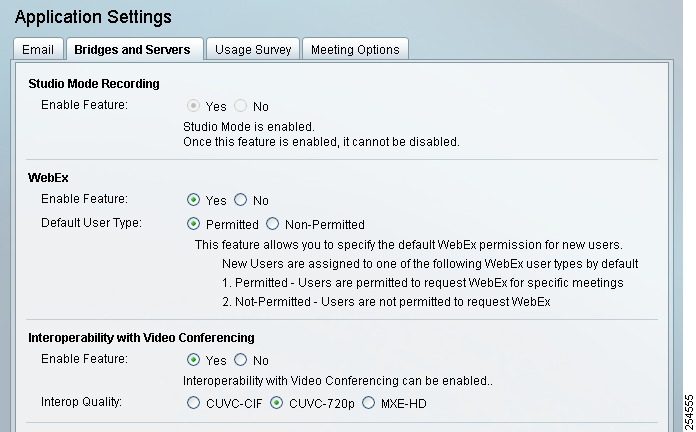
Enabling WebEx Feature and Selecting Default WebEx User Type
To select Permitted and Non-Permitted Cisco WebEx user types, follow these steps in the CTS-Manager administration interface:
Step 1
Step 2
Figure 11-3 Enabling WebEx and Configuring Default User Type
Step 3
Step 4
•
•
Note
Step 5
Step 6
Obtaining the Cisco WebEx Site Security Server Certificate
Use the information in this section to obtain and add your Cisco WebEx site security server certificate to CTS-Manager:
•
•
•
Obtaining Your Certificate Using Internet Explorer
To obtain your Cisco WebEx site security certificate using Internet Explorer (IE), follow these steps:
Step 1
Step 2
Step 3
The certificate window appears.
Step 4
Step 5
Step 6
The Certificate window appears.
Step 7
Step 8
The Certificate Export Wizard window appears.
Step 9
Step 10
Step 11
The Save As window appears.
Step 12
Step 13
Step 14
When the export is complete, the message "The export was successful" appears.
Step 15
Obtaining Your Certificate Using Firefox
To obtain your Cisco WebEx site security certificate using Firefox, follow these steps:
Step 1
Step 2
Step 3
The page info window appears with the Security tab selected.
Step 4
The Certificate Viewer window appears.
Step 5
Step 6
Step 7
The Save Certificate To File window appears.
Step 8
Step 9
Step 10
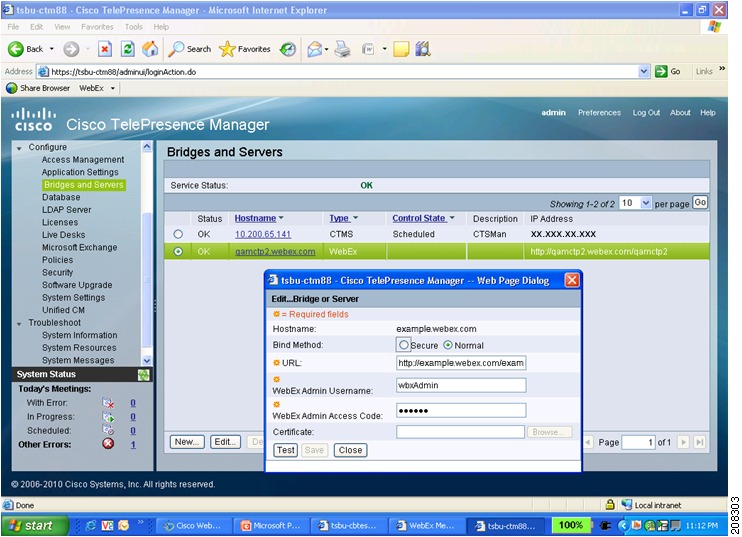
Adding Your Certificate to CTS-Manager
To add your certificate to CTS-Manager, follow these steps in the CTS-Manager administration interface:
Step 1
Step 2
Figure 11-4 Edit...Bridge or Server Dialog
Step 3
Step 4
Step 5
Tip
Step 6
Step 7
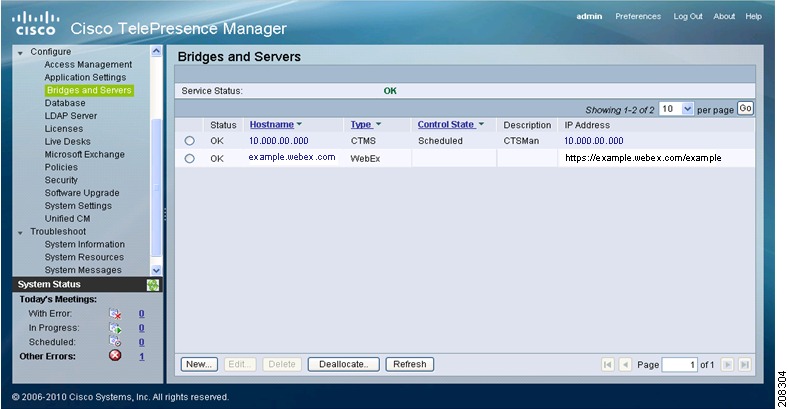
Figure 11-5 Service Status OK
Tip
First-Time Scheduling with Cisco TelePresence WebEx OneTouch
The first time a meeting organizer schedules a meeting with the Cisco TelePresence WebEx OneTouch feature, they must follow these steps:
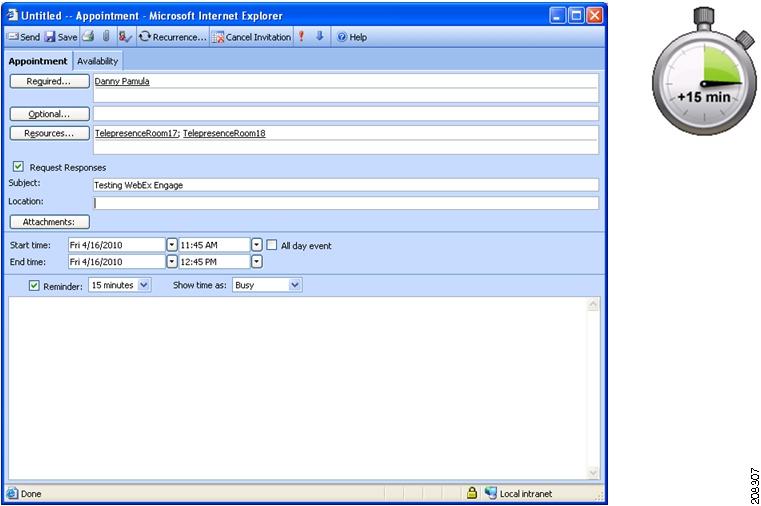
Step 1
Figure 11-6 Schedule Meeting
Step 2
Step 3
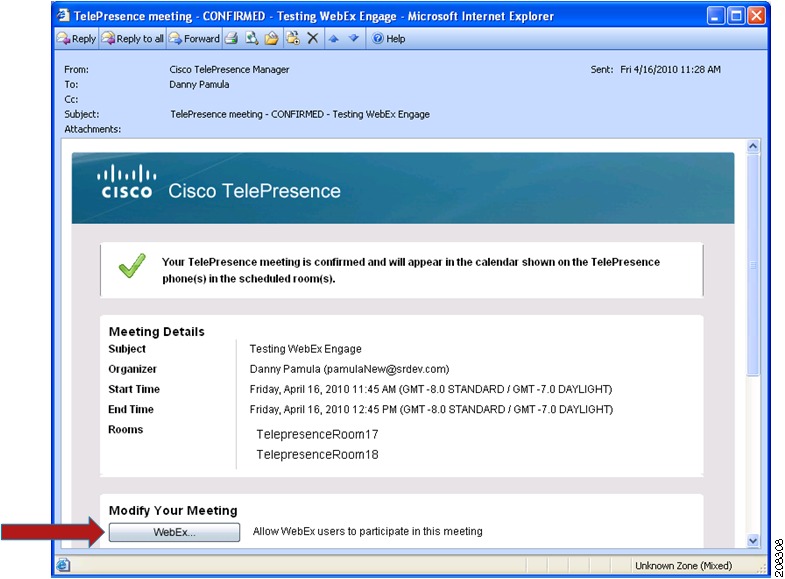
Note
Figure 11-7 Click the WebEx Button in Meeting Email Confirmation
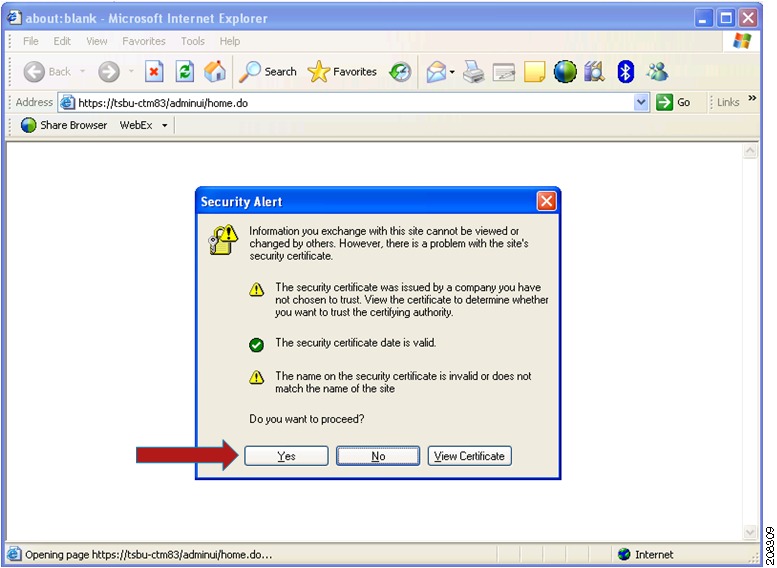
Step 4
•
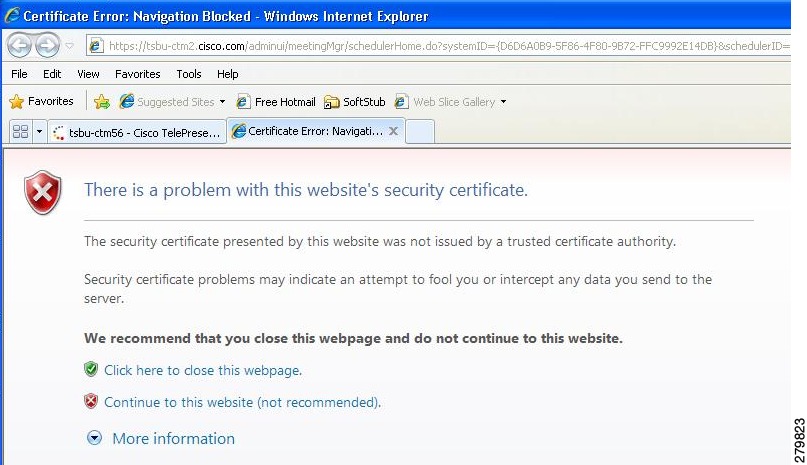
Figure 11-8 Security Warning in Internet Explorer Version 6
•
Figure 11-9 Security Warning in Internet Explorer Version 8
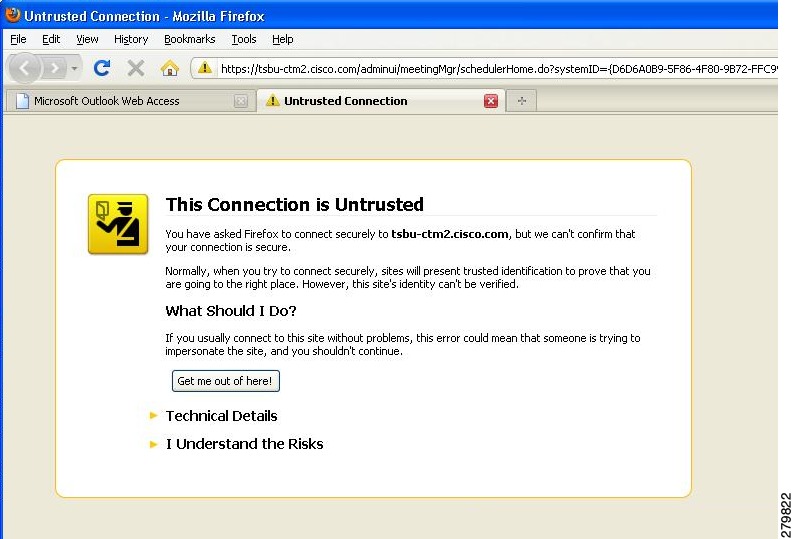
•
Figure 11-10 Security Warning in Firefox
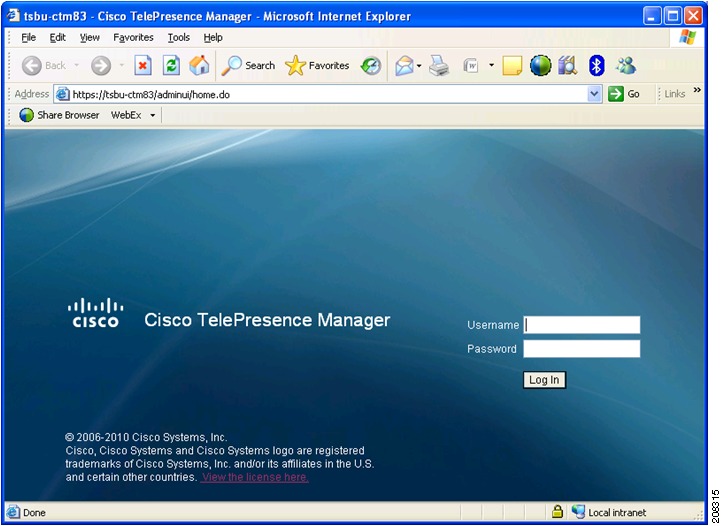
Step 5
Figure 11-11 CTS Manager Log In
Step 6
The meeting details window for your meeting appears, with the WebEx tab selected.
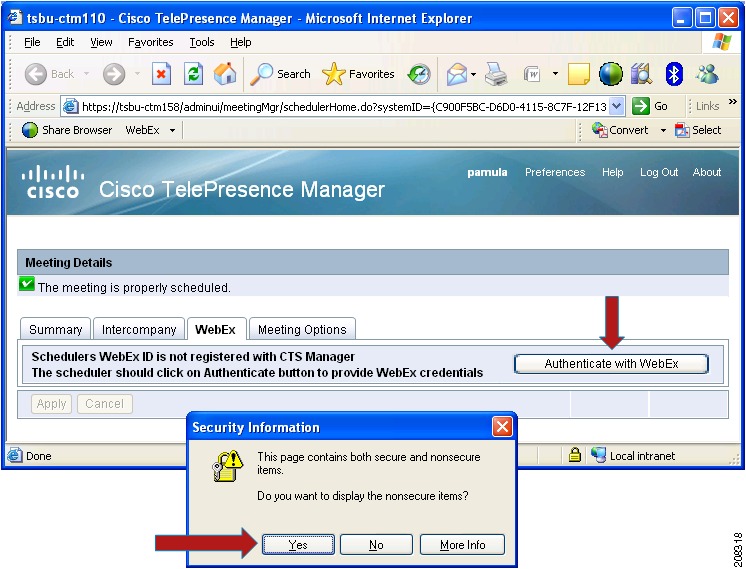
Step 7
a.
–
Figure 11-12 Authenticate with Cisco WebEx Internet Explorer Version 6
–
–
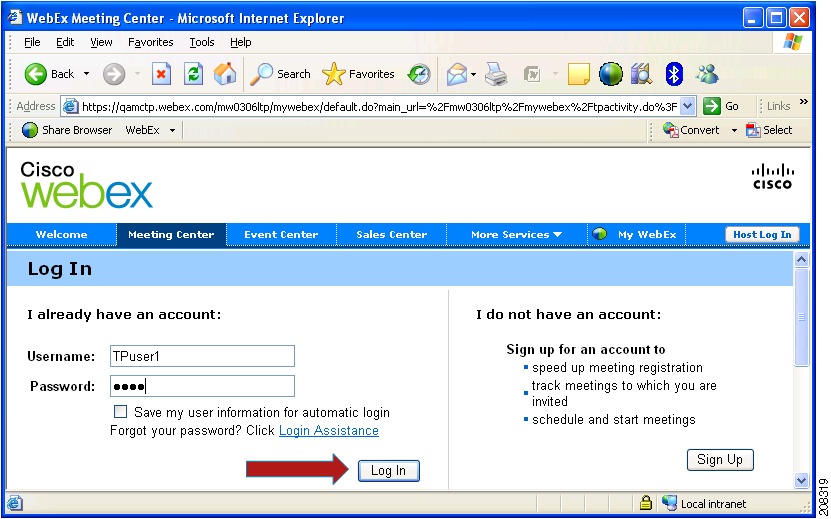
This redirects you to the Cisco WebEx server. The Cisco WebEx login page appears, as shown in Figure 11-13.
Figure 11-13 Log in to Cisco WebEx
b.
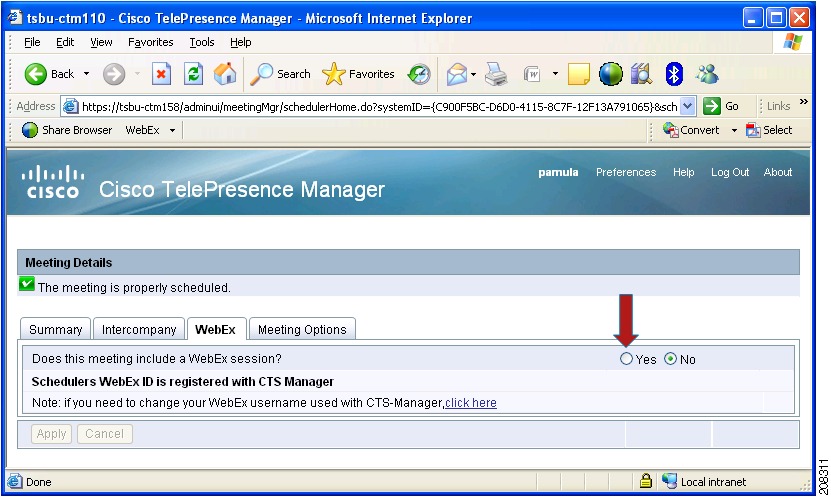
Upon successful authentication, you are directed back to the CTS-Manager meeting details window with the WebEx tab selected, as shown in Figure 11-14.
Figure 11-14 Cisco WebEx Tab in CTS Manager Meeting Details
Step 8
Cisco TelePresence WebEx OneTouch is now set up for the meeting organizer and enabled for the selected meeting. To schedule future meetings with WebEx, you will not need to log in to the Cisco WebEx server.
Note
Configuring Other Applications
For the Cisco TelePresence WebEx OneTouch feature to work, other applications, including CTMS, must also be configured. For complete details on how to configure and use this feature, refer to the "Cisco WebEx OneTouch Configuration Guide for the Cisco TelePresence System" at the following URL:
http://www.cisco.com/en/US/docs/telepresence/cts_admin/webex_solutions/guide/cts_webex_config.html
This document also describes how to manage and monitor scheduled meeting interoperability between Cisco TelePresence System (CTS), Cisco TelePresence MultiPoint Switch (CTMS) multipoint meetings, CTS-Manager, Cisco Unified Communications Manager (Cisco Unified CM), and the Cisco WebEx meeting server.