-
Cisco TelePresence Manager 1.6 Administration and Installation Guide
-
Preface
-
End User License Agreement
-
General Information About the Cisco TelePresence Manager
-
Pre-Install System Setup for Cisco TelePresence Manager
-
Configuring Microsoft Exchange for Cisco TelePresence Manager
-
Configuring IBM Domino Server for Cisco TelePresence Manager
-
Configuring Cisco Unified CM for Cisco TelePresence Manager
-
Installing and Configuring Cisco PreQualification Assistant
-
Installing or Upgrading Cisco TelePresence Manager
-
Initializing Cisco TelePresence Manager
-
Additional Installation Configurations for Cisco TelePresence Manager
-
Monitoring Cisco TelePresence Manager
-
CTS-MAN Emails and End-User Web UI
-
Supported MIBs for Cisco TelePresence Manager
-
Troubleshooting Cisco TelePresence Manager
-
 Feedback
Table Of Contents
Additional Installation Configurations for Cisco TelePresence Manager
Post-Install Guidelines for CTS-Manager
Generating Security Certificate Reports
Deleting Security Certificates
Uploading Security Certificates
Microsoft Exchange Deployments
Database - Status, Backup, and Restore
To restore data from a backup:
Assigning Roles to Groups Using Domino Directory Assistance
Cisco TelePresence Multipoint Switch (CTMS)
Cisco Unified Video Conferencing (CUVC)
Assigning a Room to a Specific Live Desk
System Configuration - System Settings
Interoperability with Video Conferencing Settings
Tentative Room Reservations Support
Meeting Notification Email Settings
CTS-Manager Redundancy Failover Procedure
CTS-Manager Redundancy Failover Procedure
CTMS Redundancy Failover Procedure
Additional Installation Configurations for Cisco TelePresence Manager
Revised: October 27, 2009, OL-13673-06
Contents
•
Post-Install Guidelines for CTS-Manager, page 9-2
•
–
–
–
–
•
–
•
–
–
–
–
•
•
•
•
•
Post-Install Guidelines for CTS-Manager
The purpose of this guide is to outline the information you will need to reference in order to configure the system after installing the CTS-Manager.
The flow of tasks you need to do for additional configurations for the CTS-Manager are provided in the following table.
Table 9-1 Post-Install Guidelines for Configuring CTS-Manager
If at any time you encounter problems, go to Chapter 13, Troubleshooting Cisco TelePresence Manager to see how to correct the problem.
Introduction
The administrator makes use of the System Configuration window to perform additional tasks such as:
•
•
•
•
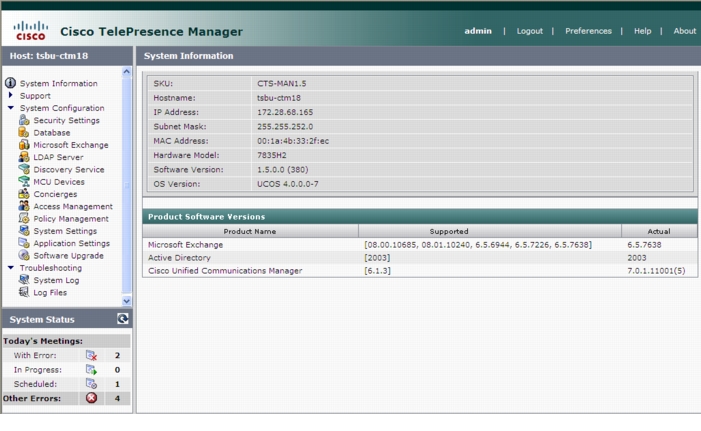
Figure 9-1 shows the system configuration tasks.
Figure 9-1 Cisco Telepresence Manager System Configuration Window
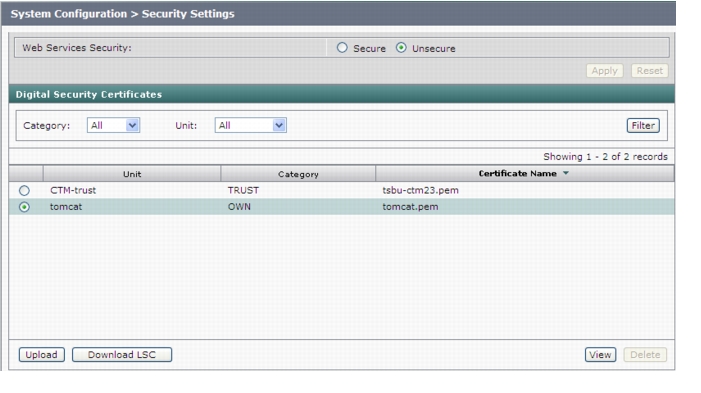
Security Settings
The Security Settings window assists with managing system security certificates and web services security.
Figure 9-2 System Configuration Security Settings Window
Web Services Security
You can turn on web services security by choosing Secure mode. For more information refer to the Cisco TelePresence Security Solution documentation on Cisco.com, http://www.cisco.com/en/US/docs/telepresence/security_solutions/security_solutions.html
Caution
Digital Security Certificates
CTS-Manager supports the following security certificates:
•
Note
•
Generating Security Certificate Reports
You can generate a list of certificates containing a specific category and unit by supplying the following criteria:
•
•
•
Viewing Security Certificates
To view the contents of a security certificate click the radio button next to the certificate unit name and click View.
The contents of the certificate can be copied and pasted in a text file.
Deleting Security Certificates
To delete a CTM-trust type security certificate, click the radio button next to the certificate unit name and click Delete.
Note
Uploading Security Certificates
To display the Certificate Upload window, from which you can copy a security certificate to Cisco TelePresence Manager, click Upload.
Caution
Step 1
Step 2
Step 3
Step 4
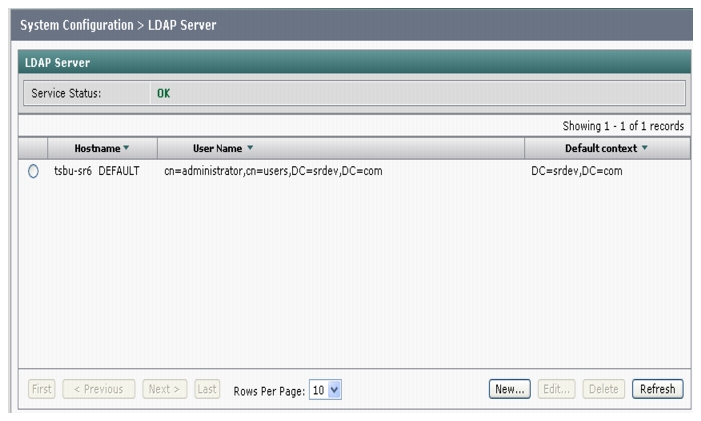
LDAP Server
CTS-Manager uses Lightweight Directory Access Protocol (LDAP) to retrieve information related to users and conference rooms from Directory Server deployments. Enterprises typically use specialized databases called directories to store information related to users, meeting rooms, and so on. LDAP is a protocol for accessing directories.
Note
The initial LDAP Server window gives details on the CTS-Manager LDAP system.
Figure 9-3 System Configuration>LDAP Server
From this window, multiple new LDAP servers can be configured or existing ones can be edited and updated.
Note
This window specifies LDAP Directory Server server settings that are used by CTS-Manager to access the directory information. Open the LDAP Server window to see the the status of the server. This window also allows new settings or editing the settings and field mappings.
Settings for LDAP
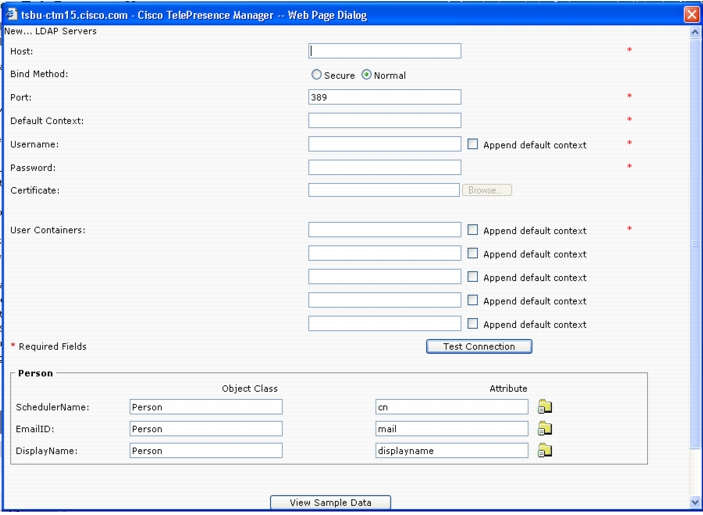
The LDAP New or Edit window is where you make changes to the LDAP server after first-time installation.
Multiple LDAP Peer Domains
If you have a LDAP peer domain configured you'll need to specify the additional user containers and context. You can do this with one of the User Container fields.
For example, cn=users,dc=domain2,dc=com
When specifying the container and context information for your peer domain, DO NOT check the Append default context box.
Step 1
Step 2
Step 3
Note
Table 9-2 describes the settings for the LDAP Server window.
Field Mappings
The CTS-Manager server uses application objects and attributes that are internally mapped to the objects and attributes in the LDAP Directory Server. Most of these mappings are predefined and fixed. However, some of the information required for the Cisco TelePresence system may be stored in different attributes of the LDAP Directory Server, based on the enterprise deployment. The Field Mapping window provides a mechanism to map such objects and attributes used by the CTS-Manager server to the object and attributes defined in the LDAP Directory Server schema.
Microsoft Exchange Deployments
The attributes are used by the Exchange server to store the user's e-mail and display name information. For most of the Exchange deployments, this information should not be changed. It is very unlikely that these mappings need to be changed. In case there is a requirement to authenticate users using a different attribute, please contact Cisco Support before changing these values.h
CTS-Manager supports connection to multiple LDAP domains/servers that belong to Active Directory forests. Some of the setups with which CTS-Manager can work are peer-peer LDAP domain setup, and Parent-Child LDAP domain setup.
Note
Caution
Figure 9-4 New LDAP Window Mappings
Table 9-2 lists the fields in the LDAP Server - New window. See Table 9-4 for the Person field information.
CTS-Manager requires the Active Directory domain level to be set to at least level 2. If the domain controller is null due to some configuration issue on the Active Directory server, CTS-Manager will not work.
Edit
To edit the LDAP mapping, click the radio button to select the LDAP server that you want to edit. Then click the Edit button. The LDAP Edit window appears. Table 9-3 lists the field information. See Table 9-4 for the Person field information.
Figure 9-5 Edit LDAP Window
Verifying Field Mapping Data
Verify that the data retrieved is as you expected. If data is incorrect, the application will not operate correctly.
Click View Sample Data to retrieve objects based on the mappings specified.
Caution
The majority of deployments do not require any changes to these attributes. Incorrectly changing these fields will result in Cisco TelePresence Manager not being able to function.
Consult the Cisco TelePresence Manager support team and the LDAP and Exchange server administrator for your deployment before changing the default mappings in these screens.
Table 9-4 describes the settings for the Person fields in both the New and Edit windows.
IBM Domino Deployments
CTS-Manager supports a Domino deployment with a single domain. CTS-Manager can be configured against one Domino server only. In a cluster environment, all resource reservation databases that contain a Cisco TelePresence room's reservations must be replicated to the Domino server that CTS-Manager is configured against. Users in Directory Assistance database configured with external LDAP servers are not supported.
View the data on a new or changed setup and then click the Apply to save the configuration.
Note
Figure 9-6 IBM LDAP New/Edit Field Mappings Window
Table 9-5 lists the information for the fields in the IBM LDAP Edit or New window.
Note
Table 9-6 describes the settings for the Person fields in both the New and Edit windows.
These attributes are used by the Domino LDAP server to retrieve the user's e-mail and display name information. For most of the Domino deployments, this information should not be changed.
Verifying Field Mapping Data
Verify that the data retrieved is as you expected. If data is incorrect, the application will not operate correctly.
Click View Sample Data to retrieve objects based on the mappings specified.
Caution
The majority of deployments do not require any changes to these attributes. Incorrectly changing these fields will result in Cisco TelePresence Manager not being able to function.
Consult the Cisco TelePresence Manager support team and the LDAP and Domino server administrator for your deployment before changing the default mappings in these screens.
Deleting Server
Before deleting a DNS server, it is important to first change existing CUCM servers and conferencing bridges from hostname to IP before the DNS server is deleted. If the hostname is not changed first, the CUCM servers and conferencing bridges will be put into an error status.
Password
Use the System Settings window to change the password for the Cisco TelePresence Manager. You must know the current password. Input the new password the second time for verification.Do not use anything other than English, as International words or characters are not supported in this release.
Figure 9-7 System Configuration - System Settings Window Password Tab
Step 1
Step 2
Step 3
Step 4
Step 5
Step 6
Note
Note
Calendar Server
If you did not specify a Calendar server (either Microsoft Exchange or IBM Domino) during the initial installation, the Calendar Server window displays the Calendar Server wizard.
The Calendar Server wizard leads you through a four-step process to register a Calendar server with CTS-Manager.
Note
The No Calendar Server window displays the Configure Now button to initiate the Calendar Server wizard.
Figure 9-8 Configure Calendar Server
Step 1
Figure 9-9 Cisco TelePresence Manager - Calendar Server Selection Screen
Step 2
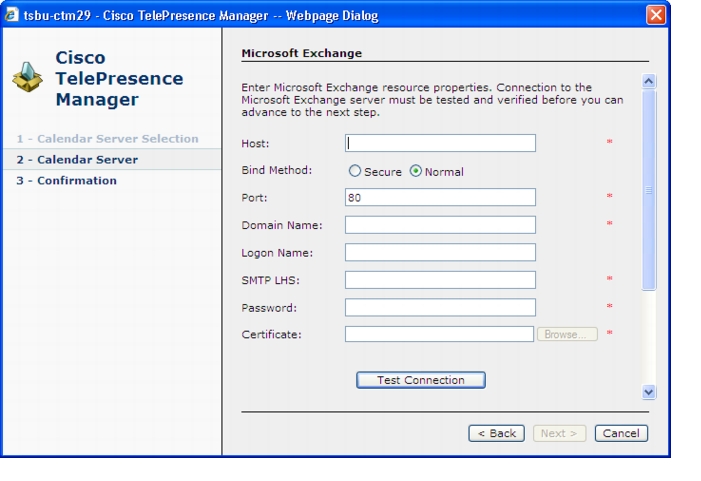
Figure 9-10 Cisco TelePresence Manager - Calendar Server MicroSoft Exchange Screen
Step 3
Figure 9-11 Cisco TelePresence Manager - Calendar Confirmation Screen
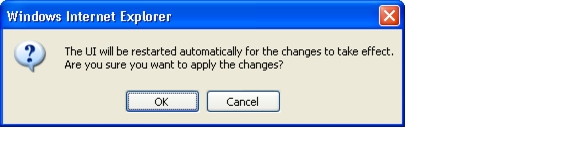
Step 4
Figure 9-12 Apply Changes Screen
Step 5
Figure 9-13 System Restart Notification Screen
Caution
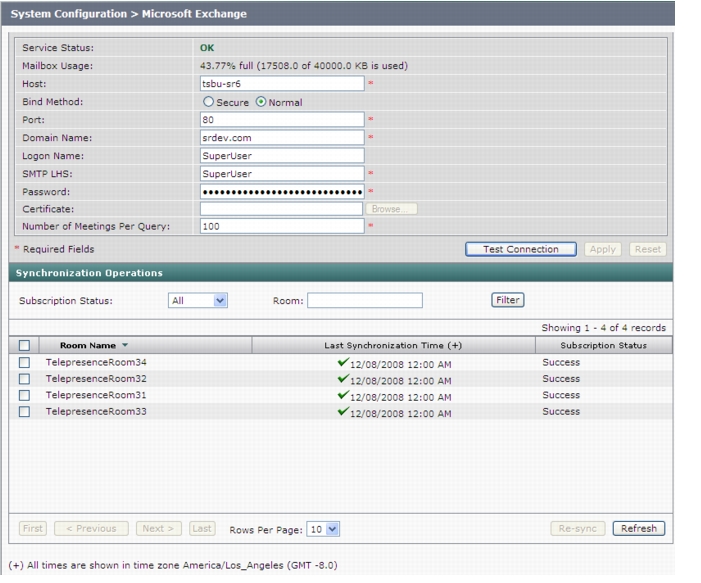
Microsoft Exchange
The Microsoft Exchange window helps you manage the database that stores meeting information.
To test the connection between this system and the Microsoft Exchange server as shown in Figure 9-14:
Step 1
Step 2
Step 3
Note
Figure 9-14 Microsoft Exchange Calendar Service Window
Table 9-7 describes the information and operations accessible from this window.
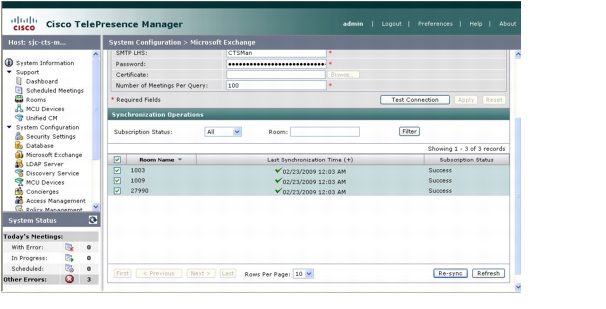
CTS-Manager and Microsoft Exchange server automatically renews subscriptions every 40 minutes. If there are any changes for room status in Exchange, the CTS-Manager will not be notified of the change until that 40 minute update time. The exception is if CTS-Manager is forces to sync with the Exchange server by either doing a reboot or a restart.
Re-sync Operations
The Re-sync Operations area tells you when information in the Microsoft Exchange server database was last updated with meetings scheduled for a particular room.
When mismatched information in the databases causes meeting conflicts or there are other problems that prevent a meeting from being launched successfully, this area of the Microsoft Exchange window allows you to synchronize information between Microsoft Exchange and the CTS-Manager database. Synchronization takes time and system resources to accomplish and should be done only when necessary.
To synchronize information between Microsoft Exchange and the CTS-Manager database:
Step 1
Step 2
Once you've begun the Re-sync operation the Service Status field displays a Sync progress indicator showing the progress of the Re-sync operation by percentage.
Step 3
Table 9-8 describes the information displayed in this area of the Microsoft Exchange window.
Note
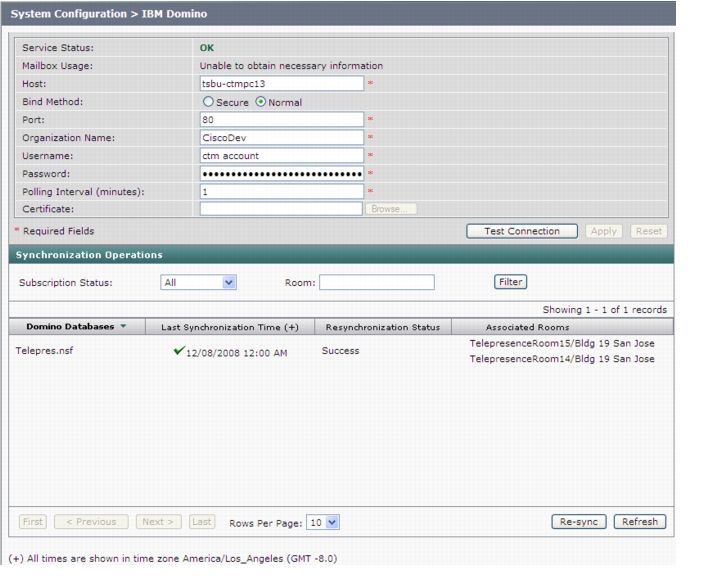
IBM Domino
The IBM Domino window helps you manage the database that stores TelePresence meeting information.
To test the connection between this system and the Domino server, as shown in Figure 9-15
Step 1
Step 2
Step 3
Note
Figure 9-15 IBM Domino Calendar Service Window
Table 9-9 describes the information and operations accessible from this window.
Note
Re-sync Operations
The Re-sync Operations area tells you when information in the Domino server database was last updated with meetings scheduled for a particular room.
When mismatched information in the databases causes meeting conflicts or there are other problems that prevent a meeting from being launched successfully, this area of the IBM Domino window allows you to synchronize information between Domino and the CTS-Manager database. Synchronization takes time and system resources to accomplish and should be done only when necessary.
To synchronize information between Domino and the CTS-Manager database:
Step 1
Once you've begun the Re-sync operation the Service Status field displays a Sync progress indicator showing the progress of the Re-sync operation by percentage.
Step 2
Table 9-10 describes the information displayed in this area of the IBM Domino window.
System Settings
If you are the system administrator and know the superuser password, you can open the System Settings window to see the following choices:
•
Use the tabs in this window to modify IP settings, configure a Network Time Protocol (NTP) server, enable or disable Simple Network Management Protocol (SNMP), set up a temporary account for access, change the system password, and restart the system.
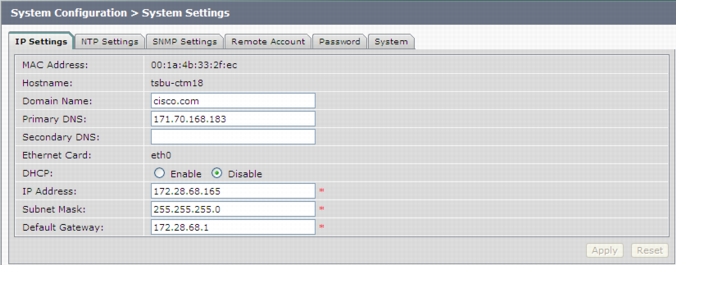
IP Setting
The IP Setting window lists information that is provided to CTS-Manager during first-time installation and configuration. Although it is typically not necessary to change IP settings, this window offers a place to modify some of them. Figure 9-16 describes the fields and buttons.
Figure 9-16 System Settings Window IP Settings Tab
To add new information, type it in the fields provided.
To change information, highlight and delete existing information and type in the new information.
To register new or modified settings, click Apply.
To restore the original settings, click Reset.
Table 9-11 describes the information displayed in this area of the IP Settings window
Deleting Server
Before deleting a DNS server, it is important to first change existing servers like CUCM and MCU to IP from hostname before the DNS server is deleted. If the hostname is not changed first, the CUCM and MCU servers will be put in error status.
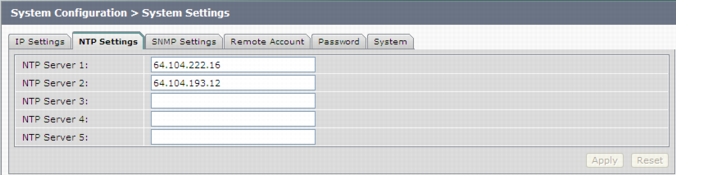
NTP Setting
Click the NTP Setting tab in the System Settings window to list the configured IP address of the Network Time Protocol (NTP) servers.
NTP is used to synchronize the clocks on Cisco IP telephony servers with an external network time server that uses NTP.
Figure 9-17 System Settings Window NTP Settings Tab
Step 1
Step 2
Step 3
Step 4
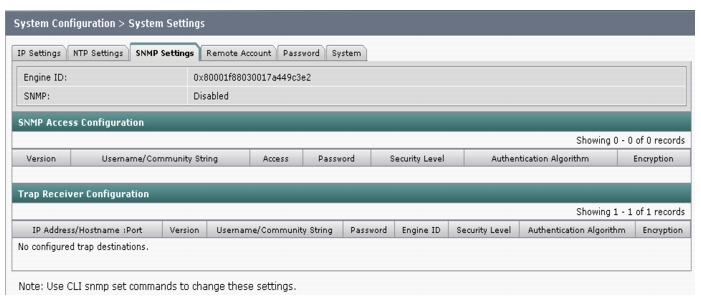
SNMP Setting
SNMP is an industry-standard interface used by network management systems to capture system status and error information, including information provided by Unified CM. Use the CLI function to enable and disable SNMP Service and also configure communities and trap destinations.
Use the CLI commands to change these settings:
•
•
•
Figure 9-18 System Settings Window SNMP Settings Tab
Table 9-12 describes the fields for SNMP settings.
Note
Technical Notes
CTS-Manager supports SNMP v3 and v2c. Together it supports ten SNMP users and five trap destination/receivers. A string of trap receiver settings is added to the /etc/snmp/snmpd.conf file to configure the trap receiver on the Cisco TelePresence Manager server. The string must include the following information, which is collected in the fields described in Table 9-12 or is set by default:
•
•
•
•
•
•
•
•
The following is an example trap receiver entry:
trapsess -e 0x80001f880474657374 -v 3 -m ALL -l authNoPriv -u traper -a MD5 -A changeme
171.71.232.113:162
Note
Allowed:
set snmp user add 3 admin rw authNoPriv snmppassword.
set snmp trapdest add 3 admin 172.20.124.44 authNoPriv snmppassword 0x80001f8803001a64635cd4
Not allowed:
set snmp user add 3 admin rw authNoPriv snmppassword
set snmp trapdest add 3 admin 172.20.124.44 authNoPriv cisco123 0x80001f8803001a64635cd4These fields can be viewed and configured using get and set commands on the /usr/sbin/snmpconfig script. To test your configuration, run snmptrapd come with net-snmp on the trap receiver system. You can create the user in /etc/snmp/snmptrapd.conf on the trap receiver system before starting snmptrapd.
Database - Status, Backup, and Restore
CTS-Manager uses an Informix database server to store information. The Database window allows the Administrator to view the database status and run backup and restore operations. Open the Database window to see the following choices:
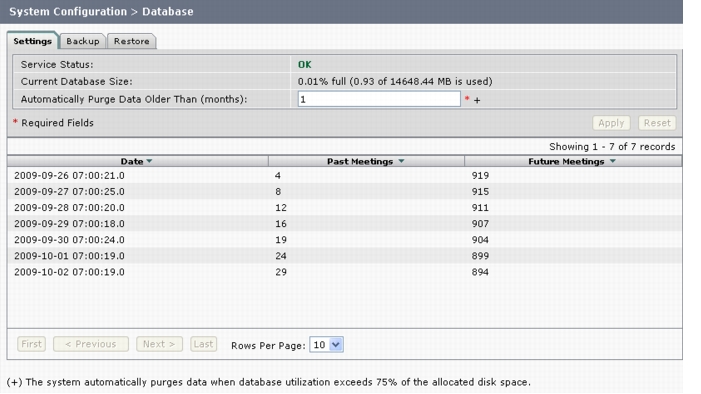
Settings
The Settings window allows you to manage the size and age of meeting information in the Informix database. To register new settings, click Apply. To return to the original settings, click Reset.
Figure 9-19 Database Window Settings Tab
Note
Table 9-13 describes the information and settings that are accessible from the Database window Settings tab.
The view at the bottom of the Database Settings window displays, for example, the status of past meetings for the past month and the future meetings scheduled for the next 12 months. If the list is longer than is what is showing, use the Next or Last button to view more data.
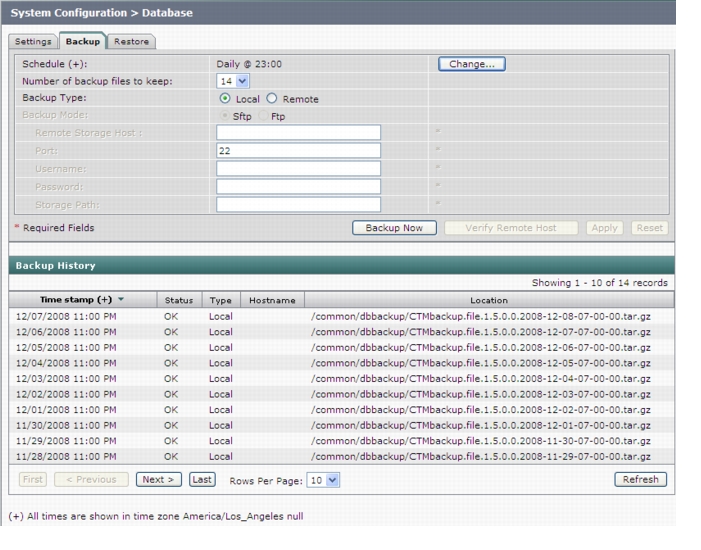
Backup
Choose the Backup tab to display fields and settings that will assist you in scheduling backups of the database. It is important to keep the backup current in case you need to activate the backup CTS-Manager system.
Figure 9-20 System Configuration - Database Window Backup Tab
Changing the Backup Schedule
The backup schedule currently set is displayed in the Backup window.
To change the backup schedule:
Step 1
Step 2
Step 3
Note
Step 4
To register new or modified settings, click Apply. To restore the original settings, click Reset.
Note
Backing Up CTS-Manager Data
Data backups are performed on the Active partition. If you switch partitions after performing a backup you'll need to perform another backup for the new Active partition. As part of data backup, the following system information is backed up:
•
•
•
To back up files in the database:
Step 1
Note
Step 2
Step 3
Step 4
Remote Storage Host Fields
A remote backup uses Secure FTP (SFTP) or FTP to store files remotely. If you choose to backup or restore using FTP, you do not need to supply a port number.
Note
Secure FTP (SFTP) is the recommended mode of transferring files over the network.You must fill in the following fields to gain access permissions to a remote host:
Viewing Backup History
The Database window Backup tab provides a history of database backups.
Table 9-15 describes the Backup History and Restore History fields.
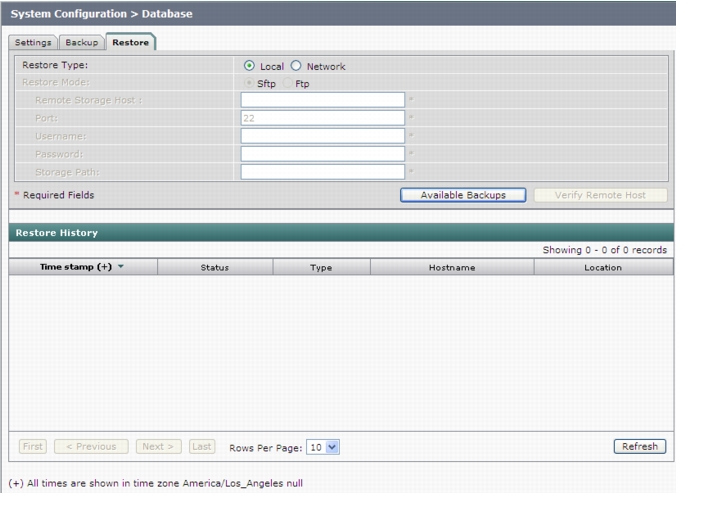
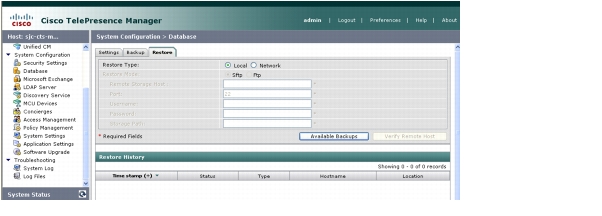
Restore
The Restore tab displays the history of the database restore operations. As part of the data restore, the following data is restored from the CTS-Manager backup file:
•
•
•
OS parameters such as NTP, DNS are not backed up and thus not restored. It is expected that these parameters are configured by the administrator on the system during installation and later modified using CLI commands.
Note
See Table 9-15 for a description of the fields.
Figure 9-21 Database Window Restore Tab
Restoring Backup Data
When you restore data from a backup file, all changes made to the database since the backup will be lost. These changes must be added by the Exchange Sync Up and Discovery functions of the Cisco TelePresence Manager server. The database Restore function should be run only as a last resort; for example, when the database is corrupted or the disk fails and has to be replaced.
The restore operation will stop the Informix database server, so some CTS-Manager operations might be impacted during the operation. While the restore operation is in progress, all other processes are stopped. The user interface will only display progress of the restore operation. When the restore operation is complete, the Cisco Telepresence Manager is automatically restarted and the login page is displayed. You will have to login to resume use of the Cisco Telepresence Manager application.
Note
To restore data from a backup:
Clicking Restore Now displays a window listing all the backups stored locally and remotely. If you want to restore from a backup stored remotely you must first click the Network Restore Type radio button. Then choose either the SFTP or FTP Restore Mode and enter required information to access the remote host. See Table 9-14 for a description of the Remote Storage Host fields.
Step 1
Step 2
Step 3
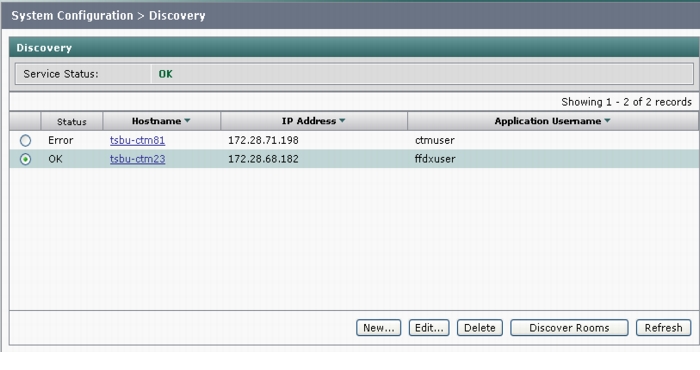
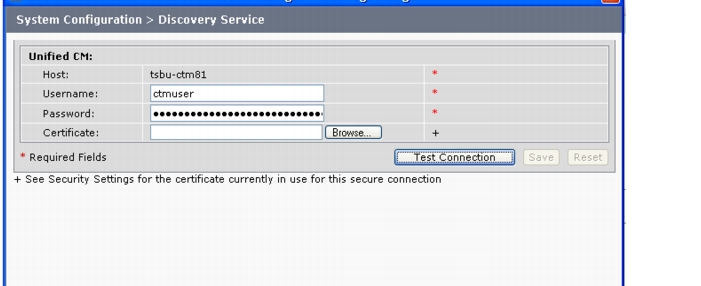
Discovery Service
To display and modify settings that associate CTS-Manager with Cisco Unified CM, choose Discovery Service in System Configuration.
The System Configuration>Discovery window opens. This window provides Service Status and the listings of the CUCM connections.
Note
Click the radio button to select a host record. Once a record is selected, the buttons on the screen become active. Refer to Table 9-17 for a description of each button's function.
To manually start the process that is periodically performed to discover new rooms added to Cisco Unified CM, click Discover Rooms.
Note
Once you select a record and press New or Edit, the Discovery Service window appears as shown in Figure 9-22.
Figure 9-22 Discovery Service Window
To test the connection between Cisco TelePresence Manager and Cisco Unified Communications Manager, click Test Connection.
Note
To register new or modified settings, click Save. To restore the original settings, click Reset.
Table 9-17 describes fields, buttons, and settings.
When a room is deleted from the application user profile, it is automatically deleted from CTS-Manager without re-discovery. It is removed from calendar server view, but remains in rooms view.
Note
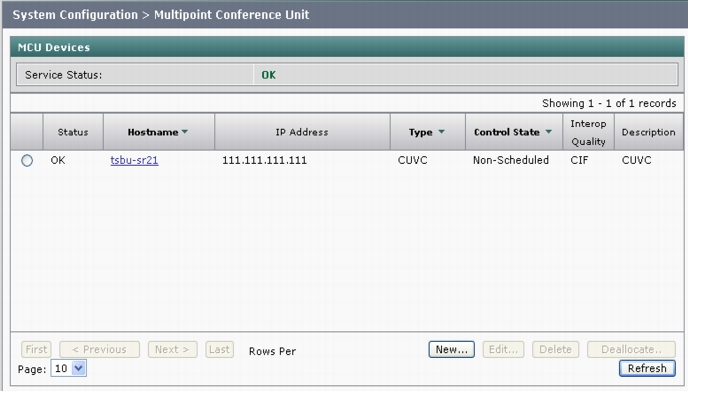
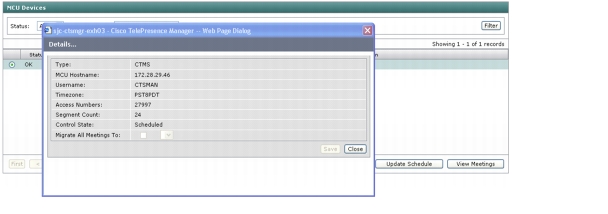
MCU Devices
The MCU Devices window provides the ability to add and delete MCU devices. There are two MCU devices supported by CTS-Manager—Cisco TelePresence Multipoint Switch (CTMS) and Cisco Unified Video Conference device (CUVC). A CTMS communicates with CTS-Manager and the CTS-Manager provides the scheduling information to the different CTMSs and each CTMS provides the multipoint switching capabilities for the conference.
Specifying a CUVC as Non-Scheduled means the CUVC will not be used when a meeting is scheduled.
The MCU Devices support screen displays attributes for each MCU device configured with CTS-Manager.
Caution
Figure 9-23 System Configuration>MCU Devices Window
Table 9-18 describes the MCU Device fields.
New MCU CTMS Device
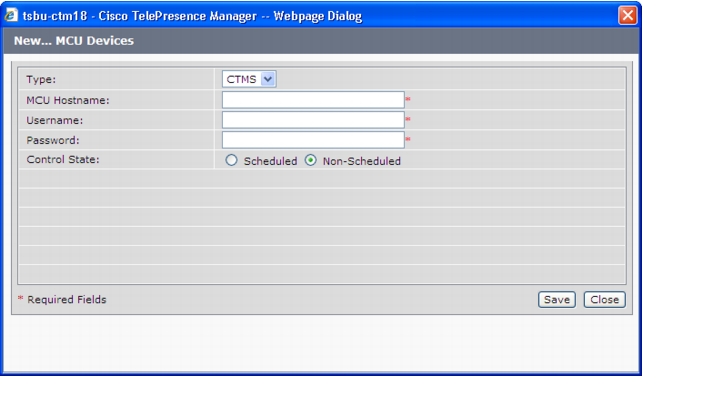
To register additional CTMS devices with Cisco TelePresence Manager, click New to display the New...MCU Devices dialog box, and choose CTMS from the Type drop-down field.
Table 9-19 describes the fields that need to be filled out.
Table 9-19 Add a New MCU CTMS Device
Field
Description or Settings
Type
The selection is available from a pull-down list menu. CTMS or CUVC are the only MCU types. If only CTMS appears in the drop-down list, Interoperability with Video Conferencing has not been enabled. Use the Application Settings window to enable this feature.
MCU Hostname
The configured Hostname of the MCU. This is the LHS of the complete Host name
Username
This is the account name used to log into the CTMS.
Password
This is the account password used to log into the CTMS.
Control State
Select either Scheduled or Non-Scheduled. Specify whether the CTMS is available (scheduled) for meetings.
CTMSs in a Scheduled state cannot be used to migrate meetings from other CTMSs.If Non-Scheduled is selected, resource allocation is not available. Selecting Scheduled allows resource allocations.
Edit the MCU setting
To edit a MCU Device, click the radio button on the device line to select that device. Click the Edit button. The Edit...MCU Devices window appears. Table 9-20 describes the fields that can be changed.
Deleting a MCU
A Multipoint Conference Unit cannot be deleted if there are any associated scheduled meetings. If the MCU is a CUVC, with associated scheduled meetings, you must first Deallocate the CUVC resources before you can delete the device.
To delete a MCU Device, click the radio button next to the device and click Delete.
Deallocate a MCU
Go to the Application Setting window. At the field, the Interoperability with Video Conferencing, under the Enable Feature, select No.
Then in the MCU, click the radio button next to the selected device and then click Deallocate
Refreshing the list of MCUs
Click the Refresh button to refresh the list of MCU devices.
Note
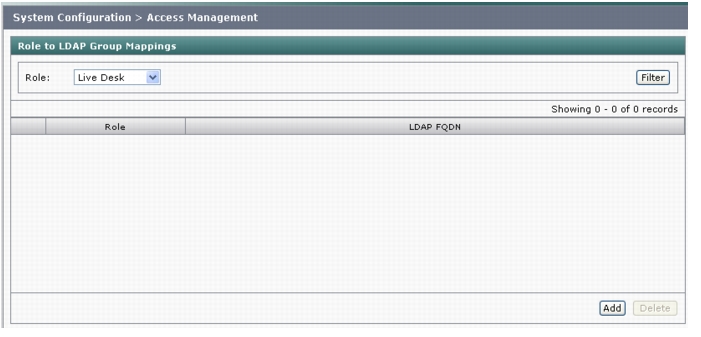
Access Management
From the Directory Server, it is possible to create groups, such as a Live Desk group and an Admin group. Use this window to view and create roles for these groups. CTS-Manager supports two roles—a Live Desk and an administrator.
The two roles have different levels of privilege and access when using CTS-Manager. Members in the group mapped to the Live Desk role have limited privileges that allow them to view the meetings, rooms, and system error and log files. Members in the group mapped to the Administrator role have the privileges of the Live Desk role plus additional privileges that allow them to make configuration changes.
Figure 9-24 Access Management Window
Assigning Roles to Groups Using Domino Directory Assistance
If your Cisco TelePresence Manager deployment is working with an IBM Domino Server and Domino Directory Assistance, it is possible for the group to contain a user from an external directory. That type of external user cannot be granted the CTS-Manager Administrator role. Only members of groups local to the IBM Domino Directory may be granted the Administrator role.
You can generate a report about specific LDAP Group mappings, as follows:
•
•
Caution
Cisco TelePresence Multipoint Switch (CTMS)
A CTMS communicates with the Cisco TelePresence Manager. CTMSes provide the functionality for three or more Cisco TelePresence rooms to attend a conference call. Cisco TelePresence Manager provides the scheduling information to the different CTMSs and each CTMS provides the multipoint switching capabilities for the conference.
Adding a CTMS
To register additional CTMS devices with Cisco TelePresence Manager, click New to display the Registration dialog box, and choose CTMS from the Type drop-down field.
Figure 9-25 Adding New CTMS - MCU Devices Window
Table 9-21 describes the fields in the New MCU Devices window.
Table 9-21 Registering a CTMS with Cisco TelePresence Manager
Type
CTMS or CUVC are the only MCU types. If only CTMS appears in the drop-down list, Interop has not been enabled. Use the Application Settings window to enable Interop.
MCU Host Name
The hostname or IP address of the CTMS. This is the LHS of the complete Host name.
Username
This is the account name used to log into the CTMS.
Password
This is the account password used to log into the CTMS.
Control State
Specify whether the CTMS is available (scheduled) for meetings. The resources of a scheduled CTMS can be used when meetings are scheduled. Specifying a CTMS as Non-Scheduled means the CTMS will not be used when a meeting is scheduled.
Note
Editing CTMS Settings
To edit CTMS registration information, click the radio button next to the device and click Edit. The following table describes the CTMS settings that may be changed.
Figure 9-26
Table 9-22 describes the fields in the Edit MCU Devices window.
Cisco Unified Video Conferencing (CUVC)
CTS-Manager support of CUVC enables video conferencing devices to join a scheduled Cisco TelePresence meeting. A CUVC is notified by and joins a Cisco TelePresence meeting through a CTMS. A CTMS device must be used to enable video conferencing devices to join, even if it is a point-to-point call.
Note
Adding a CUVC
To add a CUVC device with Cisco TelePresence Manager, click New to display the Registration dialog box, and choose CUVC from the Type drop-down field.
Table 9-23 Configuring a CUVC with Cisco TelePresence Manager
Field
Description or Settings
Type
CTMS or CUVC are the only MCU types. If only CTMS appears in the drop-down list, Interop has not been enabled. Use the Application Settings window to enable Interoperability with Video Conferencing.
Note
MCU Host Name
This is the LHS of the complete Host name.
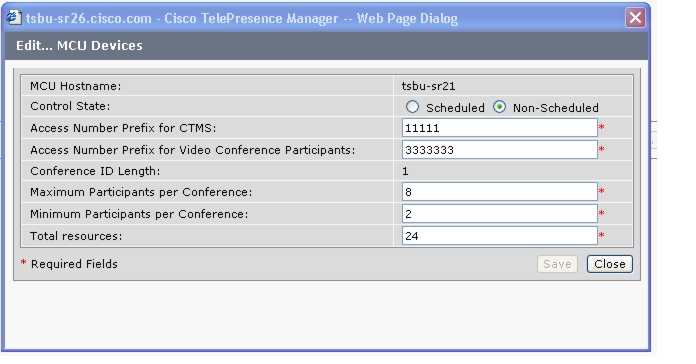
Control State
Specify whether the CUVC is available (scheduled) for meetings. The resources of a scheduled CUVC can be used when meetings are scheduled. Specifying a CUVC as Non-Scheduled means an Interop meeting will not be available when a meeting is scheduled.
Access Number Prefix for CTMS
The access number prefix for your CTMS is based on your enterprise dialing plan.
Access Number Prefix for Video Conferencing Participants
This access number prefix is based on your enterprise dialing plan.
Conference ID Length
The Conference ID can be 1-8 digits in length. The system-generated Conference ID is used to create an Interop Access Number used by the CTMS to establish the conference call. It is also used to create the Interop Access Number sent in an email to meeting participants, as the dial-in phone number. The Conference ID length is based on your enterprise dialing plan.
Maximum Participants per Conference
Enter a numeric value for the maximum number of meeting participants that may dial into the conference call.
Minimum Participants per Conference
The minimum value for this field is 2. This value cannot exceed the Maximum Participants per Conference value.
Total Resources
This value should be greater than the Maximum Participants per Conference.
Type
CTMS or CUVC are the only MCU types. If only CTMS appears in the drop-down list, Interop has not been enabled. Use the Application Settings window to enable Interoperability with Video Conferencing.
Note
Editing CUVC Settings
To edit CUVC registration information, click the radio button next to the device and click Edit. The following table describes the CUVC settings that may be changed.
Live Desks
Live Desk Role
When a person designated as Live Desk logs into CTS-Manager, the following selections and information are available:
•
•
•
•
The Live Desk is the first person contacted when there are questions or problems pertaining to connecting meeting participants. The Live Desk understands how to perform the following tasks:
•
•
•
•
Live Desk personnel can be assigned rooms to monitor in the CTS-Manager application. Assigned Live Desks are easily reached by dialing the Live Desks soft key on the Cisco IP phone in a Cisco TelePresence-enabled meeting room.
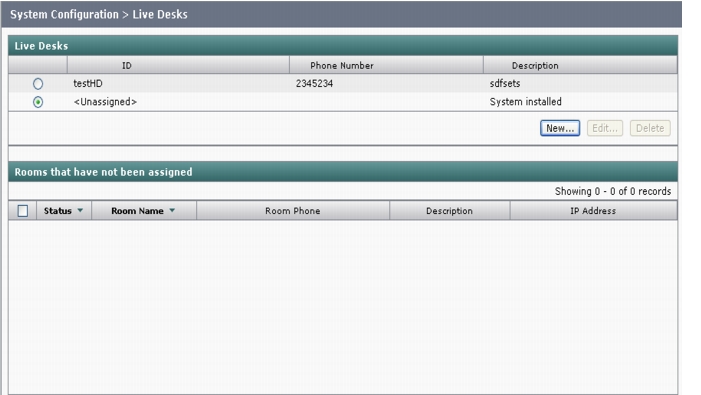
The Live Desks window has two areas, a list of Live Desks and a list of rooms that need a Live Desk assigned to them. Use the areas in this window to assign a Live Desk to a meeting room.
A phone number is associated with the Live Desk, which is displayed on the Cisco TelePresence meeting room phone user interface when the Live Desk soft key is pressed. Meeting participants can dial the Live Desk and ask for help when problems occur with the Cisco TelePresence system.
Figure 9-27 System Configuration - Live Desk Window
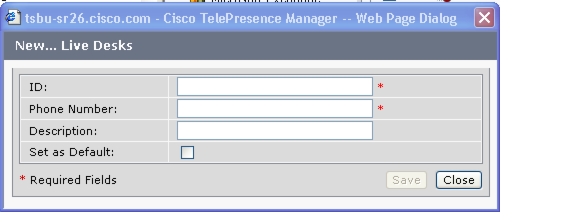
Creating Live Desk Personnel
To add a new person as a Live Desk, from this window, perform the following steps. The limit for the number of assigned Live Desk assignments is 10. The recommended range for the number of Live Desk assignments is 1 - 10.
Note
Step 1
Step 2
Step 3
Step 4
Caution
Figure 9-28 Adding a Live Desk Window
All Cisco TelePresence rooms must be assigned to a Live Desk. If you haven't specified a Live Desk for a room, the System installed <Unassigned> Live Desk is the default Live Desk for all rooms discovered in CTS-Manager. You can change the default Live Desk to a specific Live Desk by checking the Set as Default checkbox in the Live Desk details window. Any Cisco TelePresence room discovered by CTS-Manager will be assigned to the new default Live Desk. Each time you specify a different Live Desk as the default, all future rooms discovered by CTS-Manager will be assigned to the new default.
Assigning a Room to a Specific Live Desk
Once Live Desks have been registered, the next step is to assign them meeting rooms:
Step 1
Step 2
Step 3
To edit the Live Desk assignment:
Step 4
Step 5
Step 6
Note
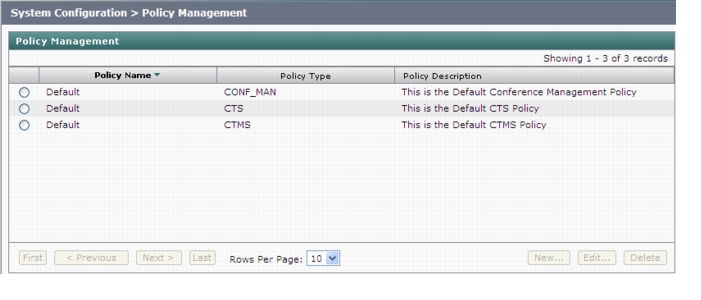
Policy Management
The Policy Management window lists the three default policies to support scheduling and conference termination:
Figure 9-29 System Configuration - Policy Management Window
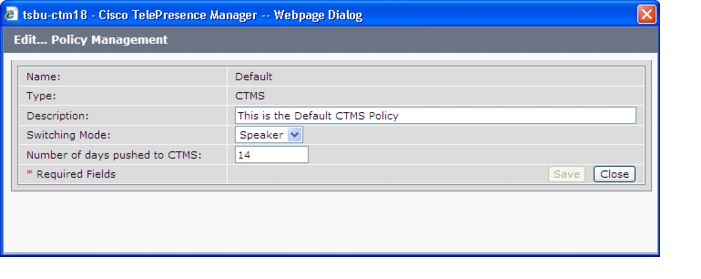
CTMS policy
Describes the switching policy for multipoint meetings. The switching mode can be set to either Speaker or Room switching. You also use the policy management window to set the number of scheduled meetings pushed to CTMS devices. The default is to push 14 days of meetings, the range is 1 to 30 max.
Figure 9-30 CTMS Policy Window
CTS endpoint policy
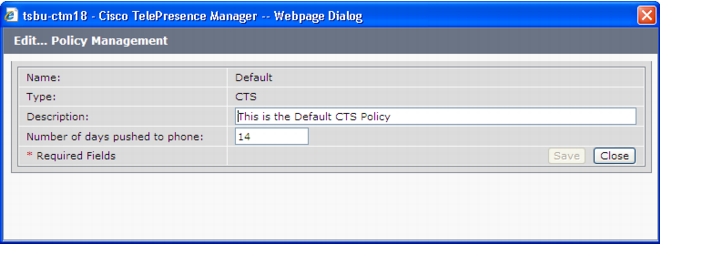
Determines the number of days of scheduled meetings pushed to each endpoint. The default is 14 days, the range is from 1 to 30 max.
Figure 9-31 CTS Endpoint Policy Window
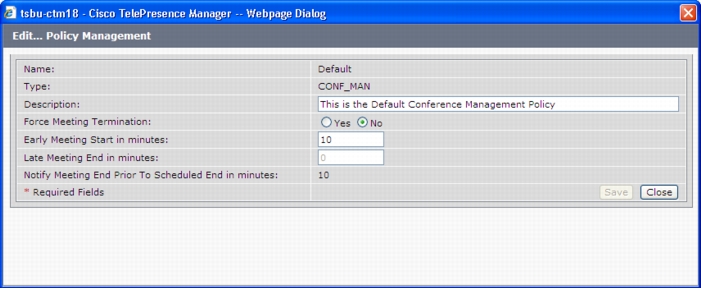
Conference Manager policy
The Conference Manager Policy specifies the following:
•
•
•
Note
Figure 9-32 Conference Manager Policy Window
Remote Account
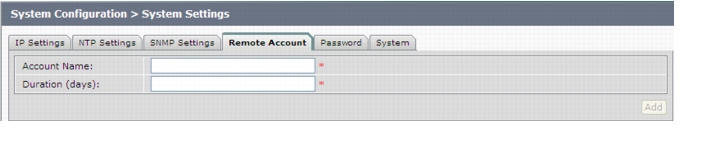
Use this window to set up limited access for remote users of this CTS-Manager. The remote account is intended for use by Cisco technical support personnel so they can access the system remotely to troubleshoot problems. Secure Shell (SSH) is used to access the system. The remote account is typically enabled for a brief period. Disabling the account will cause whoever is logged onto the system to be logged off. Only one remote account can be set up at a time, but more than one remote account can be active at the same time.
Login to the remote account is done using the account name and a pass phrase generated by software in this CTS-Manager. The remote user uses the account name, the pass phrase, and a utility available at an internal Cisco web site to generate a login name and password that allow access to this Cisco TelePresence Manager.
Figure 9-33 System Settings Window Remote Account Tab
To start the remote login account process:
Step 1
This name can be anything you choose, using English characters.
Step 2
Step 3
This step generates a pass phrase.
To complete this process, the account name and pass phrase are entered into a utility at the following Cisco Internal web site:
https://remotesupporttool.cisco.com/logon.phpFor security reasons, if remote users fail to log off, they will be logged off automatically at the time listed in the Expires field.
System Configuration - System Settings
Use the System Configuration, System Settings window to restart CTS-Manager.
Figure 9-34 System Settings Window System Tab
Step 1
•
Step 2
Step 3
This will restart the CTS-Manager system.
Application Settings
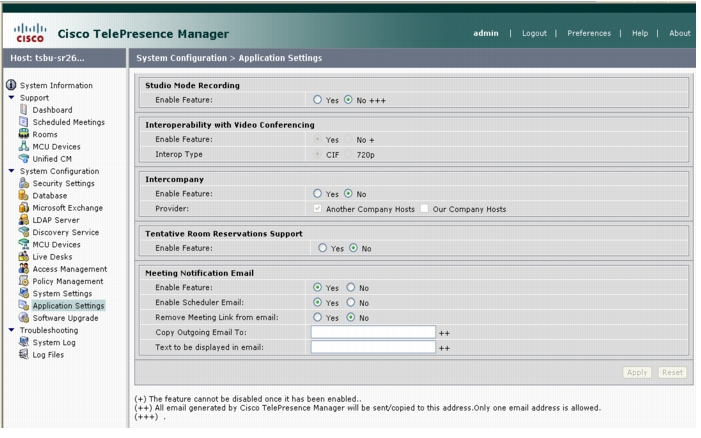
The System Configuration Applications Settings window is used to set five different options: Studio Mode Recording, Interoperability with Video Conferencing, Intercompany, Tentative Room Reservations Support, and Meeting Notification Email.
Figure 9-35 Application Settings Window
Studio Mode Recording
The default setting for Studio Mode Recording is "No." If recording is desired, select the "Yes" setting. This option allows the administrator to enable the studio mode recording support. Once this option is enabled, the user can enable this recording for a meeting from the meeting details view. The studio mode recording is mutually exclusive from Intercompany and Interop operation.
Note
Recording enabled globally
If a single meeting is set up and recording is enabled for the meeting, then if that meeting is modified as a recurring meeting all instances of that meeting will have recording enabled.
The steps in this would be:
•
•
•
•
Interoperability with Video Conferencing Settings
Enable Feature: The default setting for interoperability with video conferencing is "Disable." This feature cannot be disabled once it has been enabled.
If the setting is grayed out, and cannot be changed to "Enable" there is at least one CTS endpoint or MCU device that is not interop-ready. All endpoints and CTMS MCUs must support interop before you can enable Interop settings. Make sure all devices discovered by CTS-Manager are running interop-enabled software releases.
If Interoperability with Video Conferencing has been set to "Enable" and is grayed out so that you can't disable it, the CUVC added through the MCU Devices window is included in at least one scheduled meeting. In order to disable interop services you must, from the MCU Devices window, first Deallocate the CUVC and then Delete it.
Interop Type: This allows you to select the correct resolution setting on a global basis. For all future meetings, CTS-Manager updates affected CTMS with the new resolution by pushing updated conference schedules.
Select "CIF" for SD Interop support. If this is selected, the Admin UI provides an option to add one CUVC at CIF. Only one CUVC is allowed.
Select "720p" for HD Interop support with CUVC 7.0. If this is selected, the Admin UI provides an option to add one CUVC at 720p. Only one CUVC is allowed.
Note
The resolution type selection will be maintained by CTS-Manager and pushed to CTMS on a per meeting basis.
Once HD Interop is configured at CTS-Manager, even if SD VC end points are joining through CUVC 7.0, CTS-Manager always reserves HD Interop resources.
Intercompany Setting
Enabling Intercompany allows you to schedule multipoint meetings between two different organizations. Once you enable the Intercompany feature it cannot be disabled.
Note
The Provider setting allows you to select either "Another Company Host" or "Our Company Host." You cannot select both. These options can be changed depending on whether the company is going to host meeting or be hosted. If multiple occurring meetings are set up with the company being host, this company will be the host for all the meetings.
Another Company Host
If you select this feature, this allows another company to set up TelePresence meetings. You must provide the host with the rooms' information that will be participating in the TelePresence calls. For example, if it is a room-to-room call it will be a single (1) room. If it is a multi-room call, then, for example, a triple call would be 3.
Our Company Host
If your company is hosting the meeting, the person setting up the meetings needs to reserve the rooms, and get dial-in and room information from the other company before setting up the TelePresence meeting.
Tentative Room Reservations Support
A tentative room reservation is a meeting invite that has been viewed by room owner but not accepted yet. CTS-Manager tentative reservation is identical to accepted reservation.
Enabling this feature allows the CTS-Manager to process meetings for tentative room reservations, i.e., place a room in proxy mode. This option is supported only for Exchange and not for Domino.
Tentative acceptance is off by default, the administrator needs to turn on this feature globally to incorporate all rooms hosted by CTS-Manager.
Note
Once Tentative room reservations are turned on, this feature cannot be turned off. A re-install is required to change the on to off option.
Once all room reservations are confirmed the meeting should appear in the Scheduled Meetings window and the phone UI within five minutes. If email alerts are turned on, confirmation or error emails are generated and are sent approximately within 10-15 minutes.
The best practice for tentative room reservations is to enabled it for private (office) rooms so if the meetings scheduled aren't in sync the result is ok.
Tentative meeting not enabled
The following describes the behavior of the CTS-Manager when the tentative meeting is not enabled.
If the user creates a meeting with 1 auto-accept room (AAA) and 1 proxy room. The Proxy room accepts the meeting and the meeting is processed as a point-point meeting in CTS-Manager. Then the meeting is modified to a different time and the proxy room has not opened the meeting invite or clicked on the tentative or accept buttons. The meeting schedule in CTS-Manager is modified with a new time with both rooms shown and marked as scheduled without error. However, the proxy room calendar does not have the modified meeting time updated. To have the times sync, the proxy room must accept the modified time.
Problems can occur if public rooms and conference rooms are set up with tentative enabled. if the meeting is not accepted, the proxy setting can be out-of-sync and double booking for the room can occur. Thus, the best practice for public or conference rooms is to not have this feature enabled and force a proxy confirmation acceptance.
.
Meeting Notification Email Settings
Enable Feature: The default setting for Meeting Notification Email is "Yes." If you change this setting to "No" you disable email notifications and Confirmation emails and Action Required emails are not sent to meeting organizers.
Note
Enable Scheduler Email: This option shuts off or turns on the email to be sent to the scheduler.
Remove Meeting Link from email: This removes or adds the meeting link to the email sent out from the CTS-Manager.
Copy Outgoing Email To: CTS-Manager will accept any email address as long as it matches the Exchange domain and/or any of the LDAP domains configured on CTS-Manager. Mail notifications will be sent to the Exchange server configured on CTS-Manager and it is up to this server to route the emails as configured. You can also specify an additional email address. All emails generated by Cisco TelePresence Manager will be sent to this address.
A secondary email address specified for IBM Domino installations is included in the BCC field when emails are generated.
A secondary email address specified for Microsoft Exchange installations is included in the CC field when emails are generated.
Text to be displayed in email: Enter the text you want to appear in the email message header.
CTS-Manager Redundancy Failover Procedure
The Cisco TelePresence Manager configuration for a redundant system is to have a primary and a backup CTS-Manager system with a mirror configuration.
Note
Cold Standby
In a redundant system, the primary CTS-Manager is active and the backup is powered off.
When a CTS-Manager primary system stops working, meetings scheduled during this down-time will not be pushed to the phone. Meetings can still be scheduled in the Exchange of Notes during a the downtime and all meetings "one button to push" on the phone will not be affected. Once the backup CTS-Manager is online, meetings scheduled during the primary down-time will be processed and pushed to the phones.
Note
CTS-Manager Failover Procedure
When the primary CTS-Manager fails, perform the following procedure:
•
•
•
Figure 9-36 System Configuration Database Restore Backup Window
•
Figure 9-37 System Configuration - Microsoft Exchange Re-sync Window
•
Note
Warm Standby
CTMS Warm Standby for Scheduled Meetings
Both the primary and backup CTMS systems are configured independently with different access numbers, etc.
Each CTMS is configured in the CTS-Manager. Both primary and backup CTMS are powered on and connected to the network at all times. The meetings will only be scheduled on and serviced by the primary CTMS.
CTS-Manager Redundancy Failover Procedure
With a redundant CTS-Manager system, make sure to configure two CTMS and register the primary with CTS-Manager in "Scheduled" mode and the backup in "Non-Scheduled" mode.
Note
When the primary CTS-Manager fails, perform the following procedure:
Step 1
Step 2
Step 3
Note
Figure 9-38 System Configuration Database Restore Backup Window
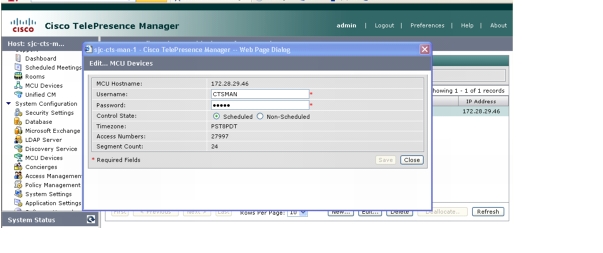
CTMS Redundancy Failover Procedure
Step 1
Figure 9-39 System Configuration MCU Devices - Details Window
Step 2
Step 3
Figure 9-40 System Configuration MCU Devices - Edit Window
All scheduled multipoint meetings are moved to the backup CTS-Manager and "One Button to Push" entries are updated with the new CTMS access number and conference ID. The time it takes to update all meeting entries and update all phones will vary depending on the number of meetings and CTS endpoints.
Hardware Replacement
If it becomes necessary to replace CTS-Manager hardware, the administrator must run a fresh install of CTS-Manager on the new server hardware.
Alternatively, the administrator can restore a previous backup on the new server from a remote location.
For more information, contact Cisco Technical Assistance Center (TAC).