-
Cisco TelePresence Manager 1.5 Administration and Installation Guide
-
Preface
-
End User License Agreement
-
General Information About the Cisco TelePresence Manager
-
Pre-Install System Set Up for Cisco TelePresence Manager
-
Configuring Microsoft Exchange for Cisco TelePresence Manager
-
Configuring IBM Domino Server for Cisco TelePresence Manager
-
Configuring Cisco Unified CM for Cisco TelePresence Manager
-
Installing and Configuring Cisco PreQualification Assistant
-
Installing or Upgrading Cisco TelePresence Manager
-
Initializing Cisco TelePresence Manager
-
Additional Installation Configurations for Cisco TelePresence Manager
-
Monitoring Cisco TelePresence Manager
-
CTS-MAN Emails and End-User Web UI
-
Supported MIBs for Cisco TelePresence Manager
-
Troubleshooting Cisco TelePresence Manager
-
 Feedback
Table Of Contents
Installing or Upgrading Cisco TelePresence Manager
Installing Cisco TelePresence Manager from DVD
Required Information and Equipment
Introduction to the CTS-Manager Administration Software
Installation Procedure for Cisco TelePresence Manager
Installation Page Values Defined
Recovering Administrator and Security Passwords
System Error - AXL Error or Invalid Credential
Upgrading to Cisco TelePresence Manager 1.5
Cisco TelePresence Manager Window
Installing or Upgrading Cisco TelePresence Manager
Revised: April 16, 2010, OL-13673-04
First Published: November 27, 2006Contents
•
Installing Cisco TelePresence Manager from DVD
•
•
•
Introduction
This document explains how to install the Cisco TelePresence Manager software in your network. You will then be able to schedule Cisco TelePresence system meetings through existing Microsoft Outlook messaging software or IBM Domino software, receive reminders, and connect to a remote meeting site with the touch of a button.
To enable these features, you must provide Cisco TelePresence Manager with the contact and access information it requires to connect to and talk with your network. The purpose of this guide is to walk you through each step using the Cisco TelePresence Manager installation DVD and the accompanying wizard help windows.
The installation requires information about your network and the rules for finding and exchanging information.Once this pre-installation data is set up, then the Cisco TelePresence Manager program can be installed from DVD .In addition, the administrator can use the System Configuration window to upgrading system software,
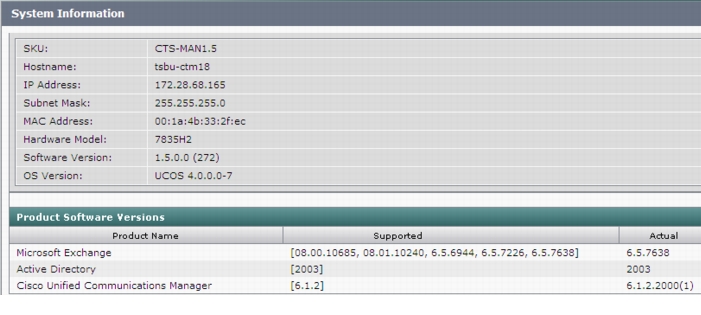
System Information
The System Information window to see a quick summary of information about your Cisco TelePresence System. The window is divided into two areas:
•
•
Installation Guidelines
The purpose of this guide is to reference the information you will need in order to install the CTS-Manager software.
The flow of tasks you need to perform to install and configure the CTS-Manager are provided in the following table.
Table 7-2 Install Guide for setting up CTS-Manager
Initializing CTS-Manager
After installing the CTS-Manager software, the next process is initializing Cisco TelePresence Manager to enable access to information sources such as Microsoft Exchange Server for meeting requests from Microsoft Outlook, Active Directory for accessing user and conference room information, and Cisco Unified Communications Manager for conference room availability and telephone support
Additional Installation Procedures for CTS-Manager
The administrator makes use of the System Configuration window to perform system configuration tasks such as as synchronizing system databases, managing security, and reconfigure system settings
Chapter 9, "Additional Installation Configurations for Cisco TelePresence Manager"
Monitoring CTS-Manager
Monitoring and updating meeting schedules and monitoring the status of rooms and system services
Installing Cisco TelePresence Manager from DVD
The following section covers installation procedures for the CTS-Manager.
Required Information and Equipment
To install the Cisco TelePresence Manager system files, the following equipment and information are needed:
•
•
•
•
Introduction to the CTS-Manager Administration Software
CTS-Manager Administration software is accessed through your browser. All Cisco TelePresence administration software supports Internet Explorer 6.0. CTS-Manager Administration software is accessed through the server's host name or IP address.
Logging Into CTS-Manager
When doing a login to the account to access the CTS-Manager functions, use:
•
•
There are three levels of functionality when logging into CTS-Manager. Any user not in these access categories will only see their own meeting details.
Administrator Role
When an administrator logs into the CTS-Manager, the following selections and information are available:
•
•
•
•
•
The administrator performs the same tasks performed by a concierge, but has an additional system configuration task available. The administrator has a different login name and password from that of the concierge. The administrator's access privileges allow access to the internal workings of the system where the administrator can modify system settings such as passwords, IP addresses, and security settings. The administrator is also responsible for defining schedules to back up the database and for assigning a concierge to a meeting room.
In day-to-day operations, the administrator assists the concierge with monitoring system status and, when problems occur, takes action to correct them by analyzing system error messages and debugging log files.
Superuser Role
The system superuser has a special login account that allows access to two additional administrative tasks. These tasks are only visible by logging in using the superuser password. This role is used mainly during installation of CTS-Manager. After installation of CTS-Manager, this role will default to administrator.
•
•
Concierge Role
When a concierge logs into CTS-Manager, the following selections and information are available:
•
•
•
•
The concierge is the first person contacted when there are questions or problems pertaining to connecting meeting participants. Concierges can be assigned rooms to monitor in the CTS-Manager application. Assigned concierges are easily reached by dialing the Help soft key on the Cisco IP phone in a Cisco TelePresence-enabled meeting room.
Installation Procedure for Cisco TelePresence Manager
Step 1
There may be a short delay while the installer validates the integrity of the files on the DVD and configures the server for the operating system and the CTS-Manager software.
Caution
Step 2
Step 3
Step 4
Step 5
Step 6
When the installation is complete, the server reboots. The installer then checks for network connectivity and access to a DNS server. If it cannot find these connections, an error message is displayed. If the installation process completes successfully, the message "The Installation of the Cisco TelePresence Manager Has Completed Successfully" is displayed.
Caution
Note
Installation Page Values Defined
Table 7-3 explains in detail the window and field definitions of the Cisco TelePresence Manager installation process in detail.
Recovering Administrator and Security Passwords
If you lose the administrator password or security password, two different procedures can be followed to reset these passwords.
Note
Recovery procedure 1:
Step 1
Username: pwrecovery
Password: pwreset
Step 2
Step 3
Step 4
Step 5
Step 6
Step 7
a. Enter a to reset the administrator password.
b. Enter s to reset the security password.
c. Enter q to quit.
Step 8
Step 9
Step 10
Recovery procedure 2:
If your password is lost, reinstall Cisco TelePresence Manager to regain access.
System Log Error Detection
When a problem is detected, you must collect system errors and logs files so they can be analyzed for prompt resolution
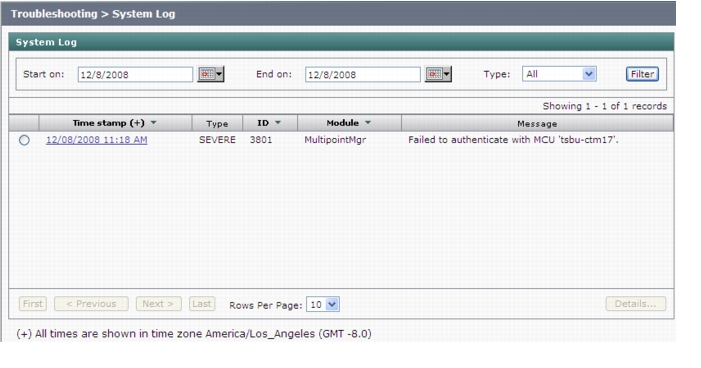
System Log
Choose the System Log window to see a list of system messages. You can filter the list by starting and ending dates and message type All, Fatal, Severe, Moderate, Warning, and Info, as follows:
•
•
Figure 7-1 System Log Window
Table 7-4 lists the error information provided by the system.
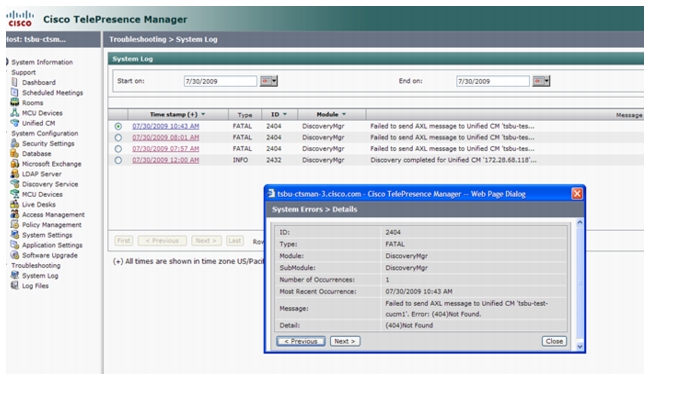
System Error - AXL Error or Invalid Credential
If the System Errors>Details message in the Syslog appears as seen in Figure 7-2, or the Invalid Credentials message appears when testing connections, the user should make sure that all the required services are running. Also, the user may need to refer to Chapter 5, "Configuring Cisco Unified CM for Cisco TelePresence Manager" to review what services need to be running on the Cisco UCM for CTS-Manager.
Figure 7-2 System Log - System AXL Error Message
If it is necessary to drill down further into error data, go to the Log files. For further information about Log details, go to Chapter 13, "Troubleshooting Cisco TelePresence Manager"
Software Upgrade
If you are the system administrator and know the superuser password, you can access the Software Upgrade window to monitor and maintain system software. This window reports the version number of the system software. There are also two buttons to assist you in version maintenance between primary and backup and upgrading the system software, as follows:
Figure 7-3 System Configuration - Software Upgrade Window
•
•
In addition to SFTP, FTP is also supported on a best-effort basis due to variations of behavior between different FTP servers. Only username/password-based login is supported. Anonymous login is not supported.
Secure FTP (SFTP) is the recommended mode for downloading the upgrade software over the network.Upgrading to Cisco TelePresence Manager 1.5
Switching calendar application type, e.g. changing from Exchange to Domino, during Cisco TelePresence Manager upgrade is not supported. A fresh install is required to install Cisco TelePresence Manager for Domino deployment.
•
•
–
–
•
•
Switch Version
The hard drive on the CTS-Manager server is divided into two partitions. CTS-Manager is always using the Active partition and contains the Active software version. The software image versions are identified in the System Configuration> Software Upgrade window.
You may find it necessary to switch the version of the CTS-Manager software.
•
The system will swap the software versions and reboot. Screens will describe activity.
Upgrade Software
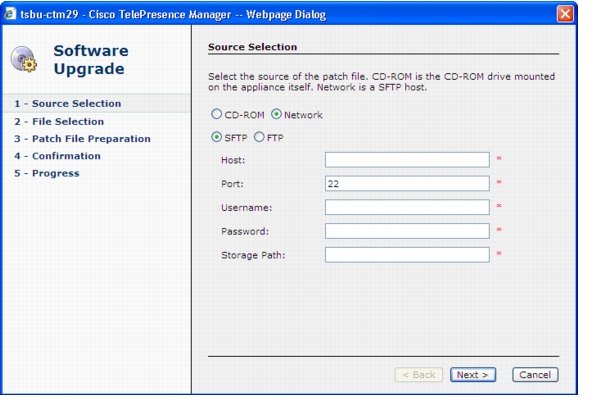
This task upgrades the CTS-Manager software by loading and applying a patch file from either a CD-ROM or an SFTP/FTP host network. Before starting this task, determine the source of the patch file.
•
The Source Selection dialog box appears.
Note
•
If you chose CD-ROM, click Next to go to the File Selection window.
If you chose Network, provide the following information, and then click Next to go to the File Selection window.
•
•
Note
•
•
Caution
Secure FTP (SFTP) is the recommended mode of transferring files over the network.
Figure 7-4 Software Upgrade - Source Selection Window
•
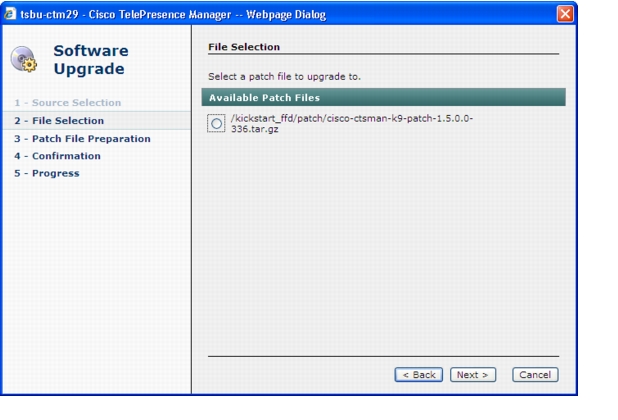
Figure 7-5 Software Upgrade - File Selection window
•
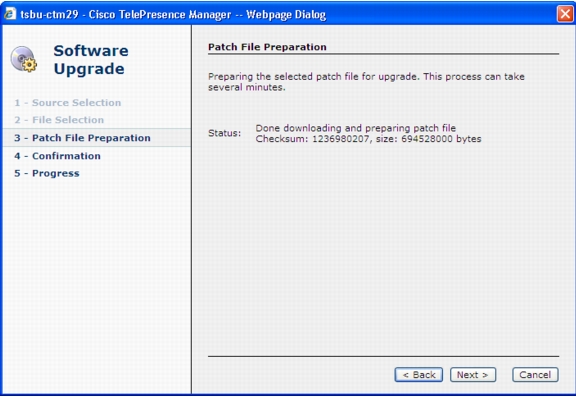
Figure 7-6 Software Upgrade - Patch File Preparation Window
•
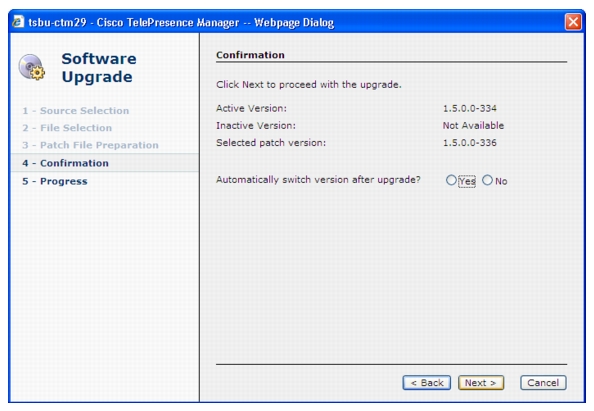
The software wizard displays the software versions that are installed and provides active Yes and No radio buttons so you can choose to switch the newly loaded software to the active partition.
•
Figure 7-7 Software Upgrade - Confirmation Window
Note
Caution
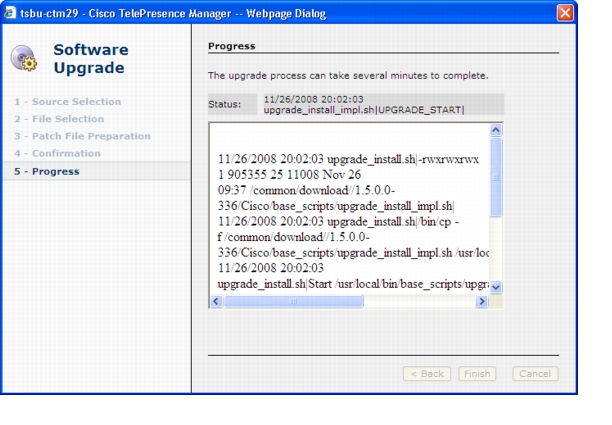
The install wizard displays a dialog window that logs the progress of the update.
Figure 7-8 Software Upgrade - Progress Window
•
Note
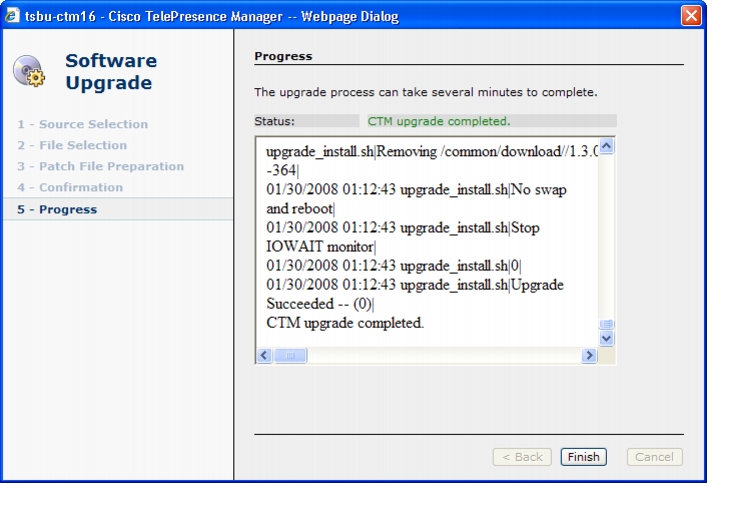
Figure 7-9 Software Upgrade - CTM Upgrade Completed Window
Cisco TelePresence Manager Window
The Cisco TelePresence Manager window is divided into several panes with different functionality.
Header Pane
Figure 7-10 Cisco TelePresence Manager Header Pane
A header at the top of all CTS-Manager windows shows either "admin" or the login name of the concierge currently logged in and provides four links:
•
•
•
•
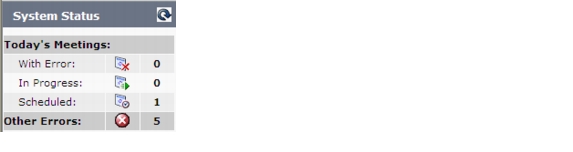
System Status Pane
Figure 7-11 System Status Pane
System Status is always in view in the lower left corner of the CTS-Manager window. Both the concierge and the administrator must closely monitor this area for notification of system errors and changes in the status of today's meetings.
The icons and numbers are links. They will take you to a window in the CTS-Manager that helps you identify problems for the With Error state or see more information about meetings in the In Progress and Scheduled states.
The following meeting states are displayed for Today's Meetings:
•
•
•
The Other Errors area displays a cumulative number of errors listed in the Dashboard.
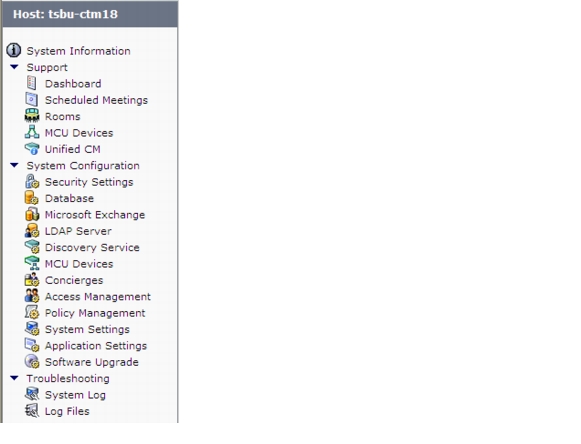
Navigation Pane
Figure 7-12 Navigation Pane
The navigation pane contains the list of commands you can run within Cisco TelePresence Manager. The commands are divided into three drop-down lists:
•
•
•
Work Pane
Figure 7-13 Work Pane
The frame to the right of the Navigation pane is the content area. The gray bar above the content area shows the navigational path so you can see where you are at any time.
The following sections describe objects, functions, and information displayed in the Work pane associated with a specific command.
Tabs
Some windows have tabs that you click to display additional functionality related to a command.
Filtering Information
Some windows provide fields where you can enter criteria to filter the information contained is a report. Click the Filter button to display the reports using the criteria you specify. The settings are temporary; when you exit the page, the criteria are removed.
Obtaining Additional Information and Help
To access additional information or relevant windows, click a highlighted link.
Navigating Long Lists
When there is a long list of data in a window, you can navigate through it using Next, Last, First, and Previous buttons at the bottom of the window. The Rows Per Page drop-down list also found at the bottom of the window can be used to change the number of rows displayed. Choose 10, 20, 50, or 100 rows per page. The setting is temporary, and when you exit the page the default setting is restored.
Copying and Pasting Information
You can place information displayed by the CTS-Manager in a file using standard copy-and-paste functions.
Typing Information in Fields
For information provided in fields, use the mouse to highlight and delete existing information. Type in new information.
New or modified information is applied using the Apply button.
To back out of changes and return to original settings, use the Reset button.
Typing Telephone Numbers
Telephone numbers must be entered into CTS-Manager fields exactly as they will be dialed by the IP phone. For example, if you need to dial 9 to get an outside telephone line and you are calling a different area code or international dialing code, you must provide all the required numbers to the CTS-Manager in the exact sequence in which they should be dialed. The following is an example: 915105550100.
Typing Meeting Room Names
The names of meeting rooms must be typed into CTS-Manager fields exactly as they are stored in your Microsoft Exchange, or IBM Domino database. If a room is listed as M-Room 1/3 at Main in the Microsoft Outlook or Lotus Notes list of resources, that name must be typed exactly the same way in the CTS-Manager. Otherwise, the system will not be able to match records and an error occurs.
Viewing All Information
Sometimes only a portion of text is visible and is completed by ellipses. You can see the full text in a tooltip by slowly passing the mouse pointer over the partial text. You can do this in any field in the user interface where text is cut off.
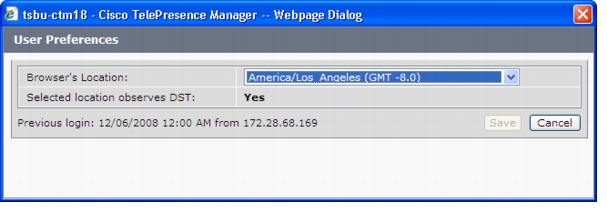
Preferences
Clicking Preferences in the header pane displays the Preferences window.
Figure 7-14 Preferences Link in the Header Pane
The first time you login you need to specify the timezone you are in. This localizes Cisco TelePresence Manager's meeting times to your location. You can use the Preferences window to change the timezone.
Figure 7-15 Preferences window