-
Cisco TelePresence Manager 1.5 Administration and Installation Guide
-
Preface
-
End User License Agreement
-
General Information About the Cisco TelePresence Manager
-
Pre-Install System Set Up for Cisco TelePresence Manager
-
Configuring Microsoft Exchange for Cisco TelePresence Manager
-
Configuring IBM Domino Server for Cisco TelePresence Manager
-
Configuring Cisco Unified CM for Cisco TelePresence Manager
-
Installing and Configuring Cisco PreQualification Assistant
-
Installing or Upgrading Cisco TelePresence Manager
-
Initializing Cisco TelePresence Manager
-
Additional Installation Configurations for Cisco TelePresence Manager
-
Monitoring Cisco TelePresence Manager
-
CTS-MAN Emails and End-User Web UI
-
Supported MIBs for Cisco TelePresence Manager
-
Troubleshooting Cisco TelePresence Manager
-
 Feedback
Table Of Contents
Initializing Cisco TelePresence Manager
Post-Install Guidelines for CTS-Manager
Initializing Cisco TelePresence Manager After Installation
Required Information and Equipment
Initialization for Microsoft Exchange Deployments
Explanation of LDAP Access Setting Fields
LDAP User Authorization Setting Fields
Explanation of Field Mappings Fields
Explanation of Cisco Unified Communications Manager Fields
Explanation of Microsoft Exchange Fields
Explanation of Database Backup Schedule Fields
Microsoft Exchange Calendar Service Window
Initialization for IBM Domino Deployments
Explanation of LDAP Access Setting Fields
Explanation of LDAP User Auth Setting Fields
Explanation of Field Mappings Fields
Explanation of Cisco Unified Communications Manager Fields
Explanation of IBM Domino Fields
Dashboard for Verification of Installation Status
Initializing Cisco TelePresence Manager
Revised: August 12, 2009, OL-13673-04
First Published: November 27, 2006Contents
•
""
•
•
•
•
•
•
•
•
•
•
•
•
•
•
•
Introduction
After installing the Cisco TelePresence Manager, the next step is to initialize the program.
The next process is initializing Cisco TelePresence Manager to enable access to information sources such as Microsoft Exchange Server for meeting requests from Microsoft Outlook, Active Directory for accessing user and conference room information, and Cisco Unified Communications Manager for conference room availability and telephone support.
The tasks for initializing the Cisco TelePresence Manager are described in the following sections.
Post-Install Guidelines for CTS-Manager
The purpose of this guide is to outline the information you will need to reference in order to initialize the CTS-Manager system after installing the CTS-Manager.
The flow of tasks you need to do for additional configurations the CTS-Manager are provided in the following table.
Table 8-1 Post-Install Procedure Guidelines for setting up CTS-Manager
If at any time you encounter problems, go to Chapter 13, Troubleshooting Cisco TelePresence Manager to see how to correct the problem.
Initializing Cisco TelePresence Manager After Installation
This section contains the following topics pertaining to initialization:
•
To initialize Cisco TelePresence Manager, you must enter contact and access information for your Microsoft Exchange Server, Lightweight Directory Access Protocol (LDAP) server, and Cisco Unified CM in a series of one-time-only, post-installation initialization windows.
Required Information and Equipment
To set up and initialize Cisco TelePresence Manager, you need the information previously entered or created during pre-installation.
Additionally, Cisco TelePresence Manager must have network access to a computer running Windows Explorer version 6.0, Microsoft Exchange Server and Active Directory server or IBM Domino Server and Domino Directory Server, and Cisco Unified Communications Manager.
Initialization Procedure
The system administrator can access and change the information after initialization from the Configuration tab of the Cisco TelePresence Manager web interface.
Initialization for Microsoft Exchange Deployments
Step 1
https://server hostname or IP addressStep 2
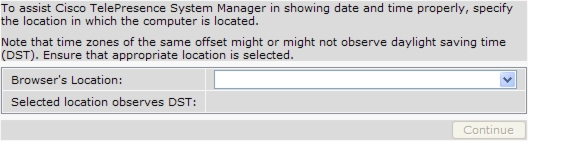
Figure 8-1 Initial Preferences Window
Step 3
Step 4
The Cisco TelePresence Manager initial window appears with several fields already populated from the installation process. Review it and click Next.
Step 5
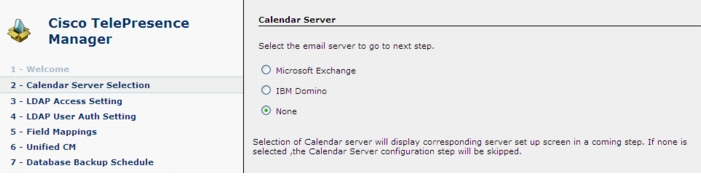
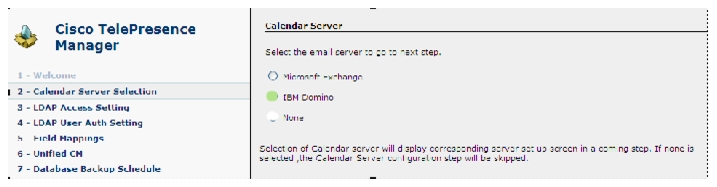
Choose Microsoft Exchange for this deployment and click Next.
Figure 8-2 Calendar Server Selection Window
Step 6
The system tests the connection information. A popup window opens and displays "Connection .... Verified." Click OK, then click Next.
Note
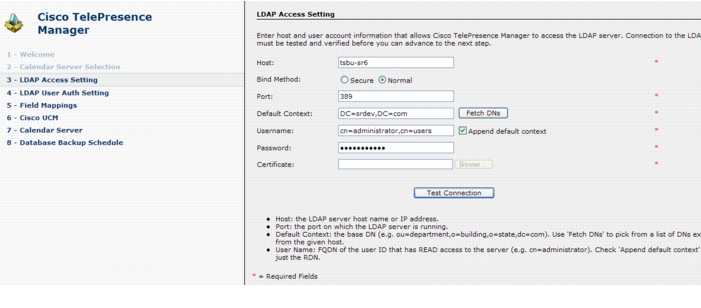
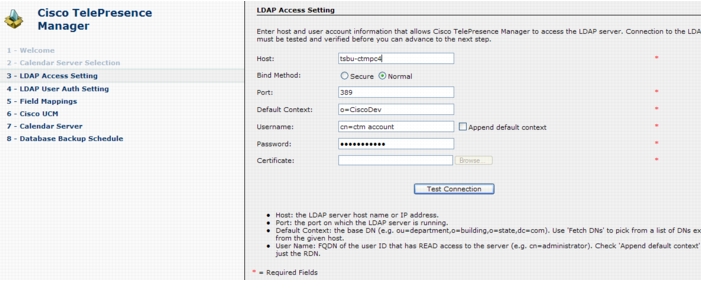
Figure 8-3 LDAP Access Setting Window
Explanation of LDAP Access Setting Fields
Lightweight Directory Access Protocol (LDAP) is a protocol definition for accessing directories. The LDAP Access Settings window specifies LDAP Active Directory server settings that are used by Cisco TelePresence Manager to access the directory information. This window contains the following fields:
•
The hostname is an alias that is assigned to an IP address for identification.
–
–
•
The bind method is the type of security required.
–
–
•
–
–
–
–
•
Default Context is the context from which the LDAP queries are performed. To change the default context, choose it in the Fetch DNs drop-down list adjacent to this field.
•
The username provides identification of the user to the LDAP server.
–
–
•
Check this box to avoid typing in the LDAP Access username manually, keeping the requirements of the LDAP FQDN format. If this box is not checked, you must append the information in the Default Context field.
•
The user password allows access to the LDAP server.
The password must contain at least six characters and maximum of 31 characters and should be unique. It must start with a lowercase alphanumeric character and be English characters. International characters are not supported.
•
The certificate is a digital representation of user or device attributes, including a public key, that is signed with an authoritative private key.
Step 7
Fill in the fields and click Verify Container DN.
The system tests the container information. A popup window opens and displays "User container <...> validated successfully." Click OK, then Next.
Note
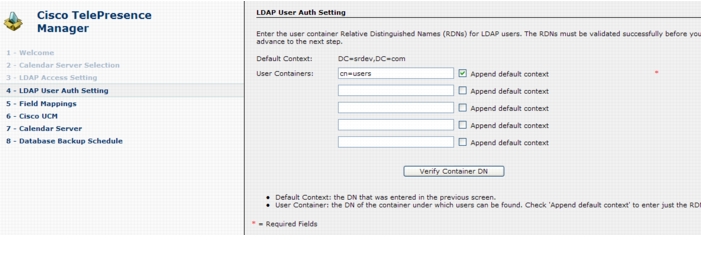
Figure 8-4 LDAP User Authorization Settings Window
LDAP User Authorization Setting Fields
The LDAP User Auth Setting window contains the following fields:
•
The FQDN format name of the LDAP container in which CTS-Manager can find the list of users.
•
Check this box to meet the requirements of the LDAP FQDN format, or type in the Default Context after the User Container name yourself.
Step 8
The fields should be populated with information you have already entered.
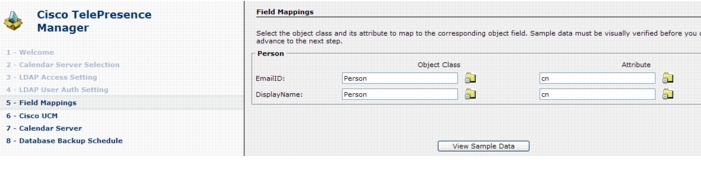
Figure 8-5 Field Mappings Window
Explanation of Field Mappings Fields
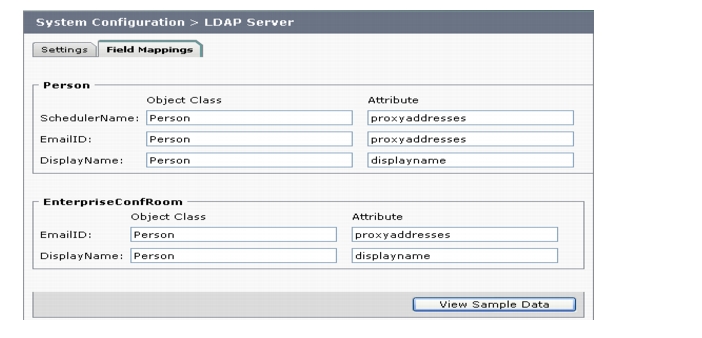
The CTS-Manager server uses application objects and attributes that are internally mapped to the objects and attributes in the LDAP Directory Server. Most of these mappings are predefined and fixed. However, some of the information required for the Cisco TelePresence system may be stored in different attributes of the LDAP Directory Server, based on the enterprise deployment. The Field Mapping window provides a mechanism to map such objects and attributes used by the CTS-Manager server to the object and attributes defined in the LDAP Directory Server schema.
Note
Caution
Note
Step 9
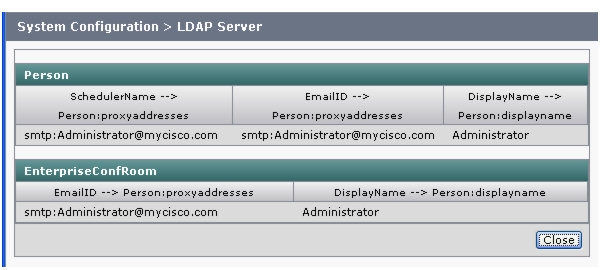
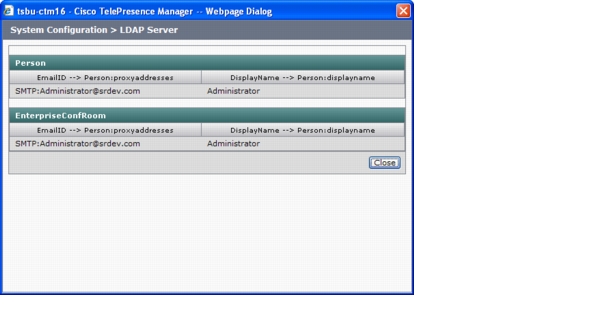
A popup window opens and displays the data that has been entered, see Figure 8-6. Review the information and verify that it is correct and complete, and click Close.
A popup window opens and displays the message "Does the data look correct to you?"
Click OK, then click Next.
Figure 8-6 System Configuration - LDAP Server Window
Step 10
Fill in the fields and click Test Connection.
The system tests the connection information. A popup window opens and displays "Connection to <....> Server was Verified." Click OK, then click Next.
Note
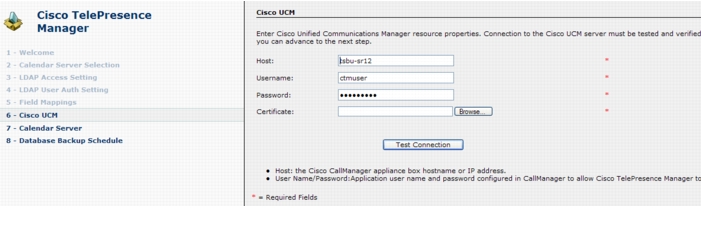
Figure 8-7 Cisco Unified CM Window
Explanation of Cisco Unified Communications Manager Fields
•
Host is the hostname or IP address of the Cisco Unified Communications Manager server host.
•
Username is the username for the application user for the Cisco Unified Communications Manager server.
•
The password allows the user to access the Cisco Unified Communications Manager.
•
The certificate is a digital representation of user or device attributes, including a public key, that is signed with an authoritative private key.
Step 11
Fill in the fields and click Test Connection.
The system tests the connection information. A popup window opens and displays the message "Connection to <....> Server was Verified." Click OK, then click Next.
Note
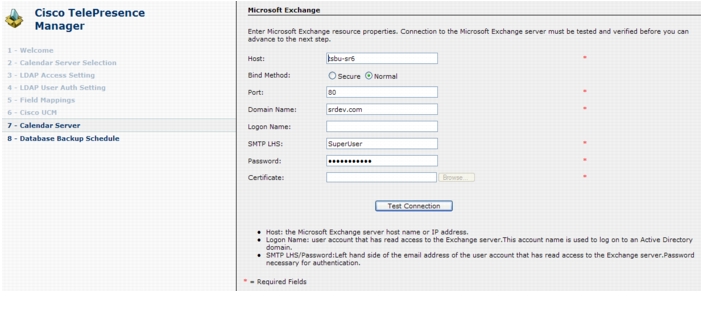
Figure 8-8 Microsoft Exchange Window
Explanation of Microsoft Exchange Fields
•
Host is the hostname or IP address of the Microsoft Exchange Server host.
•
The bind method indicates the desired level of security.
–
–
•
The default value is 80, for secure mode the value is 443.
•
This field requires a sequence of case-insensitive ASCII labels separated by dots (for example, "cisco.com")—defined for subtrees in the Internet Domain Name System and used in other Internet identifiers, such as hostnames, mailbox names, and URLs.
•
The logon username should have read access to the Exchange server and rooms. This account name is used to logon to an Active Directory domain.
•
Left hand side of the email address of the user account that has read access to the Exchange Server. Password is necessary for authentication.
•
The user password allows access to the Microsoft Exchange Server.
•
A certificate is a digital representation of user or device attributes, including a public key, that is signed with an authoritative private key. In a self-signature, the signature can be verified using the public key contained in the certificate.
Note
If you selected Secure bind method, this value is required.Step 12
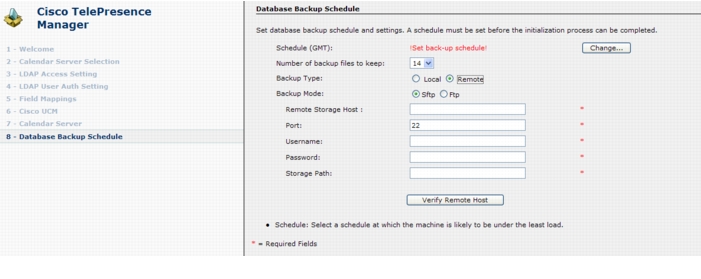
Fill in the fields. If you are setting up a remote backup, click Verify Remote Host to verify the login information.
Note
Figure 8-9 Database Backup Schedule Window
Explanation of Database Backup Schedule Fields
The Cisco Unified Communications Manager uses an Informix Database server to store information. This window allows the administrator to set up regular backup operations of the database.
Note
The Database Backup Schedule window contains the following fields:
•
Click Change... to set the backup schedule. The following choices are available:
–
Enter the hour and minute, in UTC 24-hour format, for when you want your backup to begin. UTC is the atomic clock version of Universal Time (UT), formerly known as Greenwich Mean Time. Time zones around the world are expressed as positive and negative offsets from UT. For example, Midnight Pacific Standard Time (+8 UT) is 08:00 UT.
–
Choose Daily or Weekly database backups. If you choose Weekly, select the radio button beside the day of the week on which you want your backup to occur.
•
From the drop-down menu, choose the number of backup files to keep before deleting. Choices range from 1 (default) to 14 (two week's worth of daily backups).
•
Choose Local or Remote to designate the server for backups. If you choose Remote, you must fill in the following values for the remote server:
–
The network path to the remote Secure File Transfer Protocol (SFTP) storage host.
–
Port number designated for the backup process. The default is port 22.
–
Username for login of the remote server.
–
Password for login to the remote server.
–
The file path to the location where you want to store the backup data.
Step 13
The Cisco TelePresence Manager admin window appears at http://server hostname or IP address.
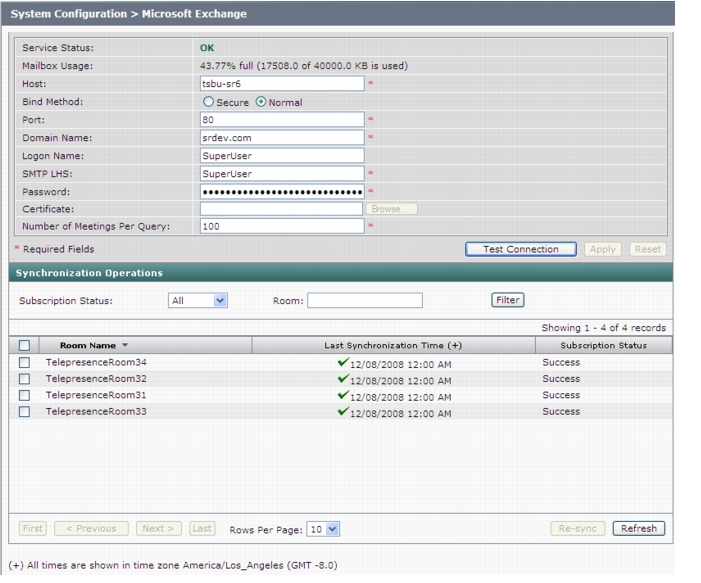
Microsoft Exchange Calendar Service Window
The Microsoft Exchange Calendar Service window helps you manage the database that stores meeting information.
To test the connection between this system and the Microsoft Exchange server as shown in Microsoft Exchange Calendar Service Window:
Step 1
Step 2
Step 3
Note
Figure 8-10 Microsoft Exchange Calendar Service Window
Table 8-3 describes the information and operations accessible from this window.
Re-sync Operations
The Re-sync Operations area tells you when information in the Microsoft Exchange server database was last updated with meetings scheduled for a particular room.
When mismatched information in the databases causes meeting conflicts or there are other problems that prevent a meeting from being launched successfully, this area of the Microsoft Exchange window allows you to synchronize information between Microsoft Exchange and the CTS-Manager database. Synchronization takes time and system resources to accomplish and should be done only when necessary.
To synchronize information between Microsoft Exchange and the CTS-Manager database:
Step 1
Step 2
Once you've begun the Re-sync operation the Service Status field displays a Sync progress indicator showing the progress of the Re-sync operation by percentage.
Step 3
Step 4
Table 8-4 describes the information displayed in this area of the Microsoft Exchange window.
Note
Initialization for IBM Domino Deployments
Step 1
https://7835 server hostname or IP address
Note
Step 2
Figure 8-11 Initial Preferences Window
Step 3
Step 4
The Cisco TelePresence Manager initial window appears with several fields already populated from the installation process and click Next.
Step 5
Choose IBM Domino for this deployment and click Next.
Figure 8-12 Calendar Server Selection Window
Step 6
The system tests the connection information. A popup window opens and displays "Connection .... Verified." Click OK, then click Next.
Note
Figure 8-13 LDAP Access Setting Window
Explanation of LDAP Access Setting Fields
Lightweight Directory Access Protocol (LDAP) is a protocol definition for accessing directories. The LDAP Access Settings window specifies LDAP Active Directory server settings that are used by Cisco TelePresence Manager to access the directory information. This window contains the following fields:
•
The hostname is an alias that is assigned to an IP address for identification.
–
–
•
The bind method is the type of security required.
–
–
•
–
–
•
Default Context is the context from which the LDAP queries are performed. To change the default context, choose it in the Fetch DNs drop-down list adjacent to this field.
•
The username provides identification of the user to the LDAP server.
–
–
•
Check this box to avoid typing in the LDAP Access username manually, keeping the requirements of the LDAP FQDN format. If this box is not checked, you must append the information in the Default Context field.
•
The user password allows access to the LDAP server.
The password must contain at least six characters and maximum 31 characters and should be unique using English characters only. It must start with a lowercase alphanumeric character. International characters are not valid.
•
The certificate is a digital representation of user or device attributes, including a public key, that is signed with an authoritative private key.
Step 7
LDAP user containers should be added so that users are unique in these containers having no user overlap. If users belong to multiple user containers, for example, sales and HR, then only one container should be specified. If not the user, then the login to email link will fail. If the container at the organizational level is specified which with include everyone, then no other user container should be specified for the email link login to work. Fill in the fields and click Verify Container DN.
The system tests the container information. A popup window opens and displays "User container <...> validated successfully." Click OK, then Next.
Note
Figure 8-14 LDAP User Authorization Settings Window
Explanation of LDAP User Auth Setting Fields
The LDAP User Auth Setting window contains the following fields:
•
The FQDN format name of the LDAP container in which Cisco TelePresence Manager can find the list of users.
•
Check this box to meet the requirements of the LDAP FQDN format, or type in the Default Context after the User Container name yourself.
Step 8
The fields should be populated with information you have already entered.
Figure 8-15 Field Mappings Window
Explanation of Field Mappings Fields
These attributes are used by the Domino LDAP server to retrieve the user's e-mail and display name information. For most of the Domino deployments, this information does not have to be changed. If this information is stored in other attributes in the LDAP server, use the following steps to change the mapping:
Caution
Table 8-5 LDAP Objects and Attributes
Application Object
Application Attribute
LDAP Object Class
LDAP Attribute
Person
EmailID
Person
cn
DisplayName
Person
cn
(for releases after 1.5)
Person
cn
Note
Step 9
A popup window opens and displays the data that has been entered, see Figure 8-16. Review the information and verify that it is correct and complete, and click Close.
A popup window opens and displays the message "Does the data look correct to you?"
Click OK, then click Next.
Figure 8-16 System Configuration - LDAP Server
Step 10
Fill in the fields and click Test Connection.
The system tests the connection information. A popup window opens and displays "Connection to <....> Server was Verified." Click OK, then click Next.
Note
Figure 8-17 Cisco Unified CM Window
Explanation of Cisco Unified Communications Manager Fields
•
Host is the hostname or IP address of the Cisco Unified Communications Manager server host.
•
Username is the username for the application user for the Cisco Unified Communications Manager server.
•
The password allows the user to access the Cisco Unified Communications Manager.
•
The certificate is a digital representation of user or device attributes, including a public key, that is signed with an authoritative private key.
IBM Domino Calendar
The IBM Domino window next appears. See Figure 8-18.
Fill in the fields and click Test Connection.
The system tests the connection information. A popup window opens and displays the message "Connection to <....> Server was Verified." Click OK, then click Next.
Note
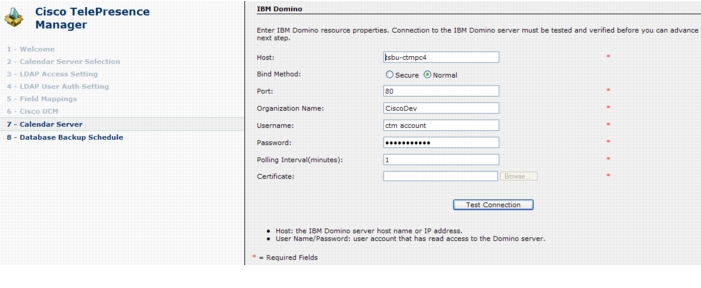
Figure 8-18 IBM Domino Calendar Window
Explanation of IBM Domino Fields
•
Host is the hostname or IP address of the IBM Domino host.
•
The bind method indicates the desired level of security.
–
–
Note
•
The default value is 80.
•
This field requires a sequence of case-insensitive ASCII labels separated by dots (for example, "cisco.com")—defined for subtrees in the Internet Organization Name System and used in other Internet identifiers, such as hostnames, mailbox names, and URLs.
•
The username provides login access to the IBM Domino server.
•
The user password allows access to the IBM Domino server.
•
This is the amount of time between intervals that the CTS-Manager will poll for Calendar information. The interval times for polling are from minimum of 1 to a maximum of 360 minutes.
•
A certificate is a digital representation of user or device attributes, including a public key, that is signed with an authoritative private key. In a self-signature, the signature can be verified using the public key contained in the certificate.
Note
If you selected Secure bind method, this value is required.After filling in all the fields, click on the Test Connection to make sure that all the data in the fields have been properly entered.
If at any time you encounter problems, go to Chapter 13, Troubleshooting Cisco TelePresence Manager to see how to correct the problem.
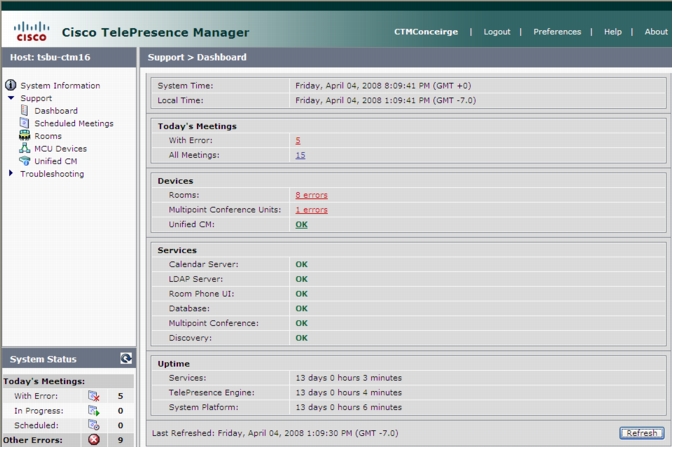
Dashboard for Verification of Installation Status
Go to the Dashboard window to verify installation and to check the status of the system services. In addition, you would choose Dashboard to provide a snapshot of meetings that are scheduled for the day in addition to showing the status of system services. This is a good place to monitor meetings and equipment. Click highlighted links in this window for quick access to other windows that provide meeting and room-scheduling functions.
Figure 8-19 describes the dashboard report information. To update the reports, click Refresh.
Figure 8-19 Cisco TelePresence Manager Support - Dashboard Window
Table 8-6 Dashboard Report