Feedback
Table Of Contents
Exporting Recordings from the Completed Recordings List
Downloading a Recording to Your Computer
Managing CTRS Recordings
October 2011The Cisco TelePresence Recording Server (CTRS) stores and enables you to manage recordings created by the following sources:
•
Cisco TelePresence Studio Mode
•
The following sections describe the CTRS Recordings Management features. Recordings Management is divided into the following areas:
–
–
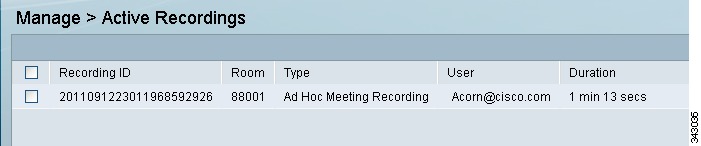
Active Recording
Click Active Recordings in the left menu to display all recordings that are currently being created (see Figure 5-1).
Figure 5-1 Manage > Active Recordings
The Active Recordings page displays a table that lists the following information about recording sessions that are currently in progress:
•
•
Completed Recordings
Click Completed Recordings in the left menu to display completed recordings (see Figure 5-2).
Figure 5-2 Manage > Completed Recordings
Use the Completed Recording page to view or edit a list of all completed recordings that are currently stored on CTRS.
To filter entries in the Completed Recordings table:
Step 1
Step 2
Step 3
•
•
•
Step 4
Step 5
Step 6
Completed Recordings displays a table providing the following information about completed recordings, as described in Table 5-2:
•
•
•
Exporting Recordings from the Completed Recordings List
You can export recordings to a specified archive server. To export recordings, do the following:
Step 1
Step 2
Step 3
Step 4
Note
Note
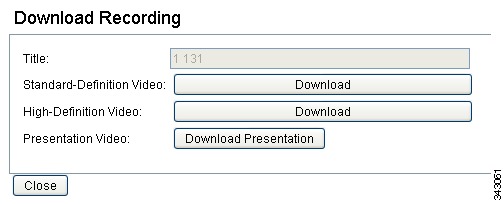
Downloading a Recording to Your Computer
You can download the standard definition (SD) or high definition (HD) version of a recording to your computer. For a recording made using Event Recording, you can also download the presentation materials displayed during the meeting.
Because of video resolution changes, recordings made using Event Recording could be stored in multiple files. Before downloading multiple files to your computer, the CTRS transcodes the files into one file, which can be a lengthy process.
To download, do the following:
Step 1
Step 2
The Download Recording dialog box appears as shown in Figure 5-3.
Figure 5-3 Download Recording Dialog Box
Step 3
If the Process File for Download button appears, the recording was written to multiple files, which must be transcoded into one file then downloaded. The transcoding process can be lengthy; therefore, a percentage complete counter provides an update of the progress.
Step 4