-
Cisco Prime Performance Manager User Guide, 1.1
-
Preface
-
Prime Performance Manager Overview
-
Managing Gateways and Units Using the Command Line Interface
-
Using the Prime Performance Manager Web Interface
-
Discovering Devices
-
Configuring SSL between Gateways and Units
-
Managing Users
-
Managing Reports and Dashboards
-
Using Summary Lists
-
Using Alarms and Events
-
Configuring Thresholds
-
Viewing Home Page Information
-
Viewing System Logs and Messages
-
Managing Prime Performance Manager Units
-
Configuring Polling Groups
-
Configuring Upstream Alarm Hosts and Tuning Event and Alarm Parameters
-
Configuring Device Access Credentials for Y.1731 and Ethernet Flow Point Reports
-
Configuring Firewalls
-
Backing Up and Restoring Prime Performance Manager
-
Prime Performance Manager and IPv6
-
Commands Reference
-
Glossary
-
Index
-
 Feedback
Table Of Contents
Creating Thresholds in Prime Performance Manager
Enabling and Disabling Thresholds
Viewing Thresholds Parameters and Reports from the Alarms Window
Configuring Thresholds
The following topics provide information about configuring thresholds in Cisco Prime Performance Manager:
•
Creating Thresholds in Prime Performance Manager
Creating Thresholds in Prime Performance Manager
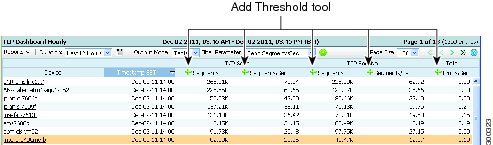
Prime Performance Manager allows you to create thresholds to generate alarms when a given report key performance indicator (KPI) rises or falls to a specified point. Threshold-eligible report KPIs are identified by Add Threshold tools in the report KPI column header. Figure 10-1 shows an example.
Figure 10-1 Add Threshold Tools
To create a threshold, you provide the KPI onset and abate points. Onset is the rising or falling KPI value that, when reached, generates an alarm. Abate is he rising or falling KPI value that, when reached, clears the alarm. Additionally, you can specify the type of alarm you want raised, the days and times you want the threshold to run, and the number of required threshold-crossing occurrences before the alarm is raised or cleared.
As you prepare to create thresholds in Prime Performance Manager, keep the following in mind:
•
•
•
•
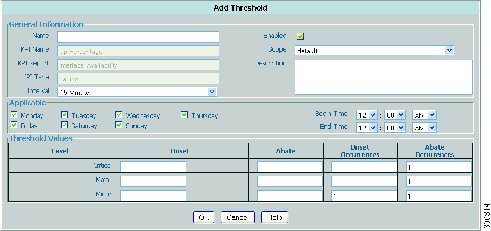
To create a Prime Performance Manager threshold.
Step 1
Step 2
Step 3
The Add Threshold dialog box appears (Figure 10-2).
Figure 10-2 Add Threshold Dialog Box
Step 4
•
•
•
•
•
–
–
–
–
–
–
Note
•
•
•
•
•
•
–
–
–
–
Step 5
The TCA is added to the gateway thresholds. To view and edit the thresholds, click Administrative > Threshold Editor. For more information, see Chapter 10 "Configuring Thresholds."
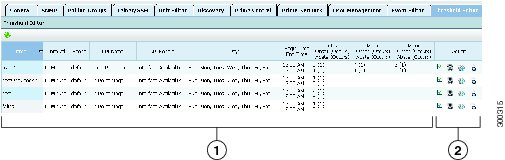
Managing Thresholds
Prime Performance Manager thresholds can be viewed, edited, disabled, enabled, and deleted from the Administrative > Thresholds Editor tab, shown in Figure 10-3. The editor displays thresholds added from the Prime Performance Manager reports GUI (see To create a Prime Performance Manager threshold.), and ones created using an XML editor and added directly to the gateway.
Figure 10-3 Edit Thresholds Tab
Related Topics
Enabling and Disabling Thresholds
Viewing Thresholds Parameters and Reports from the Alarms Window
Editing Thresholds
To edit a threshold.
Step 1
Step 2
Step 3
Step 4
Step 5
•
•
•
•
•
•
•
•
•
•
•
Step 6
The edits are displayed in the Thresholds Editor.
Enabling and Disabling Thresholds
To enable or disable a threshold:
Step 1
Step 2
Step 3
Step 4
Prime Performance Manager will update the threshold information.
Note
Deleting Thresholds
To delete a threshold:
Step 1
Step 2
Step 3
Step 4
Step 5
Prime Performance Manager will remove the threshold from the table.
Viewing Thresholds Parameters and Reports from the Alarms Window
From the Prime Performance Manager Alarms window can perform the following perform the following actions from a threshold crossing alarm:
•
•
•
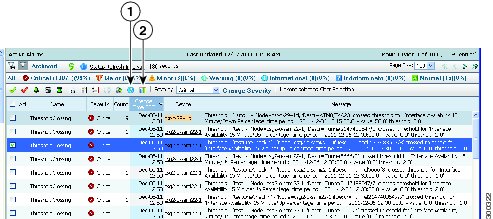
When threshold crossing alarms occur, you can view the threshold parameters from the Alarms window:
Step 1
Step 2
Step 3
Step 4
Figure 10-4 Displaying Threshold Parameters from the Alarms Window
Step 5
•
•
•
•
•
•
•
•
•
•
•
Step 6
Step 7
The threshold crossing report window appears.
Step 8
Viewing Threshold Events
To view threshold events, in the navigation area, click the Event History. The types of threshold events that appear include:
•
Threshold : 'rising1' - 'Node=csr-c-2941d,ifDescr=ATM0/IMA23' crossed threshold for
'Interface Availability 15 Minute/Down Percentage' time period : '2011-12-06
10:30:00.0' - value '50.0' threshold '5.0'.
and
Threshold : 'rising1' - 'Node=csr-c-2941d,ifDescr=ATM0/IMA23' is below threshold for
'Interface Availability 15 Minute/Down Percentage' time period : '2011-12-06
10:15:00.0'
•
Gateway: node123- Threshold rising1 - Threshold2811 - 15 Minute was overwritten by
user123.