Cisco Prime Performance Manager User Guide, 1.1
Managing Prime Performance Manager Units

Table Of Contents

Managing Prime Performance Manager Units

Managing Units Overview

Creating Device-to-Unit Maps

Editing Device-to-Unit Maps

Deleting Device-to-Unit Maps

Changing a Device Unit Assignment

Creating Unit Protection Groups

Unit Protection Group Failover Scenarios


Managing Prime Performance Manager Units


The following topics tell you how to manage Cisco Prime Performance Manager units:

Managing Units Overview

Creating Unit Protection Groups

Unit Protection Group Failover Scenarios

Managing Units Overview

Prime Performance Manager allows you to create multiple units, assign them to a gateway and distribute the network devices among them. During device discovery, whether performed from Prime Performance Manager or by importing the Prime Network device inventory, Prime Performance Manager assigns devices to units based upon the device-to-unit mappings that you must create in the Unit Editor administrative tab. You can create these mappings before or after device discovery. If you create the mappings before device discovery, Prime Performance Manager assigns the devices to the units based on the information in the maps. If device-to-unit maps are not present when device discovery is run, Prime Performance Manager assigns all discovered devices to the unit installed with the gateway, if present, or to another unit if a collocated unit is not installed.


Note Determining the best allocation of devices among multiple units will take time. Many factors are involved including the unit server size, the number of enabled reports, the number of reportable objects, and many other factors.


The following topics tell you how to create and manage the device-to-unit maps:

Creating Device-to-Unit Maps

Editing Device-to-Unit Maps

Deleting Device-to-Unit Maps

Changing a Device Unit Assignment

Creating Device-to-Unit Maps

The following procedure tells you how to create a device-to-unit map to distribute devices across multiple units. Before you complete the procedure, you will need the IP addresses or address ranges of all discovered devices, and a plan on how you want to distribute them across the units.

To create the map:


Step 1 Log into the Prime Performance Manager GUI as an administrator (Level 5) user.

Step 2 In the navigation area, click Administrative.

Step 3 In the Administrative window, click Unit Editor.

Step 4 On the Unit Editor toolbar, click Add a Device to Unit Mapping.

Step 5 In the Add Device to Unit Map dialog box, enter the following:

IP Address Range or Hostname—Enter the device IP address, device IP address range, or host name of the device(s) you want to assign to the unit for this map.

Unit—Choose the unit where you want to assign the devices. The field is populated with units that are assigned to the gateway.

Step 6 Click OK.

The map is added to the Unit Editor table.

Step 7 Repeat Steps 4 through 6 until you've completed the device maps that you want.

Step 8 In the Unit Editor toolbar, click Save all Unit Entries.

Step 9 Choose one of the following:

If device discovery has been completed and you want to redistribute the devices now, on the Unit Editor toolbar, click Redistribute Devices to Units. Click OK on the confirmation dialog.

If device discovery is not completed, you can run it at any time. During device discovery, devices are assigned to units based on the maps in the Unit Editor table. For device discovery procedures, see Chapter 4 "Discovering Network Devices."


Editing Device-to-Unit Maps

To edit a device-to-unit map, complete the following steps:


Step 1 Log into the Prime Performance Manager GUI as an administrator (Level 5) user.

Step 2 In the navigation area, click Administrative.

Step 3 In the Administrative window, click Unit Editor.

Step 4 In the Unit Editor device-to-unit entries, edit the following:

IP Address Range or Hostname—In the table cell, you can edit the device IP address, device IP address range, or host name.

Unit—If you want to assign the IP address or address range to a different unit, choose the unit from the drop-down list, which displays units connected to the gateway.

Step 5 When you are finished, in the Unit Editor toolbar, click Save all Unit Entries.

Step 6 Choose one of the following:

If device discovery is completed and you want to redistribute the devices based on the edits, on the Unit Editor toolbar, click Redistribute Devices to Units. Click OK on the confirmation dialog.

If device discovery is not completed, you can run it at any time, and the edited device-to-unit maps will be applied at that time.


Deleting Device-to-Unit Maps

To delete a device-to-unit map:


Step 1 Log into the Prime Performance Manager GUI as an administrator (Level 5) user.

Step 2 In the navigation area, click Administrative.

Step 3 In the Administrative window, click Unit Editor.

Step 4 In the Unit Editor device-to-unit entries, click the map table row(s) that you want to delete. To select more than one map, press Shift.

Step 5 When you are finished, in the Unit Editor toolbar, click Save all Unit Entries.

Step 6 Choose one of the following:

If device discovery is completed and you want to redistribute the devices based on the edits, on the Unit Editor toolbar, click Redistribute Devices to Units. Click OK on the confirmation dialog.

If device discovery is not completed, you can run it at any time, and the edited device-to-unit maps will be applied at that time.


Changing a Device Unit Assignment

You can change the device unit assignment by editing the device-to-unit map. (See Editing Device-to-Unit Maps.) You can also change the device unit assignment by individual device in the Devices summary list. To do this:


Step 1 Log into the Prime Performance Manager GUI as an administrator (Level 5) user.

Step 2 In the navigation area, click Summary Lists > Devices.

Step 3 In the device table, choose the device(s) whose unit assignment you want to change. To choose more than one device, press Shift.

Step 4 From the Actions menu, choose Relocate Device.

Step 5 In the Relocate Device dialog box, choose the unit to which you want to assign the device(s), then click Relocate.

The new device-to-unit assignments will occur immediately.


IP Address Range or Hostname—In the table cell, you can edit the device IP address, device IP address range, or host name.

Unit—If you want to assign the IP address or address range to a different unit, choose the unit from the drop-down list, which displays units connected to the gateway.

Step 6 When you are finished, in the Unit Editor toolbar, click Save all Unit Entries.


Creating Unit Protection Groups

Prime Performance Manager protection groups provide protection for units on a 1:1 or N:1 basis, where N = any number of primary units. Prime Performance Manager unit protection groups include the following key points:

Redundancy groups are created after Prime Performance Manager installation using the ppm redundancygroups command; they cannot be created or managed using the Prime Performance Manager GUI.

Multiple redundancy groups can be created. However a unit can only belong to one redundancy group.

A unit added to a protection group as a redundant unit cannot have devices attached to it. If a failure occurs to a primary unit, the devices attached to the primary unit are switched to the redundant unit.

Devices cannot be added to units in standby status, regardless of whether the unit is designated as a primary or standby unit. If a redundant unit become active due to a switchover, the following occurs:

When you request a new device discovery, the device is directed to the active redundant unit for processing. After the failback to the primary unit, the primary unit processes the discovered device(s).

When you move a device to the active redundant unit, the device is moved to the active redundant unit. After the failback, the primary unit processes the moved device.

If you move a device from an active redundant unit to another unit, the move is completed. After the failback, the primary unit does not process the moved node.

Moving a device to a failed primary unit is not allowed.

To prevent units from engaging in down/up flapping, a switchover delay is provided. The delay is the amount of time the gateway waits after a unit becomes unavailable before it initiates a failover to the redundant unit. You specify the length of the delay when you create the redundancy group. The gateway determines the unit unavailability based on a unit connection that is lost. The connection can be lost for many reasons, for example, the unit is shut down or it crashes, or the network connectivity between the gateway and unit is lost.

After the problem that caused a switchover is resolved, you must manually initiate the return to the primary unit using the ppm redundancygroups failback command.

Following a switchover, redundant units service devices in the same manner as the primary unit. State changes are communicated to the gateway. After a failback, the primary unit picks up where the redundant unit left off.

To create a unit redundancy group, use the ppm redundancy command:

ppm redundancygroups [list | detail | create | add | remove | delete | redundant | delay | enable | disable | failover | failback | import | export]

list—Lists the redundancy groups defined on the gateway, similar to the following:

ppm redundancygroups list
groupA, Enabled, Number of Units: 2
groupB, Enabled, Number of Units: 4

detail [group name]—Lists the redundancy group details, similar to the following:

ppm redundancygroups detail groupA
ID: 54001
Name: groupA
Enabled
Created: Wed Sep 21 11:44:36 EDT 2011
Create User: localhost
Last Modified: Wed Sep 21 11:44:36 EDT 2011
Last Modified User: localhost
Enabled
Fail over delay: 60
Units: [
		unit1,     Primary, 
        unit2,  Redundant
		unit3,  Primary
		unit4,  Primary

create [group name | delay | unit(s)...]—Creates a redundancy group with the provided group name, switchover delay (in seconds), and unit(s).

add [group name | unit(s) ...]—Adds unit(s) to a redundancy group.

remove [group name | unit(s) ...]—Removes a unit(s) from a redundancy group.


Note A redundant unit cannot be removed from a redundancy group. To remove a redundant unit, you must change the redundant unit for the group, then you can remove the old redundant unit. Another option is to delete and recreate the redundancy group.


delete [group name]—Deletes a redundancy group. The unit redundancy mode is not checked.

redundant [group name | unit]—Changes the redundant unit of a redundancy group. No devices can be attached to the new redundant node.

delay [group name | delay]—Changes the redundancy group failover delay. The delay is the number of seconds the gateway waits after detecting a unit unavailability before it initiates a failover to the redundant unit.

enable [group name]—Enables a redundancy group.

disable [group name]—Disables a redundancy group. If a group is disabled, automatic failovers do not occur. However, you can perform manual failovers and failbacks.

failover [unit]—Forces the failover of a unit to the redundant unit.

failback [unit]—Initiates a return of control from the redundant unit to the specified unit.

import [/directory/filename]—Imports redundancy group definitions from the provided file name.

export [/directory/filename]—Exports redundancy group definitions to the provided file name.


Note Unit protection groups cannot be created or managed using the Prime Performance Manager GUI.


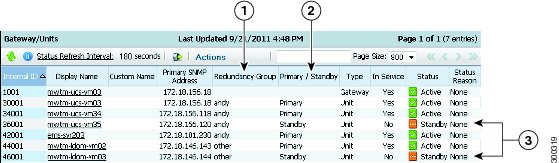
After protection groups are created, you can view them in the Gateway/Units summary list, as shown in Figure 13-1. The Redundancy Group column shows whether the unit belongs to a redundancy group, and if so, the name of the group to which the unit is assigned. The Primary/Redundant column shows the role of the unit in the redundancy group, either primary or redundant, The Status column indicates the unit status, either active or standby.

Figure 13-1 Protection Groups

1

Redundancy Group column.

2

Status column.

2

Primary/Redundant column.


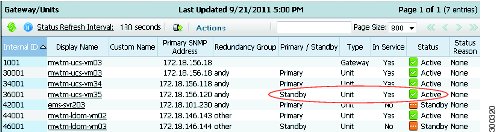
Figure 13-1 shows a redundant unit that has been switched to active status.

Figure 13-2 Redundant Units in Active Status

Unit Protection Group Failover Scenarios

The following sections describe unit protection group and failover behavior after different network circumstances occur.

Unit Shut Down or Failure

After a unit is shut down or stops functioning, the gateway waits for the delay time configured for the protection group. After that, the gateway determines the unit is down and forces a failover of its devices to the redundant server. The redundant server starts collecting statistics for the devices. The redundant unit now owns the devices and forwards CSV data to the gateway. The gateway accesses the redundant server for interactive reports. The unit that is down does not collect statistics. After it recovers and reconnects to the server, a handshake occurs and the gateway informs the unit that it is being covered for by a redundant unit. The failed unit is placed in a standby state and remains idle. It does not poll any devices; however, it can provide historical data to the gateway for interactive reporting.

To return the failed unit to its primary role, you must issue a failback. After the failback is requested, the devices on the redundant unit return to the primary unit and processing continues on the primary unit. The redundant unit returns to standby state and stops device polling, although it can participate in interactive reports. The primary unit returns to normal state and begins forwarding CSV data to the gateway.

Gateway-to-Unit Connectivity Failure

In the event connectivity between a gateway and primary unit is lost, the redundant unit picks up for the "failed" unit and takes ownership of the devices. During the network connectivity unavailability, the redundant unit and the primary unit both poll the devices. The primary unit does not forward data to the gateway it has no connectivity to the gateway. After connectivity is restored and the unit reconnects to the gateway, during the handshake the unit recognizes that a redundant unit is processing for it and at this time it drops any data queued for the gateway. This includes CSV and event data. The "failed" unit is placed in a standby state and is idle. It does not poll any devices; however it can provide historical data to the gateway for interactive reporting. To return the primary unit to its original role, you must issue a failback command.

Gateway Failure

If a gateway is brought down either by the ppm shutdown command or because of a failure, the unit continues to process devices and queue data for the gateway. After the gateway is restored, the unit forwards the queued data to the gateway. Because the gateway contains the unit protection group configuration information, a gateway failure causes a loss to the unit redundancy. If a gateway is down and a unit that is part of a redundancy group fails, the redundant unit will not take over for the failed unit.