-
User Guide for the Cisco Mobile Wireless Transport Manager 6.1
-
Overview
-
Configuring Security
-
Setting Up Your Server
-
Getting Started
-
Basic Operations
-
Understanding Basic Object Functions
-
Managing Views
-
Understanding Detailed Object Functions
-
Managing Alarms and Events
-
Viewing Network Topology
-
Accessing Data From the Web Interface
-
Managing Reports
-
Editing an ITP Route Table File
-
Editing an ITP Global Title Translation Table
-
Editing ITP MLR Address Table Files
-
Client Object Map Reference
-
Command Reference
-
FAQs
-
Troubleshooting the MWTM and the Network
-
Status Definitions
-
MIB Reference
-
Trap Reference
-
Configuring MWTM to Run with Various Networking Options
-
MWTM Ports
-
Glossary
-
Index
-
 Feedback
Table Of Contents
Viewing Basic Information for Custom Views
Viewing Detailed Information for Views
Right-Click Menu for a Subview
Right-Click Menu for an Object
Closing the View Editor Window
Loading a Client-Specific View
Managing Views
Note
The web interface does not support the views feature. You can create customized views only in the Cisco Mobile Wireless Transport Manager (MWTM) client interface.
This section contains:
•
•
•
Overview
This chapter describes how to create and manage multiple views of your network from the MWTM client. Before creating or managing a view, you must understand the basic concepts of a default view, a custom view (and its associated subviews), and the navigational features available in each view:
•
Default View
When the Cisco Mobile Wireless Transport Manager (MWTM) discovers your network, all discovered objects are placed in a DEFAULT view, which is stored on the MWTM server and shared by all MWTM clients. Clients cannot modify the DEFAULT view that is stored on the MWTM server. This view is always available for users who need to view the entire network.
Initially, all clients use the DEFAULT view. However, you can use the MWTM to create your own, client-specific views and subviews, which are subsets of the DEFAULT view, to meet your individual needs.
Custom View and Subviews
You can choose the nodes you are interested in managing, exclude all other nodes from your view, and change the layout of the topology map in the topology window. You can save all of this customized information in a custom view and set that view as the new default view for the MWTM client.
You can use the MWTM client from then on to manage only the part of the network you are interested in, with the settings you prefer. When you modify the DEFAULT view in any way (except for modifying the layout of the topology map in the topology window), the MWTM prompts you to name the new, custom view.
You can also create many different views and subviews on a given MWTM client, with each view devoted to a different aspect of the network. You can then load a different view to manage a different part of the network, or switch to the DEFAULT view to see the entire network. For details on creating views, see Creating a New View.
If more than one person uses a certain MWTM, each user can create a personal view.
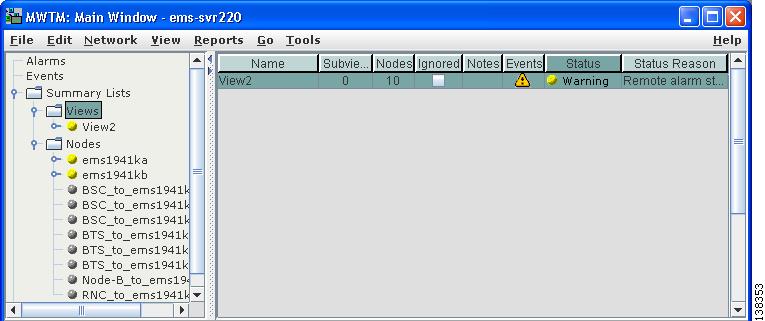
Also, you can create subviews in any custom view. The custom view becomes the parent view of one or more subviews. When you load a custom view that has subviews, the MWTM displays the Views label under Summary Lists in the navigation tree. When you click Views, the Views table appears in the right pane and lists all subviews of the custom (parent) view (see Views Summary List Table).
Note
Viewing Basic Information for Custom Views
To see all subviews currently configured in a custom view:
Step 1
Step 2
If the chosen custom view has associated subviews, the Views label appears under Summary Lists in the navigation tree.
Step 3
beside Summary Lists, then click Views.
The View Summary List window appears.
Figure 7-1 View Summary List Window
The View Summary List window provides information about all subviews that have been defined for this custom view, including their status and other important information.
The View Summary List window contains these sections:
Related Topics:
•
•
Right-Click Menu for Views
To see the right-click menu for views, under Summary Lists, select Views and right-click the mouse. For details on menu options, see Viewing the Right-Click Menu for an Object, page 8-3.
Note
Views Summary List Table
The views table shows information about the subviews that have been defined for a custom view. If a custom view has no subviews, this option is not available.
You can resize each column, or sort the table based on the information in one of the columns. By default, this table is sorted by Parent View, and the MWTM shows all of the columns in the view table except Internal ID.
For detailed information on working in tables, see Navigating Table Columns, page 5-24.
The view table contains:
Internal ID
Internal ID of the view. The internal ID is a unique ID for every object, assigned by the MWTM for its own internal use. It can also be useful when the TAC is debugging problems.
Name
Name of the subview that belongs to the custom (parent) view.
Parent View
Name of the custom or parent view to which the subview belongs.
Ignored
Indicates whether the subview should be included when aggregating and displaying MWTM status information:
•
•
Users with authentication level Power User (level 2) and higher can edit this field.
Notes
Indicates whether a note is associated with the subview.
Events
Indicates whether a recent event associated with a network object in the subview. (Even if the server purges all of the events associated with objects in the subview, the MWTM continues to display the event icon in this field.) To delete the event icon (orange triangle) from MWTM displays for:
•
•
Note
Changing a view (for example, by ignoring it or attaching a note to it) does not generate an event, and therefore does not cause an event icon to appear in this field.
Deleting an application server process, node, or signaling point with the Delete menu option does not generate an event, and therefore does not cause an event icon to appear in this field. However, if the MWTM rediscovers a deleted application server process, node, or signaling point, events are generated and logged for the deletion and the rediscovery, and the event icon appears in this field.Last Status Change
Date and time that the status of the subview last changed.
Severity
This is the worst severity of the network objects in the view or any subview.
Status
Current status of the subview. Possible values are:
Active
Unmanaged
Warning
For detailed definitions of each status, see Appendix E, "Status Definitions."
Status Reason
Reason for the current status of the subview.
For a full list of possible reasons, see the stateReasons.html file. If you installed the MWTM in:
•
•
If the cell is too small to show all of the status reason, place the cursor over the cell to see the full text in a tooltip.
The status reasons are listed in order of decreasing magnitude. If two or more reasons apply, the reason of greatest magnitude appears.
If the status reason is Unsupported Configuration, correct the configuration and enter the mwtm cleandiscover command to delete all current network data and begin a discovery of the network. If the status reason remains Unsupported Configuration, enter the mwtm clean command to restore the MWTM server to a state that would exist after a new installation of the MWTM, excluding the log files, which the MWTM retains. To also remove the log files, enter the mwtm cleanall command. For more information on the use of these commands, see Appendix B, "Command Reference."
Viewing Detailed Information for Views
The MWTM can display detailed information about a chosen view, including its associated objects, status, and other information.
Updates for the view that are received from the MWTM server are reflected automatically in this window.
To display the Details tab for a view, click the name of the view in the MWTM main window navigation tree. For example, to see detailed information for the DEFAULT view in the right pane, click DEFAULT View in the navigation tree.
The View Details window contains:
Right-click menu (MWTM client only)
Status Contributors
Details
Notes (MWTM client only)
Recent Events
Alarms
Editing a View
For details on editing a view, see Editing Properties, page 6-33.
Saving a View
You use the MWTM to save a specific view, change the list of views, and select one view to be loaded automatically when the associated preferences file is saved.
When you are satisfied with the changes you made to a view, use one of these procedures to save the view:
•
Note
•
The MWTM stores the view in the view file directory on the MWTM server:
•
•
Note
The Save File Dialog: View List contains:
Creating a New View
You use the MWTM to specify the nodes and objects you want to see in MWTM displays. This view is called a client-specific network view. All changes you make are reflected in topology tables and maps as soon as you make the changes.
Before creating a client-specific network view, ensure that Discovery has been run at least once, and data appears in the server's MWTM database. See Discovery Overview, page 4-4, for details.
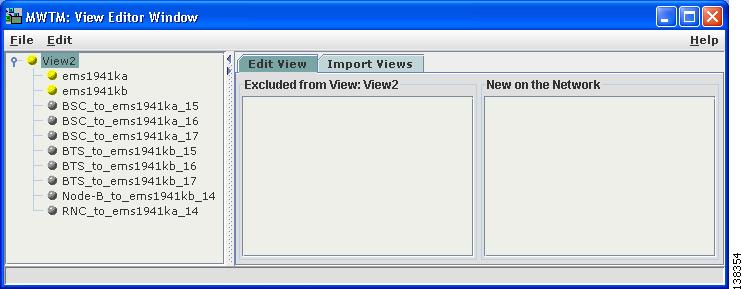
To create a client-specific network view, choose Edit > Views from the MWTM main menu. The View Editor window appears.
Figure 7-2 View Editor Window
The View Editor window shows two tabs:
•
–
–
–
•
–
–
You use the View Editor window also to move objects into and out of the current view. All changes that you make in this window are reflected in the MWTM client, and in the topology tables and maps as soon as you make the changes.
The View Editor window contains:
•
Related Topics:
•
View Editor Window Menu
The menu on the View Editor window contains:
Objects In Current View
The navigation tree in the left pane of the View Editor window lists nodes that the current view contains.
To see the objects that are associated with a node, and that are in the current view, click the turner
To exclude any of these objects from the current view, select them in the navigation tree, then choose Edit > Exclude From View from the View Editor window to move them to the Excluded From View pane of the View Editor window.
Note
If you delete an object, the MWTM removes it from the navigation tree. If the MWTM then discovers the object, the MWTM places it in the New on the Network pane. To see this object again in your current view, you must move it into the navigation tree using Edit > Include In View from the View Editor window.The navigation tree in the View Editor window provides these right-click menus:
•
•
Right-Click Menu for a View
The right-click menu for a view in the navigation tree of the View Editor window provides these options:
Right-Click Menu for a Subview
The right-click menu for a subview in the navigation tree of the View Editor window contains:
Right-Click Menu for an Object
The right-click menu for an object in the navigation tree of the View Editor window provides this option:
Exclude From View
Excludes the chosen object, and any lower-level associated objects, from the view or subview. This action also excludes the object from the topology map.
Excluded from View Pane
The Excluded from View pane lists the objects that have been excluded from the current view. To add these objects to the current view, select them in the Excluded from View pane, then choose Edit > Include In View from the MWTM main menu to move them to the navigation tree of the View Editor window.
The Excluded from View pane provides this right-click option for an object:
Include In View
Includes the chosen object, and any lower-level associated objects, in the chosen view or subview.
New on the Network Pane
The New on the Network pane shows newly discovered objects, based on these criteria. If you are using an MWTM client with:
•
•
When the MWTM discovers one or more new objects in the network, the MWTM also:
•
•
•
To add a newly discovered object to the current view, select one or more objects in the New on the Network pane, then choose Edit > Include In View from the MWTM main menu to move them to the navigation tree in the View Editor window.
To exclude a newly discovered object from the current view, select one or more objects in the New on the Network pane, then choose Edit > Exclude From View from the MWTM main menu to move them to the Excluded From View pane of the View Editor window.
The New on the Network pane provides these right-click options for an object:
Views List Pane
The Views List pane is under the Import Views tab of the View Editor window. The Views List pane lists all views that are currently defined on this MWTM client. If you have no views defined, this list will be empty.
You can resize each column, or sort the table based on the information in one of the columns. By default, this table is sorted by Name, and the MWTM shows all of the columns in the Views List pane.
For detailed information on working in tables, see Navigating Table Columns, page 5-24.
The Views List pane contains these columns:
The Views List pane provides these right-click menu option for views:
The Views List pane provides these right-click menu option for folders:
Open View
Opens the chosen folder, displaying views contained in the folder in the Views List pane.
View Data Pane
The View Data pane lists all subviews and objects that are in the view that is chosen in the Views List pane. If you have not saved a view yet, and there are no views in the Views List pane, this pane does not appear.
The View Data pane provides these right-click menu option for views and subviews:
Import View
Copies the chosen view or subview into the view or subview that is currently chosen in the navigation tree of the View Editor window.
Directory Listing Pane
The Directory Listing pane lists all subfolders that are in the folder that is chosen in the Views List pane. If the Views List pane contains no views, or if a folder (not a file) exists in the Views List pane, the Directory Listing pane appears. If the Views List pane contains only files, the Directory Listing pane does not appear.
To see the Directory Listing pane, select a folder in the Views List pane.
Closing the View Editor Window
To close the View Editor window at any time, click File > Close. If you have modified the view, the MWTM asks if you want to apply the changes before leaving the window. Click:
•
–
–
The MWTM closes the View Editor window.
•
•
If you are working in a custom view (that is, not in the DEFAULT view) and you exit the MWTM client, the MWTM automatically saves any changes you made to the view.
Choosing a View
If you are performing an action and have multiple views from which to choose, the Choose a View dialog box appears. Use it to choose the view you wish to apply.
The Choose a View dialog box contains:
Loading the DEFAULT View
To load the DEFAULT network view, choose File > Load DEFAULT View from the MWTM main menu. You might be prompted to save the view in which you currently are. Once you have chosen whether to save your current view, the MWTM loads the DEFAULT view.
Note
Loading a Client-Specific View
You use the MWTM to load a specific view, change the list of views, and select one view to be loaded automatically when the associated preferences file is loaded.
To load a client-specific network view, choose Edit > Views from the MWTM main menu. The View Editor window appears. Then choose File > Load from the View Editor window menu. The MWTM shows the Load File Dialog: View List dialog box.
The Load File Dialog: View List contains:
Ignoring a View
You can instruct the MWTM to ignore a view when it aggregates and shows network data. Setting views to Ignored prevents known problems in the views from affecting MWTM displays for associated objects. In effect, you are preventing a known problem from distracting you from other, more urgent network problems.
For example, you can set a view to Ignored before shutting down objects in the view for maintenance.
Note
Also, if you set a view to Ignored, make a note of the change, and do not forget to reset the view when the problem is corrected or the maintenance is complete.
You cannot ignore the DEFAULT view.To set a view to Ignored, check the Ignored check box in the View window for the view you want the MWTM to ignore.
Viewing Ignored Views
To display all views that are Ignored, display the View window and click the Ignored column heading. The MWTM shows all ignored views at the top of the table.

 Create New Folder
 Go Up One Folder